Setting Up Users
Overview
New user accounts can only be created by Application Administrators or FullAccess Users with User Administrator permissions. While the individual user settings and permissions may differ, setting up a user for a Host Company or Partner Organization is similar.
We recommend using the bulk upload process for entering large amounts of user data. For small amounts of data, manual entry may be a quicker process.
Users Page
The Users page, formerly called User Administration List page, provides the following user and company-related information:
-
Search - search for a user by Login, First Name, and Last Name. For Host Company, you can use the Company drop-down filter. The Company field is read-only for Partner Organizations.
-
License Metrics - displays the number of Total, Used, and Available license for the company. Refer to User License Count for more information.
-
View - select Active Users, Inactive Users, or All from the drop-down to filter the user list displayed.
-
List of existing users for the company. You can:
-
Click the user Login link to their User Detail page.
-
Click the Select or Select All checkbox to change a user status (active/inactive).
-
Select the Proxy Login icon to login as that user.
-
Add button to create a new user.
-
Inactivate button to change an active user to inactive status.

Administrators have the ability to set up pagination links for the User list. If there are more than 50 users in the User list the Previous, Page Number, and Next links display at the bottom of the list. For information, see the topic General Site Options.
The Users page lists all users. If the logged in user is not a User Administrator they will be able to see other user's detail pages in read-only mode. They can edit their own details by clicking their login in this list or by opening their My Profile page from the navigation bar or header. To restrict access to the Users list create an Admin Group which excludes access to that feature.
Administration
 Accessing the Users Page
-
Navigate to the Admin Home page.
-
Click Internal Users in the Users section.
The Users page opens. Refer to Users Page for detailed information.
Creating a User (Oracle CPQ 25B and later)
-
Navigate to the Admin Home page.
-
Click Internal Users in the Users section.
The Users page opens. Refer to Users Page for detailed information.
- On the Users page, click Add.
The User Detail page opens. Refer to User Detail for detailed information.
- Enter a Login, Email, and First Name for the user.
- Fill out additional optional fields as desired.
- Click Add at the bottom of the page.
For integrated sites, a User Integration button exists on the bottom of the page.
- Click User Integration.
The User Integration page opens. Refer to User Integration for detailed information.
Creating a User (Oracle CPQ 25A and earlier)
Oracle CPQ 25B implemented subtle layout improvements to the User Administration List page (renamed Users page) and User Administration page (renamed User Detail page). If your site is on Oracle CPQ 25A or earlier, the following information is available for setting up users using the User Administration List page.
Users are manually created through the User Administration List page by clicking Add. When creating a user, the User Administration page opens.

After the required properties have been entered on the User Administration page, clicking Add will create the user. Clicking Cancel will return the admin to the User Administration List page without creating the user.
User Properties (Admin Tab)
When creating or modifying a user, the administrator can specify the following properties on the Admin tab of the User Administration page:
Main Information
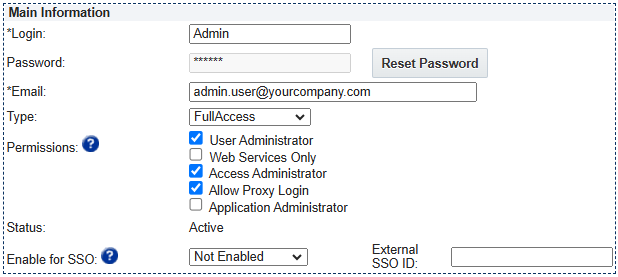
| *Login |
The username that the user will use to login to the system. The Login cannot be the same login as any other user on the site and can be changed after the user is created.
See the Host Company Login (Username) Guidelines section below for Login name criteria information.
|
| Password |
The password that the user will use to log in to the site. Leaving the password field blank will create a temporary password. Selecting the Email Password checkbox will send an email containing the password (either manually entered by the admin or generated by the system) to the email address in the Email field.
After the user has been created, a Reset Password button will allow the admin to reset the user’s password. The new password will be emailed to the user.
|
| *Email |
The email address of the user. If applicable, the system will send approval notifications and broadcast emails to this email address.
- Users can have multiple email addresses in his/her user profile. In the Email field, separate multiple email addresses with a comma. For example: email1@email.com, email2@email.com. All emails sent by the system to a user will be sent to all email addresses defined in the user's profile.
- Email addresses can be validated to enforce that all active user email addresses are unique. See the section Unique Email Address Validation section below for more information.
|
| Type |
The user type of the user. For more information on user types, see the topic User Administration Overview topic. |
| Permissions |
User Administrator
Select this option to allow the user to create new users and modify other users.
|
|
Web Services Only
When selected, the user can only access the system by logging in through the SOAP or REST APIs. The user will not be able to access the Oracle CPQ user interface. When selected, this user will be licensed under the API Call metric and not included in the user licensing count. In addition, once the maximum number of licenses is allocated, Web Services Only users can still be added to the site.
|
|
Access Administrator
Access Administrators can create and edit Administrator Groups.
- The Enable Administrator Groups setting on the General Site Options page must be set to Yes to enable this option.
- This option is always enabled for the Host Company Application Administrator/SuperUser and defaults to disabled for all FullAccess users.
- When Administrator Groups are first enabled, the Application Administrator/SuperUser must assign Access Administrator permissions to other FullAccess users.
|
|
Allow Proxy Login
This option allows administrators to log in as another user to verify changes to their setup or isolate issues reported by users.
- The Enable Administrator Groups setting on the General Site Options page must be set to Yes to enable this option.
- Users must be logged in as a SuperUser or a FullAccess user with Access Administrator permissions to change the Allow Proxy Login permission.
|
|
Application Administrator
Select this option to allow the user the Application Administrator capabilities and the ability to grant/remove Application Administrator permissions from another user.
|
|
|
|
Status
|
Displays if the user login is Active or Inactive |
| Enable for SSO |
If the User is enabled for Single Sign-On (SSO) login and the site is enabled for Single Sign-On (SSO), the user can access login via this method.
If the External SSO ID is set, it will be used for SSO, otherwise the User's Login will be used.
The site must have SSO enabled or the user's Enable for SSO field will not be available. To get to the site's Single Sign-On Settings page, navigate to Admin Home page > Integration Platform section > Single Sign-On.
|
Personal Information
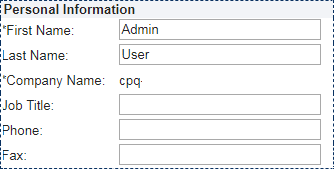
| *First Name |
The user’s first name. |
| Last Name |
The user’s last name. |
| *Company Name |
The user's company name |
| Job Title |
The user’s job title. |
| Phone |
The user’s phone number. |
| Fax |
The user’s fax number. |
Preferences

| Language Preference |
The user’s preferred language. The admin can choose from a list of the site’s supported languages. The user will see system defined strings on both the admin and user side of the application in this language. For more information on languages and translations, see the topic Internationalization Overview. |
| Currency Preference |
The user’s preferred currency. The admin can choose from a list of the site’s supported currencies. With a few exceptions, all Transactions created by the user will use the user’s preferred currency. For more information on these exceptions and how Transaction currency can be determined, see the topic Selecting Transaction Currency. |
| Number Format |
The user’s preference for how decimals are separated in Configuration and Commerce Float attributes (whether the radix point is a period or a comma). The admin can choose between ####.## where a period is the decimal separator and ####,## where a comma is the decimal separator.
- Float attributes do not have thousands separators.
- Currency attributes are formatted based on the Transaction’s currency.
|
| Units |
The user’s unit-type preference. The user will see this unit-type preference as the default unit for all numeric Configuration attributes that are tied to a Conversion Class. The admin can choose either the System Default unit-type to show (which will be either English or Metric), or English or Metric units to be shown as the default unit. For more information on units and Conversion Classes in CPQ, see the topic Unit Conversions. |
| Date/Time Format |
The user’s date and time format preference. The user will see dates formatted within the application in accordance with his/her preference. The admin can choose between several Date/Time Format options:
-
MM/dd/yyyy h:mm a
- MM/dd/yyyy HH:mm
- dd/MM/yyyy HH:mm
- dd.MM.yyyy HH:mm
- yyyy/MM/dd HH:mm
Note: A user’s Date/Time Format setting will not be used in places within the application where date and time format can be explicitly set by the admin, such as in a Document Designer or Email Designer output.
|
| Time Zone |
The user’s time zone. The user will see all dates/times within the system based on their Time Zone. Refer to Time Zones for a complete list of supported time zones. |
| Notification Preference |
When Email is selected for Notification Preference the user will receive approval notification emails, Submit sub-action notification emails, and Transition Rule notification emails from the system. When Email is not selected, the user will not receive any notification emails from the system, even if the criteria to send him/her a notification email is met.
Note: Users that elect not to receive notification emails from the system will still receive Broadcast Emails.
|
| Delegated Approver |
The active user that will receive the same approval notifications as the user and can approve or reject Transactions on his/her behalf. Typically the Delegated Approver is set by the user when he/she will be out of the office and cannot access the system to perform his/her approvals. For more information, see the topic Delegated Approvers. |
Bill To and Ship To
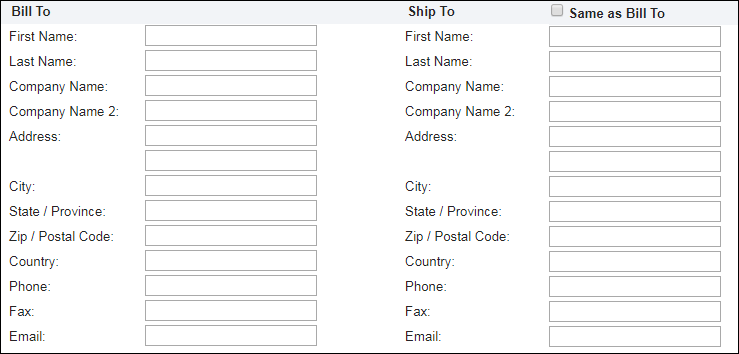
| Bill To Fields |
The user’s address for billing.
For Host Company users, Bill To fields are not typically used as an actual billing address, but rather they are typically used to give sales rep contact information attributes values on Transactions. All Bill To fields are system variables and can be referenced as attribute defaults and in BML functions.
|
| Ship To Fields |
The user’s address for shipping, which can be set to use the Bill To address information by selecting the Same as Bill To checkbox.
For Host Company users, Ship To fields are not typically used as an actual shipping address, but rather they are typically used to give sales rep contact information attributes values on Transactions. All Ship To fields are system variables and can be referenced as attribute defaults and in BML functions.
|
User Integration Page
For integrated sites, a User Integration button exists on the bottom of the Admin tab of the User Administration page.

Clicking User Integration opens the User Integration page.
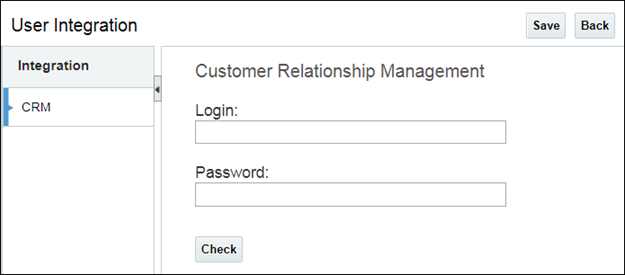
The User Integration page is used to store partner login credentials and to generate or revoke the user’s OAuth tokens. For more information on the User Integration page, see the topic User Integration.There are a number of integrations that use the User Integration page, refer to Integration Center.
Groups Tab
Clicking the Groups tab allows the administrators to manage the Groups that the user is a member of.
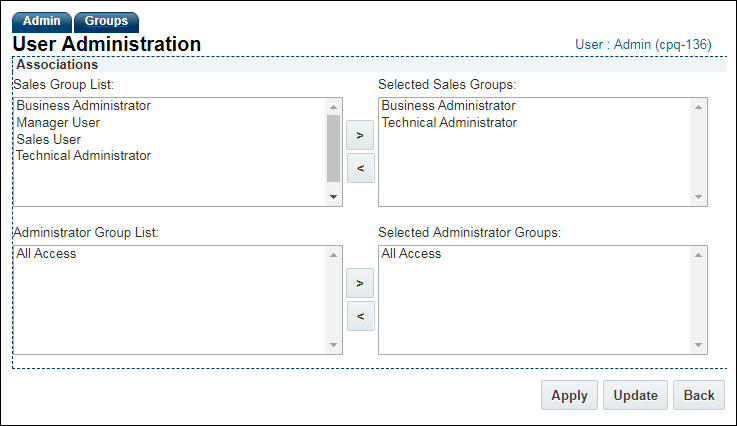
The Group List shows all active Groups on the site, while Selected Groups shows the Groups that the user is a member of. Selecting a Group in either list and then clicking the arrow button that points to the opposite list will move the Group to the opposite list.
For more information on Groups, see the topic Setting Up Groups.
Access Permissions Tab
The legacy Access Permissions feature for Oracle CPQ is being deprecated and end of life and removal of this functionality will occur in Oracle CPQ 25C. Access Permissions, sometimes referred to as Admin Segmentation, have been replaced by Administrator Groups.
Administrator Groups are currently an opt-in feature, but enabling this feature this will become mandatory and that will disable legacy Access Permissions. If you have not enabled Administrator Groups, we recommend administrators plan to transition to Administrator Groups.
The Access Permissions tab allows the admin to further restrict the access of FullAccess users that do not have permission to create and modify users. The Access Permissions tab only appears on the User Administration page of FullAccess users that do not have permission to create and modify users, and only after the users have been created. Clicking the Access Permissions tab reveals access restriction options.
Note: The Access Permissions Tab is displayed when the Enable Administrator Groups setting on the General Site Options page is set to No
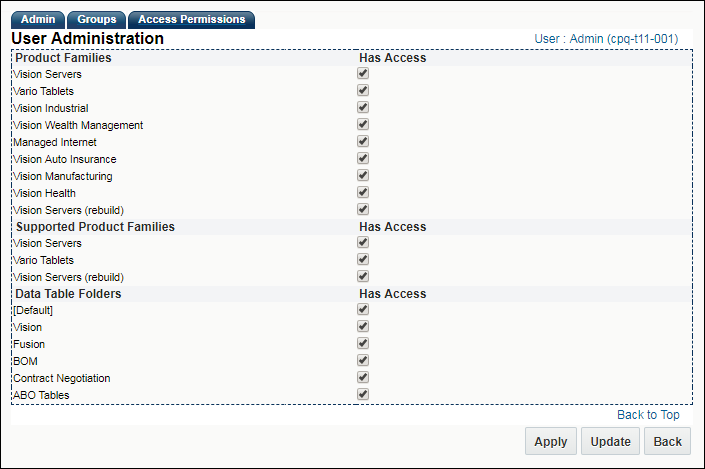
The administrator can choose to restrict the user’s administration access to only selected Product Families, Supported Product Families, and Data Table Folders.
Host Company and Partner Organization Login (Username) Guidelines
There are several guidelines for creating valid user Logins (usernames):
- Logins must be between 3-128 characters.
- Logins can contain:
- Dashes (-)
- Underscore (_)
- “At” characters (@), but the “At” character cannot be the first or last character in the Login name. A Login name can be an email address.
- Logins cannot contain the following domains:
- bigmachines.com
- guestcompany
- [company name]_buy where [company name] is the name of the Host Company or a Partner Organization
- reporting
Logins must begin with a letter, be at least three characters, and contain only letters, numbers, underscores, dashes, and periods. It can contain a single @ character that cannot be at the end.
Partner Organization users log in by adding @[Partner Organization name] to the end of their usernames. For example, if the username "user1@domain.com" is added to the Partner Organization "po1", the user would log in as "user1@domain.com@po1".
Both Host Company and Partner Organization users share validations for unique usernames, but only when the Partner Organization name is taken into consideration. For example:
- Both the Host Company and a Partner Organization can have a user named “
user1@domain.com”.
- If a Host Company has a user named "
user1@po1", the Partner Organization "po1" cannot have a user named "user", and vice-versa.
Unique Email Address Validation
Email addresses can be validated to enforce that all active user email addresses are unique.
- Both the Application Administrator/SuperUser and the guest user are exempt from unique email address validation and can have the same email address as another user. This is true for both the Host Company and Partner Organizations.
- If validation is enabled and multiple users already share the same email address, a validation error message appears when the profile of a user with a shared email address is updated in any way.
- This validation does not apply to the email addresses of inactive users. However, trying to modify an inactive user's email address will use the validation to check against the list of active user email addresses, and generate a validation error message if appropriate.
- If the user that triggers a validation error message has permission to create and modify users, the user will see a full list of the users that have the duplicate email address, and the companies they are from. If the user triggering the error does not have permission to create and modify users, the validation error message will only mention that the email address is being used by another user.
- A validation error message is triggered, as appropriate, by any change to a user's profile except changing an expired password. In Web Services, this error is triggered on the updateUsers and addUsers calls, but not on the resetPassword call.
Open a ticket on
My Oracle Support to enable or disable email address validation. If you are enabling email address validation, confirm that your users do not share email addresses before submitting the ticket.
Notes
Clicking My Profile displays information related to the logged in user.
The Users page lists all users. If the logged in user is not a User Administrator they will be able to see other user's detail pages in read-only mode. They can edit their own details by clicking their login in this list or by opening their My Profile page from the navigation bar or header. To restrict access to the Users list create an Admin Group which excludes access to that feature.
If a site exceeds the license limitations on any of the license types (Internal User & Partner Organization User), the administrator will not be allowed to create any new users until the license count is decreased and no longer exceeds the license limit. When the license limit is reached, an error message appears instructing the administrator to contact Customer Support and purchase additional licenses.
User license count excludes Web Services Only users in the count. In addition, once the maximum number of licenses is allocated, Web Services Only users can still be added to the site.
Related Topics
See Also


