General Site Options
You can specify the following types of settings on the Options-General page:
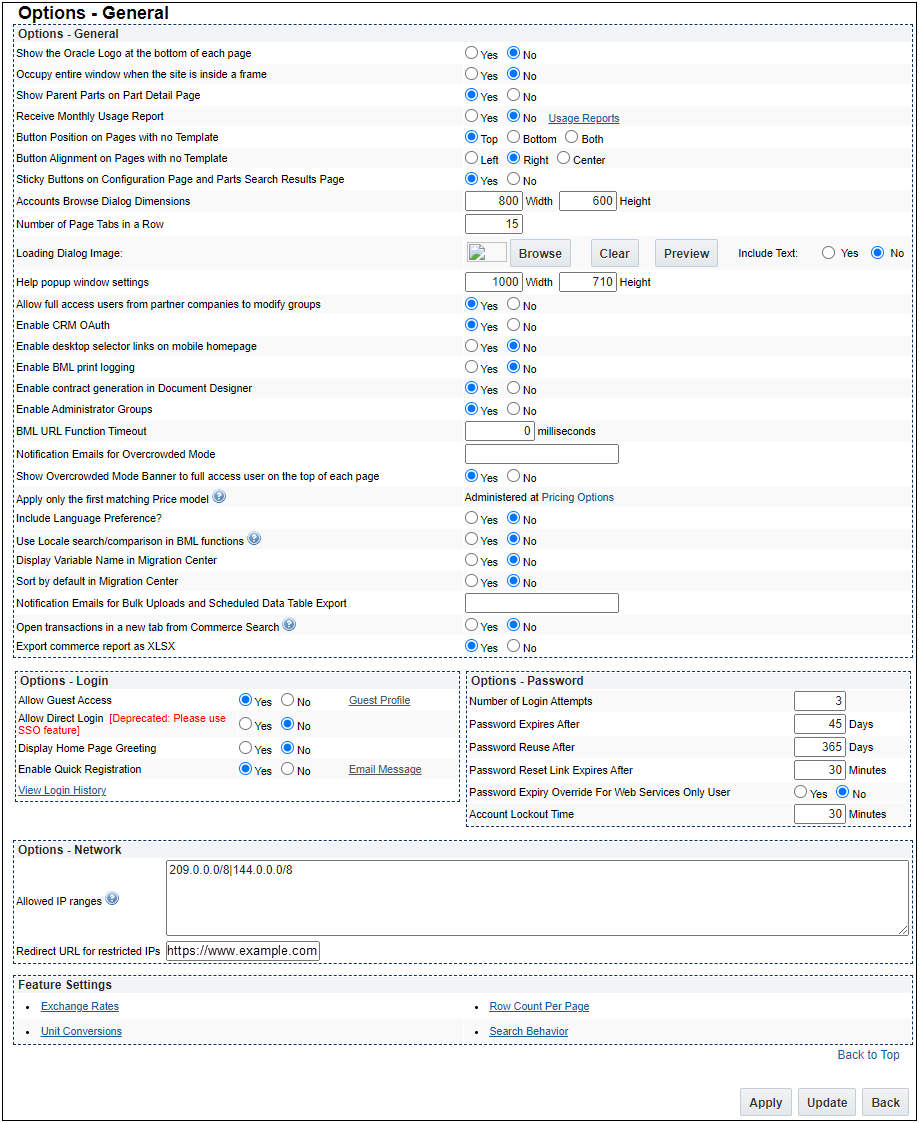
In the following screenshot of the Options-General page.
Administration
![]() Setting up General Options
Setting up General Options

 Navigate to the Options-General page.
-
Click Admin to go to the Admin Home Page.
-
Click General Site Options in the General section.
The Options-General page opens.
-
In the Options-General section, select settings for the items shown in the following table.
Options-General Feature Settings Show the Oracle Logo at the bottom of each page
Yes or No Occupy entire window when the site is inside a frame
Yes or No
Oracle Sales integrations, we recommend launching the CPQ page in an iFrame and setting this option to No.
If you need to launch CPQ in full screen mode, there are additional steps that need to be taken. Refer to Integrating CX Sales with Oracle CPQ for more information.
Show Parent Parts on Part Detail Page
Yes or No Receive Monthly Usage Report
Yes or No
For more information on Usage Reports,
see the section Scheduling and Sending Usage Reports below.Button Position on Pages with no Template
Top, Bottom, or Both Button Alignment on Pages with no Template
Left, Right, or Center Sticky Buttons on Configuration Page and Parts Search Results Page.
Yes or No
The sticky bar follows users as they scroll up and down.
Accounts Browse Dialog Dimensions
Width and Height, in pixels Number of Page Tabs in a Row
Designates the number of tabs for the Admin XSL Template Homepage Loading Dialog Image
- Click Browse to open the File Manager - Browse dialog box.
- Select a folder from which you want to import the new logo, using the Folder drop-down.
- Selecting a folder name displays the logo images present in the folder, along with a Preview, Description, and date and time the logo was imported to the folder.
- Click Select next to the entry for the desired logo.
- This closes the File Manager - Browse dialog box, and displays the name of the selected image in the Home Page Set Up page.
- Specify whether or not you want to Include Text on the image by clicking Yes or No.
- Click Clear to remove the selected image.
- Click Preview to view the selected image.
Help pop-up window settings
Width and Height, in pixels
This option is not applicable to JET UI help windows. The JET UI help windows are responsive and are sized accordingly to the help content itself.
Allow full access users from partner companies to modify groups
Yes or No
- Yes: The Groups tab is visible to the Partner Organization Full Access Users in the User Profile.
- No: The Groups tab is hidden and the Partner Organization Full Access User is unable to change the group of a user.
Enable CRM OAuth
Yes or No
For more information on OAuth, see the topic OAuth 2.0 Secure Login Functionality.
Enable desktop selector links on mobile homepage
Yes or No
- Yes: Displays Selector (Search Flow) links to display on the mobile Home page.
- No: Disables Selector links on the mobile Home page.
See the topic Mobile Home Page for more information.
Enable BML print logging
Yes or No
-
No: Disables logging for BML print statements, default value
-
Yes: Enables logging for BML print statements, used for script debugging
BML print statements for user-initiated actions are disabled unless the BML print logging is enabled. This prevents performance issues when numerous functions were executed within the print statement. BML print statements are still enabled for actions executed from the Oracle CPQ Debugger.
Enable contract generation in Document Designer
Yes or No
- Yes: Enables Contract checkbox for Document Designer Templates.
- No: (default) Disables Contact Negotiation.
Enable Administrator Groups
Yes or No
-
Yes: Enables the Administrator Access Control feature for the entire Oracle CPQ site. Only a Application Administrator can modify the setting.
When Administrator Groups are enabled, the access permission features available in prior releases are no longer available and will no longer apply. If you were using these features, you must configure access control using the new Administrator Access Control functionality.
-
No: (default) Disables the Administrator Access Control feature.
-
The Enable Administrator Groups option is by default set to Yes for customers new to Oracle CPQ.
-
The current Enable Administrator Groups selection (i.e. Yes or No) is retained on Oracle CPQ sites upgraded from Release 18B to a later version.
-
When the Enable Administrator Groups selection is set to Yes, the Access Permissions tab on the Users page is turned off and does not display. When the Enable Administrator Groups selection is reset to No, the Access Permissions tab displays and retains its previous values.
BML URL Function Timeout
Defined in milliseconds, this timeout value serves as the default timeout threshold for any URL Access function.
Notification Emails for Overcrowded Mode
Provide an email address to receive notifications when the site is overcrowded.
Show Overcrowded Mode Banner to full access user on the top of each page
Yes or No
-
Yes: Displays an Overcrowded Mode Banner to full access users at the top of each page while the system is in Overcrowded Mode.
-
No: Disables the Overcrowded Mode Banner.
Apply only the first matching Pricing model
This option allows administrators to designate how multiple price models are applied at run-time.
Beginning in Oracle CPQ 23B, Pricing Options are set in the Pricing Portal.
View options for Oracle CPQ 23A and prior releases.
- Yes: (default) Select this option to apply only the first price model that matches the pricing rule criteria to the part. If the same part is in multiple pricing rules, and within multiple price models within a rule, the pricing rule price value is derived from the first rule (as shown in the list of rules on the Administration page) and the first price model within the rule (as shown in the Linked Price Models section for the rule).
- No: Select this option to apply all price models that match the pricing rule criteria to the part.
Include Language Preferences?
When enabled, this option provides a language selection menu in the application header for sales and administration pages.
Users should save any work in progress prior to changing the current language since a page refresh is performed when a new language is selected.
Use Locale search/comparison in BML functions
This option provides locale search and comparison for BML operations like "find" and "equals".
will perform a strict comparison of characters by default.
- Yes: all character variations are normalized to their basic version. For example: A search for a lower case "a" returns the following characters: a, à, á, â, ã, ä, and å. Likewise, a search for a lower case "a" with an acute accent (á) also returns the following characters: a, à, á, â, ã, ä, and å.
- No: (default) locale search/comparison in BML functions is disabled, character variations are not normalized. For example: A search for a lower case "a" only returns the "a" character, and a search for a lower case "a" with an acute accent (á) only returns the (á) character.
BML search operations will take longer when Use Locale search/comparison in BML functions is enabled. This behavior will be most noticeable on sites with long strings or a large number of strings. Customers should only enable Use Locale search/comparison in BML functions if locale search/comparison is required.
Display Variable Name in Migration Center
When enabled, this option displays variable names in the Migration Center. The variable names make it easier for administrators to identify appropriate items for migration when multiple items had the same display label.
Sort by default in Migration Center
Select the sort by default in the Migration Center:
- Yes - Display Migration Center items in alphabetical order.
- No - Display Migration Center items in the order they are listed in their parent folder.
Notification Emails for Bulk Uploads and Scheduled Data Table Export
Provide an email address to receive notifications to send bulk upload summary notifications and scheduled data table export notifications. To send notification email to more than one email address, separate the email addresses with a comma or semicolon in the text entry field.
- If the field is blank, the email notifications continue to be sent to the Application Administrator email.
-
If the field contains one or more email addresses, the email notifications are sent to designated email addresses and the Application Administrator does not receive email notification.
Open transactions in a new tab from Commerce Search
Yes or No
- Yes: Transaction opens in a new tab and focus moves to the new tab. Opening multiple transactions with this setting enabled will result in each Transaction opening in a new tab.
- No: (default) Transaction opens in the existing parent window.
Export commerce report as XLSX
Yes or No - Yes: Commerce reports are exported in .XLSX format. Reports exported in .XLSX format can populate up to 1,048,575 results.
- No: Commerce reports are exported in .XLS format. Reports exported in .XLS format can populate up to 65,535 results.
If a report has groupings enabled, the limit of 65,535 results remain regardless of exporting to a .XLSX or .XLS file.Cache sales user groups for improved BML performance
Yes or No - Yes: The group data is pulled from cache.
- No: The group data presented is pulled from database rather than cache. Note: This will cause poorer performance.
Custom Domains List
This field provides a central location for listing external sites that users can connect to from within Oracle CPQ. The Oracle CPQ Custom Domains List supports the following use cases:
-
Your SSO implementation requires access to trusted partner Identity Providers for secure user login (i.e. Salesforce, Microsoft Dynamics, Oracle IDCS, etc.)
-
Your site implementation includes a Single Sign-On (SSO) RelayState parameter that calls on an external site for redirect after login
-
You use an external domain for SOAP Web Services testing
-
You have XML Integrations that requires external site access
-
Your site supports Oracle Integration Cloud (OIC) middleware integration and the Discovery URL is an external site
-
Your site supports Enterprise Contracts integration and external site URLs are required
Enter the external domain name.
-
Use a pipe (|) to separate domain names when there is more than one domain.
-
If the top-level domain is included, you do not need to include the sub-domain name. For example: Entering "example.com" will allow access for both "foo.example.com" and "bar.example.com".
For optimal security, fully-qualified domain names are preferred over top-level domains.
- Click Update to save your changes and return to the previous page.
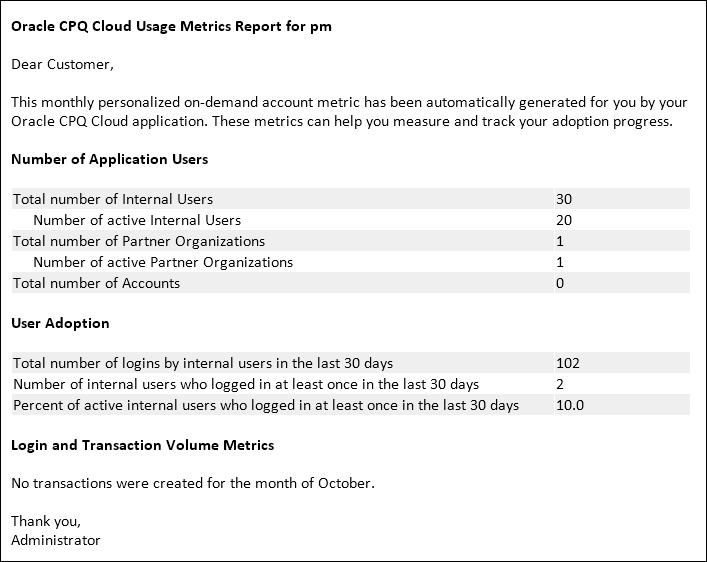
Usage reports containing site metrics can be scheduled to be sent to the Host Company’s email address at the end of each month, and they can be invoked on-demand by an admin to be sent to other email addresses.
The following site metrics are included in usage reports:
| Site Metrics | Description |
|---|---|
| Number of Application Users |
This section includes the Total Number of Internal Users, Number of Active Internal Users, Total Number of Partner Organizations, Total Number of Active Partner Organization and Total Number of Accounts. |
| User Adoption |
This section includes the Total Number of logins by Internal Users in the last 30 days and the Number of internal users who logged in at least once in the last 30 days. |
| Transaction Volume Metrics |
This section of the report includes the number of transactions created per Commerce Process by Internal and External users in the time period specified. It also includes the Total Number of Transactions created per Commerce Process by internal and external users till date. It also lists the number of transactions created per Internal User in the time period specified. |
Scheduling a monthly usage report to be sent to the Host Company’s email address
- Navigate to the Options-General page.
-
Click Admin to go to the Admin Home Page.
-
Click General Site Options in the General section.
The Options-General page opens.
-
For Receive Monthly Usage Report, select Yes.
To change the Host Company’s email address, go to the Host Company page.
For more information, see the topic Host Company.
Sending a usage report to an email address on-demand
- Navigate to the Options-General page.
-
Click Admin to go to the Admin Home Page.
-
Click General Site Options in the General section.
The Options-General page opens.
-
Click Usage Reports, located at the end of the Receive Monthly Usage Report row.
The Usage Metrics page opens.

-
In the Email Report to: field, enter the email address of the person who should receive the report.
By default, this field is populated with the email address of the current user.
- Under Report Duration, select one of the following options:
- Month: Select the month of data that the usage report will include.
- Start Date/End Date: Enter the start date and end date of the data that the usage report will include.
- Click Execute Now to send the report to the email address specified.
Sample Usage Report:
- Navigate to the Options-General page.
-
Click Admin to go to the Admin Home Page.
-
Click General Site Options in the General section.
The Options-General page opens.
-
In the Options - Login section, select settings for the items shown in the following table.
Options-Login Feature Settings Allow Guest Access Yes or No
Guest access permits visitors to view your online catalog of products and parts without registering on your site. You must have Yes selected in order to use eCommerce Registration functionality.
Guest Profile To modify the profile of all guest users who access the site, click Guest Profile. Allow Direct Login The ability to specify whether or not you want to Allow Direct Login by clicking Yes or No is no longer active. Direct login is known as Single Sign-On, or SSO. For more information, see the topic Single Sign-On (SSO).
We have announced the deprecation of Direct Login for Oracle CPQ. If you are currently using Direct Login, we recommend administrators plan the transition to Single Sign-On (SSO). The end of life and removal of this functionality is currently under reviewDisplay Home Page Greeting Yes or No Enable Quick Registration Yes or No
With quick registration, people visiting your site can quickly create a user account, and then log in to shop and possibly make purchases.
Quick registration users can only submit Commerce documents if Commerce Processes permit them to do so.When quick registration is disabled, users cannot quickly register for user accounts. Those users who already have accounts will still be able to log in.
You can grant visitors both guest access and quick registration access.Email Message Click Email Message on the Enable Quick Registration row to open the Quick Registration dialog box.
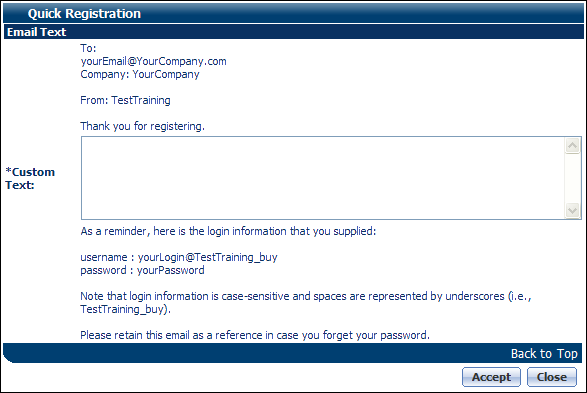
Customize the text that is sent to users after they submit a quick registration form.
Click Accept to save changes made in the Quick Registration dialog box.
- Click Update to save your changes and return to the previous page.
- Navigate to the Options-General page.
-
Click Admin to go to the Admin Home Page.
-
Click General Site Options in the General section.
The Options-General page opens.
-
In the Options-Password section, select settings for the items shown in the following table.
Options-Password Feature Settings Password Strength In Oracle CPQ 21B, support for low complexity password strength was discontinued. This change will impact end users the first time they reset their passwords following the Oracle CPQ 21B upgrade. The Password Strength setting is not available for Oracle CPQ 21B and later.Specify Low or High.
Higher password strength provides greater security to your access.
- Low: Requires 4-30 characters without special requirements.
- High: Requires 8-31 characters which include at least one uppercase letter, at least one number, and at least one special character.
Number of Login Attempts The number of attempts after which the user will be unable to attempt logging in.
If this value is set to 0, users will have infinite login attempts and the Account Lockout Time feature will not be active.Password Expires After The number of days after which the password expires.
The number must be a positive integer between 1-999.
This field cannot be left blankPassword Reuse After This specifies the number of days after which a password that has already been used, and has expired, can be reused.
Password Reset Link Expires After This specifies the number of minutes the reset link is available to the user. Password Expiry Override For Web Services Only User
This option specifies if Web Services Only user passwords follow the site password options.
- Yes: Passwords do not expire for SOAP and REST API Web Services users.
- No: (default) SOAP and REST API Web Services user passwords follow the password options set for all users on the site.
Account Lockout Time This specifies the number of minutes an account is automatically locked after the number of invalid login attempts is exceeded. Once the lockout time has passed, the account is automatically unlocked and available for user login.
If you do not want to implement this feature, set the value to 0. After the number of login attempts has been exceeded, the account login will remain locked until an administrator unlocks that account login.During the account lockout time, administrators can reset the account login password. The user can then immediately log in to their account with the new password.
-
Click Update to save your changes and return to the previous page.
Legacy users can continue to use their old password of less than 8 characters until they try to update their password.- The maximum number of days allowed before a password expires is 999.
- It is considered best practice to set the password expiration period to <90 days.
- The password expiration time period begins once a site is upgraded.
- If the system determines that the time since a user’s last password update has exceeded the password expiration setting, the user will be required to reset their password the next time they log in.
Beginning in Oracle CPQ 23B, host company administrators can control which IP ranges can access their Oracle CPQ environments. This allows administrators to specify, for example, that CPQ environments can only be accessible from customer office networks or virtual private networks (VPNs).
-
After the feature is enabled for your site,
Navigate to the Options-General page, -
Click Admin to go to the Admin Home Page.
-
Click General Site Options in the General section.
The Options-General page opens.
-
-
In the Network Settings section, enter IP range(s) and redirect URL for the items shown in the following table.
Feature Description Allowed IP Ranges This specifies all IP ranges, in IPv4 CIDR format, able to access the environment.
Administrators can enter multiple IP ranges in the Allowed IP Ranges field using a pipe ("|") as the separator between ranges. For example, "173.227.23.2/32" indicates a single value and "173.227.23.2/32|92.168.0.0/24" indicates two values. The Allowed IP Ranges field support a maximum of 2700 characters.
When this field is set to blank, users are allowed to access the site, perform any allowed action, and call Web Services.
If the user IP is not part of the allowed IP range, they are redirected to the specified redirect URL regardless if their IP is listed in other domain allow lists and error messages are returned for Web Services requests.
Redirected URL for restricted IPs This specifies the destination users are re-directed to if they are not allowed access. For example, a user may be re-directed to a corporate website home page or a dedicated access denied page.
-
Navigate to the Options-General page.
-
Click Admin to go to the Admin Home Page.
-
Click General Site Options in the General section.
The Options-General page opens.
-
-
In the Reports section, select settings for the items shown in the following table.
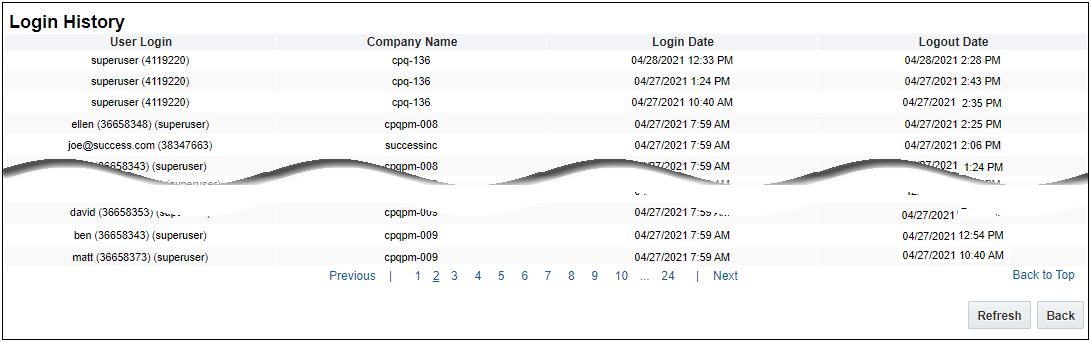
Feature Description View Login History View the login history details for all users.
You must have the appropriate access rights to view this page. For more information, see, Viewing Login History below.
API Metrics Clicking API Metrics downloads a CSV file with the API metrics to your hard drive. The business metrics are available in 24-hour UTC intervals. For more information, see Business Metrics. Login Metrics Clicking Login Metrics downloads a CSV file with the Login metrics to your hard drive. The business metrics are available in 24-hour UTC intervals. For more information, see Business Metrics.
The Login History page displays the login history information for the last 30 days. Proxy logins are indicated in parentheses. Oracle CPQ user session log in and log out records are deleted automatically after 180 days. If you would like to modify the time the user log in records persist prior to deleting for your site, submit a Service Request (SR) on My Oracle Support. Automatically purging the user log in records reduces the storage required for data that you are not actively using.
- Navigate to the Options-General page.
-
Click Admin to go to the Admin Home Page.
-
Click General Site Options in the General section.
The Options-General page opens.
-
In the Options - Login section, click View Login History.
The Login History page opens.
Administrators have the ability to set up pagination links for the Login History page. If there are more than 50 users in the Login History the Previous, Page Number, and Next links display at the bottom of the list. For information, see Defining Iterator Lengths and Row Count per Page.
 You must have the appropriate access rights to view this page.
Example: If you are the Application Administrator, you can view the login history details of all users.- User Login: The name of the user who logged in.
- Company Name: The company name of the user.
- Login Date: The login date and time.
-
Logout Date: The date and time the user logged out of the system.
- Click Refresh to update the data on the page.
-
Click Back to return to the previous page without saving changes.
-
Navigate to the Options-General page.
-
Click Admin to go to the Admin Home Page.
-
Click General Site Options in the General section.
The Options-General page opens.
-
-
In the Feature Settings section, select settings for the items shown in the following table.
Feature Description Exchange Rates Clicking Exchange Rates displays the Currency Conversion Rate List page. Use this page to manage exchange rates. For more information, see the topic Exchange Rates. Unit Conversions Clicking Unit Conversions displays the Conversion Class List page. Use this page to manage unit conversions. For more information, see the topic Unit Conversions. Row Count per Page Clicking Row Count Per Page displays the Iterator Administration page. For more information, see the section Defining Iterator Lengths and Row Count per Page, below. Search Behavior Clicking Search Behavior displays the Define Search Behaviors page. For more information, see the section Defining Search Behavior, below.
You can set different iterator lengths for each of the pages shown. The smaller the iterator, the faster a page will load. Use this page to make and modify the result set sizes for the following pages:
- Navigate to the Options-General page.
-
Click Admin to go to the Admin Home Page.
-
Click General Site Options in the General section.
The Options-General page opens.
-
In the Feature-Settings section, click Row Count Per Page.
The Iterator Administration page opens.
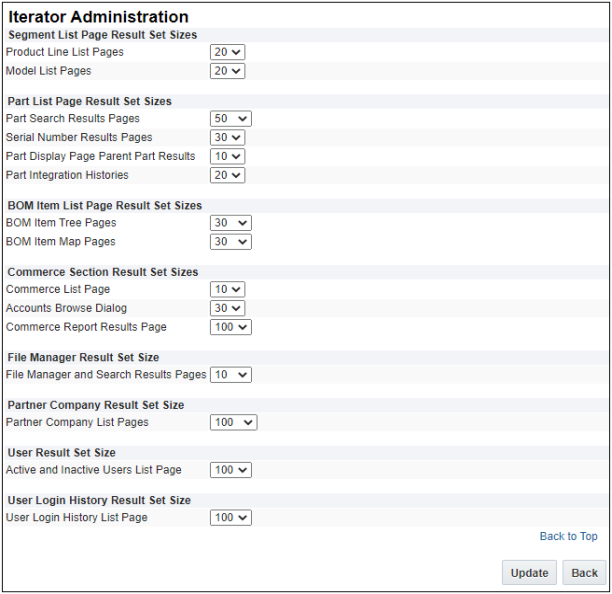
- Product Line List Pages: Select a value between 2-50 from the drop-down to specify the result set size for the page.
-
Model List Pages: Select a value between 2-50 from the drop-down to specify the result set size for the page.
The default values are 20.
Segment List Page Result Set Sizes
Part List Page Result Set Sizes
- Part Search Results Pages: Select a value between 2-250 from the drop-down to specify the result set size for the page.
- Serial Number Results Pages: Select a value between 2-50 from the drop-down to specify the result set size for the page.
- Part Display Page Parent Part Results: Select a value between 2-50 from the drop-down to specify the result set size for the page.
Part Integration Histories: Select a value between 2-50 from the drop-down to specify the result set size for the page.
The default value for Part Search Results Pages and Serial Number Results Pages is 30.
BOM Item List Page Result Set Sizes
- BOM Item Tree Pages: Select a value between 2-50 from the drop-down to specify the result set size for the page.
BOM Item Map Pages: Select a value between 2-50 from the drop-down to specify the result set size for the page.
The default values are 30.
Commerce Section Result Set Sizes
- Favorites Page: Select a value between 2-50 from the drop-down to specify the result set size for the page.
- Accounts Browse Dialog: Select a value between 2-50 from the drop-down to specify the result set size for the page.
- Commerce Reports Results Page: Select a value between 2-501 from the drop-down to specify the result set size for the page.
Commerce List Page: Select a value between 2-50 from the drop-down to specify the result set size for the page.
The default value for Favorites Page is 10.
The default value for Accounts Browse Dialog is 30.
The default value for Commerce Report Results Page is 100.
The default value for Commerce List Page is 10.
File Manager Result Set Size
File Manager and Search Results Pages: Select a value between 2-100 from the drop-down to specify the result set size for the page.
The default value for File Manager and Search Results Pages is 10.
Partner Company Result Set Size
Partner Company List Pages: Select a value between 2-500 from the drop-down to specify the result set size for the page.
The default value for Partner Company List Pages is 100.
User Result Set Size
Active and Inactive Users List Page: Select a value between 50-500 from the drop-down to specify the result set size for the page.
The default value for Active and Inactive Users List Page is 100.
User Login History Result Set Size
User Login History List Page: Select a value between 50-500 from the drop-down to specify the result set size for the page.
The default value for Users Login History List Page is 100.
Use this page to set how you want to support wildcards for each search type.
-
Navigate to the Options-General page.
-
Click Admin to go to the Admin Home Page.
-
Click General Site Options in the General section.
The Options-General page opens.
-
-
In the Feature-Settings section, click Search Behavior.
The Define Search Behaviors page opens.
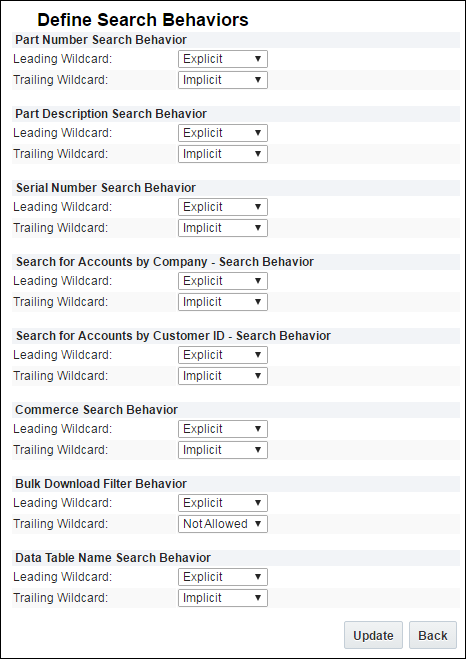
- Select Leading Wildcard and Trailing Wildcard settings for the following search pages:
- Part Number Search Behavior
- Part Description Search Behavior
- Serial Number Search Behavior
- Search for Accounts by Company Search Behavior
- Search for Accounts by Customer ID Search Behavior
- Commerce Search Behavior
- Bulk Download Filter Behavior
- Data Table Name Search Behavior
Wildcards are designated with an asterisk (*). Select one of the following options for wildcard support from the drop-down:
- Explicit makes wildcards optional. You can enter them when needed.
- Implicit means the system automatically appends a wildcard to the search criteria.
- Not Allowed turns off wildcard support.
-
Click Update to save your changes and return to the previous page.
The changes will be reflected the next time when you visit a modified Search page.


