Unit Conversions
Overview
Watch Video 
Conversion classes are sets of units of measurement. Multipliers between the units in a class create conversions from one unit type to another within the conversion class. With conversion classes, units and conversion factors can be associated with float attributes.
Conversion classes can only be associated with float attributes.
When conversion classes are associated with attributes, buyers and product FullAccess users are able to indicate which units they are using when setting attribute values.
Example: If a ”temperature” numeric attribute named temperature is created, and there is a temperature conversion class, the attribute can be linked to the conversion class. The conversion class has units, such a Celsius and Fahrenheit, and the numerical relationship among these units is set up.
Users, who set a temperature value, can also select whether the temperature is in Celsius, Fahrenheit, Kelvin, or any other unit included in the class.
Administration
 Using the Conversion Class List Page
-
 Navigate to the Conversion Class List page.
-
Click Admin to go to the Admin Home Page.
-
Click General Site Options in the General section.
The Options-General page opens.
-
Click Unit Conversions under Feature Settings.

The Conversion Class List page opens.

-
Make any desired changes indicated in the following table:
| Add a Conversion Class |
Add |
|
| Deploy new and undeployed Conversion Classes. |
Deploy |
All pending conversion classes are deployed immediately.
Pending conversion classes have New listed in the Status column.
|
| Edit the Conversion Label |
Name in the Conversion Class Name column |
|
| Manage the units list for the selected conversion class |
Units in the List Units column |
|
| Enter text language translations for supported languages |
Translations |
In the Translations dialog box:
- Click Save to save your changes. Continue entering translations.
- Click Save and Close to save translations and close the dialog box.
- Click Close to close the dialog box and return to the page without saving any changes.
|
| Delete a conversion Class |
Checkbox in the Select column, then Delete |
Only conversion classes that have not been deployed can be deleted. |
Schedule conversion class deployments during low usage times.
Conversion classes must be deployed to be active in the Commerce system.
It is not possible to undo deletions and, upon a deletion, the Commerce system also deletes all units and conversions contained in the class.
 Adding Conversion Classes
 Navigate to the Conversion Class List page.
-
Click Admin to go to the Admin Home Page.
-
Click General Site Options in the General section.
The Options-General page opens.
-
Click Unit Conversions under Feature Settings.

The Conversion Class List page opens.

-
Click Add to add an item.
The Conversion Class Administration page opens.
-
Enter a Conversion Label.
This is the name that identifies the class in Attribute administration areas and on the Conversion Class List page.

- Enter a Conversion Class.
-
Click Add to save your changes and return to the previous page.
The Conversion Class List page opens, displaying the newly added conversion class.
Create conversion classes one at a time.
 Editing Conversion Classes
 Navigate to the Conversion Class List page.
-
Click Admin to go to the Admin Home Page.
-
Click General Site Options in the General section.
The Options-General page opens.
-
Click Unit Conversions under Feature Settings.

The Conversion Class List page opens.

-
Click a name in the Conversion Class Name column.
The Conversion Class Administration page opens.
-
Modify the Conversion Label.
This is the name that identifies the class in attribute administration areas and on the Conversion Class List page.
-
Click Update to save your changes and return to the previous page.
The Conversion Class List page opens, displaying the modified conversion class.
Conversion class names can only be edited in classes that have not been deployed.
 Adding a Unit
 Navigate to the Conversion Class List page.
-
Click Admin to go to the Admin Home Page.
-
Click General Site Options in the General section.
The Options-General page opens.
-
Click Unit Conversions under Feature Settings.

The Conversion Class List page opens.

-
Click Units to manage the Units List for the selected conversion class name.
The Units List page opens for the selected conversion class.
-
Click Add to add an item.
The Unit Administration page opens.

-
Enter a Unit Label.
This is the name that will be displayed on the Units List: <name of the selected Conversion Class> page.
- Enter a Unit Class.
-
Click Add to save your changes and return to the previous page.
The Units List: <name of the selected Conversion Class> page opens, displaying the newly added conversion class.
 Defining Unit Conversions
Create conversions by setting the multiplication factor that makes one unit of measurement equivalent to another. Conversions can be edited at any time.
 Navigate to the Conversion Class List page.
-
Click Admin to go to the Admin Home Page.
-
Click General Site Options in the General section.
The Options-General page opens.
-
Click Unit Conversions under Feature Settings.

The Conversion Class List page opens.

-
Click Units to manage the Units List for the selected conversion class name.
The Units List page opens.

Define Conversions does not appear until at least two units exist for the conversion class.
-
Click Define Conversions.
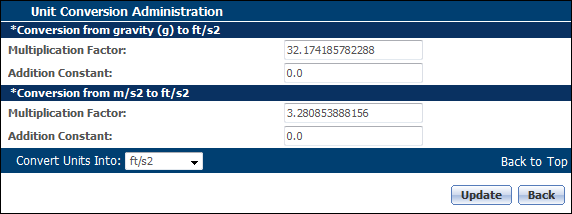
The Unit Conversion Administration page opens.

- Enter conversion values in the Multiplication Factor and Addition Constant fields.
-
Change which unit is the constant by choosing a different unit from the Convert Units Into drop-down.
This change is immediately reflects in the values to be converted.
-
Click Update to save your changes and return to the previous page.
- The default unit type specified on the Units List page is also used as the default constant. The constant (Co) should remain 0.0, except in temperature conversions.
- In deployed conversion classes, conversion changes take effect immediately after clicking Update.
 Implement Commerce Unit Conversion Use Case
Length Unit Conversion Use Case – The input Float attribute is linked to a pre-defined length conversion class that allows the user to select whether the length is in inches, feet, yards, or any other unit included in the class. The output Float attribute contains the length in meters. The following image shows the conversion functionality.
- In the first step, the user is hovering over the Length attribute that has Help Text enabled.
- In the second step, the user enters a length of "7" and selects "Yards" for the unit of measure.
- In the third step, the value for the Length in Meters attribute is converted.

The following tasks describe how to implement unit conversion float attributes.
 Select a Conversion Unit
Complete the following steps to view CPQ's pre-defined conversion classes.
- Log in to Oracle CPQ and open the Admin Home page.
- Click General Site Options in the General section.
- Click Unit Conversions in the Features Settings section.
 Create an Input Float Attribute
Complete the following steps to create a Float Attribute with Conversion Fields.
- Log in to Oracle CPQ and open the Admin Home page.
- Click Process Definition in the Commerce and Documents section.
- Select Documents for the applicable Commerce process, and then click List.
- Select Attributes for the applicable main or sub-document, and then click List.
- Click Add.
- Enter the Label and Variable Name of the attribute.
- Choose the Float from the Attribute Type drop-down.
- Click Add.
-
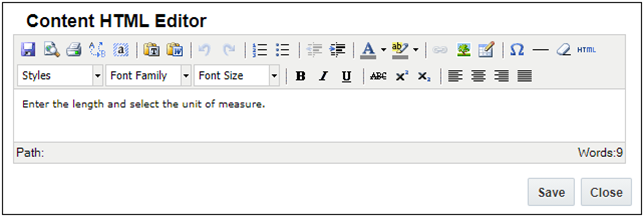
(Optional) If you want to provide user Help Text, click on the Edit button next to the Description field, enter the message you want to display to the user, and click Save.
For the Length example shown above, the following Help Text message was added.

-
Set the remaining Main Information, Groups, and Validation fields as required.
For more information, refer to Adding Attributes to a Document.
-
Select the applicable Conversion Fields.

- For the Conversion Group, select the applicable conversion class. (e.g. Length)
- For the Conversion Unit, select the desired unit of measure for the output attribute. (e.g. Meters)
- Click Apply or Update to save the attribute.
 Create an Output Float Attribute
Complete the following steps to create an output Float attribute for the converted value.
- Log in to Oracle CPQ and open the Admin Home page.
- Click Process Definition in the Commerce and Documents section.
- Select Documents for the applicable Commerce process, and then click List.
- Select Attributes for the applicable main or sub-document, and then click List.
- Click Add.
- Enter the Label and Variable Name of the attribute.
- Choose the Float from the Attribute Type drop-down.
- Click Add.
-
Set the remaining Main Information, Groups, and Validation fields as required.
For more information, refer to Adding Attributes to a Document.
- Do not set the Conversion Fields for the output Float attribute.
- Click Apply or Update to save the attribute.
 Create a Formula to Update the Output Float Attribute
Complete the following steps to create a formula to update the output Float attribute with the converted value.
- Log in to Oracle CPQ and open the Admin Home page.
- Click Process Definition in the Commerce and Documents section.
- Select Formulas for the applicable Commerce process, and then click List.
- Add the Output Float attribute to the Attribute Name.
- Add the Input Float attribute to the Formula.
- Click the Add icon
 to save the formula.
For more information, refer to Creating a Formula.
 Add Float Attributes to the Transaction UI Layout
Add both the input and output Float attributes to the Transaction UI. Refer to the JET Responsive Layout Editor topic for more information.
Notes
Only FullAccess users can administer conversion classes.
After defining Unit Conversions, administrators must perform the following items to enable Unit Conversion for users:
- Create two Commerce float type attributes
- Set the value of Conversion Group and Conversion Unit on both the attributes, then click Save.
- Define the formula for one of the attribute and enable auto update on that attribute.
- Place the attributes on the Commerce layout, then Save and Deploy.
- You can set English and metric default units for each conversion class. Whenever a conversion class is associated with a numeric attribute, the default units appear selected in the units menu.
- Users can override default units by picking other units in the class.
- Conversions happen automatically when units switch from one to another in the same class.
- Changes to default unit settings take effect immediately in deployed conversion classes.
- Conversion classes are created in a non-active, pending state. After a conversion class is complete, meaning it has both units and conversions, deploy the class to make it active.
Related Topics
 See Also
![]() Using the Conversion Class List Page
Using the Conversion Class List Page
![]() Implement Commerce Unit Conversion Use Case
Implement Commerce Unit Conversion Use Case


