Overview
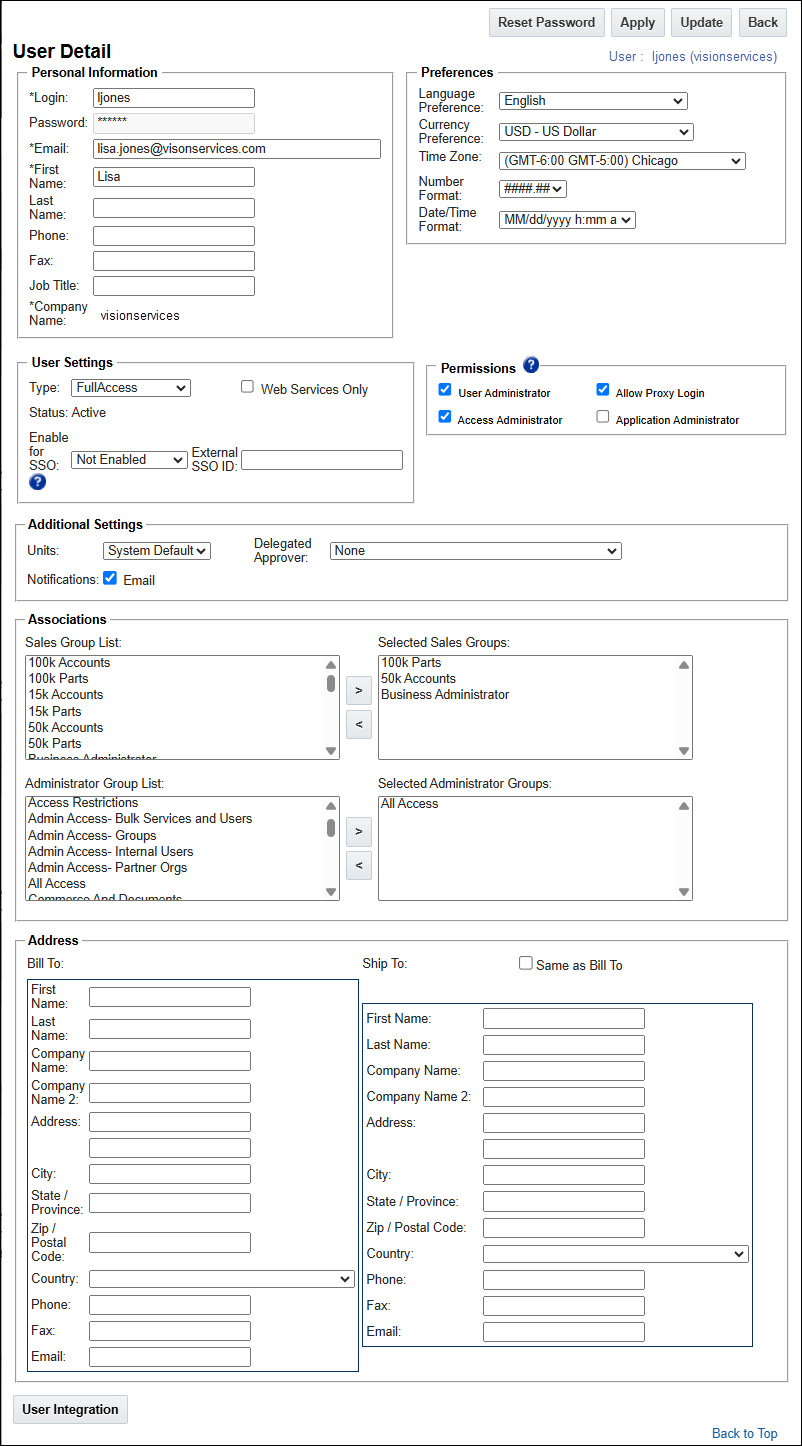
The User Detail page allows users to reset their password and access /update their Personal Information, Preferences, Settings, and Bill To and Ship To information. The properties displayed in this page depends on the user type and if applicable their administrator permissions.
Users typically access their own User Detail page by clicking My Profile from the User Navigation Menu. Clicking My Profile displays information related to the logged in user.
Administrators with user administration permission can access this page for a user from the Users page (Admin Home > Internal Users) or from My Profile if they have proxy logged in as that user.
Application Administrators or FullAccess users with User Administration permissions can reset a user's password, enter or update a user's personal information, preferences, settings, group associations, and access permissions.

The following properties are available for the User Detail page:
 Personal Information
| Property | Description |
|---|---|
| *Login |
The username that the user will use to login to the system. The Login cannot be the same login as any other user on the site and can be changed after the user is created. |
| Password |
The password that the user will use to log in to the site. The Reset Password button will allow the admin to reset the user’s password. The new password will be emailed to the user. Refer to Reset Password. |
|
The email address of the user. If applicable, the system will send approval notifications and broadcast emails to this email address.
|
|
| *First Name | The user’s first name. |
| Last Name | The user’s last name. |
| Phone | The user’s phone number. |
| Fax | The user’s fax number. |
| Job Title | The user’s job title. |
| *Company Name | The user's company name |
 Preferences
| Property | Description |
|---|---|
| Language Preference | The user’s preferred language. The admin can choose from a list of the site’s supported languages. The user will see system defined strings on both the admin and user side of the application in this language. For more information on languages and translations, see the topic Internationalization Overview. |
| Currency Preference | The user’s preferred currency. The user can choose from a list of the site’s supported currencies. With a few exceptions, all Transactions created by the user will use the user’s preferred currency. For more information on these exceptions and how Transaction currency can be determined, see the topic Selecting Transaction Currency. |
| Time Zone | The user’s time zone. The user will see all dates/times within the system based on his/her Time Zone. Refer to Time Zones for a complete list of supported time zones. |
| Number Format |
The user’s preference for how decimals are separated in Configuration and Commerce Float attributes (whether the radix point is a period or a comma). The admin can choose between ####.## where a period is the decimal separator and ####,## where a comma is the decimal separator.
|
| Date/Time Format |
The user’s date and time format preference. The user will see dates formatted within the application in accordance with his/her preference. The admin can choose between several Date/Time Format options:
Note: A user’s Date/Time Format setting will not be used in places within the application where date and time format can be explicitly set by the admin, such as in a Document Designer or Email Designer output. |
 User Settings
| Property | Description |
|---|---|
| Type | The user type of the user. For more information on user types, see the topic User Administration Overview topic. |
|
Status |
Displays if the user login is Active or Inactive |
| Enable for SSO |
If the User is enabled for Single Sign-On (SSO) login and the site is enabled for Single Sign-On (SSO), the user can access login via this method. If the External SSO ID is set, it will be used for SSO, otherwise the User's Login will be used. The site must have SSO enabled or the user's Enable for SSO field will not be available. To get to the site's Single Sign-On Settings page, navigate to Admin Home page > Integration Platform section > Single Sign-On.
|
| Web Services Only |
Web Services Only When selected, the user can only access the system by logging in through the SOAP or REST APIs. The user will not be able to access the Oracle CPQ user interface. When selected, this user will be licensed under the API Call metric and not included in the user licensing count. In addition, once the maximum number of licenses is allocated, Web Services Only users can still be added to the site. For more information on Oracle CPQ Web Services see the topics An Overview of Web Services 2.0 and SOAP APIs and REST API Overview topics. |
 Permissions
User permissions are only able to be set by FullAccess users with Application Administrator permission or FullAccess users with User Adminstrator permission.
| Property | Description |
|---|---|
| User Administrator |
This permission allows the user to create new users and modify other users.
|
|
Access Administrator |
This permission allows the user to create and edit Administrator Groups.
|
| Allow Proxy Login |
This permission allows administrators to log in as another user to verify changes to their setup or isolate issues reported by users.
|
| Application Administrator |
This permission allows a host company user Application Administrator capabilities and the ability to grant/remove Application Administrator permissions from another user. |
For more information on permissions, refer to User Permissions.
 Additional Settings
| Property | Description |
|---|---|
| Units | The user’s unit-type preference. The user will see this unit-type preference as the default unit for all numeric Configuration attributes that are tied to a Conversion Class. The admin can choose either the System Default unit-type to show (which will be either English or Metric), or English or Metric units to be shown as the default unit. For more information on units and Conversion Classes in CPQ, see the topic Unit Conversions. |
| Javascript/Advanced HTML Opt-In |
While Oracle CPQ does not endorse or guarantee the use of JavaScript customizations, we recognize that some customers have extended the Oracle CPQ. Customizations may present a security risk, conflict with new Oracle CPQ platform features, data may be corrupted or lost, maintenance and support may be difficult, cross-browser support must be verified, performance may be impaired, and testing is required for each upgrade. Customers should consider carefully the relative benefits of JavaScript customizations in light of the associated risks. Administrators must opt in to add customized advanced HTML/JavaScript to the site. This checkbox must be selected in order for the user to add or modify customized JavaScript or Advanced HTML scripts. If a user attempts to add custom advanced HTML without this setting selected, an error message displays indicating the opt-in setting is required. When this occurs the JavaScript/HTML content is blocked from entry. The user can remove the JavaScript/Advanced HTML content or opt in. This setting reminds users of the risks associated with JavaScript/Advanced HTML customizations and they take responsibility for the risks to their site. |
| Notifications |
When Email is selected for Notifications the user will receive approval notification emails, Submit sub-action notification emails, and Transition Rule notification emails from the system. When Email is not selected, the user will not receive any notification emails from the system, even if the criteria to send him/her a notification email is met. Note: Users that elect not to receive notification emails from the system will still receive Broadcast Emails. |
| Delegated Approver | The active user that will receive the same approval notifications as the user and can approve or reject Transactions on his/her behalf. Typically the Delegated Approver is set by the user when he/she will be out of the office and cannot access the system to perform his/her approvals. Refer to Delegated Approvers. |
 Associations
This section is only able to be viewed or edited by Administrators with access to user group administration. For information about Groups, see the topic Setting Up Groups.
| Property | Description |
|---|---|
| Sales Group List | The Sales Group List shows all the active sales groups on the site, while Selected Sales Groups shows the sales groups that the user is a member of. Selecting a Group in either list and then clicking the arrow button that points to the opposite list will move the Group to the opposite list. |
| Administrator Group |
The Administrator Group List shows all the active administrator groups on the site, while Selected Administrator Groups shows the administrator groups that the user is a member of. |
 Address
| Property | Description |
|---|---|
| Bill To Fields |
The user’s address for billing. For Host Company users, Bill To fields are not typically used as an actual billing address, but rather they are typically used to give sales rep contact information attributes values on Transactions. All Bill To fields are system variables and can be referenced as attribute defaults and in BML functions. |
| Ship To Fields |
The user’s address for shipping, which can be set to use the Bill To address information by selecting the Same as Bill To checkbox. For Host Company users, Ship To fields are not typically used as an actual shipping address, but rather they are typically used to give sales rep contact information attributes values on Transactions. All Ship To fields are system variables and can be referenced as attribute defaults and in BML functions. |
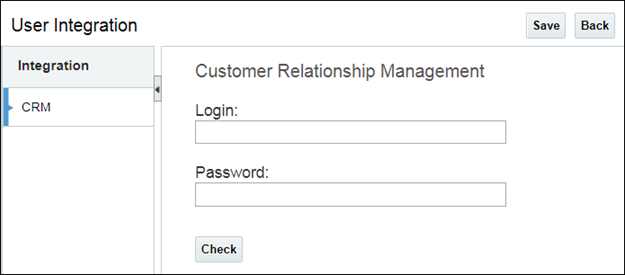
On sites that are set up for integration, for example with a CRM such as Salesforce or with DocuSign eSignature, a User Integration button exists on the bottom of the Admin tab of the User Administration page.

Clicking User Integration opens the User Integration page.

The User Integration page is used to store partner login credentials and to generate or revoke the user’s OAuth tokens.
For more information on the User Integration page, see User Integration.
For more information on the integrations that utilize the User Integration page, see Integration Center.


