Overview
Oracle CPQ – Oracle Commerce Cloud Self-Service Portal integration provides authoritative and consistent self-service experiences that reflect the state of the relationship of the self-service user with the business. This integration provides the ability to publish a quote from Oracle CPQ to the Oracle Commerce Cloud self-service portal to enable buyers and sellers to collaborate on a common open platform. Oracle Commerce Cloud buyer contacts can add their comments on specific parts of the proposal, that can be reviewed and commented back by CPQ sales users, and then incorporated appropriately on the CPQ quote transaction.
Quotes can be initiated from Oracle CPQ or the Oracle Commerce Cloud Self-Service portal.
-
Oracle CPQ Buyer Initiated Flow
When an Oracle Commerce Cloud buyer publishes a quote, a quote publication request is sent to Oracle CPQ. Upon receiving the request, the Oracle CPQ sales user can perform the Publish Quote action.

-
Oracle Commerce Cloud Self-Service Portal Seller Initiated Flow
Alternatively, an Oracle CPQ sales user can initiate the Publish Quote action without a request from an Oracle Commerce Cloud buyer.
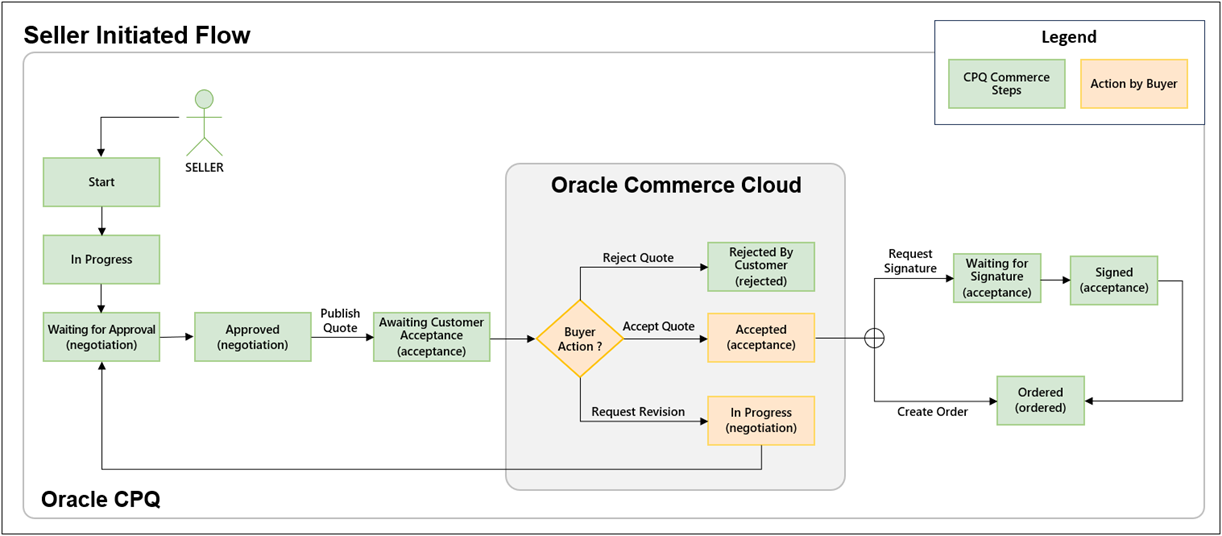
When a quote is published in Oracle CPQ, the quote is sent to Oracle Commerce Cloud, and the buyer is expected to perform one of the following actions:
-
Accept Quote – This action marks the quote as accepted by buyer by transitioning the quote into 'Accepted By Customer' step, changing the Customer Status to Acceptance and assigning the quote to the seller.
-
Reject Quote – This action will terminate the quote. Comments for the rejection reason can added to the quote or individual line items. The buyer comments are saved to the CPQ quote and/or the applicable transaction line items.
-
Request Revision - This action will send the quote back to Oracle CPQ for updates. Comments for revision requests can added to the quote or individual line items. The buyer comments are saved to the CPQ quote and/or the applicable transaction line items. After an Oracle CPQ sales user updates the quote and performs the Publish Quote action, the quote is sent back to Oracle Commerce Cloud for buyer acceptance, rejection, or revision request.
Oracle Commerce Cloud Self-Service Checkout for Buyer Accepted Quotes
Beginning in Oracle CPQ 24D, Oracle Commerce Cloud (OCC) buyers initiate the checkout process to create an order for a buyer accepted quote directly from the Self-Service Portal. The OCC self-service checkout for buyer accepted quotes flow streamlines checkout process for buyer accepted quotes. After an OCC buyer accepts a quote, they can select the Checkout option. When checkout is initiated, the OCC buyer can view the list of products with the appropriate pricing and discounting from the CPQ source quote.
During checkout, the OCC buyer can apply additional promotions and gift cards, if applicable. In CPQ, the source quote is updated to indicate that self-service checkout has been initiated from OCC. On checkout, the OCC buyer provides all the necessary shipping, billing, and payment information required to complete the ordering process.
On successful order completion, all required fields for the source quote are updated in CPQ.
The Self Service Checkout action is invoked when the order is placed from an external system to update the CPQ transaction.
- The step is transitioned from Awaiting Customer Acceptance to Cancelled.
- The Assigned To attribute is set to Buyer.
- The Customer Status attribute is updated to External order.
- The Status attribute is set to External Order.
Share Quote Proposal Documents with Oracle Commerce Cloud Self-Service Portal Buyers
Oracle CPQ 24D provides additional functionality for proposal documents that are attached to CPQ quotes and published to the Oracle Commerce Cloud (OCC) Self-Service Portal. OCC buyers can view and request on-demand proposal documents from the Self-Service Portal. The new generation process for proposal documents increases efficiency for OCC buyers and lowers the cost of sales for CPQ sellers.
-
OCC buyers can request a proposal document for products from the Self-Service Portal Cart. When the request is sent, CPQ automatically generates and sends a quote to Self-Service Portal, and the OCC buyer is redirected to the quotes list page.
-
OCC buyers can also submit requests for a new or updated proposal documents for quotes that are in the Acceptance phase, CPQ automatically generates and sends the requested proposal document.
-
To view the proposal document, OCC buyers can select quote to review from the Quotes List page and then click Download Proposal Document to review the attached proposal document.
Order Capture for Oracle Commerce Cloud Self-service Direct Orders
Oracle CPQ 25A supports direct order capture for Oracle CPQ – Oracle Commerce Cloud (OCC) Self-Service Portal integrations. This feature allows Oracle CPQ – Oracle Commerce Cloud integrated customers to leverage CPQ's order capture functionality. When an OCC buyer creates a direct pre-priced order using the self-service checkout process, the order is captured as a CPQ transaction and submitted to a downstream order fulfillment system (e.g. Oracle Order Management). The pre-priced direct order from the OCC Self-Service Portal will bypass the standard quote approval flow. Oracle CPQ captures the following items:
- Transaction/Header
- Order Level promotional discounts
- External Order id / Source Order Id
- Tax information (type and amount)
- Transaction Line
- External item id / source item id
- Prorated line item discount from Order level promotions
- Tax prices and tax charges
- Line shipping address
- Shipping methods (shipping carrier, service, mode of transport)
- Shipping charges
Productized eSignature Flows for Oracle Commerce Cloud Self-Service Integrations
Beginning in Oracle CPQ 25A, eSignature requests are automatically initiated when an OCC buyer accepts a quote. OCC buyers can also view relevant status values on DocuSign. Oracle CPQ representatives no longer need to initiate eSignature requests for OCC buyer accepted quotes.
Oracle CPQ 25B provides the following enhancements for eSignature flows in Oracle Commerce Cloud Self-Service Portal integrations:
- Automate signature request upon quote acceptance from the OCC buyer
- Allow OCC self-service checkout upon eSignature acceptance
- Expose eSignature Details and comments to OCC self-service buyers
- Add eSignature flow comments and generate an automatic comment when all approvers provide eSignature acceptance
Oracle CPQ 25C enables the following eSignature flow enhancements for Oracle Commerce Cloud (OCC) Self-Service Portal integrations:
- Allow OCC Self-Service Portal user to Cancel Signature request.
- Allow OCC Self-Service Portal user to Revise Quote and/or Request Signature again if request expires.
- Allow OCC Self-Service Portal user to Revise Quote and/or Request Signature again if request is declined/rejected by signee.
- Allow OCC Self-Service Portal user/sales user to assign the quote to Seller.
- Allow OCC to validate the maximum number of approvers configured in Oracle CPQ.
These enhancements provide a more automated and collaborative eSignature flow solution for Oracle CPQ – Oracle Commerce Cloud Self-Service Portal integrations.
Automated Cancel Request for Oracle Commerce Cloud Rejected Renewals
Beginning in Oracle CPQ 25C, CPQ will generate automated cancellation requests to Oracle Subscription Management when a renewal quote is rejected in the OCC Self-Service Portal. The cancellation request cancels the CPQ quote line, associates the cancellation reason to the request, and updates the Oracle Subscription Management renewal subscription line. This feature automates the cancellation of rejected Renewals in a self-service flow.
Administration
For integration setup between OCC, IDCS, OIC and CPQ, refer to How do I get started with the Revenue Transformation Solution?
Note: The OCC-CPQ Integration for Self-Service Portal flows are only supported on Standard Processes.
![]() Enable Commerce Process Order and Agreement Stages
Enable Commerce Process Order and Agreement Stages
-
Navigate to CPQ > Admin > Process Definition.
-
Click on the applicable Commerce process link.
-
Check the following Stage setting options:
-
Order
-
Agreement
-
-
Click Apply or Update.
Notes:
-
The Order stage is automatically enabled for newly created Standard Processes beginning in CPQ 24D.
-
Once the Order stage is enabled for a Standard Process it can't be disabled.
![]() Add Actions and Attributes to the Transaction Layout
Add Actions and Attributes to the Transaction Layout
-
Navigate to: CPQ > Admin > Process Definition > Documents > Transaction > JET Responsive Layout
Refer to Commerce Layout Editor for detailed instructions
-
Add the following transaction actions to the Transaction UI layout.
- Generate Proposal
- Publish Quote
- Revise Quote
- Submit
-
Add the following transaction attributes to the Transaction UI layout.
- Assigned To
- Business Unit ID
- Checkout Access Enabled
- Contact Email Address
- Contact First Name
- Contact Last Name
- Contact Name
- Customer ID
- Customer Status
- Host Company Full Name
- Is E-signature Enabled
- Is Published
- Skip Seller Review
- Source Of Transaction
-
Add the transaction Comments Array Set to the Transaction UI:
-
Configure Display Add Button and Display Remove Button as required.
-
Enable Editable option for applicable array set attributes.
-
-
Add the transaction eSignature Table to the Transaction UI.
-
Click Save.
![]() Enable OCC Self Service Portal Flows Standard Processes created prior to CPQ 24C
Enable OCC Self Service Portal Flows Standard Processes created prior to CPQ 24C
-
Navigate to CPQ > Admin > Process Definition > Data Columns.
-
Add the following data columns.
Refer to Data Columns for detailed instructions.
Attribute
Search & Report Label
Indexed?
Transaction: Contact Party Number (
_s_contactPartyNumber_t)Customer Party Number
No
Transaction : Assigned To (
_s_assignedTo_t)Assigned to
No
Transaction : Customer Status (
_s_customerStatus_t)Customer Quote Status
Yes
Transaction: Source Of Transaction (
_s_sourceOfTransaction_t)Source Of Transaction
No
Transaction: Is Published (
_s_isPublished_t)Is Published
No
Transaction: Contact Name (
contactName_t)Contact Name
No
Transaction: Host Company Full Name (
_s_hostCompanyFullName_t)Host Company Full Name
No
![]() Add Commerce Process Integrations
Add Commerce Process Integrations
-
Navigate to CPQ > Admin > Process Definition > Integrations.
-
Add the following Commerce integrations.
-
Update Customer Status and Visibility
-
Variable Name:
updateCustomerStatusAndVisibility -
Integration Type: BML
-
Run Type: Always Run
-
Script:
return commerce._s_updateCustomerStatusAndVisibility();
-
-
Publish and Notify Quote
-
Variable Name:
publishAndNotifyQuote -
Integration Type: BML
-
Run Type: Always Run
-
Script:
return commerce._s_publishAndNotifyQuote();
-
-
Integration-Action Associations
Associate Commerce integrations to the applicable actions, refer to Commerce Integrations for detailed instructions.
-
Navigate to CPQ > Admin > Process Definition > Documents > Transaction > Actions.
-
Select the applicable action.
-
Click on the Integrations tab.
-
Verify the Selected Integrations are listed in the specified order for the following actions:
Action Variable Name Selected Integrations Accept Quote
_s_accept_quote
-
Apply Modify Functions
-
Update Customer Status and Visibility (BML)
Approve
approve_submit_t
Create Order
order_start
Reject Quote
order_reject
Revise Quote
_s_request_quote_revision
Save
cleanSave_t
Submit
submit_t
Publish Quote
_s_publish_quote
-
Apply Modify Functions
-
Update Customer Status and Visibility (BML)
-
Publish and Notify Quote (BML)
-
-
If applicable, click Apply or Update.
-
Navigate to CPQ > Admin > Process Definition > Transaction > Steps.
-
Add or update the following workflow steps.
Refer to Workflow Steps for detailed procedures.
Step Variable Name Stage Comments Draft Order
draftOrder
Order
Add new step and set the Stage to Order
Ordered
orderedBeingFulfilled
Order
Update the Stage to Order
Fulfilled
closedFulfilled
Order
Update the Stage to Order
Agreement Finalized
agreementFinalized
Agreement
Add new step and set the Stage to Agreement
Order Cancelled
orderCancelled
Order
Add new step and set the Stage to Order
![]() Add Workflow Participant Profiles & User Access Rights
Add Workflow Participant Profiles & User Access Rights
-
Navigate to CPQ > Admin > Process Definition > Transaction > Steps.
Refer to Participant Profiles and User Access Rights for detailed procedures.
-
Add the Self Service User participant profile to all workflow steps.
-
Select the Participant Profile User Access Rights tab.
-
Select the following access rights for the Self Service User in all workflow steps:
- FullAccessWithESales : RestrictedAccess
- BuyAccess : RestrictedAccess
- Verify there is an Admin or Default participant profile present all workflow steps. If not, add the applicable participant profile.
- Verify the following access rights for the Admin or Default participant profile in all workflow steps:
- FullAccessWithESales : FullAccess
- Verify the following access rights for the Sales User participant profile in all workflow steps:
- FullAccessWithESales : SalesAgent
- Select the Draft Order step.
- Select the Set step as an initial step for the selected participant profile
option for the following participant profiles:
- Admin
- Self Service User
-
Navigate to CPQ > Admin > Process Definition > Transaction > Steps.
Refer to Document Views for detailed procedures.
-
Set the Document View for the following workflow steps and profiles
| Step | Profile | Transaction Action Access | Transaction Attribute Access | Transaction Line Attribute Access |
|---|---|---|---|---|
|
Start |
Self Service User |
Active:
|
Read/Write:
Read-Only:
|
Read/Write:
Read-Only:
|
|
Admin |
Active:
|
Read/Write:
|
||
|
Self Service User |
Active:
Inactive:
|
Read/Write:
Read-Only:
|
Read-Only:
|
|
Awaiting Customer Acceptance |
Self Service User |
Active:
|
Read/Write:
Read-Only:
|
Read-Only:
|
|
Self Service User |
|
||
|
Self Service User |
Active:
|
Read/Write:
Read-Only:
|
Read-Only:
|
![]() Add Workflow Step Transition Rules
Add Workflow Step Transition Rules
-
Navigate to CPQ > Admin > Process Definition > Transaction > Steps.
Refer to Transition Rules for detailed procedures.
-
Set the Transition Rules for the following workflow steps and profiles
| Initial Release | Step | Participant Profile | Name | Action | Condition | Transition To Step |
|---|---|---|---|---|---|---|
| 24C |
Approved |
Sales User |
Publish Quote -> Awaiting Customer Acceptance |
Publish Quote |
Always Return True |
Awaiting Customer Acceptance |
|
Awaiting Customer Acceptance |
Self service user |
Accept Quote -> Customer Accepted |
Accept Quote |
Always Return True |
Customer Accepted |
|
|
Self service user |
Reject Quote -> Rejected By Customer |
Reject Quote |
Always Return True |
Rejected By Customer |
||
|
Self service user |
Request Revision -> In Progress |
Revise Quote |
Always Return True |
In Progress |
||
|
Customer Accepted |
Sales User |
Create Order -> Ordered |
Create Order |
Always Return True |
Ordered |
|
|
Sales User |
Request Signature -> Waiting for Signature |
Request Signature |
Always Return True |
Waiting for Signature |
||
| 24D |
|
Sales User |
Revise Quote -> In Progress |
Revise Quote |
Always Return True |
In Progress |
|
Awaiting Customer Acceptance |
Self Service User |
Self Service checkout -> Cancelled |
Self Service checkout |
Always Return True |
Cancelled |
|
|
Start |
Admin |
Save -> Awaiting Customer Acceptance |
Save |
return (_transaction_s_skipSellerReview_t == true); |
Awaiting Customer Acceptance |
|
|
Start |
Admin |
Save -> In Progress |
Save |
Add condition: return (_transaction_s_skipSellerReview_t == false); |
In Progress |
![]() Enable Pre-Priced Orders from OCC Self-Service Portal
Enable Pre-Priced Orders from OCC Self-Service Portal
Perform the following procedures to enable pre-priced orders from OCC Self-Service Portal:
![]() Enable the Order Stage for a Commerce Process
Enable the Order Stage for a Commerce Process
-
Navigate to CPQ > Admin > Process Definition and click on the applicable Commerce process.
-
Check the Order Stage option.
-
Click Apply or Update.
![]() Add Attributes to the Transaction Layout
Add Attributes to the Transaction Layout
Refer to Layout Editor for detailed instructions.
-
Navigate to CPQ > Admin > Process Definition > Documents > Transaction > JET Responsive Layout.
-
Add the following header/transaction attributes to the Transaction UI layout.
- Is Tax Present
- Is Tax Inclusive
- Tax Amount
- Total Transaction Value Including Tax
- Booked Order Transition Id
- Primary Source System
- Reference Source Order Id
- Source Quote Id
- Prorated Order Level Discount
-
Add the following line item attributes to the Line Item Grid.
- Ship To Party Id
- Ship To Party Site Id
- Shipping Group
- Shipping Carrier Name
- Shipping Mode of Transport
- Shipping Service Level
- Shipping Instructions
- Reference External Item Id
- Tax Price
- Tax Price Rollup
- Total Price
- Total Price Rollup
- Total Amount
- Total Amount Rollup
- Total Contract Price Rollup
- Total Price Excluding Tax
- Total Amount Excluding Tax
- Tax Calculation Info
- Unit Prorated Order Discount
- Total Prorated Order Discount
-
Click Save.
-
If desired, add line item attributes to the Transaction Line Details page.
-
Navigate to CPQ > Admin > Process Definition > Documents > Transaction Line > JET Responsive Layout.
-
Add desired line item attributes (listed Step 3) to the Transaction Line Details layout.
-
Click Save.
-
![]() Disable Required Transaction Line Item Price
Disable Required Transaction Line Item Price
Perform this procedure to allow the creation of orders for configurations that have children with zero price values.
-
Navigate to CPQ > Admin > Process Definition > Documents > Transaction Line > Attributes.
-
Open the Price Attribute Set.
-
Open the Item Price (_price_item_price_each) attribute.
-
Uncheck the Required option.
-
Click Apply or Update.
Perform this procedure to synchronize the Transaction Line Charge Array Set with the pricing charge schema, which is comprised of standard and extensible custom charge attributes.
-
Navigate to CPQ > Admin > Process Definition > Documents > Transaction Line > Attributes.
-
Click Synchronize Charge Array Set at the bottom of the Attribute List page.
![]() Update Commerce Workflow Items
Update Commerce Workflow Items
Note: This procedure is only required for existing Pre-25A Standard Processes. This procedure is not required for newly created Standard Processes beginning in Oracle CPQ 25A.
-
Navigate to CPQ > Admin > Process Definition > Steps.
-
Add a Draft Order step.
Refer to Oracle CPQ Administration Online Help > Commerce > Workflow > Workflow Steps for detailed procedures.
-
Variable Name: draftOrder
Note: If you receive an error stating that "draftOrder" is an invalid custom variable name and it must end with "_c", submit a Service Request (SR) on My Oracle Support to disable the "_c" suffix on variable names for custom Commerce entities.
-
Stage: Order
-
-
Add the Admin participant profile to Draft Order step.
Refer to Participant Profiles and User Access Rights for detailed procedures.
-
Set User Access Rights to FullAccessWithESales : FullAccess
-
Unselect the Performance Steps - Start Step option.
-
-
Update the Ordered step settings, Admin profile settings, and transitions.
Refer to Workflow Steps, Participant Profiles, and Transition Rules for detailed procedures.
-
Set the Ordered step Stage to Order.
Note: Step transitions in the Order stage can only transition to another step in the Order stage. If you receive an error stating the selected stage is not allowed due to transition rules(s), update the step transitions mentioned in the error so that all transitions are to steps in the Order stage only.
-
For the Admin profile, check Set step as an initial step for the selected participant profile.
-
Add a Transition Rule for the Admin profile.
-
Name: Create Order > Ordered
-
Action: Create Order
-
Transition to step: Ordered
-
-
Click Save.
-
-
Verify Admin profile Document Views for the following attributes:
Refer to Document Views for detailed procedures.
-
For the Draft Order > Admin profile, set the following transaction attributes to Read/Write.
-
For the Ordered > Admin profile, set the following transaction attributes to Read-Only.
- _customer_id
- _customer_t_first_name
- _customer_t_last_name
- _s_billToCustomerAccountID_t
- _s_proratedOrderLevelDiscount_t
- _s_shipToPartyID_t
- _s_shipToPartySiteID_t
- _s_soldToPartyID_t
- _s_soldToPartySiteID_t
- _tax_isTaxInclusive_t
- _tax_isTaxPresent_t
- _tax_taxAmount_t
- _txnRef_externalSourceOrderId_t
- _txnRef_primarySourceSystem_t
- _txnRef_sourceQuoteId_t
- billToSiteUseId_t
- businessUnitId_t
- contractEndDate_t
- currency_t
- oRCL_ERP_PartialShipAllowed_t
- orderDate_t
- paymentTerms_t
-
For the Draft Order > Admin profile, set the following transaction line attributes to Read/Write.
-
For the Ordered > Admin profile, set the following transaction line attributes to Read-Only.
- _chargeSet_chargeDefIntegrationId
- _chargeSet_chargeType
- _chargeSet_discountAmount
- _chargeSet_discountType
- _chargeSet_discountValue
- _chargeSet_netAmount
- _chargeSet_netPrice
- _chargeSet_priceType
- _chargeSet_taxCalculationInfo
- _chargeSet_taxPrice
- _chargeSet_totalAmountInclTax
- _chargeSet_totalPriceInclTax
- _chargeSet_unitPrice
- _chargeSetControl
- _configuration_id
- _part_number
- _price_book_var_name
- _price_item_price_each
- _price_quantity
- _price_unit_price_each
- _s_totalProratedOrderDiscount_l
- _s_unitProratedOrderDiscount_l
- _shipping_shipCarrierName_l
- _shipping_shipModeOfTransport_
- _shipping_shippingGroupId_l
- _shipping_shippingInstructions_l
- _shipping_shippingServiceLevel_l
- _shipping_shipToPartyId_l
- _shipping_shipToPartySiteId_l
- _tax_calculation_info
- _tax_taxPrice_l
- _tax_totalAmount_l
- _tax_totalAmountMinusTax_l
- _tax_totalPrice_l
- _tax_totalPriceMinusTax_l
- _txnRef_externalLineId_
- _txnRef_externalLineId_l
- contractDiscount_l
- contractEndDate_l
- contractListValue_l
- contractStartDate_l
- contractValue_l
- customDiscountAmount_l
- customDiscountType_l
- customDiscountValue_l
- discountAmount_l
- fulfillmentOrganizationCode_l
- listAmount_l
- listPrice_l
- netAmount_l
- netPrice_l
- paymentTerms_l
- requestedUnitOfMeasure_l
- requestShipDate_l
-
-
Navigate to CPQ > Admin > Process Definition > Deployment Center.
-
Select the Deploy Event Type, and then click Add Event.
![]() Add Shipping Charge Definition in CPQ Pricing Portal
Add Shipping Charge Definition in CPQ Pricing Portal
Refer to Lookups and Charge Definitions for detailed procedures.
-
Add a Shipping Freight lookup value to the Charge Types Lookup.
-
Navigate to CPQ > Admin > General > Lookups.
-
Open the Charge Types Lookup.
-
Add a Shipping Freight lookup value.
-
Displayed Text: Shipping Freight
-
Code: ORA_SHIPPING_FREIGHT
-
Description: Shipping Freight Charge
-
Integration ID: ORA_SHIPPING_FREIGHT
-
-
-
Add a One time Shipping Price Charge Definition.
Note: Charge Definitions must be enabled in the CPQ Pricing Portal. If Charge Definitions are not enabled, refer to Enable Charge Definitions.
-
Navigate to Admin > Pricing Portal > Charge Definitions.
-
Add a shipping Charge Definition.
-
Label: One time Shipping Price
-
Code: QP_SHIP_FREIGHT_c
-
Integration ID: QP_SHIP_FREIGHT
-
Price Type: One time
-
Charge Type: Shipping Freight
-
-
![]() Enable eSignature Flows for OCC Self-Service Portal Integrations
Enable eSignature Flows for OCC Self-Service Portal Integrations
Perform the following procedures to enable automatically initiated eSignature flows from OCC Self-Service Portal:
![]() Update the Generate Proposal Action
Update the Generate Proposal Action
Refer to Actions for detailed instructions.
-
Navigate to CPQ > Admin > Process Definition > Documents > Transaction > Actions.
-
Open the Generate Proposal action, then update the following options:
-
Save Document Upon Printing – Desktop: Save – Automatically
-
Save Document to File Attachment Attribute: eSignature File Attachment [eSignature Attribute Set] (_eSignatureAttributeSet_esig_file_attachment)
-
-
Click Apply or Update.
![]() Expose eSignature Attributes and Actions
Expose eSignature Attributes and Actions
-
Navigate to CPQ > Admin > Process Definition > Documents > Transaction > Attributes.
Refer to eSignature Attribute Set for detailed instructions.
-
Open the eSignature Attribute Set.
-
Open the following attributes, select the Document Views tab, then set the access permission as listed below.
Attributes
Step
Self service profile
Sales user profile
esig File Attachment
esig Date Modified
esig Status
All steps
Read only
Read only
esig Recipients
Awaiting Customer Acceptance
Read/Write
Read only
All other steps
Read only
Read only
esig Envelope ID
All steps
Hide
Hide
Assigned To
Checkout Access Enabled
Awaiting Customer Acceptance
Read/Write
-
Customer Accepted
Read/Write
-
Signed
Read/Write
-
Comments Array
- Commenter
- Message
- Activity Date
- Is Internal Comment
- Type
All steps
Read/Write
Read/Write
-
Navigate to CPQ > Admin > Process Definition > Documents > Transaction > Actions.
Refer to Actions for detailed instructions.
-
Open the eSignature Action Set.
-
Open the following actions, select the Document Views tab, then set the access options as listed below.
Actions
Step
Self service profile
Sales user profile
Request Signature
Customer Accepted
Active
Active
Awaiting Customer Acceptance Active Active Rejected
Active
Active
All remaining steps
Hidden
Hidden
Details Waiting for Signature Active
Active
Signed Active
Active
Ordered Active
Active
Fulfilled Active
Active
Cancel Signature Request
Waiting for Signature
Hidden
Active
All remaining steps
Hidden
Hidden
Revise Quote
Rejected
Active
Active
![]() Update the BML Script for the Publish Quote Action
Update the BML Script for the Publish Quote Action
Refer to Actions for detailed instructions.
-
Navigate to CPQ > Admin > Process Definition > Documents > Transaction > Actions.
-
Open the Publish Quote action.
-
Select the Override Standard Advanced Modify - After Formulas option, then click Apply.
-
For Advanced Modify - After Formulas, click Define Function.
-
Click Reselect, then select the Variable Name for (Transaction) tab.
-
Select the "_transaction_eSignatureAttributeSet_esig_file_attachment" attribute.
-
Deselect the "fileAttachment_t attribute".
-
-
Click Next.
-
Replace all "
fileAttachment_t" references in the BML script with "_transaction_eSignatureAttributeSet_esig_file_attachment". -
In the BML window, click Save and Close.
-
Click Apply or Update for the Publish Quote action.
![]() Enable CPQ Commerce Access Rules for eSignature Self Service Flows
Enable CPQ Commerce Access Rules for eSignature Self Service Flows
Refer to Access Rules for detailed instructions.
-
Navigate to CPQ > Admin > Process Definition > Documents > Transaction > Rules.
-
Set the Status to Active for the following rules:
-
Hide Actions if Esign Disabled for SelfService Flows
-
Hide Actions if Esign Enabled for SelfService Flows
-
![]() Add Workflow Step Transitions for eSignature Self Service Flows
Add Workflow Step Transitions for eSignature Self Service Flows
Refer to Workflow Steps, Participant Profiles, and Transition Rules for detailed procedures.
-
Navigate to CPQ > Admin > Process Definition > Steps.
-
Add following step transition rules:
Workflow Step
Action
Profile
Step transition Name
Condition
Transition to Step
Awaiting Customer Acceptance
Request Signature
Self Service User, Sales User, and other profiles with Docusign token to request signatures
Request Signature > Waiting for Signature
No condition: Always true
Waiting for Signature
Customer Accepted
Waiting for Signature
Receive
Self Service User, Sales User, and other profiles with Docusign token to request signatures
Receive Signature > Signed
return _transaction_eSignatureAttributeSet_esig_status=="Signed";
Signed
Waiting for Signature
Receive
Self Service User, Sales User, and other profiles with Docusign token to request signatures
Receive Signature > Rejected By Customer
return _transaction_eSignatureAttributeSet_esig_status=="Rejected";
Rejected By Customer
Waiting for Signature
Receive
Self Service User, Sales User, and other profiles with Docusign token to request signatures
Receive Signature > Awaiting Customer Acceptance
return _transaction_eSignatureAttributeSet_esig_status=="Cancelled";
Awaiting Customer Acceptance
Waiting for Signature
Cancel Signature Request
Sales User
Cancel Signature Request > Customer Accepted
No condition: Always true
Customer Accepted
Waiting for Signature
Cancel Signature Request
Self service user Cancel Signature > Awaiting Customer Acceptance No condition: Always true Awaiting Customer Acceptance Rejected By Customer
Revise Quote
Self service user
Revise Quote > In Progress
No condition: Always true
In Progress
Canceled Revise Quote Self service user Revise Quote > In Progress No condition: Always true In Progress Rejected By Customer Request Signature Self service user Request Signature > Waiting for Signature No condition: Always true Waiting for Signature Canceled Request Signature Self service user Request Signature > Waiting for Signature No condition: Always true Waiting for Signature
![]() Add Integration Associations for eSignature Actions
Add Integration Associations for eSignature Actions
Associate Commerce integrations to the applicable actions, refer to Commerce Integrations for detailed instructions.
-
Navigate to CPQ > Admin > Process Definition > Documents > Transaction > Actions > eSignature Action Set
-
Select the applicable action.
-
Click on the Integrations tab.
-
Verify the Selected Integrations are listed in the specified order for the following actions:
Action Variable Name Selected Integrations Request Signature
_action_esig_send
-
Apply Modify Functions
-
Update Customer Status and Visibility (BML)
Cancel Signature
_action_esig_cancel
Receive
_action_esig_receive
-
-
If applicable, click Apply or Update.
![]() Add Signature Tags to Document Designer Template
Add Signature Tags to Document Designer Template
Refer to DocuSign eSignature for detailed procedures.
-
Navigate to CPQ > Admin > Document Designer.
-
Select the applicable Process, and then open the template that is associated with Generate Proposal action.
-
Select a location in the document for signature tags.
Note: In Document Designer, you may need to add a Text Element first.
-
Create a signature tag by typing \s1, where "1" is the number of the signer.
You can add additional signature tags as required (e.g. \s2 \s3 .... \sn)
n = the number of signature tags in the Document Designer template
Note: The Request Signature action will fail if you exceed the maximum number of signers.
Refer to Configure Maximum Number of Recipients/Signers.
-
Save and deploy the template.
![]() Configure Maximum Number of Recipients/Signers
Configure Maximum Number of Recipients/Signers
Refer to Commerce Options for detailed procedures.
-
Navigate to CPQ > Admin > Commerce Settings.
-
If you need to update the maximum number of recipients/signers, modify the Doc Designer - Number of eSignature signers option.
-
Click Apply or Update.
-
Navigate to CPQ > Admin > Process Definition > Deployment Center.
-
Select the Deploy Event Type, and then click Add Event.
![]() Enable Automated Cancel Request for OCC Rejected Renewals Standard Processes created prior to CPQ 25C
Enable Automated Cancel Request for OCC Rejected Renewals Standard Processes created prior to CPQ 25C
Perform the following procedures to enable automated cancellation request for OCC rejected renewals:
![]() Add Workflow Step Transitions for Automated Cancel Request
Add Workflow Step Transitions for Automated Cancel Request
Refer to Workflow Steps, Participant Profiles, and Transition Rules for detailed procedures.
-
Navigate to CPQ > Admin > Process Definition > Steps.
-
Add following step transition rules:
Workflow Step
Action
Profile
Step transition Name
Condition
Transition to Step
Awaiting Customer Acceptance
Cancel Transaction
Self Service User
Cancel Transaction > Canceled
No condition: Always true
Canceled
![]() Add Integration Associations for Automated Cancel Request
Add Integration Associations for Automated Cancel Request
Associate Commerce integrations to the applicable actions, refer to Commerce Integrations for detailed instructions.
-
Navigate to CPQ > Admin > Process Definition > Documents > Transaction > Actions.
-
Select the applicable action.
-
Click on the Integrations tab.
-
Verify the Selected Integrations are listed in the specified order for the following actions:
-
If applicable, click Apply or Update.
Action Variable Name Selected Integrations Cancel Transaction
order_cancel
-
Apply Modify Functions
-
Update Customer Status and Visibility (BML)
-


