Data Columns
Overview
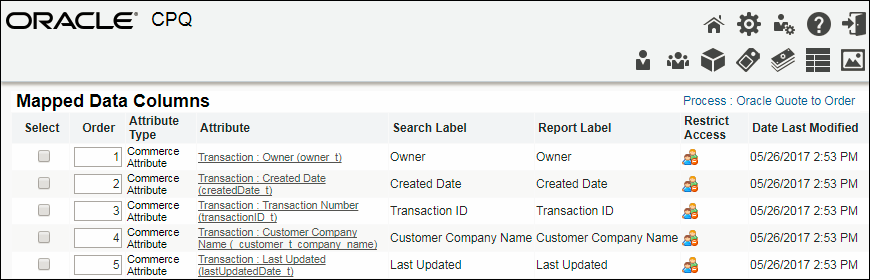
Data Columns are used to map attributes to document. Attributes can only be mapped to the document under which they are created. Data Column Mappings cannot have duplicates; an attribute can be mapped to only one document.
Data Columns are also used to create Process Manager Column mappings. They are also useful in Reporting and Search because both these functions can only be performed on data of attributes that have been mapped in the data columns.
Administrators can define data column indices. When an index is specified for a Data Column, searches against Transactions for that process prioritize searching by the indexed column. This capability improves REST API performance when filtering a large number of quotes.
Each Commerce Process can have 651 Data Column mappings.
-
251 Data Columns are available for main-document level Attributes.
There are 250 Data Columns and 1 Tab Column, located on the Process Edit page.
-
400 Data Columns are available for sub-document level Attributes.
These Data Columns can be mapped to sub-document attributes or Configuration attributes.
-
5 Data Column Indices are allowed per Commerce process. There is no limit per site.
Administration
 Add a Data Column
-
Navigate to the Admin page.
-
Click Process Definition in the Commerce and Documents section.
-
Select Data Columns from the Navigation menu for the applicable Commerce process, then click List.
-
Click Add.
The Edit Data Column page opens.
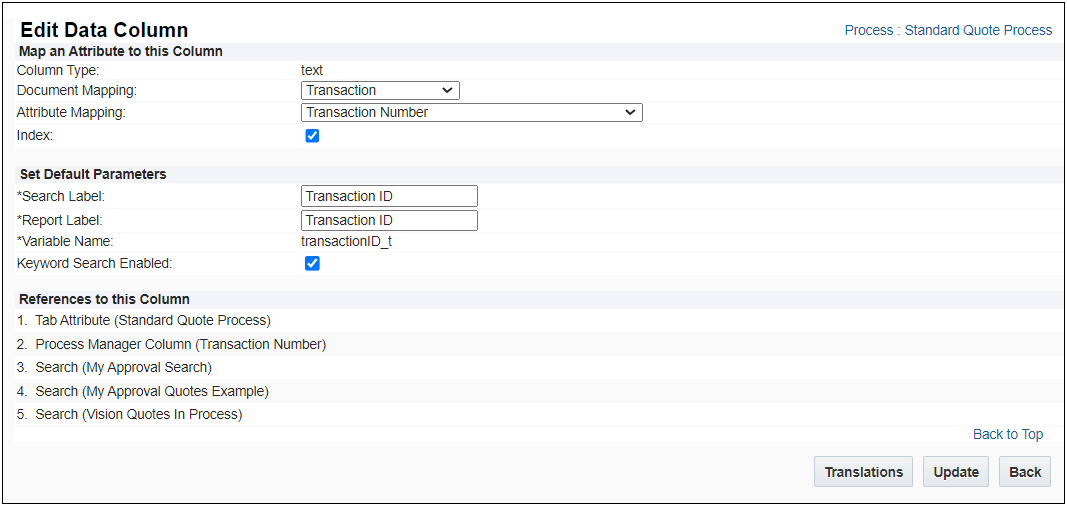
- In the Document Mapping drop-down, select the document (quote or line) to map an attribute to.
- In the Attribute Mapping drop-down, select the attribute to map to, based on the document selected in the previous step.
- Select Index to enable to an index for the Data Column.
-
Enter info in the Set Default Parameters section.
- Search Label Enter the text label that should appear in any Search results.
- Report Label Enter the text label that should appear on Reports, if enabled.
-
Variable Name Enter the variable name for the column.
The Variable Name field populates automatically. Variable names can only contain alpha-numeric characters and underscores. The entry can be changed before saving, but after saving the value is read-only.
If you return to edit at a later date, you'll see a list of where this data column is referenced. This includes Process Manager columns.
-
Select Keyword Search Enabled to the keyword search option on the Quotes List UI. This provides quick searches to enabled attribute items.
-
Click Add to save your changes or click Cancel to return to the Mapping Data Columns page without saving your changes.
If you have made changes to Data Columns in a process that has already been deployed, go to the Deployment Center to repopulate column data.
Add a Data Column Index
Administrators can define data column indices. When an index is specified for a data column, searches against Transactions for that process prioritize searching by the indexed column. Adding this capability improves REST API performance when filtering a large number of quotes.
-
Navigate to the Admin page.
-
Click Process Definition in the Commerce and Documents section.
-
Select Data Columns from the Navigation menu for the applicable Commerce process, then click List.
-
Click on the applicable Attribute link
-
Select the appropriate Attribute link.
The Edit Data Column page opens.
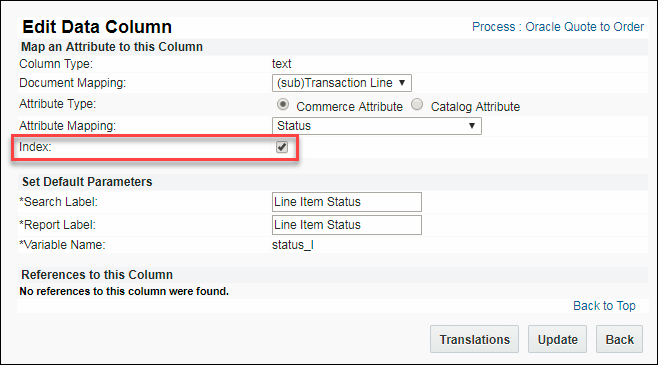
- Select Index to enable to an index for the Data Column.
-
Click Update to save your changes or click Back to return to the Mapping Data Columns page without saving your changes.
Only 5 Data Column Indices are allowed per Commerce process. There is no limit per site.
Reorder Data Columns
-
Navigate to the Admin page.
-
Click Process Definition in the Commerce and Documents section.
-
Select Data Columns from the Navigation menu for the applicable Commerce process, then click List.
- In the Order column, specify the order of the mapped data columns.
- Click Apply.
Translations
-
Navigate to the Admin page.
-
Click Process Definition in the Commerce and Documents section.
-
Select Data Columns from the Navigation menu for the applicable Commerce process, then click List
-
If your site has more than one language enabled, click Translations.
The Translations page opens.
-
Enter a translation for the Search Label and/or Report Label fields for each supported language.
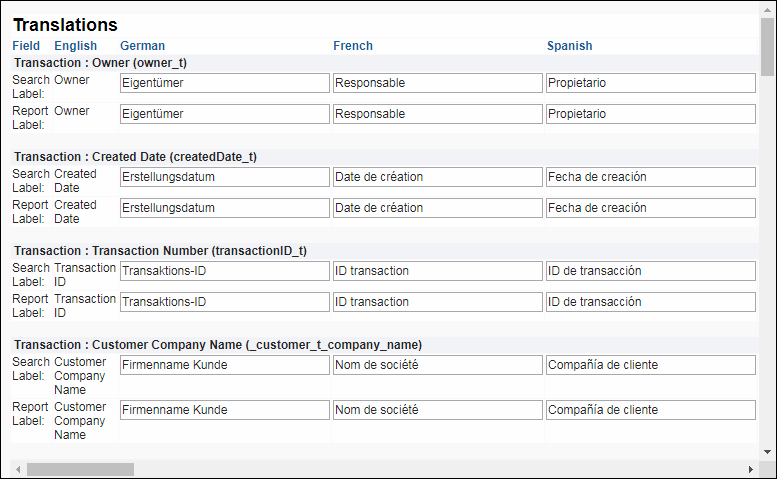
- Click Save and Close to return to the Mapped Data Columns page.
Restrict Access for Data Columns
Data columns can be hidden from certain users or groups in Reporting, Search and the Process Manager. The FullAccess User might choose to set up permissions on data columns to ensure that sensitive information mapped in the data columns is not visible to all users in Reporting, Search and/or the Process Manager.
-
Navigate to the Admin page.
-
Click Process Definition in the Commerce and Documents section.
-
Select Data Columns from the Navigation menu for the applicable Commerce process, then click List
-
For the data column you are interested in, click the users icon  in the Restrict Access column.
The Edit User Permissions dialog box appears.

-
In the Company Types drop-down, select a company type with users that you want to be able to perform the Copy action.
- In the User Types drop-down, select the user types who you want to be able to perform the Copy action.
- Click the greater than symbol ( > ) to move the selected Company Types:User Types set to the Hide for following user type box.
- Remove a Company Type: User Types set from the Hide for following user type box by selecting the set and clicking the less than symbol ( < ).
- In the Internal Groups section, select the group(s) for whom you want to restrict access and click the greater than symbol ( > ) to move them to the Hide for following groups box.
- In the External Groups section, select the group(s) for whom you want to restrict access and click the greater than symbol ( > ) to move them to the Hide for following Company: Group List box.
-
Click Save to save your changes and remain in the dialog box. Click Save and Close to save changes and return to the Mapping Data Columns page. Click Close to return to the Mapping Data Columns page without saving changes.
To remove restricted access, select a user/group and click the less than symbol ( < ).
Delete Data Columns
Admins have the ability to delete Data Columns without being required to undeploy the Commerce Process.
-
Navigate to the Admin page.
-
Click Process Definition in the Commerce and Documents section.
-
Select Data Columns from the Navigation menu for the applicable Commerce process, then click List
-
Select the Data Column you wish to delete by clicking its corresponding checkbox and click Delete.

Warning messages point users to any existing Column Mappings so dependencies can be removed.
Admins must re-populate data from existing columns, located in the Deployment Center.
Notes
-
For Attributes selected for Tab Label in the Process Manager:
Tab Labels are always visible to every user even if this attribute is mapped to a data column that is hidden from the logged in user.
-
For Restricted Data Columns as Condition Filters in Reporting/Search:
Report/Search results are only run on the condition filter attributes that the user has access to in the data columns. The FullAccess User must be aware that shared reports/searches might yield erroneous results for certain users if these users have been restricted from data columns that are used as condition filters in the shared reports/searches.
Notes:
-
Oracle CPQ Standard Process provides several pre-defined Data Columns, refer to Standard Process Data Columns.
-
The following Attributes cannot added to Data Columns.
- RTE Attributes
- HTML Attributes
- File Attachment Attributes
- History Attributes
- Attributes from Array Sets
Custom Variable Name Conventions
In Oracle CPQ 23D, CPQ adopted Oracle CX Sales variable naming conventions for custom items. When an administrator creates a new custom Commerce item, the "_c" suffix is appended to the variable name. The new naming convention for custom variable names provides more consistency for integrations with Oracle Sales.
Beginning in Oracle CPQ 24C, customers can submit a service request to disable the "_c" suffix on variable names for custom Commerce entities (Actions, Analytics, Attributes, Data Columns, Integrations, Library Functions, Rules, Steps, etc.). The "_c" suffix is enabled by default for standard and legacy Commerce processes.
- Customers can submit a Service Request (SR) on My Oracle Support to disable the "_c" suffix on variable names for custom Commerce entities
- When the "_c" is disabled, the "_c" variable name suffix will not be required for newly created custom Commerce entities.
- Disabling the "_c" variable name suffix for custom Commerce entities will not change existing variable names.
- The "_c" suffix setting will not impact existing variable names when cloning a Commerce process or migrating Commerce items. Target variable names will be the same as the variable names from the source Commerce process.
-
A maximum of 100 characters display in a Data Column on a report.
-
When searching an attribute using the Transaction Manager Search feature only enter the first 100 characters in order to return search results. If more than 100 characters are entered into the search, results will not be found.
-
Repopulate Column Data can be found in the Deployment Center. This event ensures that any changes made in the Data Columns on a deployed Process are available on the Commerce side. This event is basically applicable for the Transaction Manager data.
Related Topics
See Also


