Commerce Integrations
Overview
Administrators can create Commerce Integrations which integrate with an external system commonly a CRM system, such as Oracle Sales, Microsoft Dynamics 365, or Salesforce.
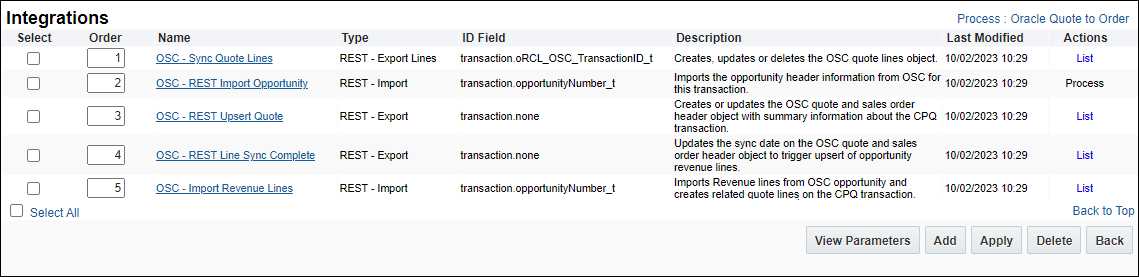
The Integrations page displays current Commerce Integrations and shows the Order, Name, Type, ID Field, Description, Last Modified, and linked Actions. The following example shows Commerce Integrations for an Oracle Sales integrated site.
Note: The Integrations Types available for your site are dependent upon your CRM Integration.
- Export (SOAP Generator) integrations push data from Oracle CPQ into a partner system. As an example, export integrations are frequently used to push quote PDFs to corresponding opportunities, every time there is a change made to the quote.
- Import (Query and Result Parser) integrations pull data into Oracle CPQ from a partner system. For example, in transactions, typically data that is imported into is accounts data from the partner site.
- Integration Cloud Service integrations are required to integrate with Oracle Integration Cloud (OIC), also sometimes referred to as Oracle Autonomous Integration Cloud Service (OAIC) or just Integration Cloud Service (ICS). OIC integration enables Oracle CPQ to connect to back office systems, on premise environments, and other Oracle products in a consistent, enhanced manner. Commerce Integrations are also required for integration with the Integration Cloud Service, or ICS. For more information, see the Oracle Integration Cloud topic.
- BML integrations can be used on Commerce Actions to send and receive data from external systems typically using REST Web Services. BML Integrations provide all the power and flexibility of BML functions and are defined on the Integrations page under each Commerce Process. Once defined, the BML integration is associated with a specific Commerce action under the action's Integrations tab.
-
REST – Export Lines integrations replicate and synchronize CPQ quote lines to Oracle Sales. This feature will enable Oracle Sales users to search quote lines within Oracle Sales using key quote line data. Quote lines are synced back to Oracle Sales to provide visibility of the quote lines within Oracle Sales. Additionally, the user-friendly attribute mapping UI allows administrators a drag and drop attributes to define integration mappings and eliminates the need to understand or edit XSL syntax.
-
REST - Export integrations are used to export transaction level data from CPQ to Oracle Sales (e.g. Export the CPQ transaction to Oracle Sales). The REST-based integration updates existing Oracle Sales quotes and replaces the existing SOAP integrations that were used to delete and then replace Oracle Sales revenue lines.
-
REST - Import integrations are used to import Main Document or Sub-Document data into CPQ (e.g. Import an Oracle Sales opportunity into a CPQ transaction or Import an Oracle Sales revenue lines into CPQ transaction line items). This REST-based integration replaces the existing SOAP import integration to significantly improve the administrative experience.
Notes:
- Oracle CPQ 23B introduced the Standard Process to simplify set up for integrations with Oracle CPQ. The Standard Process automatically provides several predefined REST integrations for Oracle Sales and BML integrations for Oracle Order Management and Oracle Subscription Management. Customers can add additional integrations and they can delete integrations that are not needed.
- REST Integration types are only supported for Oracle Sales integrations.
Administration
 Add a BML Integration
To add a BML Integration to a Commerce process, complete the following steps:
- Navigate to the Admin Home page.
- Click Process Definition in the Commerce and Documents section.
-
For the applicable process, select Integrations from the Navigation drop-down.
- Click List. The Integrations page displays.
- Click Add. The Select Integration Types page displays.
- Select the BML Type option, then click Next.
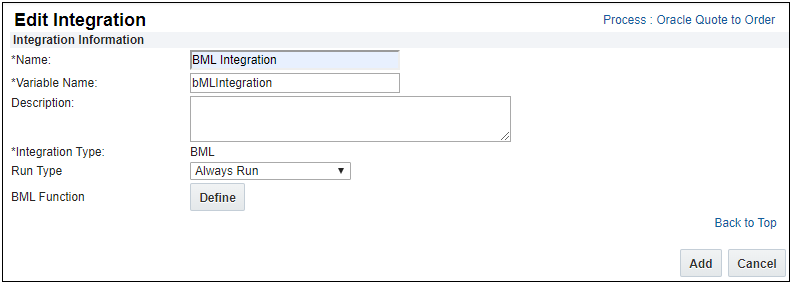
- Enter the Name and Variable Name of the BML integration.
- If required, enter a Description.
- Select a Run Type value:
- Always Run: the BML function runs every time the process is requested.
- Requires Partner Session: the BML function only runs when a partner session is active.
-
Click Define to open the BML Editor.
- Using the BML Editor, define the BML function that you want to run when the Commerce action is invoked. Upon closing the BML Editor, you are returned to the Edit Integration page.
- Click Add to save this integration.
Add an Integration Cloud Service
- Navigate to the Admin Home page.
- Click Process Definition in the Commerce and Documents section.
-
For the applicable process, select Integrations from the Navigation drop-down.
- Click List. The Integrations page displays.
-
Click Add. The Select Integration Types page displays.
-
Select Integration Cloud Service and click Next.
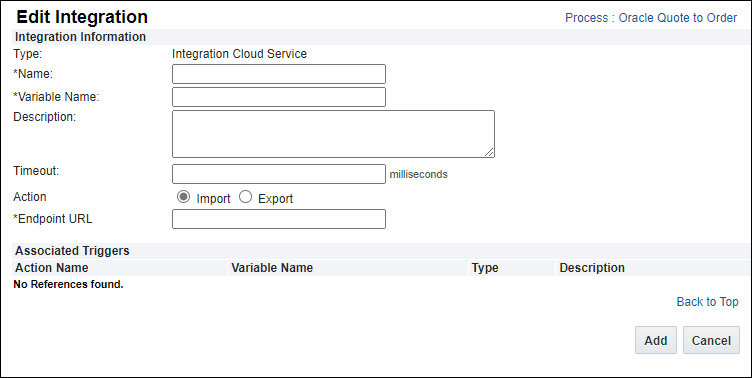
- Name: Enter a name (i.e. label) for the integration.
- Variable Name: Enter a unique identifier. This field cannot by edited after creation.
- Description: If required, enter a description for the integration.
- Timeout: If a value is not specified, this field will default to 5000 milliseconds.
- Action: This is just a label for the integration to describe how it will be used, and does not have any effect on how it works.
- Endpoint URL: (only applicable to Gen3 integrations) Enter the applicable ICS endpoint.
- Services: (only applicable to Gen2 integrations) When a CPQ–OIC Adapter is configured, select the applicable service.
-
Click Add.
The process now appears on the Integrations page.
Add a REST – Export Lines Integration
Complete the following steps to create a REST – Export Lines Integration.
- Navigate to the Admin Home page.
- Click Process Definition in the Commerce and Documents section.
-
For the applicable process, select Integrations from the Navigation drop-down.
- Click List. The Integrations page displays.
-
Click Add. The Select Integration Types page displays.
-
Select REST – Export Lines, and then click Next.
-
Complete the fields in the Integration Information section.
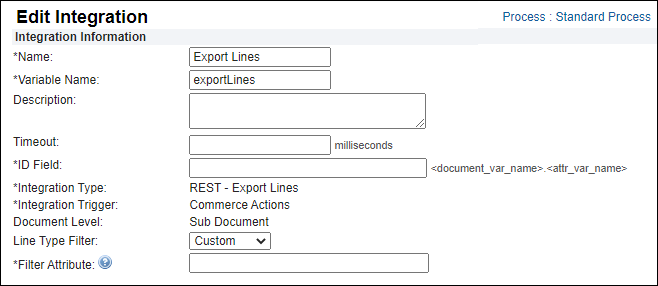
- Name: Enter a name (i.e. label) for the integration.
- Variable Name: Enter a unique identifier. This field cannot by edited after creation.
- Description: If required, enter a description for the integration.
- Timeout: If a value is not specified, this field will default to 5000 milliseconds.
-
ID Field: Enter the documentVarName.attributeVarName.
This field indicates which Commerce attribute stores the external ID of the object being updated by the integration.
-
Line Type Filter: Select one of the following options. This field cannot by edited after creation.
- Root Lines: Include only models or parts that do not have a parent item
- Part Lines: Include only part items
- All Lines: Include all root models, child models, and parts
- Custom: Administrator specifies a line-level attribute which indicates if that line should be included or not included in the export. When Custom is selected, the Filter Attribute field displays.
-
Filter Attribute: This field is only displayed when the Custom Line Type Filter is selected.
The filter can be Boolean or text and if the attribute value is "true" then the line is included in the export. If the attribute value is anything other than "true", the line-level attribute is not included in the export.
Notes:
- The filter attribute must be a sub-document Boolean or Text type attribute.
- At this time, REST Integrations are only supported with Oracle Sales integrations. Any lines which are synchronized will be visible in the Oracle Sales Workspace. Any lines filtered will not be available in Oracle Sales.
-
Complete the fields in the Endpoints section.
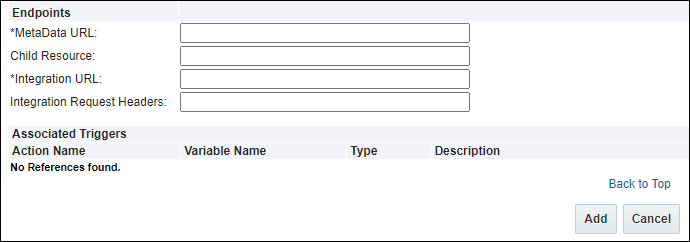
-
MetaData URL: The endpoint to retrieve the metadata about CRM attributes available for mapping for this integration.
- Child Resource: Name of the child resource from metadata for mapping attributes.
- Integration URL: The endpoint used to invoke the export operation.
- Integration Request Headers: This field takes the headers to be passed in the request to the above integration endpoint.
-
Batch Size is automatically set to the maximum of 500 quote lines to be integrated in a single invocation of the API endpoint. CPQ automatically handles the multiple invocations needed for larger quotes.
- Click Add.
Notes:
- REST Integration types are only supported for Oracle Sales integrations.
- The Standard Process includes the Sync Quote Lines integration by default. Customers can add additional REST – Export Lines integrations in the Commerce Process and they can delete integrations that are not needed.
Add a REST – Export Integration
Complete the following steps to create a REST – Export Integration
- Log in to Oracle CPQ and open the Admin Home page.
- Click Process Definition, in the Commerce and Documents section.
- Select Integrations from the Navigation drop-down menu for the applicable process, and then click List.
- Click Add.
-
Select REST – Export, and then click Next.
-
Complete the fields in the Integration Information section.
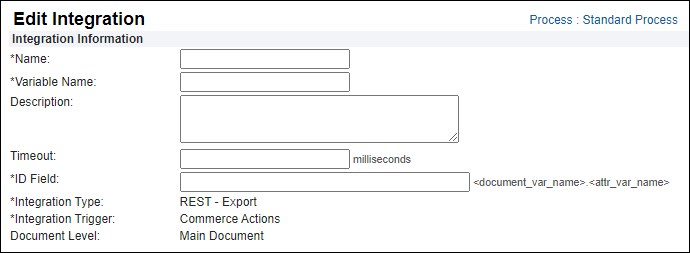
- Name: Enter a name (i.e. label) for the integration.
- Variable Name: Enter a unique identifier. This cannot by edited after creation.
- Description: If required, enter a description for the integration.
- Timeout: If a value is not specified, this field will default to 5,000 milliseconds.
-
ID Field: Enter the documentVarName.attributeVarName.
This field indicates which Commerce attribute stores the external ID of the object being updated by the integration.
-
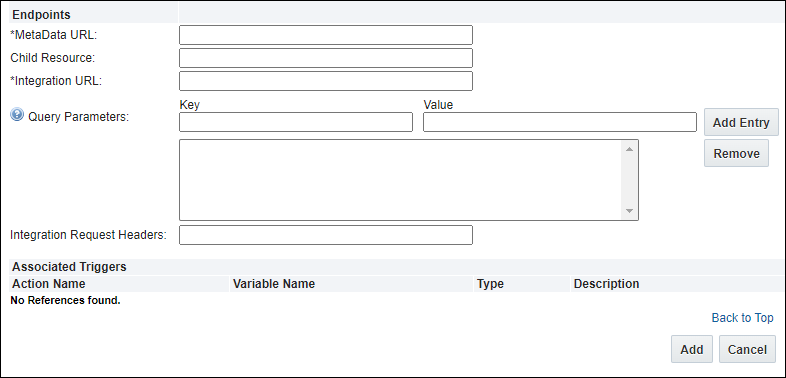
Complete the fields in the Endpoints section.
- MetaData URL: The endpoint to retrieve the metadata about CRM attributes available for mapping for this integration.
- Child Resource: Name of the child resource from metadata for mapping attributes.
- Integration URL: The endpoint used to invoke the export operation.
- Integration Request Headers: This field takes the headers to be passed in the request to the above integration endpoint.
-
Batch Size is automatically set to the maximum of 500 quote lines to be integrated in a single invocation of the API endpoint. CPQ automatically handles the multiple invocations needed for larger quotes.
- Click Add.
Notes:
- REST Integration types are only supported for Oracle Sales integrations.
- The Standard Process (introduced in Oracle CPQ 23B) includes the REST Upsert Quote
and REST Line Sync Complete integration by default. Customers can add additional REST – Export integrations in the Commerce Process and they can delete integrations that are not needed.
Add a REST – Import Integration
Complete the following steps to create a REST – Import Integration.
- Navigate to the Admin Home page.
- Click Process Definition in the Commerce and Documents section.
-
For the applicable process, select Integrations from the Navigation drop-down.
- Click List. The Integrations page displays.
-
Click Add. The Select Integration Types page displays.
-
Select REST – Import, and then click Next.
-
Complete the fields in the Integration Information section.
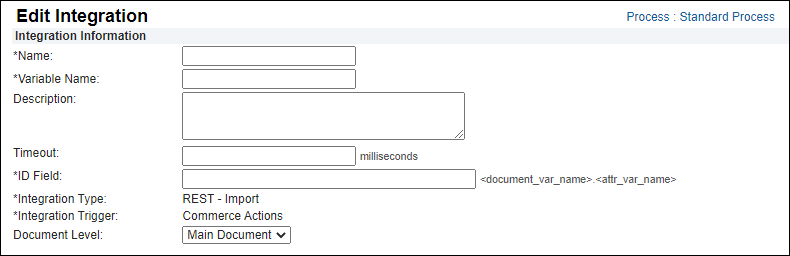
- Name: Enter a name (i.e. label) for the integration.
- Variable Name: Enter a unique identifier. This cannot by edited after creation.
- Description: If required, enter a description for the integration.
- Timeout: If a value is not specified, this field will default to 5,000 milliseconds.
-
ID Field: Enter the documentVarName.attributeVarName.
This field indicates which Commerce attribute stores the external ID of the object being updated by the integration.
- Document Level: Select Main Document.
-
Complete the fields in the Endpoints section.
-
MetaData URL: The endpoint to retrieve the metadata about the CRM attributes available for mapping for this integration.
-
Child Resource: Name of the child resource from metadata for mapping attributes.
-
Integration URL: The endpoint used to invoke the import operation.
-
Query Parameters: This section can be used to define query parameters for imports.
Notes:
- Some query parameters are managed automatically for batch processing.
limit, offset, and totalResults query parameters should be avoided as they may disrupt automated batch processing.- When multiple query parameters with the same key but different values are used, the first query parameter in the string will be picked up for execution.
-
Integration Request Headers: This field takes the headers to be passed in the request to the above integration endpoint.
- Click Add.
Notes:
- REST Integration types are only supported for Oracle Sales integrations.
- The Standard Process (introduced in Oracle CPQ 23B) includes the REST Import Opportunity and Import Revenue Lines integrations by default. Customers can add additional REST – Import integrations in the Commerce Process and they can delete integrations that are not needed.
Add an Import (Query and Result Parser) Integration
Complete the following steps to create an Import (Query and Result Parser) Integration.
-
Navigate to the Admin Home page.
-
Click Process Definition in the Commerce and Documents section.
-
Select Integrations from the Navigation drop-down menu for the applicable process, and then click List.
-
Click Add.
-
Select Import (Query Generator and Result Parser) and then click Next.
-
Enter the Name for the integration.
-
Enter the Variable Name for the integration.
-
Enter the ID Field in the format <document_var_name>.<att_var_name>.
-
Click Browse to select and load a SOAP Generator XSL into the integration, based on your use case.
-
Click Browse to select and load a Result Parser XSL into the integration, based on your use case.
The result parser converts one XML format into another. If the partner system returns a valid id, then Oracle CPQ populates the transaction field projectname_quote with the name value coming from the partner - sf:Name.
-
Click Add.
-
To view the integration, click the Integration name. Preview the SOAP XML by entering a Commerce Transaction ID. For more information, see the topic
Finding the Transaction ID.
Edit or Preview a Commerce Integration
Administrators are able to view SOAP or REST (Update 22D and later) request and response payloads for Commerce integrations via the Edit Integration page. This can help when setting up or troubleshooting integrations by providing easily accessible attribute mapping information.
- Click Admin to go to the Admin Home Page.
-
Click Process Definition in the Commerce and Documents section.
The Processes page opens.
-
For the Commerce Process, choose Integrations in the Navigation drop-down and click List.
The Integrations page opens.
-
Click the name of the integration you want to edit.
The Edit Integration page opens.
- Make any desired changes.
- To access Attribute Mapping for REST type integrations, click Edit for the applicable mapping.
-
To preview the integration, enter a Transaction ID and click a Preview link.
For more information, see the topic Finding the Transaction ID.
This will execute the integration, and may modify the remote site.
- Click Update.
Both SOAP and REST integrations require a valid external key, for example:
- The REST – Import integration requires a valid Opportunity Number (
opportunityNumber_t) field to be populated.
- The REST – Export integration requires a valid Opportunity Id (
opportunityID_t) field to be populated.
- The REST – Export Lines integration requires a valid OSC Transaction ID (
oRCL_OSC_TransactionID_t) field to be populated. This value corresponds to OrderHeaderId from the preview response of the REST – Export integration.
View Commerce Integration Parameters
Oracle CPQ exposes parameters for Commerce integrations, such as Oracle Sales and Salesforce. The following items are exposed:
- Site Name
- Site URL
- Commerce Process Id
- Copy Process Action Id
- Open Transaction Action Id
- Transaction Id
- Create Quote Version Action Id
- Commerce Process Version Id
- Commerce Process Variable Name
Complete the following steps to view Commerce integration parameters.
- Navigate to the Admin Home page.
- Click Process Definition in the Commerce and Documents section.
- For the applicable process, select Integrations in the Navigation drop-down, and the click List.
-
Click View Parameters.

The integration parameters and action Ids are displayed.
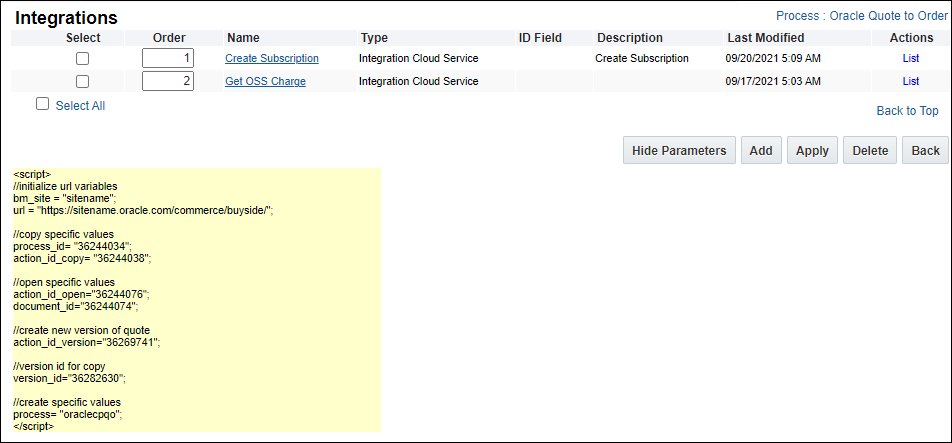
- To hide the parameters, click Hide Parameters.
Predefined Commerce Integrations for Oracle Sales
The following default predefined integrations are included in the Oracle CPQ Standard Process for CPQ sites integrated with Oracle Sales. Administrators can add additional integrations, modify attribute mappings, and delete integrations that are not needed.
Sync Quote Lines
This integration synchronizes quote lines from CPQ to Oracle Sales.
- Type: REST Export Lines
- Timeout: 20000
- ID Field:
- Standard Process:
transaction.oRCL_SFA_TransactionID_t
- Oracle Sales Reference Application:
transaction.oRCL_OSC_TransactionID_t
- Integration Trigger:
- Standard Process:
oRCL_SFA_UpdateOpportunity
- Oracle Sales Reference Application:
oRCL_OSC_UpdateOpportunity
- Document Level: Sub Document
- Line Type Filter: All Lines
- MetaData URL:
/crmRestApi/resources/11.13.18.05/salesOrderLines/describe
- Integration URL:
/crmRestApi/resources/11.13.18.05/salesOrders
- Integration Request Headers:
Upsert-Mode:true
- Batch Size: 500
- Sync Quote Lines Attribute Mapping
REST Upsert Quote
This integration imports the opportunity header information from Oracle Sales to a CPQ transaction.
- Type: REST Export Lines
- Timeout: 20000
- ID Field:
- Standard Process:
transaction.oRCL_SFA_TransactionID_t
- Oracle Sales Reference Application:
transaction.oRCL_OSC_TransactionID_t
- Integration Trigger:
- Standard Process:
oRCL_SFA_UpdateOpportunity - Oracle Sales Reference Application:
oRCL_OSC_UpdateOpportunity
- Document Level: Sub Document
- Line Type Filter: All Lines
- MetaData URL:
/crmRestApi/resources/11.13.18.05/salesOrderLines/describe
- Integration URL:
/crmRestApi/resources/11.13.18.05/salesOrders
- Integration Request Headers:
Upsert-Mode:true
- Batch Size: 500
- REST Upsert Quote Attribute Mapping
REST Line Sync Complete
This integration exports transaction level data from CPQ to the Oracle Sales quote and sales order header object.
- Type: REST - Import
- Timeout: 100000
- ID Field:
transaction.opportunityNumber_t
- Document Level: Main Document
- MetaData URL:
/crmRestApi/resources/11.13.18.05/opportunities/describe
- Integration URL:
/crmRestApi/resources/11.13.18.05/opportunities/{optyNumber}
- REST Line Sync Complete Attribute Mapping
REST Import Opportunity
This integration updates the "Last Synchronized" date for an Oracle Sales quote and sales order header object to trigger upsert of opportunity revenue lines.
- Type: REST - Import
- Timeout: 100000
- ID Field:
transaction.opportunityNumber_t
- Document Level: Main Document
- MetaData URL:
/crmRestApi/resources/11.13.18.05/opportunities/describe
- Integration URL:
/crmRestApi/resources/11.13.18.05/opportunities/{optyNumber}
- REST Import Opportunity Attribute Mapping
Import Revenue Lines
This integration imports revenue lines from an Oracle Sales opportunity and creates related quote lines on a CPQ transaction.
- Type: REST - Import
- Timeout: 20000
- ID Field: transaction.none
- Integration Trigger:
transaction.opportunityNumber_t
- Document Level: Sub Document
- MetaData URL:
/crmRestApi/resources/11.13.18.05/salesOrders/describe
- Child Resource: ChildRevenue
- Integration URL:
/crmRestApi/resources/11.13.18.05/opportunities/{opty_number}/child/ChildRevenue
- Query Parameters:
- Key:
q
- Value:
SplitTypeCode!=DETAILCHILDSPLIT,RecurTypeCode!=CHILDRECUR
- Import Revenue Lines Attribute Mapping
TCA Account Integration
This integration is used to retrieve Bill To, Sold To, and Ship To customer information from Oracle Sales.
Troubleshooting
Debugging CRM Integration
- Updates may only be performed through the Integration API (using the CRM system). An error may reference permissions.
- Solution:
- Log in to the CRM system.
- Perform a manual update.
This error can occur when an admin did not properly set up a users' Read/Write access for a field.
-
“Set as Primary” errors occur when there is an exception generated by the Apex code responsible for synching the primary quote with the Opportunity.
When this error occurs, it just appears as though the operation failed and nothing changed. This is because the error is emailed to the installer of the package (who is not usually the user).
- Solution: Use a Quote that is already primary. This causes the Apex exception to be displayed as an error in Oracle CPQ when the user attempts to save.
- Errors in synching the primary Quote to the Opportunity are usually caused by the following:
NOTES
Refer to the following documents for more information focused on Oracle Sales to Oracle CPQ integration implementation.
Custom Variable Name Conventions
In Oracle CPQ 23D, CPQ adopted Oracle CX Sales variable naming conventions for custom items. When an administrator creates a new custom Commerce item, the "_c" suffix is appended to the variable name. The new naming convention for custom variable names provides more consistency for integrations with Oracle Sales.
Beginning in Oracle CPQ 24C, customers can submit a service request to disable the "_c" suffix on variable names for custom Commerce entities (Actions, Analytics, Attributes, Data Columns, Integrations, Library Functions, Rules, Steps, etc.). The "_c" suffix is enabled by default for standard and legacy Commerce processes.
- Customers can submit a Service Request (SR) on My Oracle Support to disable the "_c" suffix on variable names for custom Commerce entities
- When the "_c" is disabled, the "_c" variable name suffix will not be required for newly created custom Commerce entities.
- Disabling the "_c" variable name suffix for custom Commerce entities will not change existing variable names.
- The "_c" suffix setting will not impact existing variable names when cloning a Commerce process or migrating Commerce items. Target variable names will be the same as the variable names from the source Commerce process.
Notes:
- Oracle CPQ does not support using different integration types in the same Commerce action. Only integrations of a single type are able to be used on a given Commerce Action; you cannot mix integration types.
-
Oracle CPQ 20B implements XML Translation Line Limits to prevent performance issues that could occur when generating XML for quotes with an extremely large number of transaction lines.
Related Topics
See Also


