Overview
Workflow administration is the final step in setting up a Commerce Process. Workflows are made up of steps, which define the states transactions can be in, as well as document permissions and routing. Commerce Processes can have any number of workflow steps.
For example, an RFQ process could have steps like "Submitted", "Quoted", "Accepted", "Declined" and "Expired". These steps could transition a transaction from an RFQ document, to a Quote document, then to a PO document.
- Workflow Steps use profiles to define access rights, transition notification, and transaction views. The Commerce system automatically creates a default profile for each workflow step. You can customize the default profile and create additional ones to support different transaction access rights.
- Profile permissions can be granted based on user access type, user groups, or previous performers. In addition to these permissions, you can add auto-forwarding rules to workflow steps to support a collaborative sales environment, one in which multiple users can work on the same transaction.
- Auto-forwarding rules direct the system to share transactions between members of certain user groups. You can create auto-forwarding rules for each workflow step and base them on any number of criteria.
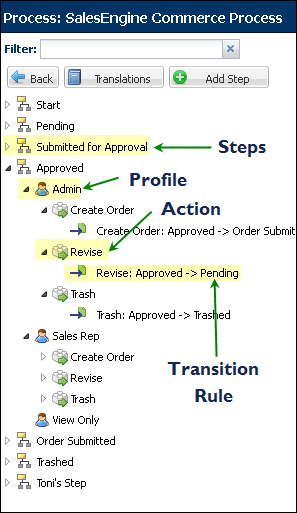
You can add, edit, and delete all steps, profiles, transition rules and timers from a single page. Steps and profiles are organized in a hierarchical tree structure for ease of administration. You can re-order your steps and profiles and move transition rules using drag and drop. The following image shows how workflow steps, profiles, and transition rules are related.
Standard Process Workflow Steps
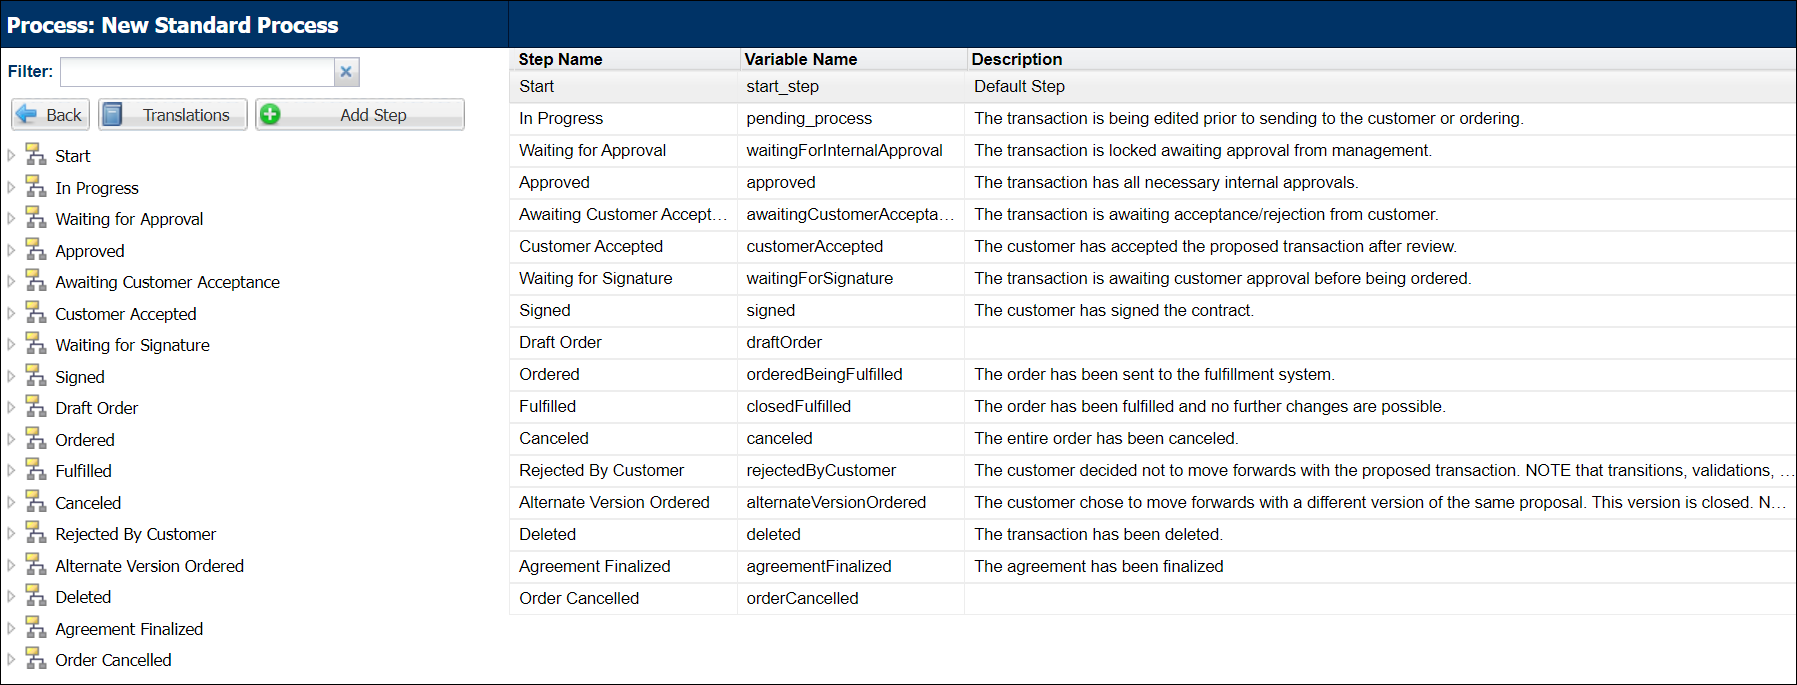
The Standard Process is delivered for new Oracle Sales integrated site installations and is the default process when creating a new Commerce process. The Standard Process provides pre-defined workflow steps to manage quote approvals and order management.
The following steps are automatically created when a new Standard Process is created. These steps can be modified to meet customer workflow requirements. Note that steps cannot be deleted once a process is deployed.
Oracle CPQ 24D Standard Process Workflow Steps
Beginning in Oracle CPQ 24D, newly created Standard Processes will include predefined stage-specific workflow steps and rules to manage user access and transitions for transactions in the Order and Agreement Commerce process stages. Refer to the following for more information:
-
Standard Process Workflow Steps, Profiles, and Transition Rules
-
Enable Order Stage Workflow for an Existing Pre-24D Standard Process
-
Enable Agreement Stage Workflow for an Existing Pre-24D Standard Process
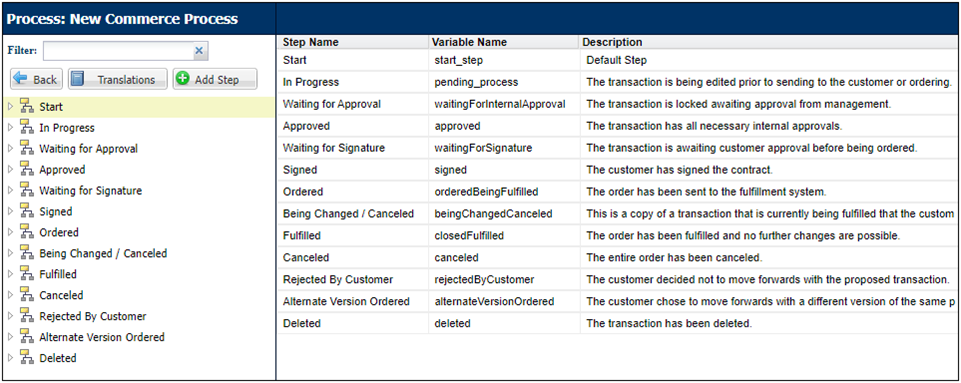
Oracle CPQ 23B Standard Process Workflow Steps
Administration
Steps (document states) can be created individually from the Step List page. We recommend creating all of the steps in a workflow before managing profiles.
- Navigate from the Admin Home Page > Commerce and Documents > Process Definition > Select a Commerce Process > Steps.
- Click Add Step.
-
Enter a step Name and Variable Name. The name is displayed when you encounter the step. For example, Start.
The Variable Name field populates automatically. Variable names can only contain alpha-numeric characters and underscores. The entry can be changed before saving, but after saving the value is read-only.
-
Select the Stage:
This setting is only available when the Commerce process Order or Agreement stages are enabled.-
Quote - used to identify steps that are in the quote phase of the Commerce process flow. (default stage)
-
Order - used to identify steps that are in the order phase of the Commerce process flow. This option is only available when the Commerce process Order stage is enabled.
-
Agreement - used to identify steps that are in the order phase of the Commerce process flow. This option is only available when the Commerce process Order stage is enabled.

-
- Enter a Description for the step.
-
Click Save.
This displays the section where you can define forwarding rules for the step. Forwarding rules are used to give one or more user groups access to transactions during that step.
To understand the concept of auto-forwarding rules, see the topic Forwarding Rules. - Specify the following in the Forward Rule section:
- Select No Forward Rule if you do not want to add a forwarding rule. This is the default section.
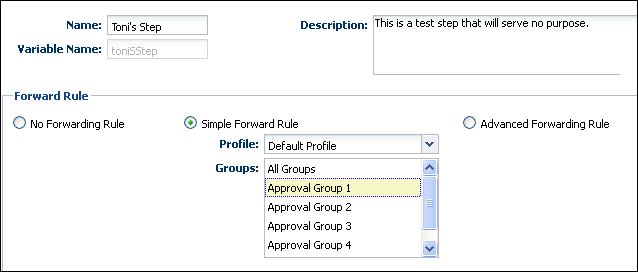
- Select Simple Forwarding Rule if you want to add a forwarding rule that doesn't require BML.
- Select a Profile from the drop-down provided.
- Choose All Groups if you want to link this step to all the groups or select individual group names if you want to link this step to a few selected groups. Select multiple group names using the CTRL key from the names provided in the list box.
- Select Advanced Forward Rule if you want to add an advanced forwarding rule and click Define Function. This opens the Commerce BML Editor window.
-
Click Save. The new step appears in the right panel.
To edit workflow steps, double-click the Step name in the right pane.Steps are created in an inactive, pending state. After all components of a Commerce Process have been completed, the process should be deployed. For more information, see the topic Commerce Deployment Center.
![]() Enable Order Stage Workflow for an Existing Pre-24D Standard Process
Enable Order Stage Workflow for an Existing Pre-24D Standard Process
Complete the following tasks to enable order stage functionality for an existing Standard Process:
-
Enable the Commerce Process Order stage. Refer to Commerce Process for more information.
Note: Once the Order stage is enabled for a Standard Process it can't be disabled.
-
Update Workflow Steps for Order stages. Refer to Add a Workflow Step for detailed procedures.
-
Add the following Workflow Steps:
-
Draft Order variable name
draftOrder, set the Stage to Order -
Order Cancelled variable name
orderCancelled, set the Stage to Order
-
-
Update the Stage to Order for the Ordered and Fulfilled steps.
-
-
Add or update the following Participant Profiles and Transition Rules. Refer to Add a Participant Profile and Add a Transition Rule for detailed procedures.
|
Step |
Variable Name |
Profile |
Initial Step |
Action |
Transition Rule |
Transition to Step |
Condition |
|---|---|---|---|---|---|---|---|
|
Approved |
approved |
Sales User |
No |
Revise Quote |
Revise Quote -> In Progress |
In Progress |
Always True |
|
Awaiting Customer Acceptance |
awaitingCustomerAcceptance |
Sales User |
No |
Revise Quote |
Revise Quote -> In Progress |
In Progress |
Always True |
|
Awaiting Customer Acceptance |
awaitingCustomerAcceptance |
Self Service User |
No |
Self Service Checkout |
Self Service checkout -> Cancelled |
Canceled |
Always True |
|
Customer Accepted |
customerAccepted |
Sales User |
No |
Revise Quote |
Revise Quote -> In Progress |
In Progress |
Always True |
|
Draft Order |
draftOrder |
Admin |
Yes |
Create Order |
Create Order: Draft Order -> Ordered |
Ordered |
Always True |
|
Draft Order |
draftOrder |
Sales User |
No |
None |
|||
|
Draft Order |
draftOrder |
Self Service User |
Yes |
Create Order |
Create Order: Draft Order -> Ordered |
Ordered |
Always True |
|
Ordered |
orderedBeingFulfilled |
Admin |
No |
View Next Step |
Next |
Fulfilled |
Always True |
|
Ordered |
orderedBeingFulfilled |
Sales User |
No |
Cancel Order |
Cancel Order: Ordered -> Order Cancelled |
Order Cancelled |
Always True |
|
Ordered |
corderedBeingFulfilled |
Self Service User |
No |
None |
|||
|
Fulfilled |
closedFulfilled |
Admin |
No |
None |
|||
|
Fulfilled |
closedFulfilled |
Sales User |
No |
None |
|||
|
Fulfilled |
closedFulfilled |
Self Service User |
No |
None |
|||
|
Order Cancelled |
orderCancelled |
Admin |
No |
None |
|||
|
Order Cancelled |
orderCancelled |
Sales User |
No |
None |
|||
|
Order Cancelled |
orderCancelled |
Self Service User |
No |
None |
![]() Enable Agreement Stage Workflow for an Existing Pre-24D Standard Process
Enable Agreement Stage Workflow for an Existing Pre-24D Standard Process
Complete the following tasks to enable agreement stage functionality for an existing Standard Process:
-
Enable the Commerce Process Order stage. Refer to Commerce Process for more information.
-
Add the Agreement Finalized
(agreementFinalized)workflow step, and set the Stage to Agreement. -
Add or update the following Participant Profiles and Transition Rules. Refer to Add a Participant Profile and Add a Transition Rule for detailed procedures.
Step
Variable Name Profile
Initial Step
Action
Transition Rule
Transition to Step
Start
start_step
Admin
Not Applicable
Create Agreement
Create Agreement: Start -> Agreement Finalized
Agreement Finalized
Start
start_step
Admin
Not Applicable
Save
Save -> Awaiting Customer Acceptance
Awaiting Customer Acceptance
Start
start_step
Admin
Not Applicable
Save
Save -> In Progress
In Progress
Start
start_step
Sales User
Not Applicable
Create Agreement
Create Agreement: Start -> Agreement Finalized
Agreement Finalized
Start
start_step
Self Service User
Not Applicable
Save
Save -> Awaiting Customer Acceptance
Awaiting Customer Acceptance
Start
start_step
Self Service User
Not Applicable
Save
Save -> In Progress
In Progress
Approved
approved
Admin
No
Create Agreement
Create Agreement: Approved -> Agreement Finalized
Agreement Finalized
Approved
approved
Sales User
No
Create Agreement
Create Agreement: Approved -> Agreement Finalized
Agreement Finalized
Signed
signed
Default
No
Create Agreement
Create Agreement: Signed -> Agreement Finalized
Agreement Finalized
Agreement Finalized
agreementFinalized
Admin
No
None
Agreement Finalized
agreementFinalized
Sales User
No
None
Agreement Finalized
agreementFinalized
Self Service User
No
None
-
Add Advanced Conditions to the following Workflow Steps. Refer to Add a Transition Rule for detailed procedures.
Step
Profile
Action
Transition Rule
Transition to Step
Condition
Start
Admin
Save
Save -> Awaiting Customer Acceptance
Awaiting Customer Acceptance
Advanced Conditions
Selected Variables: Transition > Skip Seller Review
Script:
return (_transaction_s_skipSellerReview_t == true);
Start
Admin
Save
Save -> In Progress
In Progress
Advanced Conditions
Selected Variables: Transition > Skip Seller Review
Script:
return (_transaction_s_skipSellerReview_t == false);
Start
Self Service User
Save
Save -> Awaiting Customer Acceptance
Awaiting Customer Acceptance
Advanced Conditions
Selected Variables: Transition > Skip Seller Review
Script:
return (_transaction_s_skipSellerReview_t == true);
Start
Self Service User
Save
Save -> In Progress
In Progress
Advanced Conditions
Selected Variables: Transition > Skip Seller Review
Script:
return (_transaction_s_skipSellerReview_t == false);
Notes
Notes:
-
All workflow step functionality can be administrated in Commerce Processes that have not been deployed. Steps cannot be deleted after a process has been deployed.
- IDs and descriptions for all steps can be viewed easily after accessing the Workflow page. You can view them by clicking a Step name.
- You can use the Filter feature to dynamically drill down through the Steps, Profiles, Actions and Rules. For example, you could type "Sales" into the Filter, and any Step Profile, Action or Transition Rule that has "Sales" in the name would dynamically display, improving the speed of maintenance.
- When performing a Mass Update, users can filter which steps the update applies to.
Custom Variable Name Conventions
In Oracle CPQ 23D, CPQ adopted Oracle CX Sales variable naming conventions for custom items. When an administrator creates a new custom Commerce item, the "_c" suffix is appended to the variable name. The new naming convention for custom variable names provides more consistency for integrations with Oracle Sales.
Beginning in Oracle CPQ 24C, customers can submit a service request to disable the "_c" suffix on variable names for custom Commerce entities (Actions, Analytics, Attributes, Data Columns, Integrations, Library Functions, Rules, Steps, etc.). The "_c" suffix is enabled by default for standard and legacy Commerce processes.
- Customers can submit a Service Request (SR) on My Oracle Support to disable the "_c" suffix on variable names for custom Commerce entities
- When the "_c" is disabled, the "_c" variable name suffix will not be required for newly created custom Commerce entities.
- Disabling the "_c" variable name suffix for custom Commerce entities will not change existing variable names.
- The "_c" suffix setting will not impact existing variable names when cloning a Commerce process or migrating Commerce items. Target variable names will be the same as the variable names from the source Commerce process.


