Overview
The Product Workbench (previously known as Product Launch) is used for Oracle CPQ sites integrated with Oracle Sales. Product Workbench is designed for product managers, with the goal of making the definition and management of their products and services more intuitive and seamless. Product Workbench provides the ability to:
- Set and edit pricing from the product-centric point of view (i.e. the user is presented with all the pricing defined for a particular product). If the product should be priced differently under different condition sets, Product Workbench will display all records on a single page, grouped by those condition sets, making it easier to read.
- Easily define "contextual pricing", which can be thought of as the ability to define differentiated pricing when the product or service is to be sold together with other products and / or services.
- Define multiple charges for each product or service under the different circumstances mentioned above (conditional and contextual pricing) in a very intuitive way. These multiple charges can be of different types and there’s no limit to the number of charges associated with each product or service.
Access Product Workbench
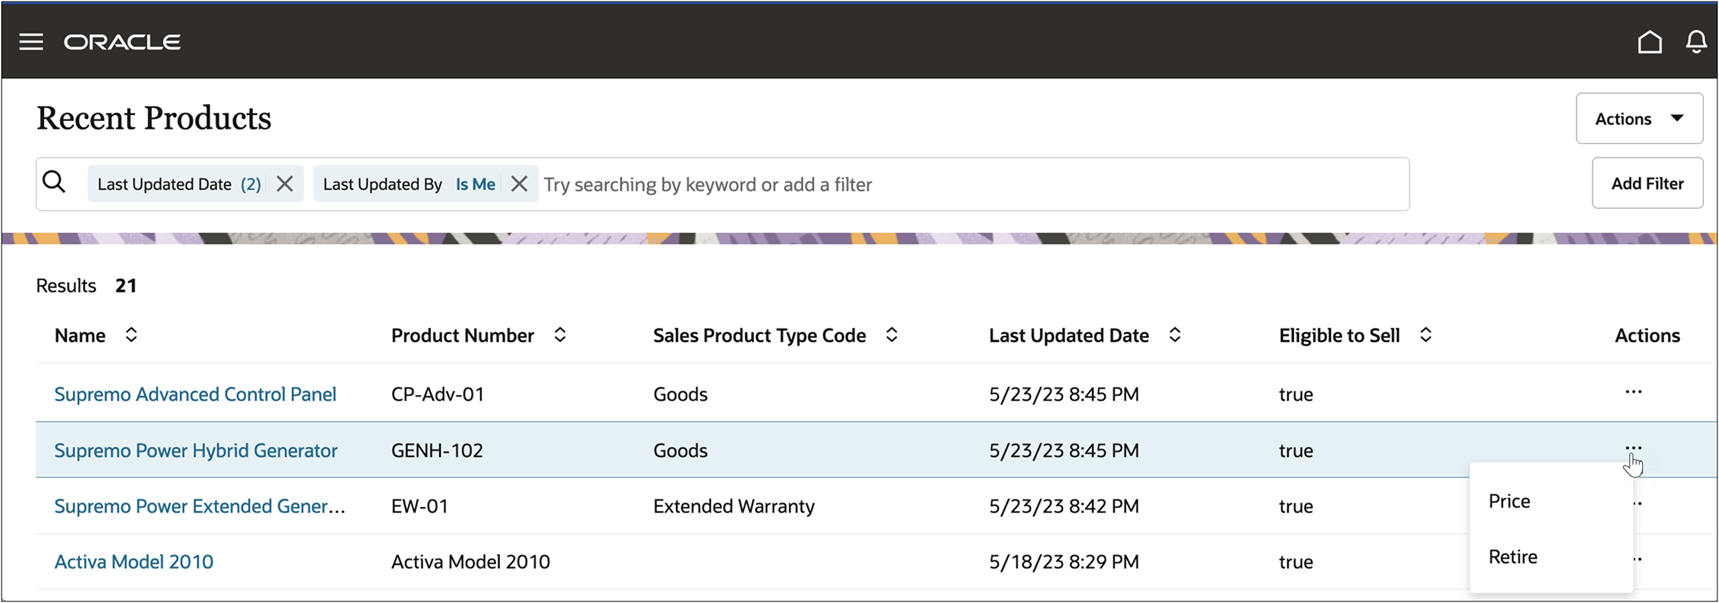
When an Oracle Sales product manager selects the Price action for a sales product, the Product Workbench is launched.
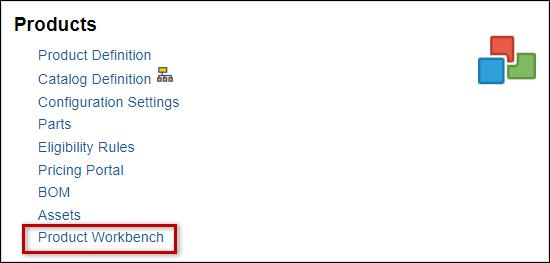
Beginning in Oracle CPQ 24C, CPQ administrators can access the Product Workbench from the Products section on the CPQ Admin Home page.
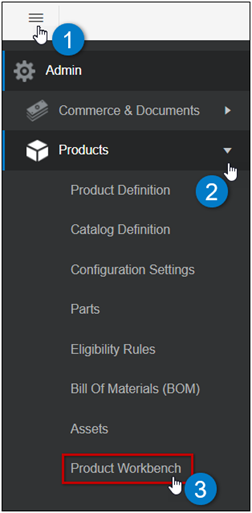
When Alta Navigation is enabled, administrators can directly navigate to Product Workbench using the CPQ Admin Navigation Menu. For more information about Alta Navigation, refer to Navigation Menus. To access the Product Workbench from the Admin Navigation Menu:
-
Click on the Admin Navigation Menu icon on the top left side of the page.
-
Click on the Products expand icon.
-
Click on the Product Workbench sub menu item.
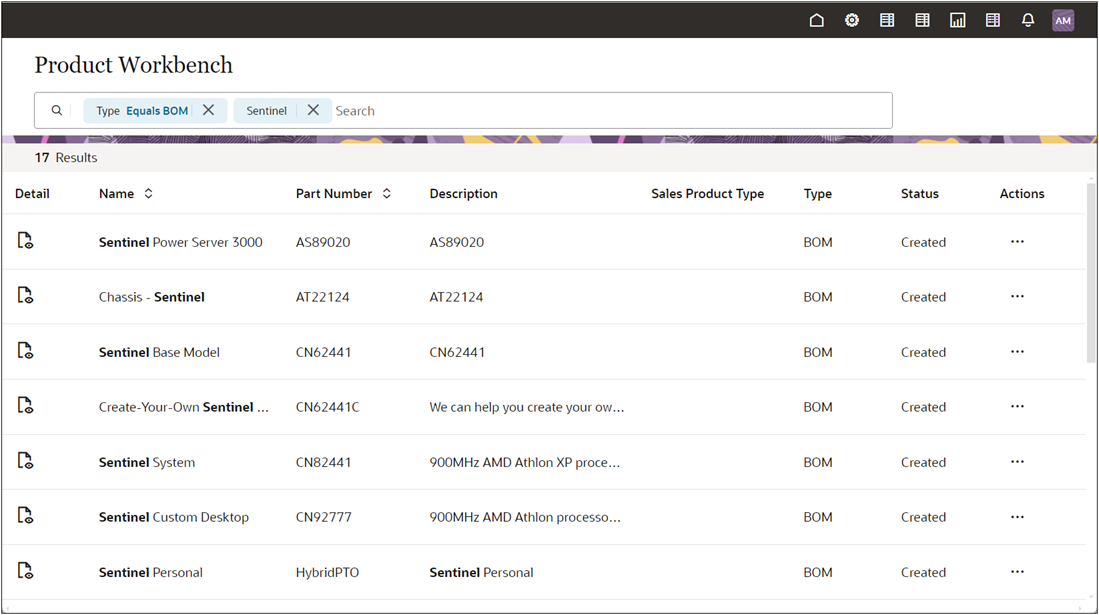
When a CPQ administrator navigates to the Product Workbench, the new product list displays all products. This view allows administrators to search for the product they want to manage. The product search UI includes a prominent search bar, advanced filtering options, auto-suggestions, and the ability to sort and filter results.
Administrators can type keywords in the search box to filter search results. Context within the Name, Part Number, and Description fields will be filtered, and the keywords are highlighted in bold type.
Advanced filters for the Type and Sales Product Type fields can be used independently or combined with keyword searches to further refine search results.
CPQ administrators can then select a product to view and define prices and charges for CPQ products and root BOM items.
Structure View for Product Management Personas
Product Workbench and Pricing Portal provide two different 'views' of the same pricing data, but both personas (product managers and pricing managers) need to be able to easily switch between a product-centric view and a pricing list view. Beginning in Oracle CPQ 24D Product Management users of the Product Workbench select the Edit/View Pricing option for a product in the Product Workbench to view the Products & Pricing page.
The new Products & Pricing page displays the product structure on the left side of the page and pricing for the selected item on the right side of the page. Users can expand or collapse hierarchical items and quickly access pricing information for the entire product structure from a single page.
The new structured view allows product managers to view pricing for all items in a hierarchical product from a single page. This enhancement improves the user experience and reduces the number of clicks required to access product structures and pricing.
Products & Pricing
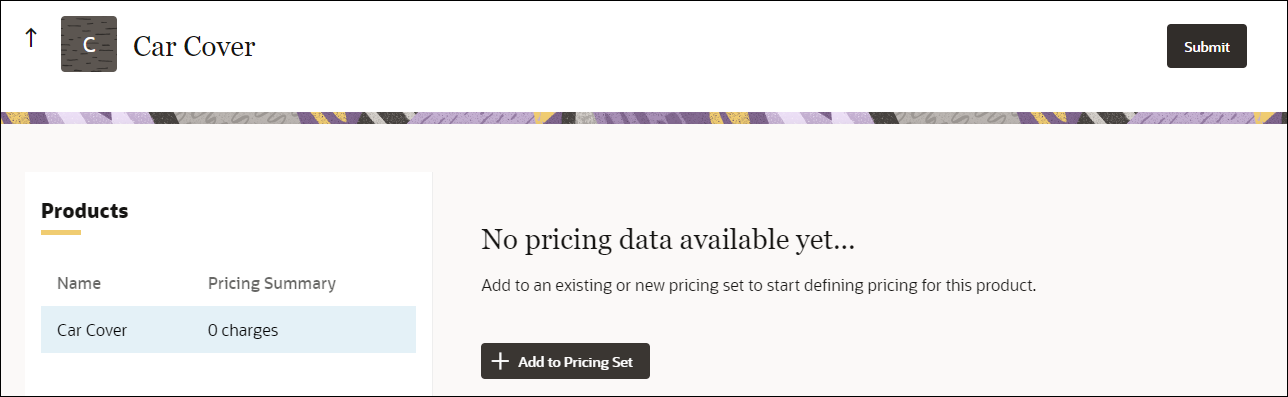
The Products & Pricing page provides a pricing summary for the selected product or product structure. Available actions will vary based on the selected product type. The product type can be a Part or a BOM. Parts are standard products and BOMs are sophisticated hierarchical product bundles.
If pricing has not been defined, administrators are prompted to add a pricing set to begin defining pricing for the selected product.
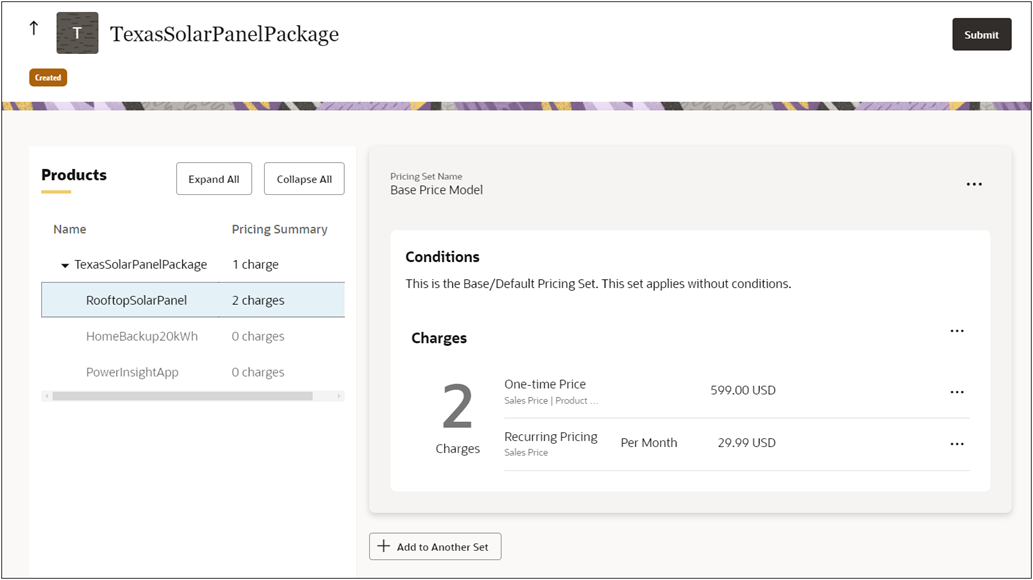
When has been defined, administrators can view and manage pricing plans along with their associated charges.

| Item | Description |
|---|---|
|
1 |
Navigate to the Product Workbench. |
|
2 |
Click the Pricing Set ellipsis to Delete Set From List.
|
|
3 |
Conditions display the criteria that must be met to apply the price plan. |
|
4 |
The Rate Plans section lists all charges in the Plan allowing product managers to modify existing Rate Plans. |
|
5 |
Click the Rate Plans ellipsis to view Rate Plan actions.
|
|
6 |
When expanded, the Rate Plans section displays details for Charges in the Rate Plan. |
|
7 |
Click the Charge ellipsis to Edit or Delete the associated Charge. |
|
8 |
Click + Add to Another Set to apply pricing conditions for this product.
|
Product Workbench and Pricing Portal provide two different 'views' of the same pricing data, but both personas (product managers and pricing managers) need to be able to easily switch between a product-centric view and a pricing list view. Users of the Product Workbench select the Edit/View Pricing option for a product in the Product Workbench to view the Products & Pricing page. The Products & Pricing page displays the product structure on the left side of the page and pricing for the selected item on the right side of the page. Users can expand or collapse hierarchical items and quickly access pricing information for the entire product structure from a single page. The structured view allows product managers to view pricing for all items in a hierarchical product from a single page.
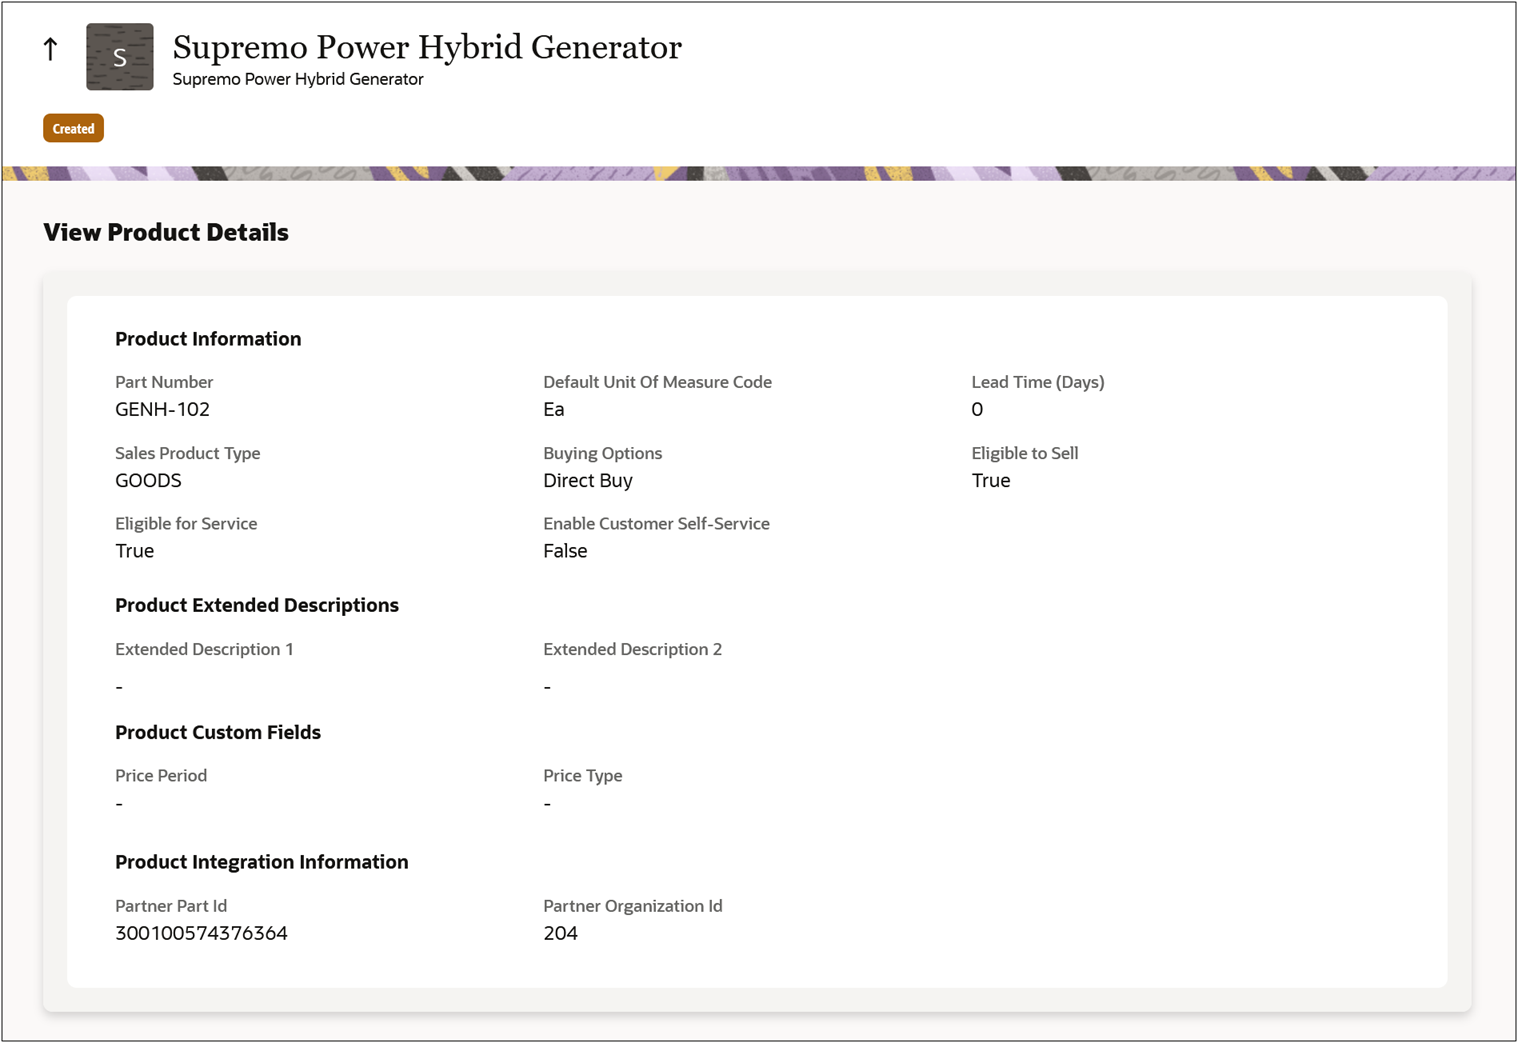
View Product Details
Users can access the Products Details page by clicking on the View details icon  . This page displays sales-related data for the product, extended descriptions, and integration information.
Edit / View Configurations
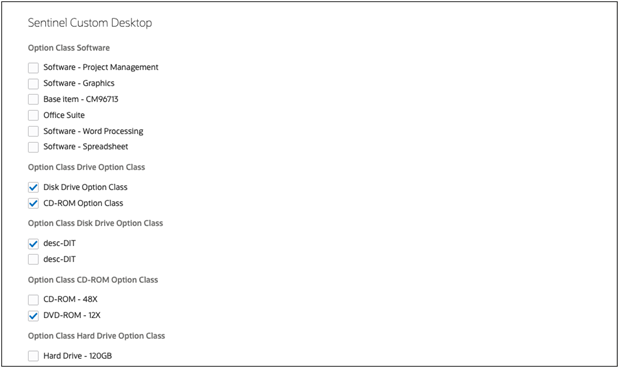
Beginning in Oracle CPQ 24C, simple BOM configurators can be auto-generated to provide a simple mechanism that allows the selection of options based on the optional items defined in the product structure.
![]() Auto Generation of BOM Simple Configurator
Auto Generation of BOM Simple Configurator
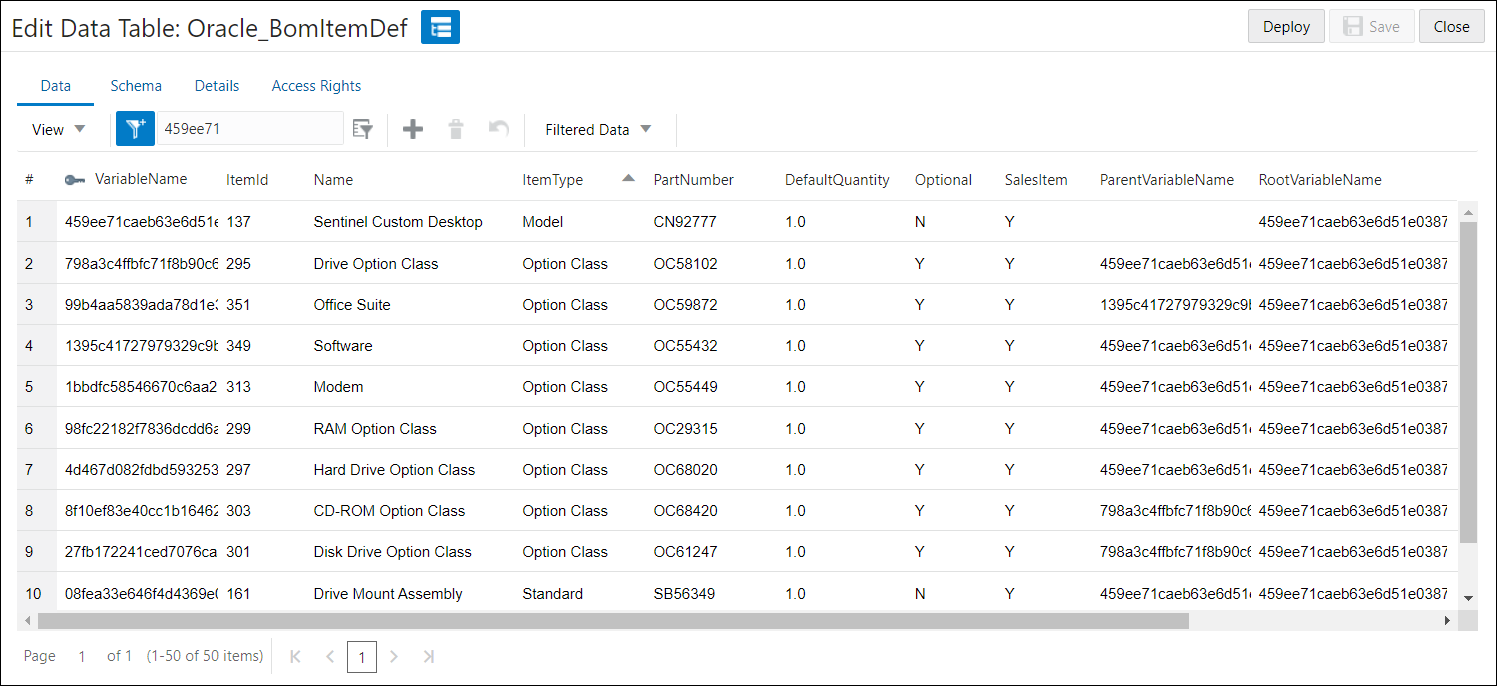
Simple BOM configurators can be generated for product structures with optional items that are defined in the BOM Item Definition data table. The follow example shows the BOM Item Definition for the Sentinel Custom Desktop model with optional items. The optional items are specified as "Option Class" item types.
In the Product Workbench, a navigation action labeled Edit/View Configurations is available for BOM structures that contain at least one optional child item.
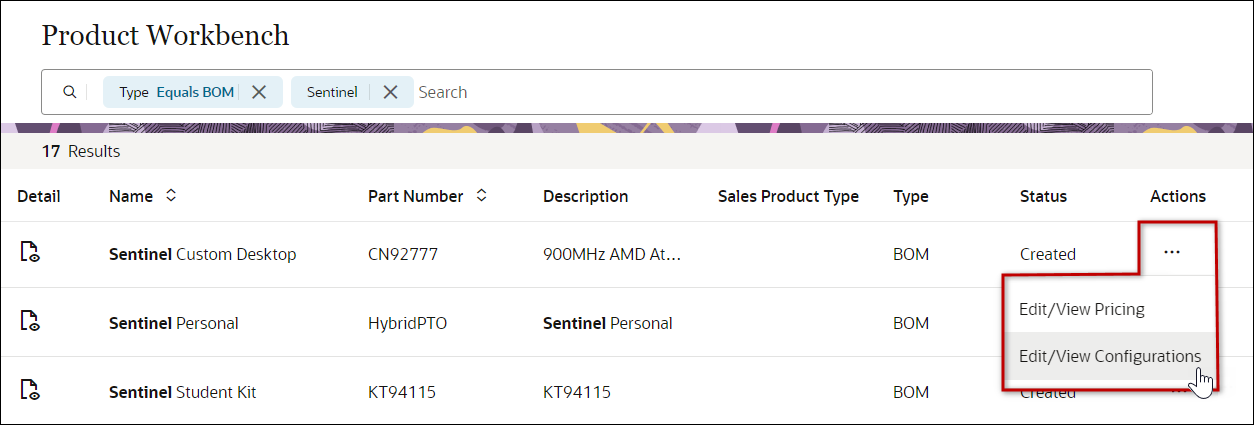
After navigating to the Edit/View Configurations page, click Create Configuration to launch the simple BOM configurator.

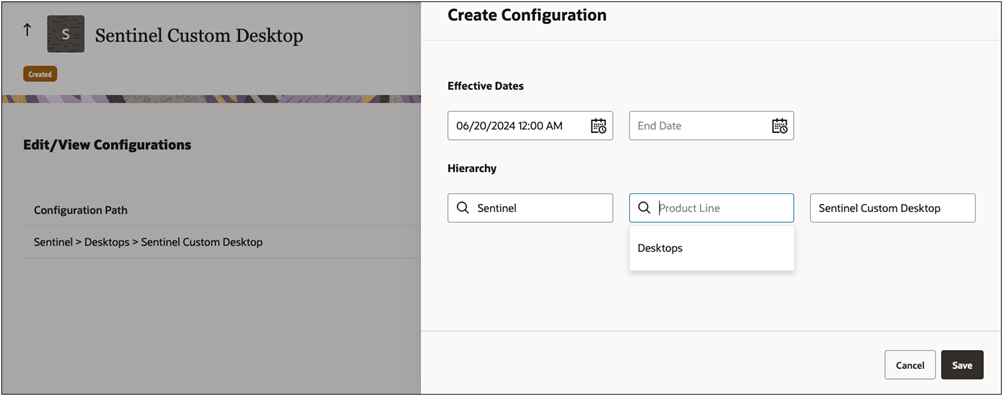
You can specify effective dates and define where the new Model Configuration should be created. Existing Product Families and Product Lines can be selected, or new Product Families and Product Lines can be created. If an existing Product Family and Product Line are selected, the new Model is added to the selected product hierarchy. If you enter a new Product Family and/or Product Line, you are prompted to confirm the creation of the new hierarchy. The generator will create and deploy the new Product Family and/or Product Line.
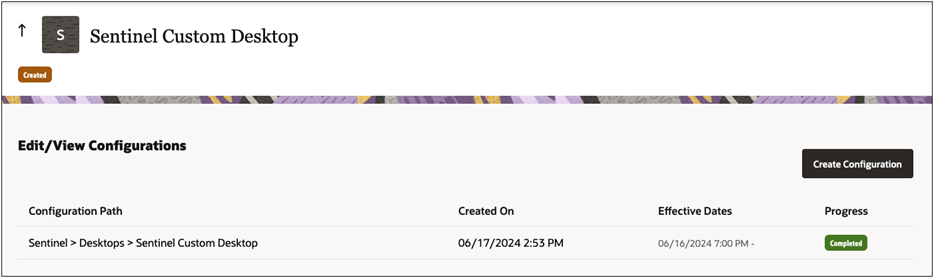
The Edit/View Configurations page displays the progress of model configurations. After the simple BOM configurator is generated, the Configuration Path details are displayed, and the progress is marked as Completed.
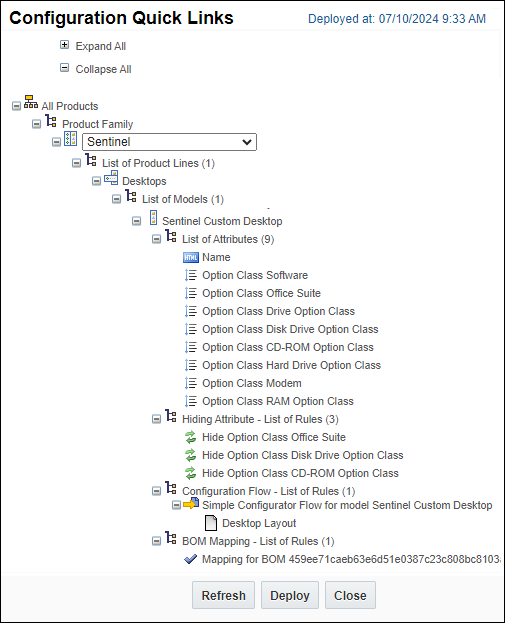
A new model is created under a new or existing Product Family and Product Line.
-
Configurable attributes are automatically defined at the Model level based on optional items and BOM Mapping conditions are automatically created.
-
A new layout is generated with the previously auto-generated attributes.
-
Configuration rules including Hiding and BOM Mapping are created for the model.
To make the new configurator available on the Home Page, administrators need to access the Home Page management page to define potential restricted access and Deploy the Home Page.
The new Configuration will be accessible from Product Search results and sales users will be able to add it to a quote.
Cardinality in Simple Configurator
Beginning in CPQ 24D, the auto-generator for Simple Configurators will use the BOM Item Definition’s minimum and maximum number of selectable item values when generating Multi-Select Menu attributes for Option Class BOM items with two or more optional children. See Enable BOM Item Cardinality and Configuration Menu Attributes for more information.
Customers use BOM Item Definition tables and the auto-generator to provide Simple Configurators that control the minimum and maximum number of menu items a sales user can select on buyside.
Administration
Perform the following procedures to enable Product Workbench.
- Set Up Oracle Sales Product Information Master (SPIM) Integration - Refer to Oracle Sales Product Information Master (SPIM) Integration to establish Oracle Sales Product Information Master (SPIM) as the Products Source for an Oracle Sales – Oracle CPQ Products Integration.
- Enter the Integration User Credentials - Refer to Product Hub Integration Added to Oracle Fusion CRM Integration to create a CRM integration type and include the Product Hub integration credentials.
Complete the following steps to add a Rate Plan to a subscription-based product.
Note: Rate Cards are used to support subscription-based pricing (i.e. 'SUBSCRIPTION' Sales Product Types).
- Navigate to the CPQ Product Workbench:
- From CPQ, navigate to Admin > Products > Product Workbench.
From Oracle Sales, navigate to Redwood Sales > Products.
Then select the Price action for a product. The CPQ Product Workbench application will open.
-
Click on the product ellipsis, and then select Edit/View Pricing.
-
Click Add Rate Plan. If there are existing charges or product prices, select Convert to Rate Plan.
- Enter a Rate Plan Name.
- Enter a variable name in Rate Plan Number.
- (optional) Select a Start date. This effective start date value will apply to all charges in this rate plan.
- (optional) Select an End date. This effective end date value will apply to all charges in this rate plan.
- (optional) Enter a Description.
- Click Create.
-
Perform one of the following options:
-
To add charges, click on the rate plan ellipsis, and then select Add Charges. (Proceed to Add a Charge)
-
To add a product price, click on the rate plan ellipsis, and then select Add Product Price. (Proceed to Add a Product Price)
-
To submit your pricing modifications and return to Oracle Sales, click on the Up Arrow icon at the top of the page, and then click Submit.
-
Complete the following steps to add a charge to a product.
- Navigate to the CPQ Product Workbench:
- From CPQ, navigate to Admin > Products > Product Workbench.
From Oracle Sales, navigate to Redwood Sales > Products.
Then select the Price action for a product. The CPQ Product Workbench application will open.
- Click on the product ellipsis, and then select Edit/View Pricing.
-
Perform one of the following:
-
To add non-rate plan charges, click Add Charges - OR - click on the charges ellipsis, and then select Add Charges.
-
To add charges to a rate plan, click on the rate plan ellipsis, and then select Add Charges.
-
-
When enabled, select a Charge Definition.
Charge Definitions standardize charge categories and define the valid combinations of price types and charge types. The Price Type and Charge Type are automatically populated when using Charge Definitions.
- Charge Definitions are highly recommended for customers using charge pricing (vs. legacy product pricing) to simplify the setup of prices.
- Charge Definitions are required when CPQ pricing is integrated with Oracle Fusion Pricing.
- For more information, refer to Charge Definitions.
-
Select a Price Type to define the basis on which a price or charge is levied.
- The Price Type is automatically populated and not editable when using Charge Definitions.
- The Pricing Type Pricing Lookup provides the following standard values: One time, Recurring, Usage. To add custom lookup values, refer to Pricing Lookups.
-
Select a Charge Type to define the value that will be received by the customer for a charge price.
- The Charge Type is automatically populated and not editable when using Charge Definitions.
- The Charge Type Pricing Lookup provides the following standard value: Sales Price. To add custom lookup values (e.g. Activation Fee, Call Charge, Data Charge), refer to Pricing Lookups.
-
If applicable, select the Price Period to define the time frequency, periodicity, or recurrence with which the price is levied or charged.
- Price Periods are only applicable for Recurring and Usage Price Types.
- The Pricing Type Pricing Lookup provides the following standard values: Per Month, Per Year. To add custom lookup values (e.g. Per Week, Per Year), refer to Pricing Lookups.
-
If applicable, select or enter the Usage UOM to define the units of measures for usage quantities.
To add custom lookup values (e.g. Per Week, Per Year), refer to Pricing Lookups.
- (optional) Choose a Start Date to set the effective start date for an individual charge.
- (optional) Choose an End Date to set the effective start date for an individual charge.
-
Select one of the following options, and perform the included steps:
 None (Static Pricing)
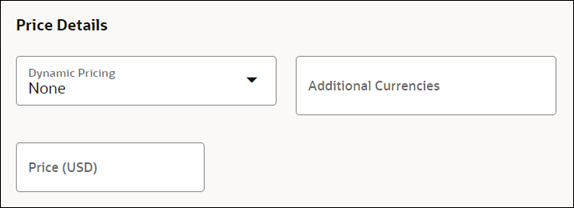
- Select None from the Dynamic Pricing drop-down.
- If applicable, select Additional Currencies from the drop-down.
- Enter the price or discount value for each applicable currency.
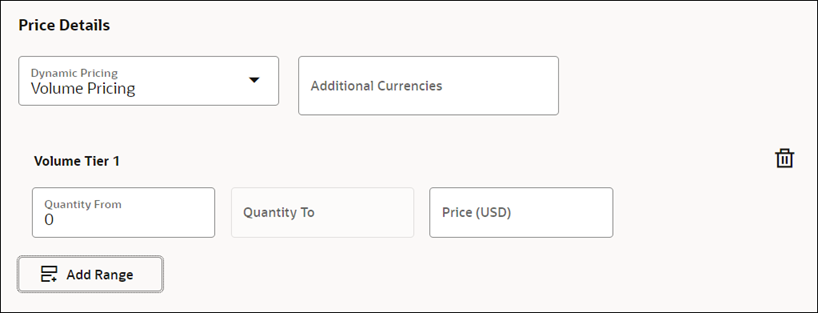
- Select Volume Pricing from the Dynamic Pricing drop-down.
- If applicable, select Additional Currencies from the drop-down.
- Click Add Range.
- Enter the Quantity From value.
- Enter the price or discount value for each applicable currency.
-
Click Add Range.
-
Enter the Quantity From value for the new tier.
The Quantity To value for the previous tier will be populated with the same value.
-
Enter the price or discount value for each applicable currency.
-
Repeat Step f - Step g to add additional tiers.
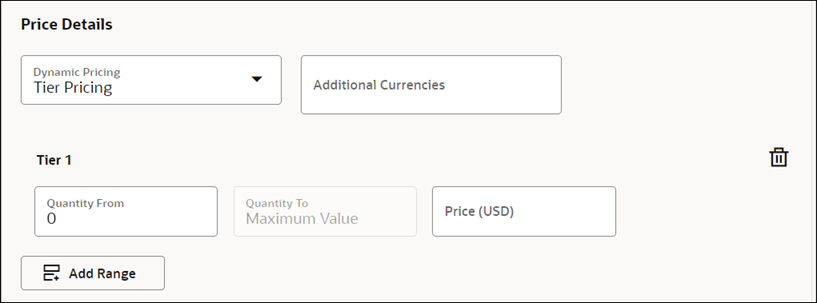
- Select Tier Pricing from the Dynamic Pricing drop-down.
- If applicable, select Additional Currencies from the drop-down.
- Click Add Range.
- Enter the Quantity From value.
- Enter the price or discount value for each applicable currency.
-
Click Add Range.
-
Enter the Quantity From value for the new tier.
The Quantity To value for the previous tier will be populated with the same value.
-
Enter the price or discount value for each applicable currency.
-
Repeat Step f - Step g to add additional tiers.
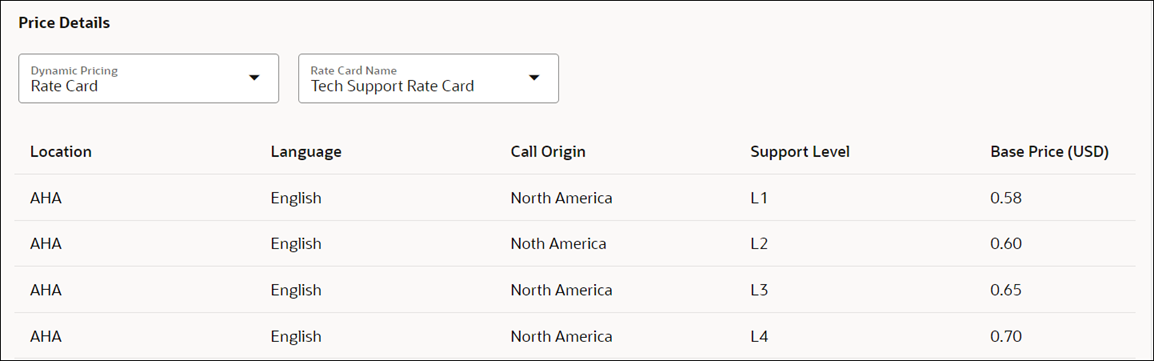
- Select Rate Card from the Dynamic Pricing drop-down.
- Select the Rate Card Name from the drop-down.
- Rate Cards are only available for Price List type Price Models.
- Rate Cards are only available for Usage Price Types.
- Price values are defined by the applicable Rate Card and can't be modified when defining a charge.
- For more information, refer to Rate Cards & Rate Card Templates.
-
Click Create.
-
Perform one of the following options:
-
To add charges, click on the rate plan ellipsis, and then select Add Charges. (Proceed to Add a Charge)
-
To add a product price, click on the rate plan ellipsis, and then select Add Product Price. (Proceed to Add a Product Price)
-
To submit your pricing modifications and return to Oracle Sales, click on the Up Arrow icon at the top of the page, and then click Submit.
-
Complete the following steps to add a product price to a product.
- Navigate to the CPQ Product Workbench:
- From CPQ, navigate to Admin > Products > Product Workbench.
From Oracle Sales, navigate to Redwood Sales > Products.
Then select the Price action for a product. The CPQ Product Workbench application will open.
- Click on the product ellipsis, and then select Edit/View Pricing.
-
Perform one of the following:
-
To add non-rate plan product price, click Add Product Price - OR - click on the charges ellipsis, and then select Add Product Price.
-
To add a product price to a rate plan, click on the rate plan ellipsis, and then select Add Product Price.
-
-
When enabled, select a Charge Definition.
Charge Definitions standardize charge categories and define the valid combinations of price types and charge types. The Price Type and Charge Type are automatically populated when using Charge Definitions.
- Charge Definitions are highly recommended for customers using charge pricing (vs. legacy product pricing) to simplify the setup of prices.
- Charge Definitions are required when CPQ pricing is integrated with Oracle Fusion Pricing.
- For more information, refer to Charge Definitions.
-
Select a Price Type.
The Pricing Type Pricing Lookup provides the following standard values: One time, Recurring, Usage. To add custom values, refer to Pricing Lookups.
-
If applicable, select the Price Period to define the time frequency, periodicity, or recurrence with which the price is levied or charged.
- Price Periods are only applicable for Recurring and Usage Price Types.
- The Pricing Type Pricing Lookup provides the following standard values: Per Month, Per Year. To add custom values (e.g. Per Week, Per Year), refer to Pricing Lookups.
-
Select one of the following Dynamic Pricing options, and perform the included steps:
None (Static Pricing)
- Select None from the Dynamic Pricing drop-down.
- If applicable, select Additional Currencies from the drop-down.
- Enter the price or discount value for each applicable currency.
- Select Volume Pricing from the Dynamic Pricing drop-down.
- If applicable, select Additional Currencies from the drop-down.
- Click Add Range.
- Enter the Quantity From value.
- Enter the price or discount value for each applicable currency.
-
Click Add Range.
-
Enter the Quantity From value for the new tier.
The Quantity To value for the previous tier will be populated with the same value.
-
Enter the price or discount value for each applicable currency.
-
Repeat Step f - Step g to add additional tiers.
- Select Tier Pricing from the Dynamic Pricing drop-down.
- If applicable, select Additional Currencies from the drop-down.
- Click Add Range.
- Enter the Quantity From value.
- Enter the price or discount value for each applicable currency.
-
Click Add Range.
-
Enter the Quantity From value for the new tier.
The Quantity To value for the previous tier will be populated with the same value.
-
Enter the price or discount value for each applicable currency.
-
Repeat Step f - Step g to add additional tiers.
-
Click Create.
-
Perform one of the following options:
-
To add charges, click on the rate plan ellipsis, and then select Add Charges. (Proceed to Add a Charge)
-
To add a product price, click on the rate plan ellipsis, and then select Add Product Price. (Proceed to Add a Product Price)
-
To submit your pricing modifications and return to Oracle Sales, click on the Up Arrow icon at the top of the page, and then click Submit.
-
Perform this procedure if you need to apply pricing conditions for this product.
Within CPQ Pricing, sets are named Price Models. By default, products are added to the Base Price Model in CPQ Pricing. The Base Price Model will apply defined pricing without any conditions.
- Navigate to the CPQ Product Workbench:
- From CPQ, navigate to Admin > Products > Product Workbench.
From Oracle Sales, navigate to Redwood Sales > Products.
Then select the Price action for a product. The CPQ Product Workbench application will open.
- Click on the product ellipsis, and then select Edit/View Pricing.
- Click + Add to Another Set.
- Perform the following steps to add this product to an existing set:
- Search for and select the existing set.
- Click Select.
- Perform the following steps to add a new set, if you can’t find a set with the right conditions, for this conditional pricing:
- Click + Add New Set.
- Enter the Pricing Set Name.
Select the Action based on option.
- All Conditions
- Any Conditions
- Complex Conditions
Click the Click to add attributes here link to add attributes and condition values.
Select the condition Attribute, Operator, and enter a Value.
For more information attributes that are available for conditions, refer to CPQ Pricing Attributes.
(Optional) Click Add New Condition to add another condition.
To delete a conditions click the Delete
 icon.
icon.Click Save.
-
Perform one of the following options:
-
To add charges, click on the rate plan ellipsis, and then select Add Charges. (Proceed to Add a Charge)
-
To add a product price, click on the rate plan ellipsis, and then select Add Product Price. (Proceed to Add a Product Price)
-
To submit your pricing modifications and return to Oracle Sales, click on the Up Arrow icon at the top of the page, and then click Submit.
-
![]() Create a BOM Simple Configurator
Create a BOM Simple Configurator
Complete the following steps to auto-generate simple BOM configurator based on the optional items defined in the product structure.
- Navigate to the CPQ Product Workbench:
- From CPQ, navigate to Admin > Products > Product Workbench.
From Oracle Sales, navigate to Redwood Sales > Products.
Then select the Price action for a product. The CPQ Product Workbench application will open.
- Click on the product ellipsis, and then select Edit/View Configurations.
- Click Create Configuration.
- If applicable, specify effective dates for the new Model Configuration.
-
Specify the hierarchy for the new Model Configuration:
-
Select an existing Product Family or enter a new Product Family name.
-
Select an existing Product Line or enter a new Product Line name.
Note:
-
If an existing Product Family and Product Line are selected, the new Model is added to the selected product hierarchy.
-
If you enter a new Product Family and/or Product Line, you are prompted to confirm the creation of the new hierarchy. The generator will create and deploy the new Product Family and/or Product Line.
-
-
If applicable, click Confirm.
-
Click Save.
A new model is created under a new or existing Product Family and Product Line.
-
Configurable attributes are automatically defined at the Model level based on optional items and BOM Mapping conditions are automatically created.
-
A new layout is generated with the previously auto-generated attributes.
-
Configuration rules including Hiding and BOM Mapping are created for the model.
The Edit/View Configurations page displays the progress of model configurations. After the simple BOM configurator is generated, the Configuration Path details are displayed, and the progress is marked as Completed.
Related Topics
Refer to the following documents for more information focused on Oracle Sales to Oracle CPQ integration implementation.


