Navigation Menus
Overview
The navigation menu is a shortcut menu that lets you access desired areas using the side/top navigation menu. What appears in these menus can be customized based upon where the page you, or the user, happen to be working on: Admin, Commerce, Quick Registration, Subheader and Subfooter.
There are default menus for each user type, but you can customize these by adding custom links or hiding default links. Navigation menus can be customized with the links you want to display in the sidebar or top navigation bar. You can add, reorder, hide, or delete links. External links can be added to default link sets, and you can designate a unique link set for each user type.
 Navigation Menu Descriptions
Navigation Menus are always managed in a pending state. In order for navigation menu changes to become active, they must be initialized on the system. To determine which user type has access to which menu, see the access rights tables for the various menus provided.
| Admin |
The Admin menu contains links pertaining to administration functions in the system. In order for users to reach the administration menu, the Subheader menu must contain the default Admin link. The Admin link cannot be hidden from full access FullAccess users in the FullAccessWithESales company type. |
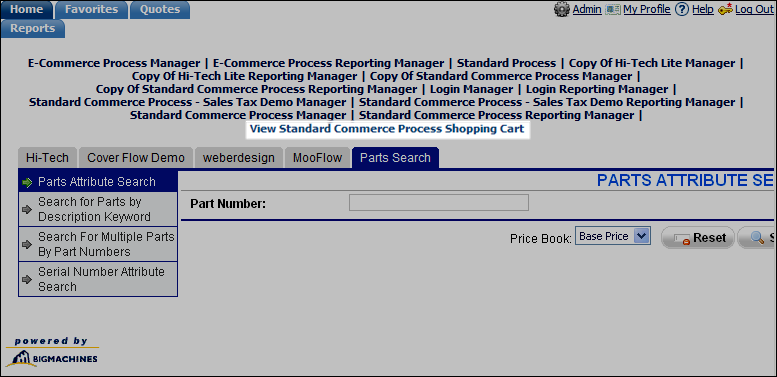
| Commerce |
The Commerce menu contains links to Commerce Managers, Commerce List, and the commerce system's home page where product searches can be conducted. The commerce area of the site automatically appears when a user logs in to the Oracle CPQ system. When a user is in the administration area of the site, they can return to the commerce and catalog areas by clicking the Home Page link in the Subheader menu. |
| Quick Registration |
The Quick Registration menu is displayed before a user logs in to the system. It is also displayed during the quick registration process. |
| Subheader |
The Subheader menu enables users to toggle between the Admin and Commerce menus. This menu is always active when a user is logged in to the system, and by default it contains links to online help and the log out process. |
| Subfooter |
The Subfooter menu refers to the links that are available at the end of a page. |
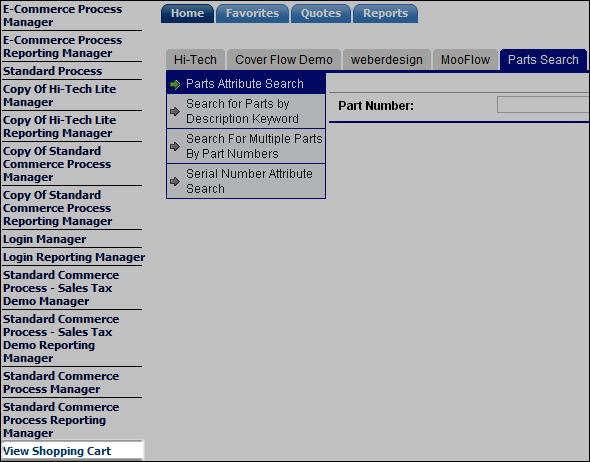
| Sidebar/Top Navigation |
Display your favorite menu options vertically in the sidebar or horizontally on the top navigation bar. Click Set to make the required change. Side Navigation Template: all menus, except Subheader, appear in the side navigation bar. The Subheader menu always appears horizontally across the top of the page, either as a set of links (side navigation template) or a set of tabbed links (top navigation template). Top Navigation Template: all menus appear horizontally across the top of the page. |
Alta Navigation Overview
Administrators can modernize the appearance and usability of Oracle CPQ navigation with the Oracle Alta UI system. Once activated, a new Global Header replaces the previous header and navigation links with a customizable branding area, Global Links, User Navigation Menu, and Admin Navigation Drawer.
The Alta Navigation option adds a single navigation component for global links and the user menu. This allows users to skip the navigation with one tab key press, for ease of keyboard access. To navigate within the global links and user menu, tab into the global links, then use arrow keys to move between links. Use the tab key to skip past the navigation to the page content.
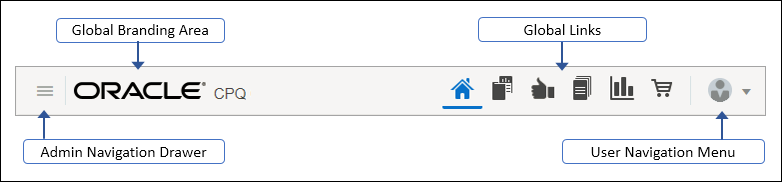
Global Branding Area
Located on the left side of the Global Header, the branding area provides a location for placement of corporate identity information in the form of a custom logo or image and a site name. The default global branding is shown below.

Global Links
Displayed to the right of the branding area, Global Links are icon only buttons that provide easy navigation to key functions while remaining compact to minimize visual clutter. The Global Links streamline access to Oracle CPQ tools and resources based on user access permissions. Administrators can use settings on the Navigation Menus page to display up to six Global Links on the Global Header. Sample global links are shown below.

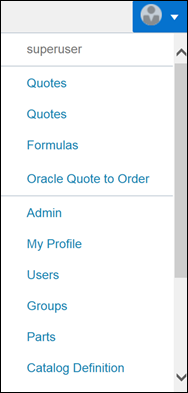
User Navigation Menu
Located in the far right corner of the Global Header, users access the User Navigation Menu by clicking on the User Stamp (a menu button with an icon as the visual representation of the user). The User Navigation Menu contains all of the same options as those available when using the Top Navigation or Side Navigation styling options.

The User Menu, sometimes referred to as the Global Menu, contains three sections:
- The username of the currently authenticated user
- Menu items to navigate to different areas of the Oracle CPQ application
- Global actions such as Help and Sign Out
Note: Administrators can customize the menu items and global actions by showing or hiding the menu items and global actions based on user type. They can also reorganize the placement of the menu items.
Admin Navigation Drawer
The Admin Navigation Drawer presents an interface where navigation items appear as a list containing all of the links currently available on the Admin Home page. The menu icon for accessing the Admin Navigation Drawer represents as three stacked bars, which administrators can click to expand or collapse the Admin Navigation Drawer at any time.

The expanded Admin Navigation Drawer displays primary list items with both an icon and text, while second level navigation items present as text only.
Administration
Setting the Navigation
- Navigate to: Admin > Styles and Templates > Navigation Menus
- Select a navigation option:

Top Navigation: Navigation menu will appear above the administration and user UI.
Side Navigation: Navigation menus will appear to the left of the administration and user UI.
All menus, except Subheader, appear in the side navigation bar. The Subheader menu always appears horizontally across the top of the page, either as a set of links (side navigation template) or a set of tabbed links (top navigation template).
Alta Navigation Enables Alta Navigation and branding area. The first six navigation links will display as icons in the header, the remaining links will display in the User Menu.
When Alta Navigation is selected, the following confirmation message displays:
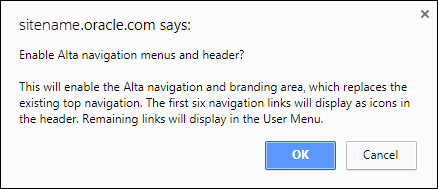
Click OK to confirm the enablement of Alta Navigation and the branding area.
- Click Set.
Managing Navigation Menus
- Navigate to: Admin > Styles and Templates > Navigation Menus
- Click List Links next to the menu you'd like to edit.
- Click one of the following:
- Internal Tab
- User Defined Tab
- Customize Menus
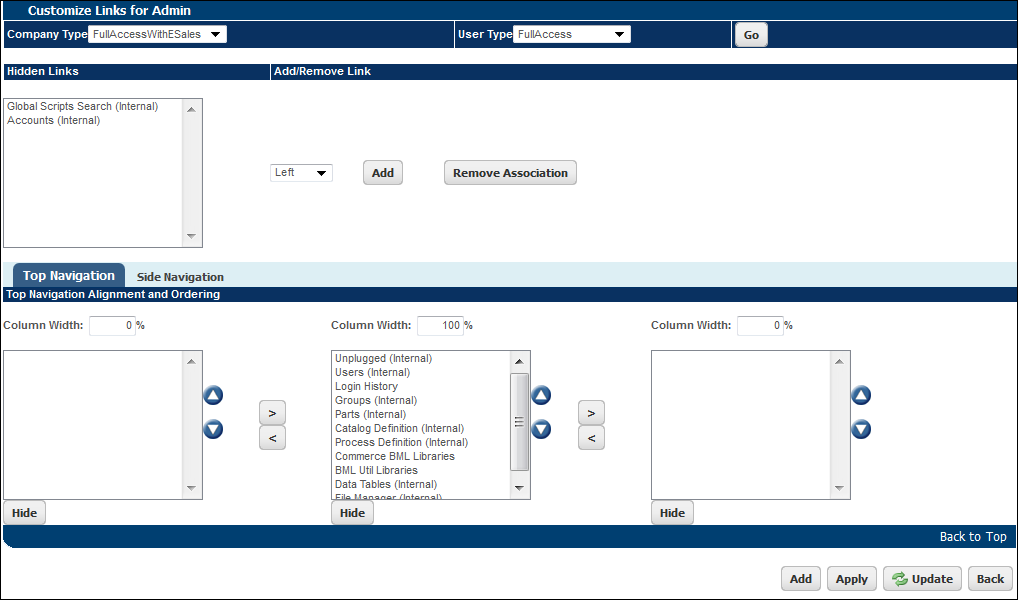
Customizing Menus
Use this area to set the company/user type that can access this menu. You will also hide or show links here.
- Click Customize Menus on the Internal Tab or User Defined tab.
- Choose a Company Type and User Type and click Go.
- Do one of the following:
- To hide a default link: Select the navigation item you want to hide from desired section and click Hide. Click Update.
- To add a default link: Under the Hide Links section, select a link and click Add. Click Update.
- To remove a default link: Under the Hide Links section, select a link and click Remove Association. Click Update.
- Modify which columns are displayed in the Top Navigation and Side Navigation tabs:
- Click Add to add a custom link to the menu, if available.
- Click Update after doing necessary changes
- Click Back and this will take you to the Navigation Menu page. Click Deploy to deploy.
Editing Menu Links: Internal or User-Defined Tab
The Internal tab contains all the navigation items that are built-in.
- Click List Links next to one of the navigation menus.
- Click on the Internal or User-Defined tab.
-
Click Edit next to a corresponding link. When you click Edit against an item, the corresponding Link Editor page is displayed.
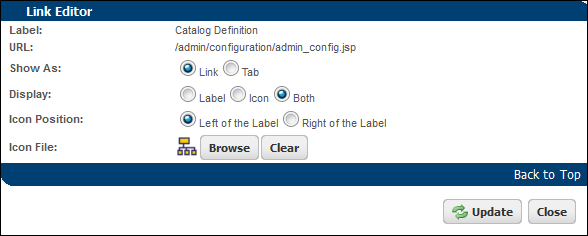
- Manage the following settings:
- Show As: You can either show the item as a link or tab.
- Display: Choose how to display the item, if you chose Show As: Link.
- Icon Position: If you selected Both, you will need to decide if the icon should display to the left or right of the label.
- Icon File: Click Browse to select an image to display next to the icon. This is if you chose to display the link as an icon.
- Click Update to save your changes and return to the Navigation Items List for the menu you are working on.
Adding a Custom Link: User-Defined Tab
-
Click List Links next to one of the navigation menus.
- Click the User-Defined tab.
- Click Add to add a navigation item.
- Enter the Label and the URL.
-
Click Add.
To delete user-defined links, select the links to be deleted and click Delete.
Customize Current Session Language Selection by User Type
Administrators can also enable or disable Language Selection for specific User Types. Complete the following steps to customize Current Session Language Selection.
- Navigate to the Admin Home page.
-
Under Styles and Templates, select Navigation Menus.
The Navigation Menus page opens.
-
Select List Links for the Subheader.
The Navigation Items List - Subheader page opens.
-
Select Customize Menus.
The Customize Links for Subheader page opens.

-
Select the desired Company Type and User Type.
-
Click Go.
The settings for the specified User Type display.
- Set the Include Language Preference? option:
- Select this option to enable Current Session Language Selection for the selected User Type.
- Unselect this option to disable Current Session Language Selection for the selected User Type.
- Click Update.
Alta UI Navigation does not support Current Session Language Selection.
Translations
- Click Translations to open a dialog where you can enter text language translations for supported languages.
- Click Save to save translations in the system and continue entering translations.
- Click Save and Close to save entered translations and close dialog. Click Close to close dialog without saving.
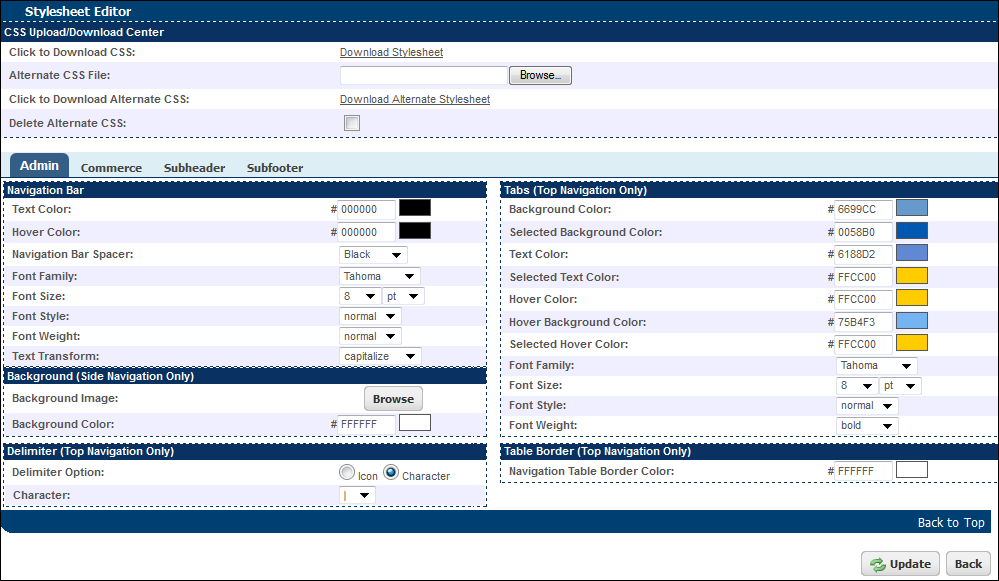
Editing the Stylesheet
Deploying the Navigation Menus
- Navigate to: Admin Home Page > General > Navigation Menus.
- Make edits to any navigation menus and their links.
-
Click Deploy on the Navigation Menus page.
- Styling changes for the Top Navigation and Side Navigation must be deployed in order to take effect.
- Styling modifications for the JET UI take effect immediately and do not require either deployment or a refresh of browser cache.
Notes
- When using top navigation for your site, the sidebar background color should be set to white (FFFFFF) and the text should be a dark, high-contrast color.
- After updating links, remember to deploy the navigation menu on the Navigation Menu List page.
- Through the use of custom links, user types cannot be granted access rights to areas of the commerce system that they do not have default access to.
- Customization of menu links can occur in: Admin, Commerce, Quick Registration, Subfooters, and Subheaders.
- When a link is deleted from the system, it is also removed from all menus.
- User types cannot be granted access rights to additional areas of the commerce system through the use of links.
Related Topics
See Also