Oracle Sales Product Information Master Integration
Overview
The Oracle Sales Product Information Master (SPIM) Integration is used to synchronize products and product structures from Oracle Sales to Oracle CPQ. Synchronization from Oracle Sales to Oracle CPQ can be configured as follows based on your business needs:
-
Batch Synchronization, a predefined scheduled synchronization. Batches of products records are sent from Oracle Sales to Oracle CPQ.
-
Near Real Time Synchronization, without waiting for a scheduled batch to occur. Synchronization can be triggered when a product is modified in Oracle Sales.
-
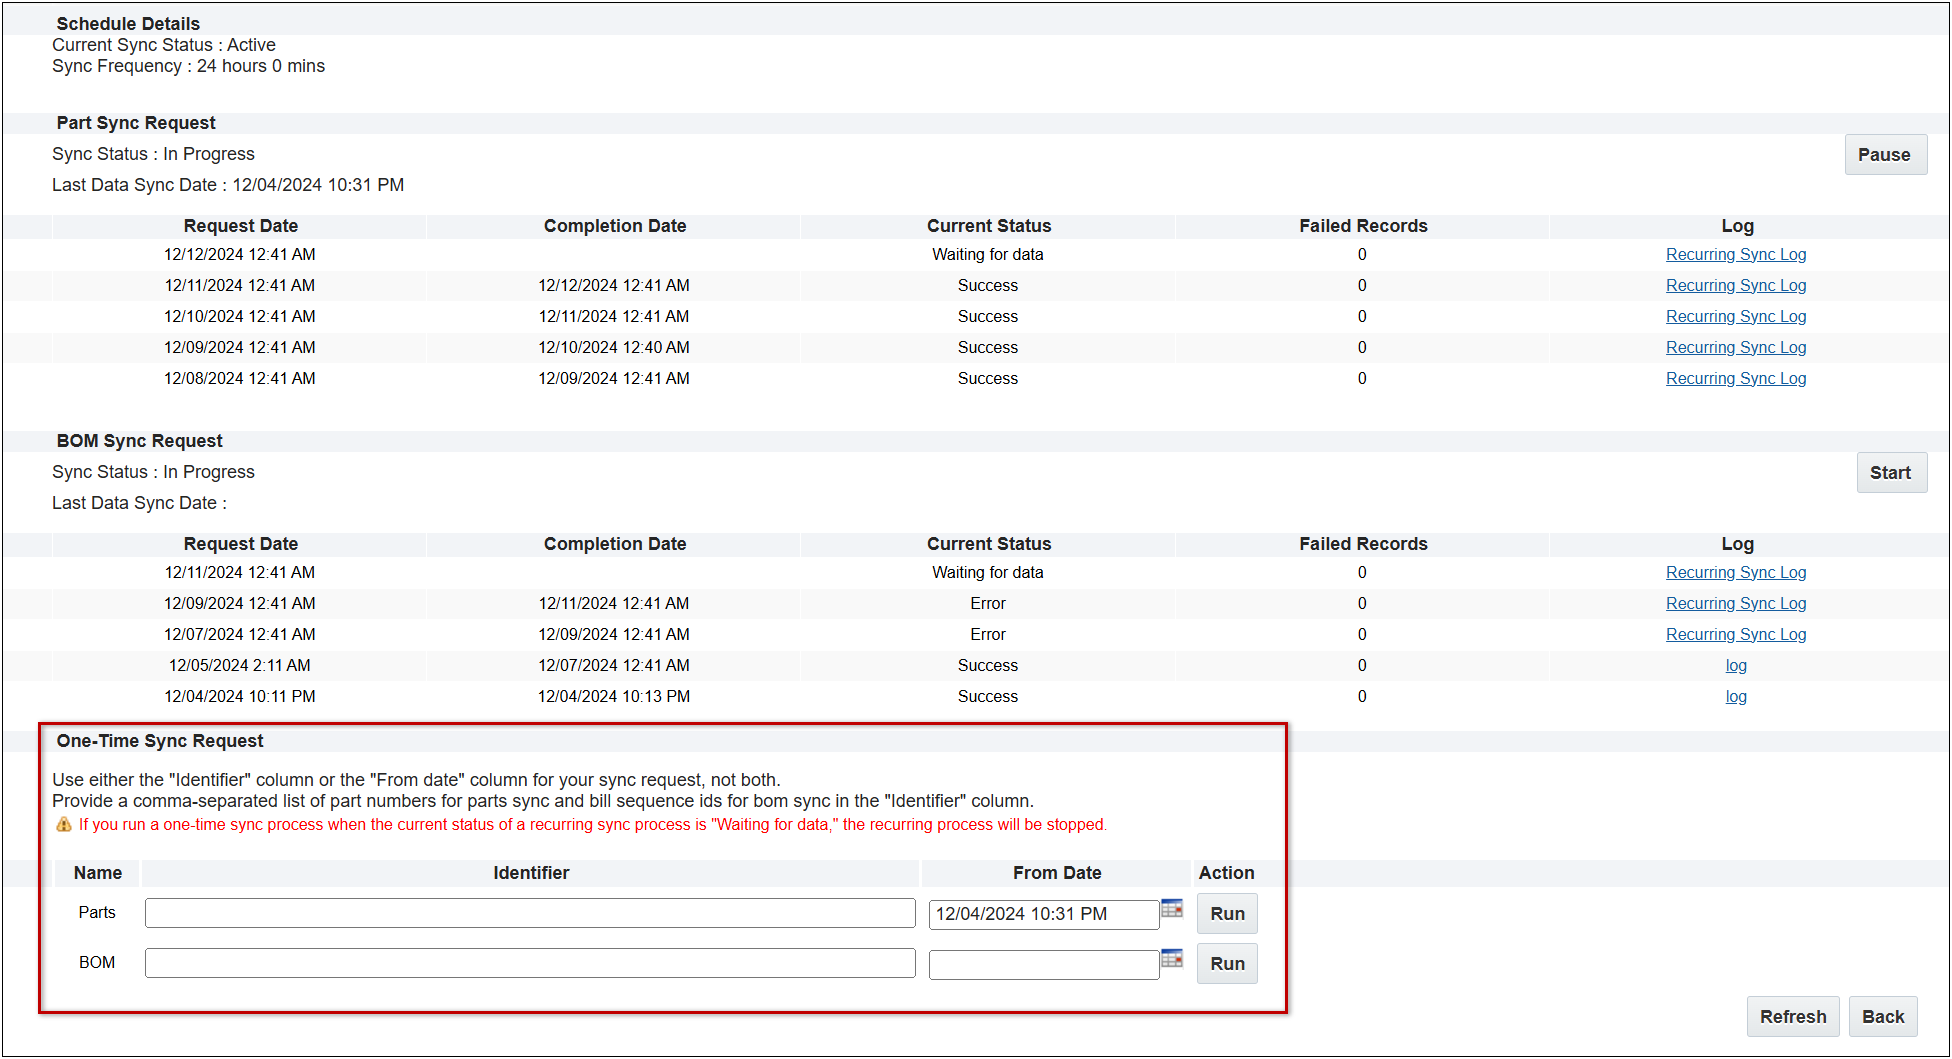
One-Time Parts and BOM Syncs, provide customers with the flexibility to trigger a one-time synchronization for specific parts or BOMs, addressing situations where data might have been missed or needs to be updated immediately.
In addition to setting when synchronization occurs, customers can synchronize standard products or both standard products and hierarchical product structures.
Batch Synchronization
Batch synchronization from the Oracle Sales Product Information Master to Oracle CPQ is performed in scheduled batches, typically once every 24 hours. At the scheduled time:
-
Oracle CPQ sends a synchronization request to Oracle Sales.
-
Oracle Sales exports batches of the entire set of records or a delta set of record changes to CPQ.
-
An Oracle Sales data integration for products provides pre-defined mapping for Standard Part Attributes.
Additional mapping can be added for custom attributes.
-
Oracle Sales sends an export completion notification to Oracle CPQ after all of the batches of records are sent.
-
Oracle CPQ updates the records in the CPQ parts database after receiving the export completion notification from Oracle Sales.
Complex structures created in Oracle Sales can also be synchronized to Oracle CPQ on a scheduled basis. When the Unified BOM Sync is enabled, Oracle Sales product structures are synchronized to the Oracle CPQ BOM Item Definition table.
-
The unified BOM synchronization is initiated upon completion of the parts synchronization.
-
The initial BOM sync will be a complete synchronization and the following BOM synchronizations will be delta synchronizations. BOM sync uses Last Sync Date header value to retrieve records during delta synchronization.
-
An Oracle Sales data integration for product structures provides pre-defined mapping for BOM items.
Note: By default, the frequency of the parts synchronization is scheduled to occur daily (i.e. every 24 hours) and the batch download size is set to 100,000 exported items. Customers can submit a Service Request (SR) on My Oracle Support to change the synchronization frequency and/or batch download size.
Near Real Time Synchronization
This service provides synchronization of a given product or product structure, without waiting for a scheduled batch synchronization to occur. Oracle Sales products and product structures are synchronized to Oracle CPQ.
The Oracle Sales "Upsert Product in CPQ" action synchronizes products when an appropriate Oracle Sales Routine trigger occurs. The Oracle Sales Integration Maps use pre-defined mapping for Standard Part Attributes and additional mapping can be added for custom attributes. The CPQ Upsert BOM Item List REST API can create, update, or delete CPQ BOM hierarchies using a list format, instead of the hierarchical JSON format.  View PTO Model Structure Example
For example, an Oracle Sales product manager creates the PTO Model structure.
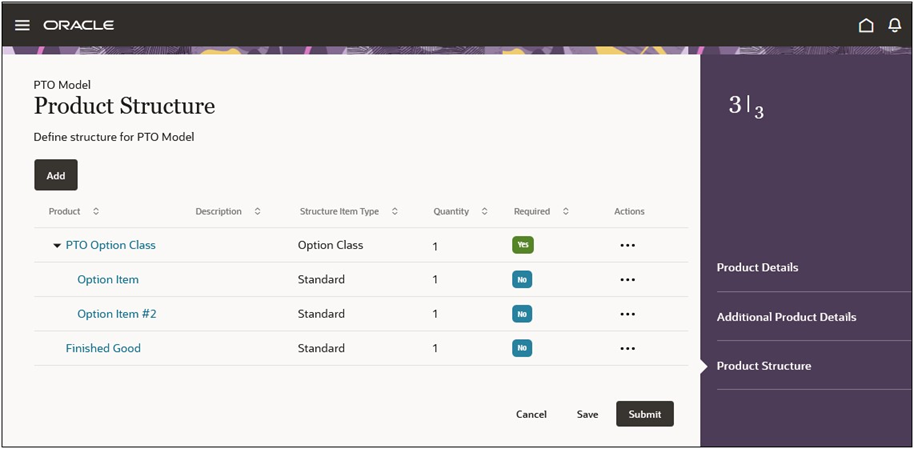
The corresponding structure is added to the CPQ BOM Item Definition data table BOM Item Tree using the Upsert BOM Item List REST API.

One-Time Parts Sync and One-Time BOM Sync
This feature introduces a "One Time Sync" option for parts and Bill of Materials (BOMs) to address situations where data might have been missed or needs to be updated immediately.
One-Time Parts Sync:
-
Specify either a list of comma-separated part numbers or a "from date" for the parts to be synchronized.
-
Only parts with a launch status other than "Draft" will be synchronized.
-
If a recurring synchronization is running and is in the "Waiting for data" status, it will be canceled and replaced with the requested One-Time Parts Sync.
One-Time BOM Sync:
-
Specify either a list of comma-separated Bill Sequence IDs or a "from date" for the BOMs to be synchronized.
-
If a recurring synchronization is running and is in the "Waiting for data" status, it will be canceled and replaced with the requested One-Time BOM Sync.
Notes:
-
When running either the parts or BOM sync, providing both a list of IDs and a "from date" will result in an error. Only choose one of these options to specify the items to be synchronized.
-
The log file name will identify if a specific run occurred as part of the recurring synchronization or it was a one-time sync triggered by a user.
-
Unlike batch synchronization, the One-Time BOM Sync is NOT triggered after the One-Time Part Sync.
Synchronization Status Details in CPQ
 Accessing Synchronization Details
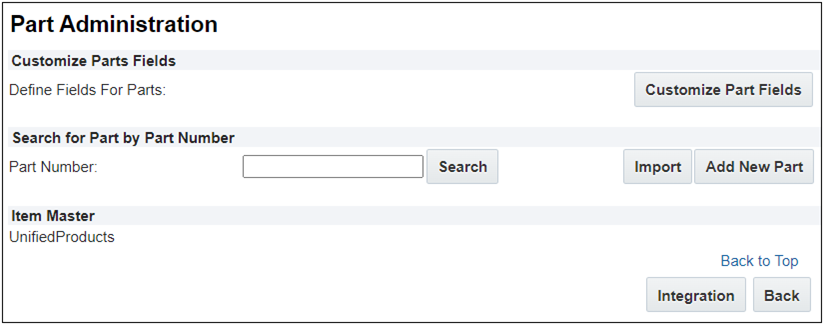
The Parts Administration page provides integration information and provides access to synchronization details and controls. To access the Parts Administration page navigate to the CPQ to the Admin Home page, and then click Parts in the Products section.
When CPQ is integrated with the Oracle Sales Product Master, "UnifiedProducts" is listed as the Item Master on the Parts Administration page.
Note: If you don't find the Item Master section on the Parts Search for Admin page, contact My Oracle Support to enable the Oracle Sales Product Information Master (SPIM) parts integration. You will need to provide your Oracle Sales site URL in the request.
- CPQ administrators can still import and add new CPQ parts, but parts originated in CPQ are not synchronized with Oracle Sales.
- For parts synchronized from the Oracle Sales Product Master, CPQ administrators can only view and provide translations for the integrated items. Synchronized parts can only be modified and deleted in the Oracle Sales application.
- When Oracle Sales Product Information Master (SPIM) integration is enabled, existing CPQ parts that have the same part number as an Oracle Sales Product Master part will be synchronized, and thus become read-only in CPQ.
- If a new part is added to the Oracle Sales Product Master and the part number matches an existing CPQ part, it will be synchronized, and thus become read-only in CPQ after the next synchronization.
To access synchronization details and controls, click the Integration button on the Parts Administration page. Synchronization details are displayed for both parts/items and BOM hierarchies/structures.
 Parts Synchronization Status and Details
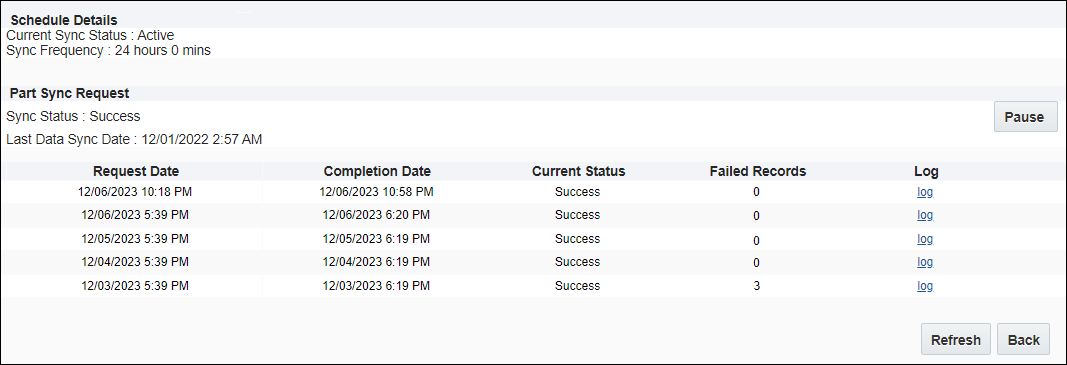
The Part Sync section shows the overall part synchronization status and lists details for the last five of part synchronization jobs.
| Schedule Details |
|
Current Sync
Status
|
Indicates whether
the synchronization scheduling is active, complete, or paused.
|
|
Sync Frequency
|
Indicates how
often synchronization will occur, the default value is 24 hours.
|
|
Sync Status
|
Indicates whether
the previous parts synchronization was successful. |
|
Last Data Sync Date
|
The date and time
when the previous parts synchronization finished.
|
|
Part Sync Request
The following details are displayed for the for the last five of part synchronization jobs.
|
|
Request Date
|
The date and time
when the applicable parts synchronization job started.
|
|
Completion Date
|
The date and time
when the applicable parts synchronization job finished.
|
|
Current Status
|
Indicates whether
the applicable parts synchronization job was successful.
|
|
Failed Records
|
The number of parts
that failed to synchronize in the applicable parts synchronization job.
- "0" is displayed when all
parts are successfully synchronized.
- If
part synchronization failures occur, administrators can click the applicable log link to view the synchronization
log.
- When enabled, BOM Sync will be
initiated after Parts Sync regardless of part synchronization failures.
|
|
Log
|
Provides synchronization details for the applicable synchronization job.
|
Click the Sync Control Pause button to suspend the currently scheduled synchronization. When the synchronization is resumed:
- A new part synchronization will begin immediately. Either a full synchronization or delta synchronization will occur.
- The next part synchronization will initiate after a pre-defined interval, measured from the time the previous synchronization was initiated.
 Unified BOM Synchronization Status and Details
When the Unified BOM Sync is enabled BOM synchronization details and controls are displayed below the part synchronization section on the integration page.
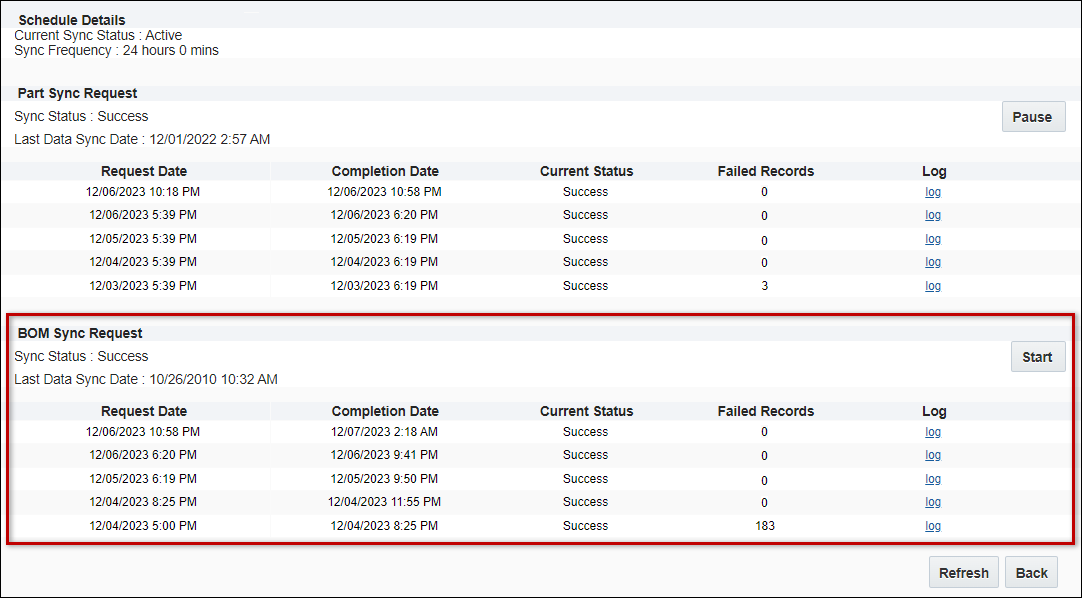
If required, Oracle CPQ administrators can click the BOM Sync Request Start button to initiate a synchronization before the scheduled synchronization. If there is an active parts synchronization administrators will be prompted to wait for competition of the current synchronization before initiating a new BOM synchronization.
| BOM Sync Request |
|
Sync Status
|
Indicates whether
the previous BOM synchronization was successful. |
|
Last Data Sync Date
|
The date and time
when the previous BOM synchronization finished.
|
|
The following details are displayed for the for the last five of BOM synchronization jobs.
|
|
Request Date
|
The date and time
when the applicable BOM synchronization job started.
|
|
Completion Date
|
The date and time
when the applicable BOM synchronization job finished.
|
|
Current Status
|
Indicates whether
the applicable BOM synchronization job was successful.
|
|
Failed Records
|
The number of BOM items
that failed to synchronize in the applicable BOM synchronization job.
- "0" is displayed when all
BOM items are successfully synchronized.
- If
BOM synchronization failures occur, administrators can click the log link to view the synchronization
log.
- When enabled, BOM Sync will be
initiated after Parts Sync regardless of part synchronization failures.
|
|
Log
|
Provides synchronization details for the applicable synchronization job.
|
 Synchronization Behavior
A complete synchronization will occur for the first synchronization. If your parts system contains a large number of parts, complete synchronizations can be very time-consuming. After the initial synchronization, delta synchronizations will occur if the prior synchronization completes successfully without any record failures. Delta synchronizations are less time-consuming than a complete synchronization because they only transfer updates and additions that occurred since the last successful synchronization.
- For parts synchronization, the max last updated date is used as filter parameter for delta records.
- For BOM synchronization, the Last Sync Date header is used as filter parameter for delta records. If the Last Sync Date header is empty, all BOM records are exported.
A scheduled parts synchronization will not fail if an individual part fails to synchronize. However, an individual part synchronization failure will prevent delta synchronization from occurring until the individual part synchronization error is resolved. Part synchronization errors should be resolved as soon as possible since complete parts synchronizations can be very time-consuming. Customers can submit a Service Request (SR) on My Oracle Support to request synchronization logs
A parts synchronization will fail if:
- The Oracle Sales site cannot be reached.
- The Oracle Sales site credentials in Integration Center are incorrect.
- The REST Notification Name specified in Configuration Settings doesn't match the name of the Web Service defined in Oracle Sales. When this occurs CPQ is not notified of a completed Oracle Sales export and will not continue the synchronization process.
- The synchronization request to Oracle Sales site exceeds the CX Sales API timeout. If required, customers can contact My Oracle Support to change the CX Sales API timeout value.
BOM Synchronization Behavior
This section identifies synchronization behavior that is specific to BOM/complex structure synchronizations.
- A BOM synchronization will fail if:
- The Oracle Sales site cannot be reached.
- The Oracle Sales site credentials in Integration Center are incorrect.
- The REST Notification Name specified in Configuration Settings doesn't match the name of the Web Service defined in Oracle Sales When this occurs CPQ is not notified of a completed Oracle Sales export and will not continue the synchronization process.
- The synchronization request to Oracle Sales site exceeds the CX Sales API timeout. If required, customers can contact My Oracle Support to change the CX Sales API timeout value.
- Unified BOM Sync is not enabled in CPQ Configuration settings.
- If an individual Oracle Sales structure fails to synchronize, it will not fail the entire BOM synchronization.
- If a part that is referenced in a BOM fails part synchronization, the root BOM for that item will fail BOM synchronization. This will not affect synchronization of other root BOM items.
- If BOM record synchronization failures occur, the earliest failure time is recorded and the number of BOM record synchronization failures will be displayed. When the next BOM Sync occurs, it will start from earliest failure time. For example, if there are 50 BOM records to synchronize and the 31st BOM record fails synchronization:
- The earliest failure time is recorded as the 31st BOM record.
- "1" is displayed for the Failed Records in Last Successful Sync.
- 1 failure and 49 inserted/updated records will be listed in the Sync Details.
- When the next BOM Sync occurs, it will start from the 31st BOM record.
Administration
Set Up Oracle Sales Product Information Master (SPIM) Integration
The following procedures will establish Oracle Sales Product Information Master (SPIM) as the Products Source for an Oracle Sales – Oracle CPQ Products Integration.
 Verify Current Parts Source in Oracle CPQ
Complete the following steps to verify the current parts source.
-
Log into Oracle CPQ as a parts administrator or as a Full Access user.
-
Navigate to the Admin Home page.
-
Click Parts in the Products section. The Parts Search for Admin page appears.
-
The Item Master field shows the current parts source. If you see "UnifiedProducts" as the item master (source), your CPQ site is integrated with the Oracle Sales Product Master.
Note: If you don't find the Item Master section on the Parts Search for Admin page, contact My Oracle Support to enable the Oracle Sales Product Information Master (SPIM) parts integration. You will need to provide your Oracle Sales site URL in the request.
 Set Up Fusion CRM Integration
Create an Oracle CPQ CRM Integration to establish a connection between Oracle CPQ and an Oracle Sales environment.
-
Log into Oracle CPQ as an administrator or as a Full Access user.
-
Navigate to Admin > Integration Platform > Integration Center.
-
Click Create Integration, select CRM, and then enter the following parameters:
-
Vendor: Fusion
-
Name: Fusion
-
Variable Name: fusion
-
Endpoint URL: the web address for the integrated Oracle Sales site
-
Username and Password: user credentials of a Fusion Integration user with the sales administrator role
-
(optional) Scope: the value used for accessing the public key of the OAuth Provider
-
Enable Integration: check to enable the Oracle Fusion CRM integration
Note: Once the CRM Integration is active, unselecting the Enable Integration checkbox disables any integrations which use it. Run-time integrations will not execute and some administrative features may not be available.
-
Click Save.
 Set Up Notification Web Service in Oracle Sales
Complete the following steps to create an Oracle Sales web service to send an export completion notification to Oracle CPQ.
-
Log into Oracle Sales as a user with the Sales Administrator role.
Note: You must have "Customer Relationship Management Application Administrator" privileges to perform this procedure. Contact your helpdesk to request access.
-
Choose Configuration and then Sandboxes from the upper left navigation menu.
-
Click Create Sandbox.
-
Enter the Name for the Sandbox.
-
Select Yes for the Publishable option.
-
Select the Active checkbox for the Application Composer tool.
-
Click Create.
-
Click on the applicable the sandbox link.
-
Click Application Composer.
-
Choose Common Setup and then Web Services from the left navigation menu.
-
Click on the 'Add Web Service' icon.
-
In the Select Connection Type dialog, select the REST option and click OK.
-
Enter and record the Name for the web service notification.
-
In the URL field, enter the following URL:
https://<siteName>/rest/v18/unified/bulkExportActivities/actions/notify
Where "siteName" is the domain name for the integrated Oracle CPQ site.
-
In the Authentication Scheme section, select the None option.
-
In the Select and Configure Methods against Resource section, select the POST check box.
-
In the Request Payload section, select the Code Sample option and add {} to the multi-line text box.
-
In the Response Payload section, select the Code Sample option and add {} to the multi-line text box.
-
Click Save and Close.
-
Click Publish.
 Set Up Products Synchronization in Oracle CPQ
Complete the following steps to set product synchronization options in Oracle CPQ.
-
Log into Oracle CPQ as a parts administrator or as a Full Access user.
-
Navigate to the Admin Home page.
-
Click Configuration Settings in the Products section.
-
Configure the Unified Products Sync options.
-
Enter the REST Notification Name.
-
Mapping ID: The Oracle Sales Integration Map Number that is used to map The REST Notification Name must match the web service notification Name defined in Set Up Notification Web Service in Oracle Sales. The Mapping ID for the default mapping, which maps standard parts attributes, is DATAINTG-100.
-
Oracle Sales administrators can modify or clone the default mapping.
-
The default mapping can be modified to map an additional Oracle Sales standard or custom part attribute to a CPQ custom part attribute.
-
The default mapping must be cloned if you want to map an additional Oracle Sales standard or custom part attribute to a CPQ standard part attribute.
-
When the default mapping is cloned, a new Mapping ID will be generated.
-
Enable Unified BOM Sync: This option to enable synchronization of The REST Notification Name must match the web service notification Name defined in Set Up Notification Web Service in Oracle Sales. complex structures to Oracle CPQ BOM hierarchies.
-
Click Apply.
 Set Up Data Integration Mapping in Oracle Sales
 Create and Map CPQ BOM Tables
CPQ BOM tables and mapping are required to enable synchronization of Oracle Sales product structures and components to CPQ.
Complete the following procedure to create and map CPQ BOM tables.
-
Log into Oracle CPQ as a parts administrator or as a Full Access user.
-
Navigate to Admin > BOM > BOM Tables.
-
Check the Select All checkbox and click Save.
-
Complete the following to download each of the table definitions:
-
Click on the applicable BOM table link.
-
Click the Download Sample link.
-
Click Cancel to return to the Bills of Materials Tables page.
-
Navigate to Admin > Data Tables.
-
Add a BOM Tables data folder.
-
From the Admin Toolbar, click on the Add Folder icon.
-
Enter BOM Tables for the folder Name.
-
Click inside the Variable Name field.
-
Click OK.
-
Complete the following to import and deploy each of the data table definitions downloaded in Step 4:
-
Select Import from the from the side navigation panel menu drop-down.
-
Drag the applicable Zip file into the "Drop files here or click to upload .csv .txt or .zip" area.
-
Select BOM Tables from the Destination Folder drop-down.
-
Click Import and wait for the Import dialog to close.
-
Double-click on the newly created data table.
-
Click on the Schema tab.
-
Check the Index and Key checkboxes for the VariableName row.
-
Click Deploy.
-
Click OK and wait for the Deploy dialog to close.
-
Navigate to Admin > BOM > BOM Tables.
-
Complete the following to map each of the BOM data tables imported in Step 7:
-
Click on the applicable BOM table link.
-
Select the matching BOM data table from the Table Name drop-down.
-
If Column Mappings are all automatically mapped, click Save and then click Cancel.
-
If Column Mappings are not mapped; select the matching data table columns from the unmapped Column Mapping drop-down, click Save and then click Cancel.
-
Check Select All in the Active column, and then click Save.
 BOM/Structure Attribute Mapping
The following table shows the mapping between Oracle Sales and the CPQ BOM Item Definition table fields.
|
Hashkey(ComponentPath+ComponentItemNumber)
|
09335b122d37febe8bff6846eb5d4568e9326d2c5f2e305073ff01f359b18140
|
Computed
|
variableName
|
09335b122d37febe8bff6846eb5d4568e9326d2c5f2e305073ff01f359b18140
|
|
Hashkey(ComponentPath)
|
6feb7dba6dafaad59f919895a403b36f62712b7dc171a32d2a2050a607286145
|
Computed
|
parentVariableName
|
6feb7dba6dafaad59f919895a403b36f62712b7dc171a32d2a2050a607286145
|
|
Hashkey(ComponentPath[0])
|
e01b40ffc191a57f3f3d2efeedb3aed82265ab8f1454f02ef00f44bfc63bfd5c
|
Computed
|
rootVariableName
|
e01b40ffc191a57f3f3d2efeedb3aed82265ab8f1454f02ef00f44bfc63bfd5c
|
|
Quantity
|
|
Mapped
|
defaultQuantity
|
|
|
StartDateTime
|
2017-07-26
|
Mapped
|
effectiveFrom
|
2017-07-26T00:00:00Z
|
|
EndDateTime
|
2017-07-27
|
Mapped
|
effectiveTo
|
2017-07-27T00:00:00Z
|
|
Equivalent PIM
attribute does not exist.
|
|
Not Mapped
|
isIncludedInBasePrice
|
Note:This value will be set to “N”.
|
|
Equivalent PIM
attribute does not exist.
|
|
Not Mapped
|
isManufacturingItem
|
Note:This value will be set to “N”.
|
|
OptionalFlag
|
true
/ false
|
Mapped
|
isOptional
|
Y/N
|
|
Equivalent PIM
attribute does not exist.
|
|
Not Mapped
|
isRootModel
|
Note:This value is set to “Y” for Root models, and “N”
for all child models.
|
|
CustomerOrderEnabledFlag
|
true
/ false
|
Mapped
|
isSalesItem
|
Y/N
|
|
ComponentItemId
|
300100545999948
|
Mapped
|
itemIdentifier
|
300100545999948
|
|
ComponentStructureItemTypeValue(BomItemType)
|
Model
/ Standard / Option Class
|
Mapped
|
itemType
|
Model / Standard / Option
Class
|
|
(ComponentPath+ComponentItemNumber)
|
FOS-Home Appliances>
Lighting equipment OC> Exhaust Fan
|
Mapped
|
Label
|
Exhaust Fan
|
|
Equivalent PIM
attribute does not exist.
|
|
Not Mapped
|
modelPath
|
Note:This
value will be left empty.
|
|
ComponentItemNumber
|
Exhaust Fan
|
Mapped
|
partNumber
|
Exhaust
Fan
|
|
ItemSequenceNumber
|
10
/ 20 / 30
|
Mapped
|
sequenceNumber
|
10 /
20 / 30
|
|
Equivalent PIM
attribute does not exist.
|
|
Not Mapped
|
bomPrice
|
Note: This
value will be set to 0,0
|
 Initiate a One-Time Parts Sync
Complete the following steps to initiate a One-Time Parts Sync:
-
Navigate to CPQ > Admin > Parts.
-
Click Integration.
-
Specify only one of the following for the parts to be synchronized:
Note: When running the One-Time Parts Sync, only specify one of these options. An error will occur is you provide both part numbers and a "From Date".
- Click Run.
Notes:
-
The log file name will identify if a specific run occurred as part of the recurring synchronization or it was a one-time sync triggered by a user.
-
Unlike batch synchronization, the One-Time BOM Sync is NOT triggered after the One-Time Part Sync.
 Initiate a One-Time BOM Sync
Complete the following steps to initiate a One-Time BOM Sync:
-
Navigate to CPQ > Admin > Parts.
-
Click Integration.
-
Specify only one of the following for the BOMs to be synchronized:
Note: When running the One-Time BOM Sync, only specify one of these options. An error will occur is you provide both Bill Sequence Ids and a "From Date".
- Click Run.
Notes:
-
The log file name will identify if a specific run occurred as part of the recurring synchronization or it was a one-time sync triggered by a user.
-
Unlike batch synchronization, the One-Time BOM Sync is NOT triggered after the One-Time Part Sync.
Notes
Refer to the following documents for more information focused on Oracle Sales to Oracle CPQ integration implementation.
Related Topics
 See Also
![]() View PTO Model Structure Example
View PTO Model Structure Example
![]() Accessing Synchronization Details
Accessing Synchronization Details
![]() Parts Synchronization Status and Details
Parts Synchronization Status and Details
![]() Unified BOM Synchronization Status and Details
Unified BOM Synchronization Status and Details
![]() Verify Current Parts Source in Oracle CPQ
Verify Current Parts Source in Oracle CPQ
![]() Set Up Notification Web Service in Oracle Sales
Set Up Notification Web Service in Oracle Sales
![]() Set Up Products Synchronization in Oracle CPQ
Set Up Products Synchronization in Oracle CPQ
![]() Set Up Data Integration Mapping in Oracle Sales
Set Up Data Integration Mapping in Oracle Sales
![]() Initiate a One-Time Parts Sync
Initiate a One-Time Parts Sync


