Overview
Oracle CPQ supports canonical Pricing and Charge Attributes in the CPQ pricing module. Pricing Attributes are mapped to specific attributes from Commerce, Parts, or Configuration. CPQ provides several standard Pricing Attributes with predefined mapping for frequently used attributes (e.g. Configuration Quantity, Commerce Quantity, Pricing Segment, and Account). Customers can also add their own custom Pricing and Charge Attributes. Pricing Attributes can be used to define conditions and functions for Price Models and Pricing Rules. The Price Models and Pricing Rules will be invoked based on the values from the Pricing Attributes and will automatically populate the price values referenced in conditions and functions.
Oracle CPQ 24D combined Charge Attributes with Pricing Attributes into a single module in the Pricing Portal. Refer to Charge Attributes for releases prior to Oracle CPQ 24D. The "Charge" type Pricing Entity identifies Charge Attributes inside the Pricing Attributes module. The Pricing Attributes module supports all previous Charge Attribute fields and functionality.
Pricing Attribute Pages
![]() Pricing Attributes List Page - This list page allows administrators to view the pricing attributes Pricing Entity (Header or Line), Name, Variable Name, Data Type, and Type without opening individual Pricing Attributes details. The array type attributes are appropriately labeled in the Data Type column on the Pricing Attributes list page.
Pricing Attributes List Page - This list page allows administrators to view the pricing attributes Pricing Entity (Header or Line), Name, Variable Name, Data Type, and Type without opening individual Pricing Attributes details. The array type attributes are appropriately labeled in the Data Type column on the Pricing Attributes list page.
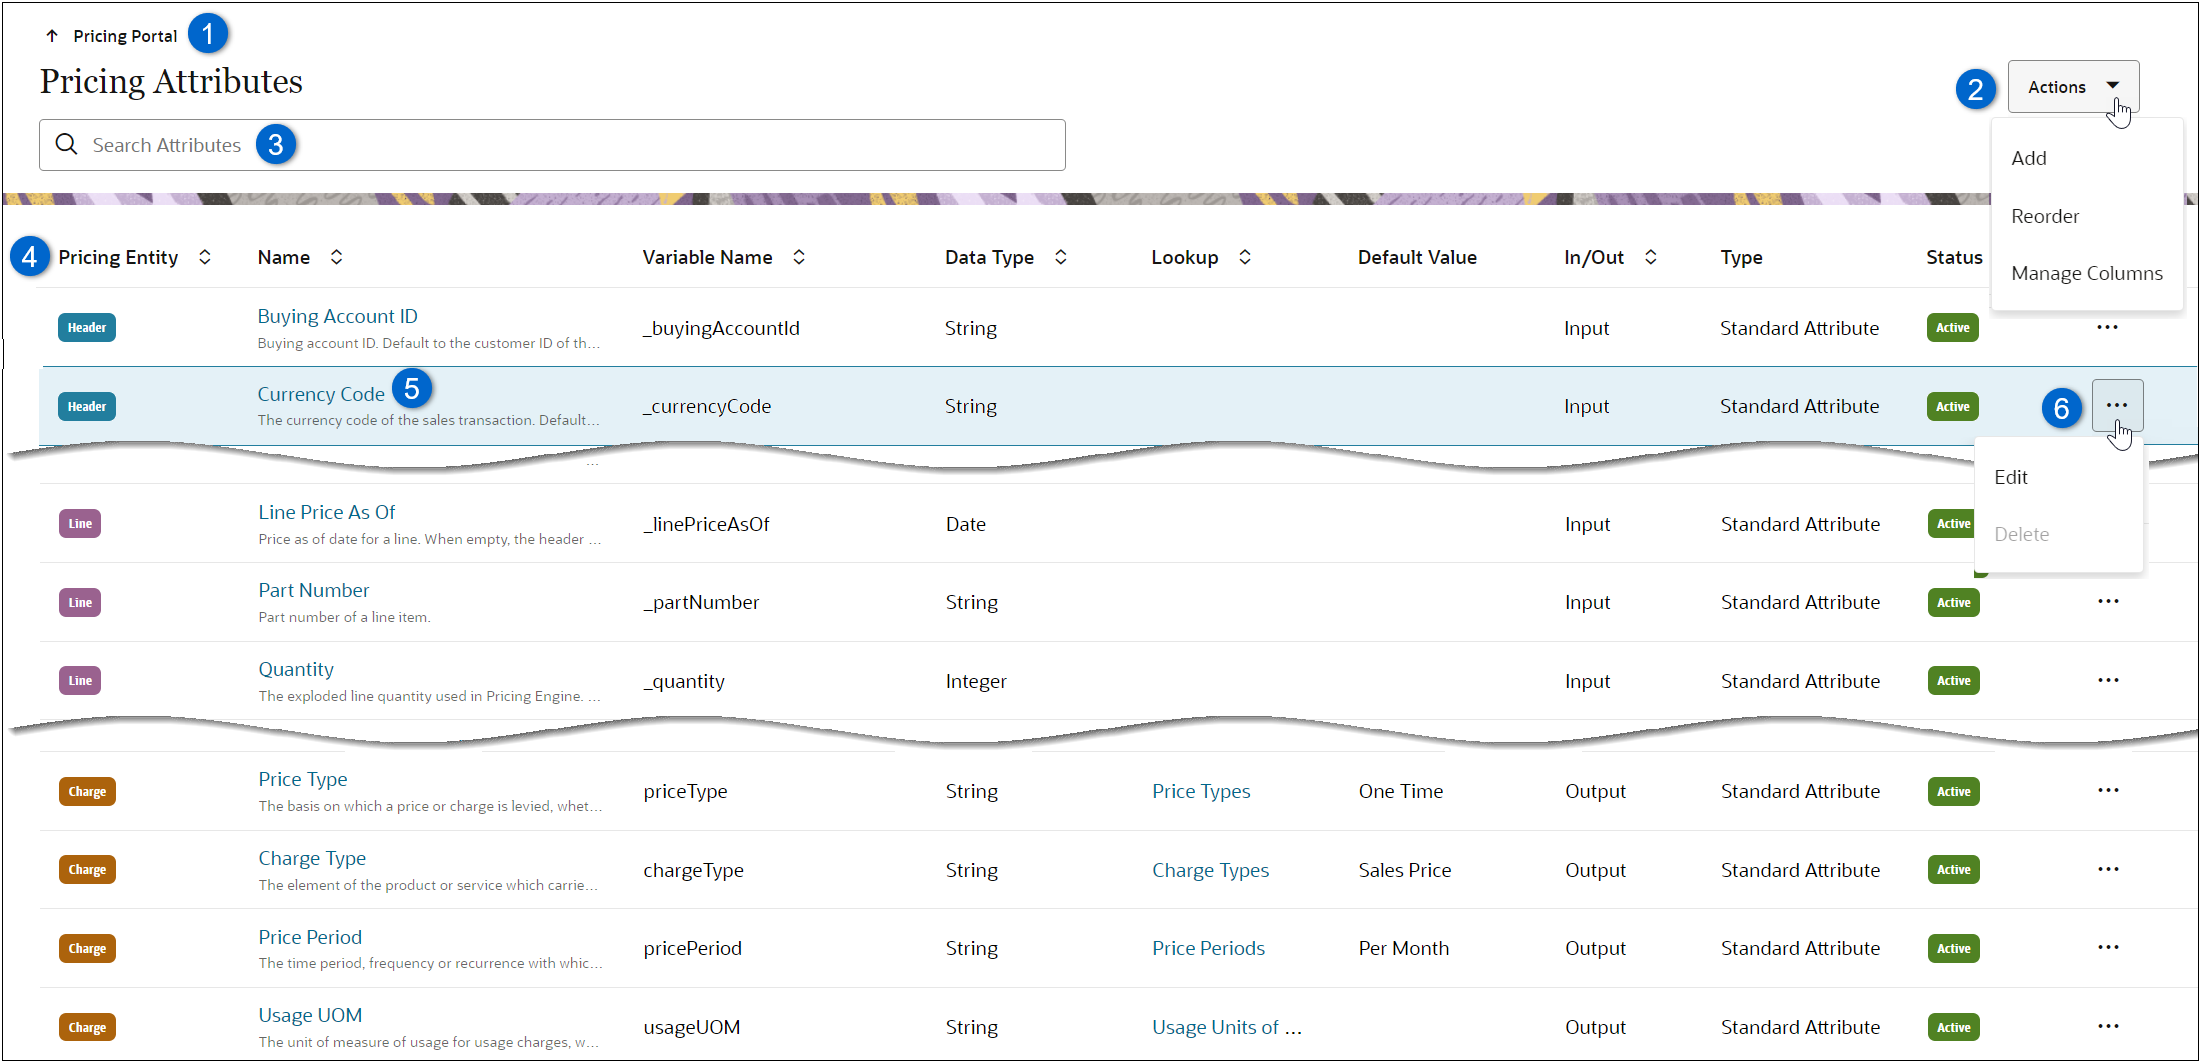
| Item | Description |
|---|---|
|
1 |
Navigate to Pricing Portal. |
|
2 |
Click Actions to Add new custom Pricing Attributes, Reorder custom charge attributes, or to Manage Columns for the Pricing Attributes list. Note: Only custom Charge type Pricing Attributes can be reordered. |
|
3 |
Enter search criteria to filter Pricing Attributes results, which remain persistent while navigating within Pricing Attributes. |
|
4 |
Sort Pricing Attributes using the Pricing Entity, Name, Variable Name, Data Type, or Type column headers. |
|
5 |
Edit an existing Price Attribute by clicking on the appropriate Name link or click on the line ellipsis and selecting Edit. |
|
6 |
Edit or Delete a Pricing Attribute by clicking on the line ellipsis and selecting the appropriate action. |
![]() Pricing Attribute Page - This page allows administrators to manage Pricing Attributes. This section describes fields for Header and Line type Pricing Attributes. See Charge Type Pricing Attribute Page for more information about charge-related fields.
Pricing Attribute Page - This page allows administrators to manage Pricing Attributes. This section describes fields for Header and Line type Pricing Attributes. See Charge Type Pricing Attribute Page for more information about charge-related fields.
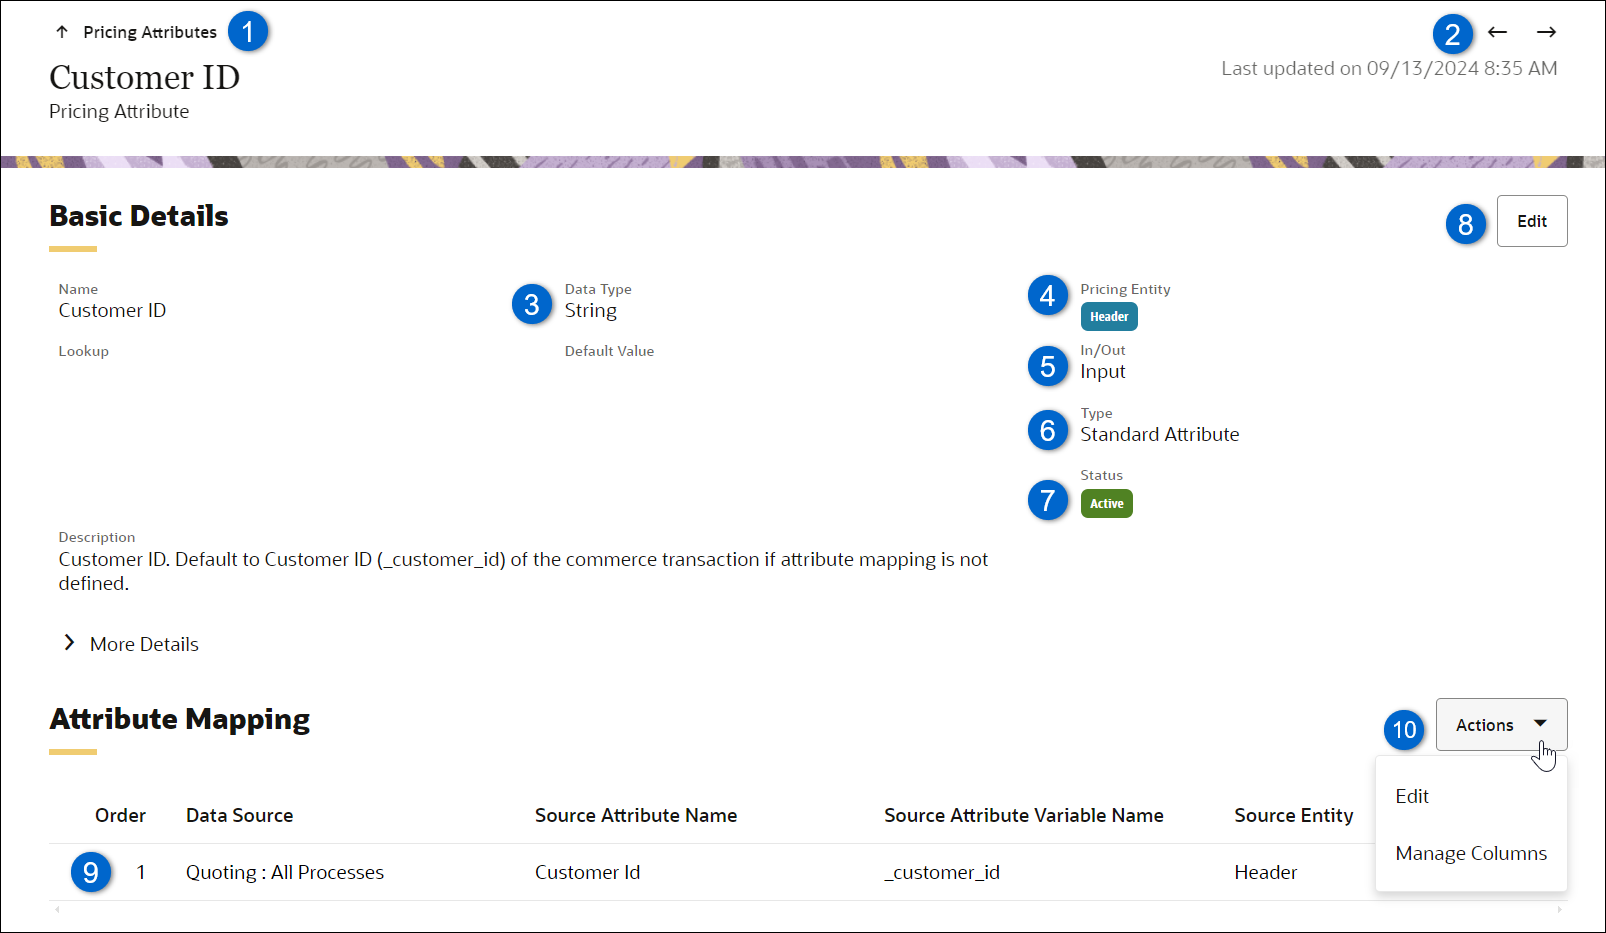
| Item | Description |
|---|---|
|
1 |
Navigate to the Pricing Attributes list page. |
|
2 |
Navigate to Next or Previous pricing attribute in the pricing attributes list or filtered pricing attributes search results list. |
|
3 |
Data Type: Boolean, Currency, String, Decimal, Date, or Integer. |
|
4 |
Pricing Entity: Header, Line, or Charge |
|
5 |
In/Out: Identifies if an attribute is a Pricing Engine input, output, internal, or external. Each Pricing Attribute can have only one of the following values:
The In/Out parameter can be set to Input, Output, or Internal for new custom Pricing Attributes. Charge Attributes are automatically set to Output. |
|
6 |
Type: Custom or Standard |
|
7 |
Status: Active or Inactive |
|
8 |
Edit the pricing attributes Name, Lookup, Default Value, or Description. |
|
7 |
Mapped Data Sources |
|
8 |
Click Edit to add, reorder, and delete attribute mappings. Click Manage Columns to manage displayed columns. |
![]() Charge Type Pricing Attribute Page - This page allows administrators to manage Pricing Attributes. This section describes fields for Charge type Pricing Attributes.
Charge Type Pricing Attribute Page - This page allows administrators to manage Pricing Attributes. This section describes fields for Charge type Pricing Attributes.
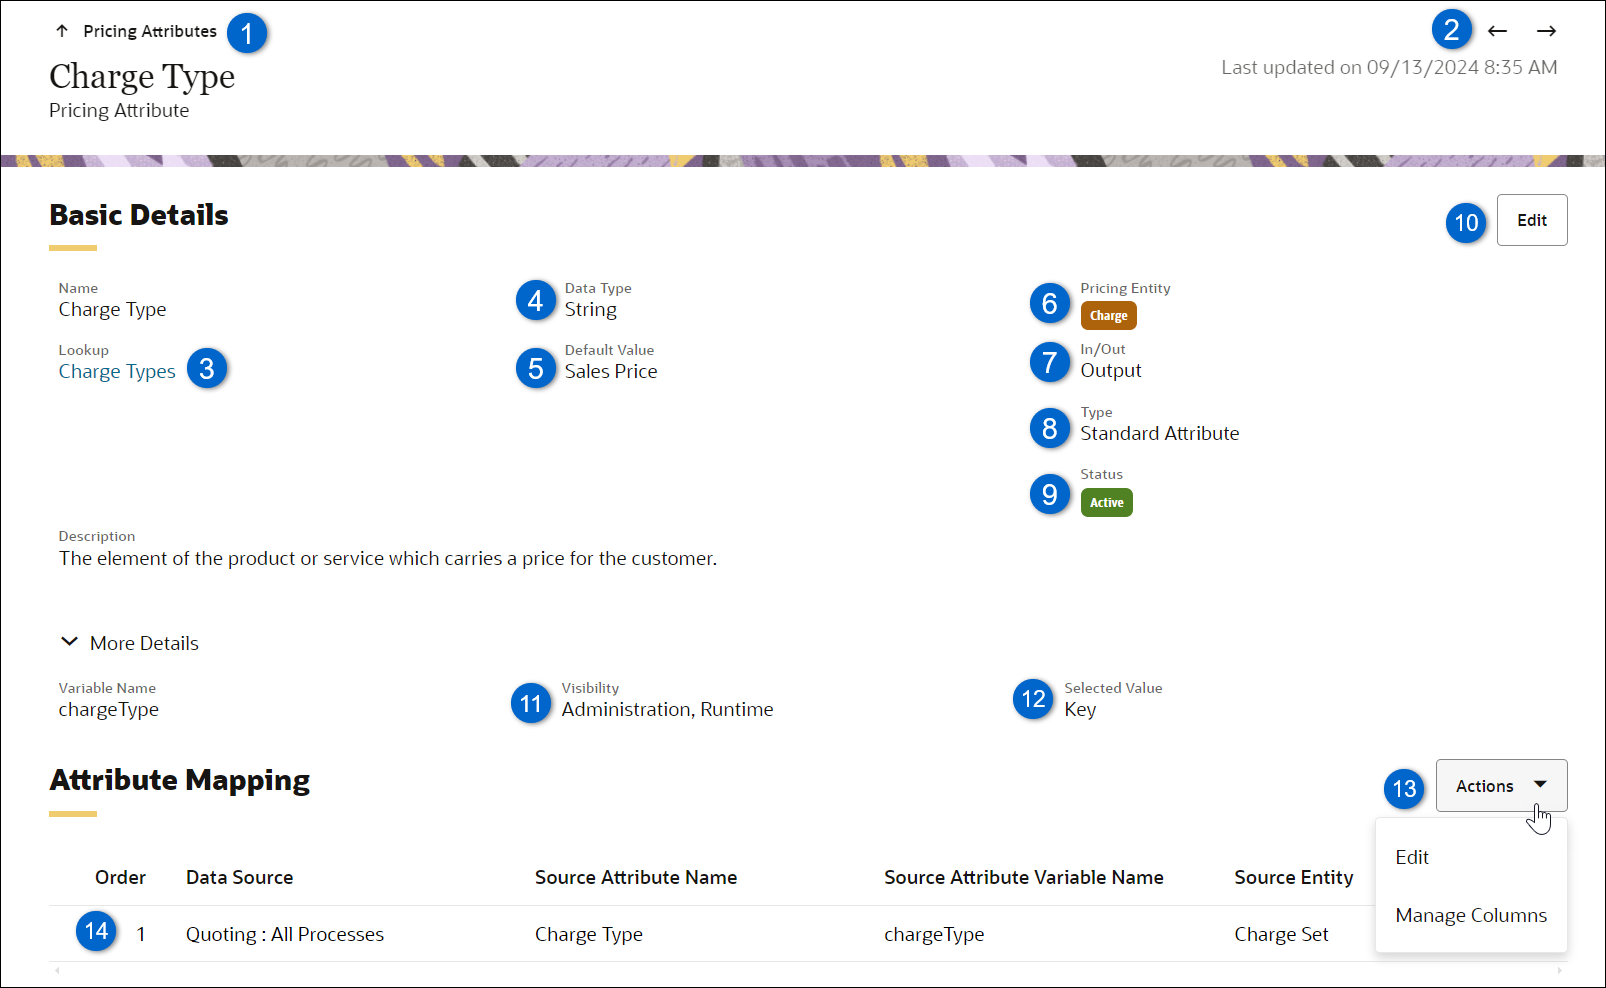
| Item | Description |
|---|---|
|
1 |
Navigate to the Pricing Attributes list page. |
|
2 |
Navigate to Next or Previous pricing attribute in the pricing attribute list or filtered pricing attribute search results list. |
|
3 |
A Lookup associates a Pricing Lookup to a String type attribute. |
|
4 |
The Data Type: Boolean, Currency, Date, Decimal, Integer, String, or Text Area. |
|
5 |
The Default Value for specified for Boolean, Date, Decimal, Integer, or String data types. When a Lookup is selected, you can select a default value from values defined in Pricing Lookups. |
|
6 |
Pricing Entity: Header, Line, or Charge |
|
7 |
In/Out: Identifies if an attribute is a Pricing Engine input, output, internal, or external. Each Pricing Attribute can have only one of the following values:
The In/Out parameter can be set to Input, Output, or Internal for new custom Pricing Attributes. Charge Attributes are automatically set to Output. |
|
8 |
Type indicates if the Charge Attribute is standard of custom. |
|
9 |
Status indicates if the Charge Attribute is active of inactive. |
|
10 |
Click Edit to modify editable charge attribute fields. The fields that are editable are dependent on the charge attribute Type and Data Type. |
|
11 |
Visibility identifies if the charge attribute is visible in other CPQ modules.
|
|
12 |
Selected Value: Key, Required, or Negotiable. |
|
13 |
Click Edit to add, reorder, and delete attribute mappings. Click Manage Columns to manage displayed columns. |
|
14 |
Mapped Data Sources |
Standard Pricing Attributes
CPQ provides the following standard Pricing Attributes with predefined mapping for frequently used attributes. Standard Pricing Attributes and mappings cannot be deleted or inactivated.
![]() View Standard Pricing Attributes
View Standard Pricing Attributes
|
Pricing Entity |
Name |
Variable Name |
In/Out |
Description |
Data Type |
Lookup |
Visibility |
|---|---|---|---|---|---|---|---|
|
Header |
Buying Account ID |
_buyingAccountId |
Input |
Buying account ID. Default to the customer ID of the current transaction if attribute mapping is not defined. Pricing Engine uses this attribute to locate price agreements for a customer. |
String |
|
|
|
Header |
Currency Code |
_currencyCode |
Input |
The currency code of the sales transaction. Default to the system currency preference (_system_current_document_currency_pref) of the commerce transaction if attribute mapping is not defined. |
String |
|
|
|
Header |
Customer ID |
_customer_id |
Input |
Customer ID. Default to Customer ID (_customer_id) of the commerce transaction if attribute mapping is not defined. |
String |
|
|
|
Header |
Price As Of |
_priceAsOf |
Input |
Price as of date. When empty, the current timestamp at the pricing execution is used. |
Date |
|
|
|
Line |
BOM Item Variable Name |
_bomItemVariableName |
Input |
Variable Name of the BOM item definition for a BOM item. It is empty for a part item. |
String |
|
|
|
Line |
Line Price As Of |
_linePriceAsOf |
Input |
Price as of date for a line. When empty, the header price as of date is used. |
Date |
|
|
|
Line |
Part Number |
_partNumber |
Input |
Part number of a line item. |
String |
|
|
|
Line |
Quantity |
_quantity |
Input |
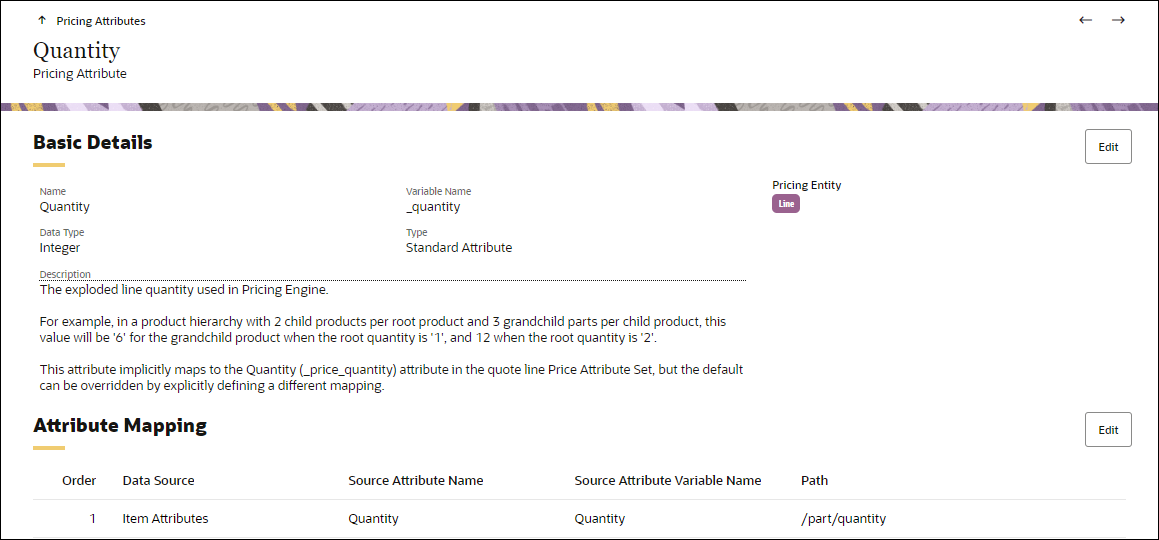
The exploded line quantity used in Pricing Engine. For example, in a product hierarchy with 2 child products per root product and 3 grandchild parts per child product, this value will be '6' for the grandchild product when the root quantity is '1 and 12 when the root quantity is '2'. This attribute implicitly maps to the Quantity (_price_quantity) attribute in the quote line Price Attribute Set, but the default can be overridden by explicitly defining a different mapping. |
Integer |
|
|
|
Line |
Requested Agreement Number |
_requestedAgreementNumber |
Input |
The price agreement that will be applied to the line if applicable. Note if the supplied agreement number is not applicable. then a default agreement will be applied. |
String |
|
|
|
Line |
Requested Rate Plan Number |
_requestedRatePlanNumber |
Input |
Requested Rate Plan Number During the CPQ quoting or ordering process, a default Rate Plan is applied initially on the quote line to the Applied Rate Plan attribute. The Requested Rate Plan drop-down menu provides the user with a list of alternative Rate Plans available for their selection. Refer to Applying Rate Plans for more information |
String |
|
|
|
Line |
Service Duration |
_serviceDuration |
Input |
The duration to service a product, measured in the unit of Service Duration Period. Only applicable to a product that fulfills a service contract. |
Integer |
|
|
|
Line |
Service Duration Period |
_serviceDurationPeriod |
Input |
The time period unit in which a product is service, e.g., month or year. Only applicable to a product that fulfills a service contract. |
|
Service Duration Periods |
|
|
Charge |
Calculation Information |
calculationInfo |
Output |
A JSON array of the Price Models used in calculating this charge's price. |
Text Area |
|
Runtime |
|
Charge |
Charge Definition |
chargeDefinition |
Output |
The display label of the charge definition. This attribute is only available when Charge Definitions are enabled. |
Text |
|
Administration Runtime |
|
Charge |
Charge Definition Code |
chargeDefinitionCode |
Output |
The code of the charge definition. This attribute is only available when Charge Definitions are enabled. |
Text |
|
Runtime |
|
Charge |
Charge Definition Integration ID |
chargeDefinitionIntegrationId |
Output |
The charge definition code in the integrated order management system. This attribute is only available when Charge Definitions are enabled. |
Text |
|
Runtime |
|
Charge |
Charge Type |
chargeType |
Output |
The classification of a charge associated with the price for a product or service. This attribute differentiates the purpose of charges with the same price type and price period. For example, the sale of a network device may have both a one-time purchase price (with charge type of 'Purchase Price') and a one-time installation price (with charge type of 'Installation Fee'). |
String |
Charge Types |
Administration Runtime |
|
Charge |
Discount Amount |
discountAmount |
Output |
The extended custom discount amount per period for this charge. Typically this represents the unit discount x quantity. |
Currency |
|
Runtime |
|
Charge |
Discount Type |
discountType |
Output |
The type of custom discount applied to this charge. Typically this may be an override price, a discount value or a discount percentage. |
String |
Discount Types |
Runtime |
|
Charge |
Discount Value |
discountValue |
Output |
The numeric value for a custom discount associated with the discount type for this charge. For example, if the Discount Type is Override, this value with be the override price for this charge. |
Decimal |
|
Runtime |
|
Charge |
Dynamic Pricing Type |
dynamicPricingType |
Output |
The type of dynamic pricing used to define this charge: static, tiered, volume, rate card, advanced. |
String |
|
Runtime |
|
Charge |
Extended List Amount |
extendedListAmount |
Output |
The extended price of a line item. This is the line unit price multiplied by the quantity. |
Currency |
|
Runtime |
|
Charge |
Net Amount |
netAmount |
Output |
The extended net price or amount per period that will be paid for this charge. Typically this represents the unit price x quantity. |
Currency |
|
Runtime |
|
Charge |
Net Price |
netPrice |
Output |
The unit price net of all discounts for this charge. The Net Price is the unit price that the customer will be invoiced. |
Currency |
|
Runtime |
|
Charge |
Price Period |
pricePeriod |
Output |
The time period, frequency, or recurrence with which the price or charge is levied. |
String |
Price Periods |
Administration Runtime |
|
Charge |
Price Type |
priceType |
Output |
The basis on which a price or charge is levied, whether one time, on a periodic basis or based on usage. |
String |
Price Types |
Administration Runtime |
|
Charge |
Rate Card |
rateCard |
Output |
Display label for the Rate Card applied in calculating this charge's price. |
String |
|
Runtime |
|
Charge |
Rate Card in HTML |
rateCardinHTML |
Output |
The HTML-formatted rate card data. |
Text Area |
|
Runtime |
|
Charge |
Rate Card Structure |
rateCardStructure |
Output |
The rate card used to calculate this charge's price. |
Text Area |
|
Runtime |
|
Charge |
Rate Card Variable Name |
rateCardVariableName |
Output |
Variable Name for the Rate Card applied in calculating this charge's price. |
String |
|
Runtime |
|
Charge |
Tax Calculation |
taxCalculationInfo |
External |
A JSON array of the additional tax information like tax amount, net price excluding tax, and net amount excluding tax. |
Text Area |
|
Runtime |
| Charge |
Tax Price |
taxPrice |
External |
Tax to be paid for each unit of the line item. |
Currency |
|
Runtime |
| Charge |
Total Amount Including Tax |
totalAmountIncludingTax |
External |
Total amount to be paid for the line item, including taxes. |
Currency |
|
Runtime |
| Charge |
Total Price Including Tax |
totalPriceIncludingTax |
External |
Total price to be paid for each unit of the line item, including taxes. |
Currency |
|
Runtime |
|
Charge |
Unit Price |
unitPrice |
Output |
The unit price to be paid by the customer for this charge. |
Currency |
|
Runtime |
|
Charge |
Usage UOM |
usageUOM |
Output |
The unit of measure of usage for usage charges, which may differ from the unit of measure used for the parent product. |
String |
Usage UOMs |
Administration Runtime |
Pricing Attribute Enhancements
-
Oracle CPQ 24D combined Charge Attributes with Pricing Attributes. The Pricing Attributes module supports all previous Charge Attribute fields and functionality.
-
Oracle CPQ 24D also introduced the In/Out parameter for Pricing and Charge Attributes to identify if an attribute is a Pricing Engine input, output, internal, or external. Each Pricing Attribute can have only one of the following values:
-
Input – This option defines attribute values that are used as inputs to pricing calculations.
-
Output – This option defines attribute values that will be written as outputs from pricing into Commerce.
-
Internal - This option defines attributes that are used only inside the Pricing Engine. For example, a customer segment attribute can be used internally within the Pricing Engine to determine pricing. It could be used in matrix-based pricing, pricing rule conditions, price model conditions, or BML scripts, but never be written into an output attribute.
-
External – This value is automatically set for Charge Set Attributes that are currently calculated by CPQ Quoting but will in future be calculated by Pricing Engine. For now these attributes form part of the schema definition for Charge Set attributes in CPQ Commerce. This value cannot be selected when created new custom Pricing Attributes.
The In/Out parameter can be set to Input, Output, or Internal for new custom Pricing Attributes. New custom Charge-type Pricing Attributes are automatically set to Output.
-
- Oracle CPQ 24C introduced the Line Price As Of attribute to expand price effectivity to honor a 'price as of' date for each quote line when pricing is re-evaluated.
-
Pricing Lookups for Pricing Attributes - Oracle CPQ 24B enables text type Pricing Attributes to be mapped to Pricing Lookups so that valid domains of values are presented for selection by the pricing administrator and product manager. Valid domains of values can be defined in Pricing Lookups.
-
Oracle CPQ 23B introduced the BOM Item Variable Name Attribute Pricing Attribute to automatically supports BOM item product pricing in the Pricing Engine without requiring a pricing administrator to set up this attribute and its mapping.
Administration
![]() Add a Custom Pricing Attribute
Add a Custom Pricing Attribute
Complete the following steps to create a Pricing Attribute.
-
Navigate to Admin > Pricing Portal > Pricing Attributes.
-
Select Add form the Actions drop-down.
-
Select the Pricing Entity option.
-
Header - Select this option for transaction level attributes.
-
Line - Select this option for transaction line item attributes.
-
Charge – Select this option for charge attributes, refer to Add a Custom Charge Attribute.
-
-
Select the In/Out type. The In/Out parameter can be set to Input, Output, or Internal for new custom Pricing Attributes.
Each Pricing Attribute can have only one of the following values:
-
Input – This option defines attribute values that are used as inputs to pricing calculations.
-
Output – This option defines attribute values that will be written as outputs from pricing into Commerce.
-
Internal - This option defines attributes that are used only inside the Pricing Engine. For example, a customer segment attribute can be used internally within the Pricing Engine to determine pricing. It could be used in matrix-based pricing, pricing rule conditions, price model conditions, or BML scripts, but never be written into an output attribute..
-
-
Enter a Name.
-
Enter the Variable Name.
-
Select the Data Type: Boolean, Currency, String, Decimal, Date, or Integer.
-
Select the Array Type option, if applicable.
-
Enable this option for Array attributes.
-
Disable this option for Non-Array attributes.
-
-
Select a Lookup to associate a Pricing Lookup to a String type attribute, if applicable.
-
This field is only available for string data types.
-
Refer to Pricing Lookups for more information.
-
-
(optional) Select or enter a Default Value.
-
The default value cannot be specified for currency or text area data types.
-
Only True or False values can be selected for Boolean data types.
-
When a Lookup is selected, you can select a default value from values defined in Pricing Lookups.
-
-
(optional) Enter a Description.
-
Click Create.
-
-
Complete the following items to map a pricing attribute to a Commerce, Configuration, or Parts attribute.
-
Select Edit from the Actions drop-down.
-
Click Add.
-
Select the Data Source from the drop-down menu.
-
Select the appropriate attribute from the Source Attribute Name drop-down menu.
-
The Source Attribute Variable Name and Path will auto-populate.
-
To reorder mapping attributes, click in the Order field and enter the desired order number.
-
To delete an attribute mapping, click the ellipsis at the end of the line and select Delete.
-
-
Repeat 3b – 3d to add and map additional attributes.
Note: Contextual data sources can be enabled for Pricing Attributes that have attribute mappings to two or more different types of Data Sources (e.g. a Configuration model and a Commerce process). Refer to Enable Apply context-dependent data source in Pricing Attribute Mapping.
-
-
Click Update or Save.
Complete the following steps create a custom Charge Attribute in the Pricing Engine.
-
Navigate to Admin > Pricing Portal > Pricing Attributes.
-
Select Add form the Actions drop-down.
-
Select the Charge Pricing Entity option.
Refer to Add a Custom Pricing Attribute for Header and Line attributes.
-
The In/Out type is automatically set to Output for Charge type Pricing Attributes.
Each Charge type Pricing Attribute can have only one of the following values:
-
Output – This option defines attribute values that will be written as outputs from pricing into Commerce.
-
External – This value is automatically set for Charge Set Attributes that are currently calculated by CPQ Quoting but will in future be calculated by Pricing Engine. For now these attributes form part of the schema definition for Charge Set attributes in CPQ Commerce. This value cannot be selected when created new custom Pricing Attributes.
-
-
Enter a Name.
-
Enter the Variable Name.
-
Select the Data Type: Boolean, Currency, String, Decimal, Date, Integer, or Text Area.
-
Select a Lookup to associate a Pricing Lookup to a String type attribute, if applicable.
-
This field is only available for string data types.
-
Refer to Pricing Lookups for more information.
-
-
(optional) Select or enter a Default Value.
-
The default value cannot be specified for currency or text area data types.
-
Only True or False values can be selected for Boolean data types.
-
When a Lookup is selected, you can select a default value from values defined in Pricing Lookups.
-
-
The Visibility field identifies if the charge attribute is visible in other CPQ modules. This field is automatically populated. Visibility options can be deleted, but this field cannot be empty. You can click inside the Visibility field to reselect modules.
-
Administration: CPQ administrator UIs, for example, Pricing Portal, Product Workbench
Administration must be visible to display an attribute in Price Model > Pricing Data.
-
Runtime: Buy-side UIs, for example, quoting & configuration buy-side.
-
-
Check Required to make this field mandatory.
-
Check Negotiable to allow modification of this attribute at runtime.
-
(optional) Enter a Description.
-
Click Create.
-
-
Complete the following items to map a pricing attribute to a Commerce attribute.
-
Select Edit from the Actions drop-down.
-
Click Add.
-
Select the Data Source from the drop-down menu.
-
Select the appropriate attribute from the Source Attribute Name drop-down menu.
-
The Source Attribute Variable Name and Path will auto-populate.
-
To reorder mapping attributes, click in the Order field and enter the desired order number.
-
To delete an attribute mapping, click the ellipsis at the end of the line and select Delete.
-
-
Repeat 3b – 3d to add and map additional attributes.
Note: Contextual data sources can be enabled for Pricing Attributes that have attribute mappings to two or more different types of Data Sources (e.g. a Configuration model and a Commerce process). Refer to Enable Apply context-dependent data source in Pricing Attribute Mapping.
-
-
Click Update or Save.
Complete the following steps to synchronize the Transaction Line Charge Array Set with the pricing charge schema, which is comprised of standard and extensible custom charge attributes. If the Transaction Line Charge Array Set doesn’t exist, it will be created when the Synchronize Charge Array Set action is invoked.
- Navigate to Admin > Process Definition.
- Select Documents from the applicable process Navigation drop-down menu, and then click List.
- Select Attributes from the Transaction Line Navigation drop-down menu, and then click List.
- Click Synchronize Charge Array Set at the bottom of the Attribute List page.
Notes:
- If the Transaction Line Charge Array Set doesn’t exist, it will be created when the Synchronize Charge Array Set action is invoked.
- Refer to Sub-Document Attribute Sets > Charge Array Set for more information about the Transaction Line Charge Array Set.
![]() Enable Apply context-dependent data source in Pricing Attribute Mapping
Enable Apply context-dependent data source in Pricing Attribute Mapping
Complete the following steps to enable Apply context-dependent data source in Pricing Attribute Mapping in the Pricing Engine.
Note: This setting is only applicable when a Pricing Attribute has attribute mappings to two or more different types of Data Sources (e.g. a Configuration model and a Commerce process).
-
Navigate to Admin > Pricing Portal > Pricing Options.
-
Click Edit.
-
Set the Apply context-dependent data source in Pricing Attribute Mapping option to On.
-
Click Update.
![]() Pricing Engine Quantity Attribute
Pricing Engine Quantity Attribute
The standard Pricing Engine Quantity attribute supports the Volume Pricing and Tier Pricing price models. This pricing attribute can't be deleted, but it can have new mappings added and its mappings can be reordered. This Quantity pricing attribute is used to determine which pricing tier applies when executing the dynamic pricing types that are quantity-driven (i.e. Tiered Pricing, Volume Pricing price models). If the value of the attribute is missing when the mappings are evaluated at runtime, a quantity of 1 is used.
![]() Reorder Mapped Pricing Attributes
Reorder Mapped Pricing Attributes
Complete the following steps to reorder mapped pricing attributes.
-
Navigate to the Admin page.
-
Click Pricing Portal in the Products section.
- Click on the Pricing Attributes card.
-
Click the appropriate Attribute Name link.
-
Click the Attribute Mapping Edit button.
-
To reorder mapping attributes, click in the Order field and enter the desired order number.

-
Click Update to save the new attribute mapping order.
Notes
Caution: A header Pricing Attribute should not be mapped to a Configuration attribute, unless pricing is executed only for recommended items in Configuration. In all other scenarios, the Pricing Attribute can have an invalid value during runtime execution, for example at quoting, or for BOM items in Configuration. If you'd like to map to a Configuration attribute, consider using a line Pricing Attribute instead.
Notes:
-
By default, CPQ Pricing Engine uses a standard natural key for the Charge object including Price Type, Charge Type, and Price Period.
-
Mapping a Text Area type Charge Attribute to a Commerce Text attribute may cause truncated data.
-
Oracle Order Management requires that each Charge for an item has a unique combination of Price Type and Charge Type. If you are integrating Oracle CPQ with Oracle Order Management you will need to define a different Charge Type to distinguish Charges with the same Price Type but different Price Periods.
-
The maximum number of custom Pricing/Charge Attributes is 75. Submit a Service Request (SR) on My Oracle Support to change the maximum number.


