Price Models
Overview
Price Models (previously known as Pricing Profiles) very simply are containers for prices. They contain a set of price points, a set of discounts, or a set of markups that can be applied based simple conditions or conditions from linked Pricing Rules.
Price Model Structure
A Price Model Item can have zero to many Rate Plans, or zero to one product price, and zero to many non-Rate Plan stand-alone charges. A Rate Plan can also have zero to one product price and zero to many charges. If a product has more than one Rate Plan, one of the Rate Plans is designated as the default Rate Plan. Oracle CPQ supports the Rate Plan business object to define groups of charges that can be optionally applied to the pricing for a subscription product (e.g. Monthly vs. Quarterly Subscription Plan). Rate Plans provide an alternative to non-Rate Plan charges and product prices. Rate Plans can be defined using either the Pricing Portal or Product Workbench. A Rate Plan is a collection of charges for a product that is added as Price Model Items within a CPQ Pricing Engine Price Model.
Price Models continue support for linked Pricing Rules and Simple Condition within the Price Model.

Dynamic Pricing
Dynamic Pricing types, such as Tier or Volume Pricing, are defined at the Price Model Item level. This allows pricing administrators and product managers to add multiple different Dynamic Pricing type items to the same Price Model. They can also change the Dynamic Pricing type for a data item without the need to create a new Price Model.
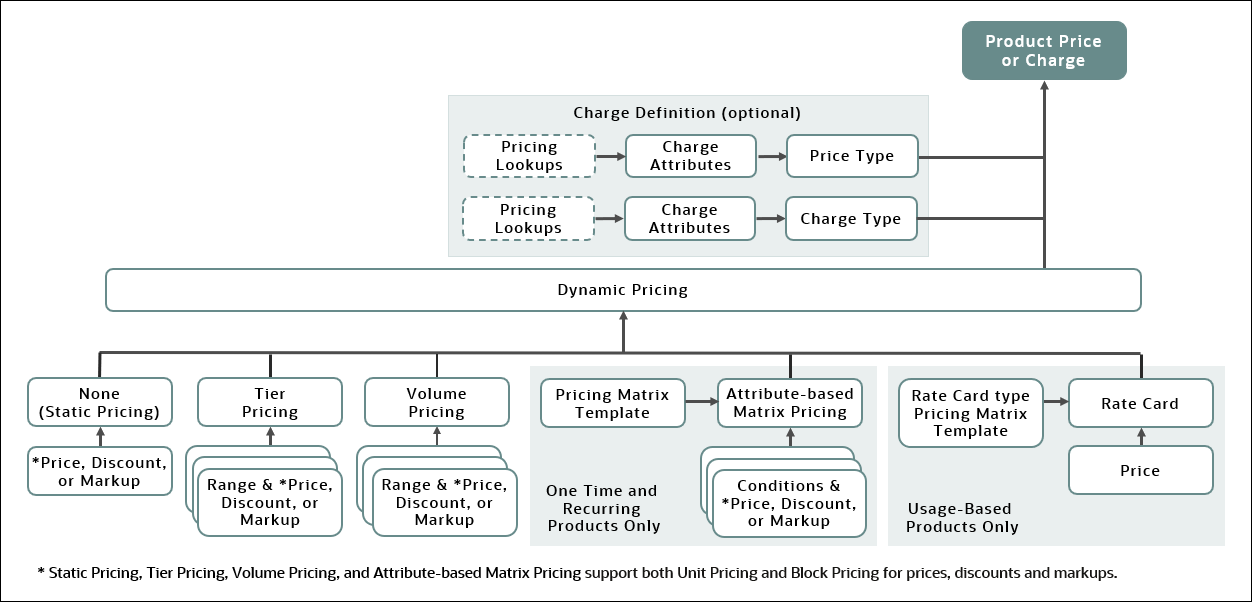
Each Product Price or Charge is defined by a Price Type, Charge Type, and Dynamic Pricing type.
- Price Type and Charge Type values are determined by Charge Attributes. Lookups can be used to define the domains of values for pricing-related attributes. For more information, refer to Charge Attributes and Lookups.
- If optional Charge Definitions are enabled, the Price Type and Charge Type are defined by the Charge Definition. For more information, refer to Charge Definitions.
-
Dynamic Pricing types can be None (static pricing), Tier Pricing, Volume Pricing, or Attribute-based Matrix Pricing (this includes Rate Cards for usage-based products).
- Static pricing 'None' is used to assign a single price or discount value for the Product Price or Charge.
- Volume Pricing and Tier Pricing are used to define multiple tier ranges with price or discount value assigned for each tier. For more information, refer to Dynamic Pricing Types.
- Price Model Attribute-based Matrix Pricing - can be used to define pricing that requires the Pricing Engine to use a custom dynamic matrix as the basis for calculating runtime prices. The Pricing Matrix Template is assigned to a price model and associated with all of the price model's child products. For more information, refer to Pricing Matrix Templates.
-
Product / Charge Attribute-based Matrix Pricing - can be used to define pricing that requires the Pricing Engine to use a custom dynamic matrix as the basis for calculating runtime prices. The Pricing Matrix Template is assigned to a product price or charge. Pricing Matrix Templates can be used to price both one-time or recurring product prices and charges. For more information, refer to Pricing Matrix Templates.
-
Rate Cards and the associated Rate Card type Pricing Matrix Templates can be used to define complex usage-based pricing for Usage Price Types. For more information, refer to Rate Cards and Pricing Matrix Templates.
Static Pricing, Tier Pricing, Volume Pricing, and Attribute-based Matrix Pricing support both Unit Pricing and Block Pricing for prices, discounts, and markups. For more information, refer to Block Pricing.
Price Model Types
You can create the following types of Price Models (aka Price Model List Types):
![]() Price List - allows administrators to define simple conditions and add absolute prices for all child Price Model Items.
Price List - allows administrators to define simple conditions and add absolute prices for all child Price Model Items.
- Administrators can define different prices for each child Price Model Item.
- Price Lists are the equivalent of Absolute Price Value Price Models.
![]() Discount List - allows administrators to define simple conditions and add discount pricing adjustments for the child Price Model Items.
Discount List - allows administrators to define simple conditions and add discount pricing adjustments for the child Price Model Items.
-
Administrators can define whether the applied discount is specified by Amount or Percent.
-
The Adjustment Type cannot be modified after the initial creation of the Price Model.
-
The same Adjustment Type is applied to all child Price Model Items, but administrators can define different values for the discount Amount or Percent for each Price Model Item.
![]() Markup List - allows administrators to define simple conditions and add markup or uplift pricing adjustments for the child Price Model Items.
Markup List - allows administrators to define simple conditions and add markup or uplift pricing adjustments for the child Price Model Items.
-
Administrators can define whether the applied markup is specified by Amount or Percent.
-
The Adjustment Type cannot be modified after the initial creation of the Price Model.
-
The same Adjustment Type is applied to all child Price Model Items, but administrators can define different values for the markup Amount or Percent for each Price Model Item.
![]() Advanced - enables scripting support for charges and other extensible output values using Advanced type Price Models and Scripting Price Model type Pricing Matrix Templates.
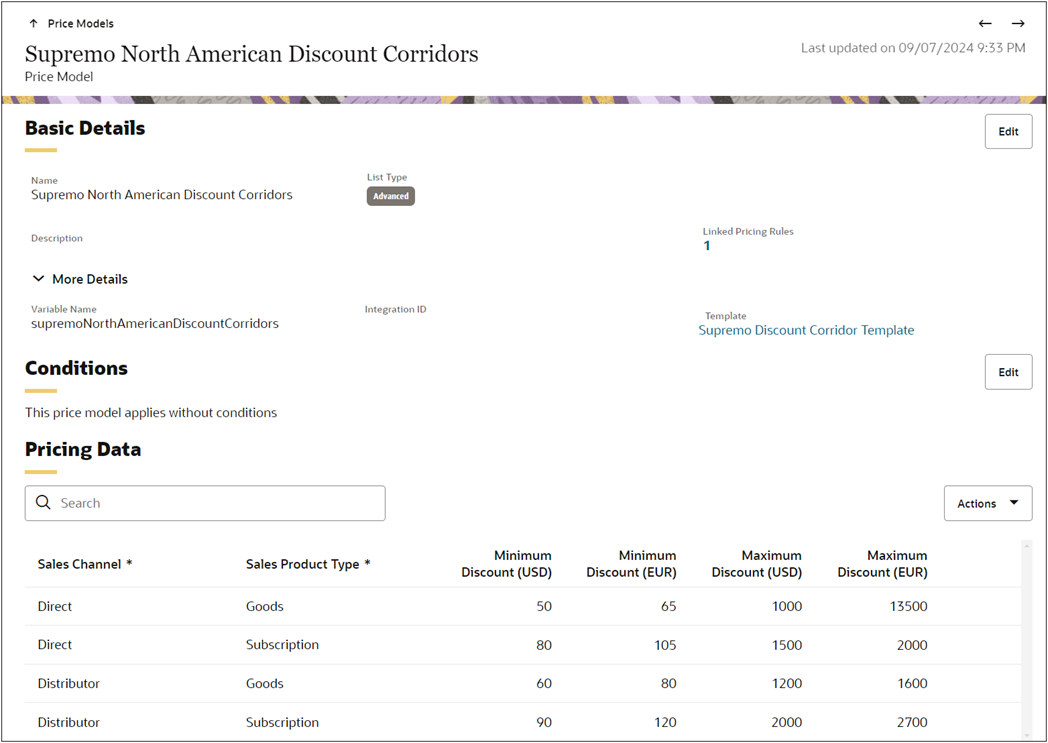
Advanced - enables scripting support for charges and other extensible output values using Advanced type Price Models and Scripting Price Model type Pricing Matrix Templates.
-
The Advanced Price Model is created and associated to a Scripting Price Model Template.
-
The BML is authored in the Scripting Price Model Template which defines the extensible schema used by the BML.
-
The same template can be used to create multiple advanced price models. For example, the same discount template can be used to create a North America Discount Price Model and Latin America Discount Price Model.
-
Each Advanced Price Model can have its own Pricing Data which is viewed and edited in the associated Price Model.
-
This native Pricing Data corresponds to the data table previously required by most Legacy Advanced Price Models.
-
The BML is executed once for the whole pricing document when multiple lines are included in the pricing invocation.
-
For more information see Pricing Matrix Templates and Example Advanced Price Model & Scripting Matrix Template.
![]() Advanced (Legacy) - allows administrators to define simple conditions and add advanced BML functions for a Price Model.
Advanced (Legacy) - allows administrators to define simple conditions and add advanced BML functions for a Price Model.
The advanced BML functions return the following pricing items:
-
Unit Price: Displays Unit List Prices in Oracle CPQ Configuration and Commerce Price Attribute Set attributes (
_pricing_rule_price_eachand_price_unit_price_each). -
Pricing JSON: Contains customer-defined data used for Pricing Engine integrations.
The
_price_calculation_infoCommerce system attribute stores the details of the pricing calculation performed by a Price Model. This attribute is automatically available in the Commerce sub-document Price Attribute Set and will be populated in Commerce if the Transfer Price Models JSON Pricing Option is enabled.
Dynamic Pricing Types
The Oracle CPQ Pricing provides the following Dynamic Pricing types:
![]() Static Pricing (None) allow administrators to define simple product prices or charges for each currency.
Static Pricing (None) allow administrators to define simple product prices or charges for each currency.
- Static Pricing is established when Dynamic Pricing is set to 'None'.
- Pricing values can be prices or discounts, as established by the Price Model List Type.
![]() Volume Pricing applies the same price or discount to all items on a single transaction line. The price or discount is based upon the quantity (total number of units).
Volume Pricing applies the same price or discount to all items on a single transaction line. The price or discount is based upon the quantity (total number of units).
- Volume Pricing is established when Dynamic Pricing is set to 'Volume Pricing'.
- Pricing values can be prices or discounts, as established by the Price Model List Type.
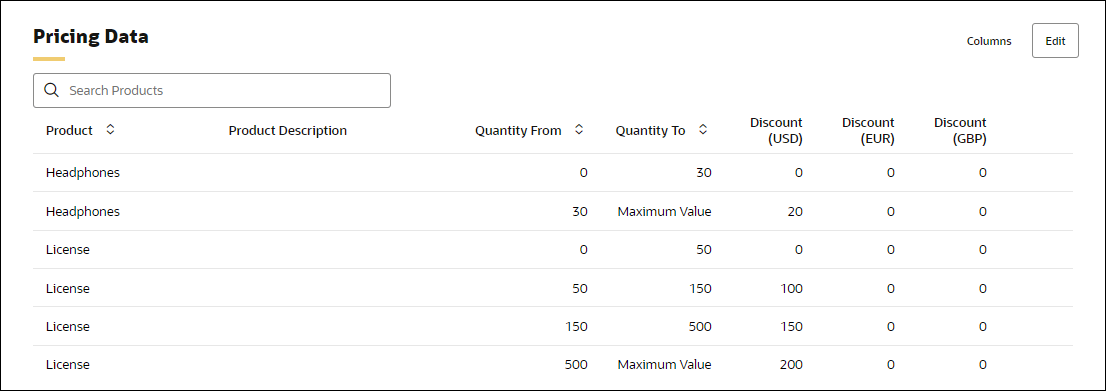
The following image shows a Price Model Item with Volume Pricing.
- The customer will receive a $20 discount per item when they order more than 30 headphones.
- When the customer orders licenses, they can receive the following discounts:
- $0 discount per item when they order 0 - 50 licenses
- $100 discount per item when they order 51 – 150 licenses
- $150 discount per item when they order 151 – 500 licenses
- $200 discount per item when they order 501 or more licenses
![]() Tier Pricing applies different unit price values to different items of a single transaction line. The total price or discount of the transaction line is based on aggregating the pricing brackets for all units of the item for that transaction line.
Tier Pricing applies different unit price values to different items of a single transaction line. The total price or discount of the transaction line is based on aggregating the pricing brackets for all units of the item for that transaction line.
- Pricing values can be prices or discounts, as established by the Price Model List Type.
- Tier Pricing is established when Dynamic Pricing is set to 'Tier Pricing'.
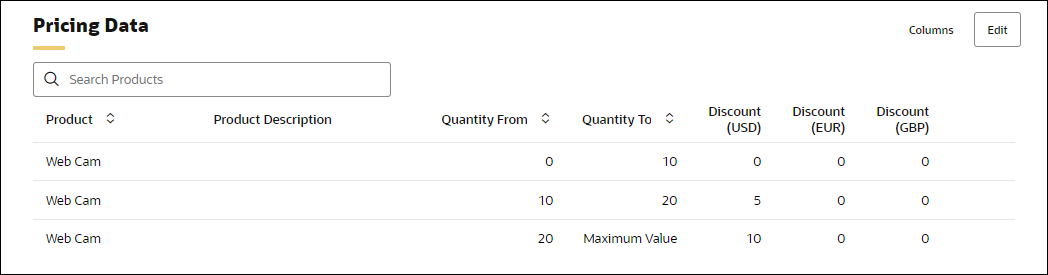
The following image shows a Price Model Item with Tier Pricing. If a customer with tier pricing orders a quantity of 25 web cams, they will receive the following discounts:
- No discount (Tier 1) is applied to the first 10 web cams.
- $5 discount per item (Tier 2) is applied to the next 10 web cams.
- $10 discount per item (Tier 3) is applied to the remaining 5 web cams.
![]() Price Model Attribute-based Matrix Pricing and the associated Pricing Matrix Templates can be used to define pricing that requires the Pricing Engine to use a custom dynamic matrix as the basis for calculating runtime prices, thus replacing the need for data tables and custom BML.
Price Model Attribute-based Matrix Pricing and the associated Pricing Matrix Templates can be used to define pricing that requires the Pricing Engine to use a custom dynamic matrix as the basis for calculating runtime prices, thus replacing the need for data tables and custom BML.
This allows customers to define table-based pricing at the Price Model level. Attribute-based Matrix Pricing and the associated Pricing Matrix Templates can be used to define pricing that requires the Pricing Engine to use a custom dynamic matrix as the basis for calculating runtime prices, thus replacing the need for data tables and custom BML.
-
Attribute-based Matrix Pricing is available for Price List, Discount List, and Markup List type Price Models and Price Agreements.
-
Conditional pricing for a single or multiple products can then be defined by using the pre-defined columns to specify the criteria for desired conditions.
-
For more information, refer to Pricing Matrix Templates.
![]() Product / Charge Attribute-based Matrix Pricing and the associated Pricing Matrix Templates can be used to define pricing that requires the Pricing Engine to use a custom dynamic matrix as the basis for calculating runtime prices.
Product / Charge Attribute-based Matrix Pricing and the associated Pricing Matrix Templates can be used to define pricing that requires the Pricing Engine to use a custom dynamic matrix as the basis for calculating runtime prices.
- Attribute-based Matrix Pricing is available for Price List, Discount List, and Markup List type Price Models.
- Pricing Matrix Templates can be used to price both one-time or recurring product prices and charges.
- After a Pricing Matrix Template has been defined, it can be selected as a Dynamic Pricing type when creating product prices and charges. Conditional pricing can then be defined by using the pre-defined columns to specify the criteria for desired conditions.
- For more information, refer to Pricing Matrix Templates.
![]() Rate Cards and the associated Rate Card type Templates can be used to define complex usage-based pricing for Usage Price Types.
Rate Cards and the associated Rate Card type Templates can be used to define complex usage-based pricing for Usage Price Types.
- Rate Cards are only available for Price List type Price Models.
- Rate Cards are only available for Usage Price Types.
- Price values are defined by the applicable Rate Card and can't be modified when defining a charge.
- For more information, refer to Rate Cards and Pricing Matrix Templates.
Enhanced Price Authoring
![]() Block Pricing allows customers to price products by blocks of units rather than per unit.
Block Pricing allows customers to price products by blocks of units rather than per unit.
Customers in some industries (e.g. communications, utilities, hosting services) price products by blocks of units rather than per unit. Block pricing provides more flexibility, encourages larger purchases, and simplifies fulfillment, rating, and invoicing processes. For example, a customer may want to price software in blocks of hundreds or thousands and charge a price for the entire block rather than per each user. CPQ pricing supports both block and unit pricing for the same product price or charge under the same conditions. CPQ also supports Block Pricing for Dynamic Tier Pricing.
Block Pricing applies different unit price values to different items of a single transaction line. The total price or discount of the transaction line is based on aggregating the pricing brackets for all units of the item for that transaction line.
-
Pricing values can be prices or discounts, as established by the Price Model List Type.
-
Block Pricing is established when Block Pricing is enabled and the Block Size is greater than 1.
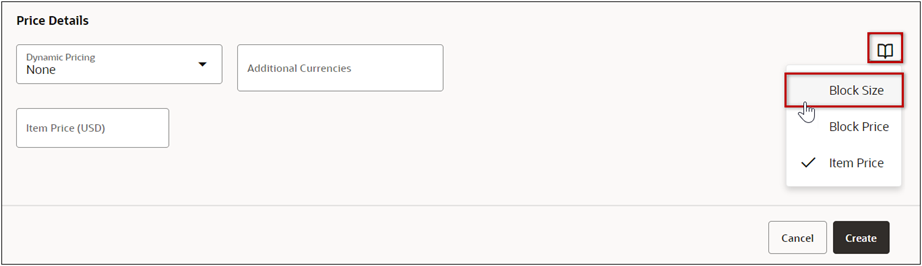
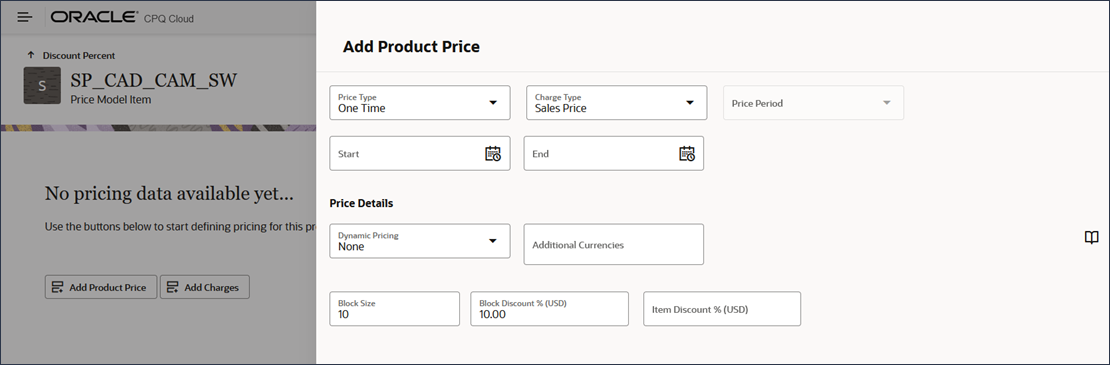
Block Pricing is disabled by default. To enable Bock Pricing, administrators click the Mange Columns icon, and select the Block Size option when adding a product price or charge to a Price Model Item.
Block Price Examples
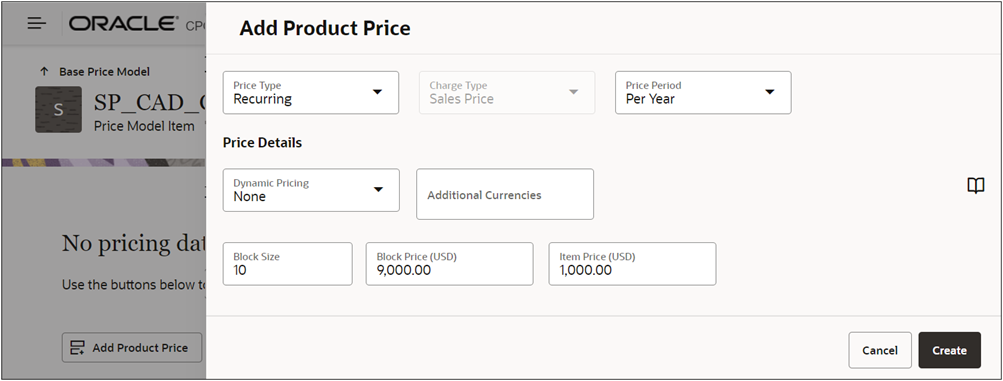
For example, a customer selling CAD software subscriptions uses block pricing to offer discounts on yearly subscriptions purchased in blocks of 10. The block size is 10 and the block price is $9,000. The price for items not purchased in blocks of 10 is $1,000 each.
If a customer with block pricing orders 15 yearly subscriptions, the following pricing is applied:
-
The block pricing is applied to the subscriptions that are purchased in blocks of 10.
(1 block of 10 at a price of $9,000 = $9,000) -
The item price of $1,000 is applied to the 5 subscriptions not in a block of 10.
(5 items at a price of $1,000 = $5,000) -
The total aggregated price is $14,000 ($9,000 + $5,000).
-
The List Price is the average price for all 15 subscriptions ($14,000 ÷ 15 = $933.33).

Another example, a customer selling CAD software subscriptions uses block pricing to offer discounts on yearly subscriptions purchased in blocks of 10. The block size is 10 and the block price is $9,000. The price for items not purchased in blocks has not been defined in any Price Model.

If a customer with block pricing orders 15 yearly subscriptions, the following pricing is applied:
-
The block 1 pricing is applied to the subscriptions that are purchased in blocks of 10.
(1 block of 10 at a price of $9,000 = $9,000) -
The block 2 pricing is applied to the remaining 5 subscriptions that are purchased in blocks of 10.
(1 block of 10 at a price of $9,000 = $9,000) -
The total aggregated price is $18,000 ($9,000 + $9,000).
-
The List Price is the average price for all 15 subscriptions ($18,000 ÷ 15 = $1,200.00).
Discount Block Price Example
An amount or percent discount works out a bit differently. For example, a customer selling CAD software subscriptions uses block pricing to offer discounts on yearly subscriptions purchased in blocks of 10. The block size is 10 and the block discount is 10%. The price for items not purchased in blocks has not been defined in any Price Model.
If a customer with block pricing orders 15 yearly subscriptions, the following pricing is applied:
-
The block discounting is not applied to the subscriptions until a block of 10 is reached.
(9 or less subscriptions are not discounted per above definition) -
The 1 block discounting is applied to the block of subscriptions that are purchased in blocks of 10.
(1 block of 10 at a discount of 10% = $9,000 if product price is defined as $1,000 initially) -
The 5 additional subscriptions do not have block pricing discounting applied as block 2 has not been met.
(5 subscriptions at no discount = $5,000 if product price is defined as $1,000 initially) -
The aggregated price is $14,000 ($9,000 + $5,000).
-
The List Price is the average price for all 15 subscriptions ($14,000 ÷ 15 = $933.33).
Markup Block Price Example
Markup List type Price Models support markup and uplift pricing. Let’s use the same example as before to understand the difference in the calculations when a markup is set up for block pricing without the Item Discount being present.
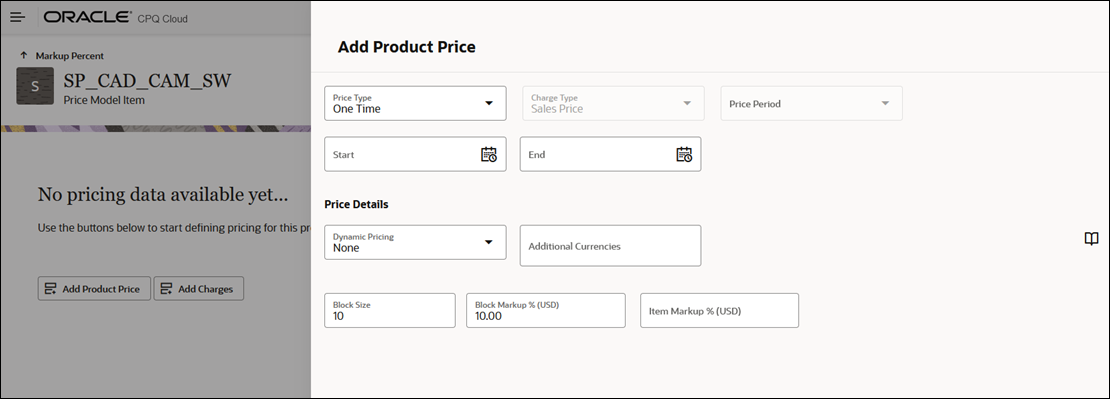
If a customer with block pricing orders 15 yearly subscriptions, the following pricing is applied:
-
The 1 block markup is applied to the block of 10 subscriptions that are purchased in blocks of 10.
(1 block of 10 with markup of 10% = $11,000 if product price is defined as $1,000 initially)
-
The block 2 markup is applied for the 5 additional subscriptions, as the calculation differs for markups from discounts.
(5 subscriptions with markup = $6,000 if product price is defined as $1,000 initially)
-
The aggregated price is $17,000 ($11,000 + $6,000).
-
The List Price is the average price for all 15 subscriptions ($17,000 ÷ 15 = $1,133.33).
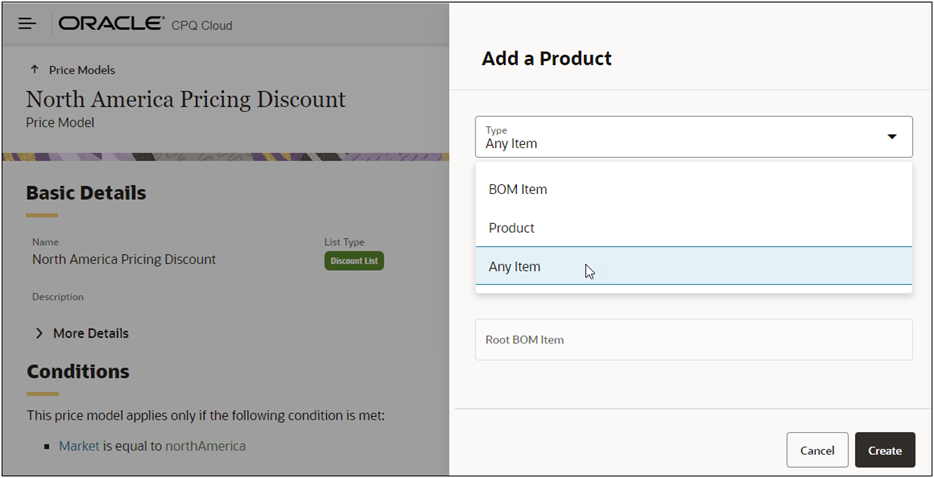
![]() Discount or Markup All Products - The All Item Product type option the ability to apply discounts or markups to all products or a group of products without enumerating each product in a Price Model.
Discount or Markup All Products - The All Item Product type option the ability to apply discounts or markups to all products or a group of products without enumerating each product in a Price Model.
The All Item Product type option can be selected when adding new products to a Discount List or Markup List Price Model. By combining this feature with Price Model conditions customers can also define discounts or markups for a group of products.
Beginning in Oracle CPQ 25B, you can specify one or more particular Charge Definitions to which the All Item discount or markup will apply - regardless of whether for a product price or charge price. This allows customers to specify discounts and markups to all products for a specified Charge Definition without enumerating every product in their Price Model. For example, you can define a promotional discount to waive all installation fees for all sales within February or all activation fees for your top customers.
When Enable charge-specific product price adjustments is enabled, pricing execution applies discounts or markups to a product price only if the charge definitions match. Additionally, a non-product price discount can be applied to a product price as long as the charge definition matches.
Conversely, when the option is disabled, a product price can only be adjusted by another product price. Discounts or markups can be applied to a product price regardless of whether the charge definitions match. In this case, the charge from the second adjustment price model takes effect.
Note: Customers using multiple price types, charge types, or charge definitions are advised to enable this option. Refer to Pricing Options for more information.
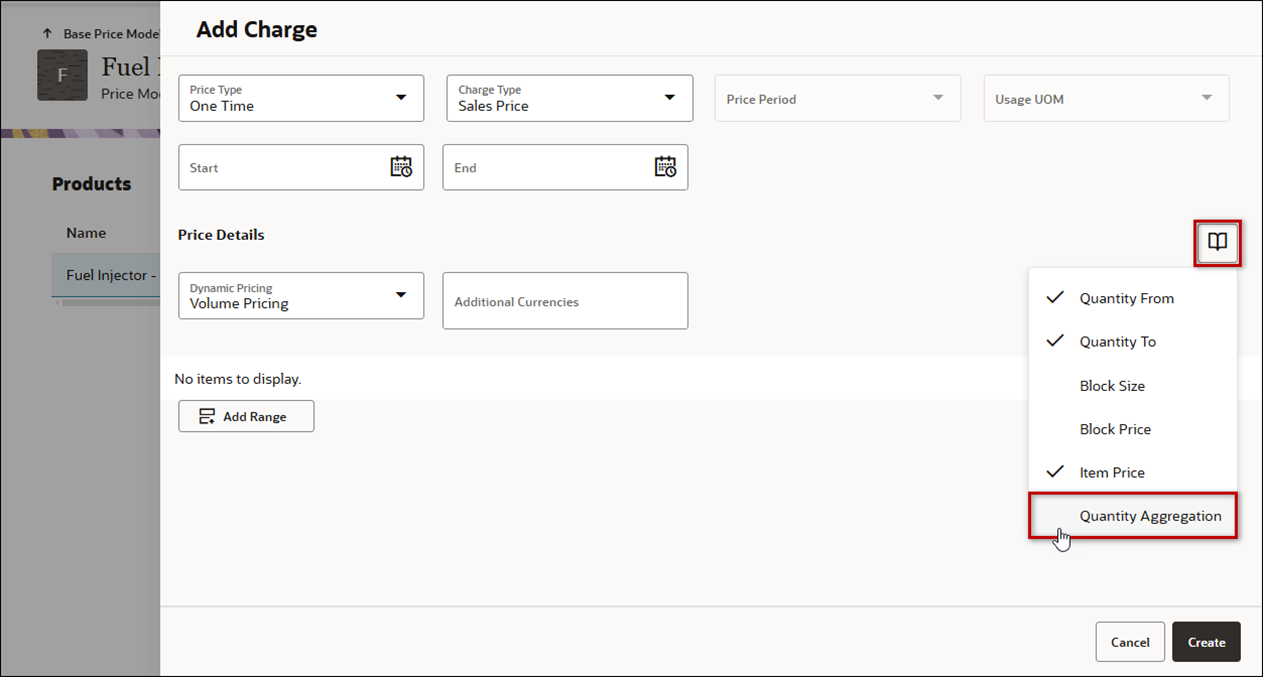
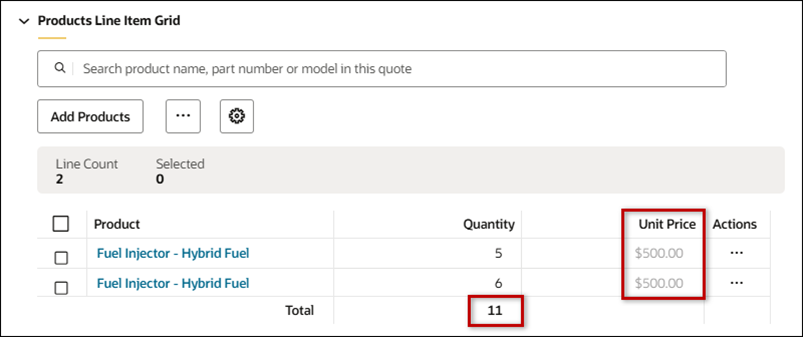
![]() Quantity Aggregation Across a Quote aggregates the quantity of a part number in a quote is used to calculate price, instead of the quantity on a line item.
Quantity Aggregation Across a Quote aggregates the quantity of a part number in a quote is used to calculate price, instead of the quantity on a line item.
Oracle CPQ 25B introduces Quantity Aggregation for volume and tier pricing. When Quantity Aggregation is enabled, the aggregate quantity of a part number in a quote is used to calculate price, instead of the quantity on a line item. The quantity is aggregated based on the part number, regardless of whether a line item is a stand-alone part number or BOM item.
The Quantity Aggregation option is disabled by default. To enable the Quantity Aggregation option for Volume and Tier dynamic pricing types, administrators click the Mange Columns icon, and select the Quantity Aggregation option when adding a product price or charge to a Price Model Item.
When Pricing Option Include relevant line items when triggering pricing in quotes is enabled and Quantity Aggregation is selected for a product price or charge, the aggregate quantity of a part number is used in a quote instead of the quantity on a line item. The quantity is aggregated based on the part number, irrelevant of whether a line item is a stand-alone part number or BOM item.
Quantity Aggregation Example
For example, assume a customer has a charge with the following Volume pricing defined:
- Quantity Aggregation: selected
- Volume Tier 1: Quantity From: 0, Quantity To: 10, Item Price: $600
- Volume Tier 2: Quantity From: 10, Quantity To: Maximum Value, Item Price: $500

Then a sales user wants to send products to two different locations, so they create a quote with two lines for the same product:
- Line Item 1: quantity 5
- Line Item 2: quantity 6
The quantity from both line items is aggregated and both line items are priced at the aggregated quantity (11). The Unit Price for both lines will be $500. Without aggregation, the Unit Price for both line items would be $600.
![]() Service Durations can be used to define different pricing for the same service product based on the duration.
Service Durations can be used to define different pricing for the same service product based on the duration.
Pricing administrators can define different pricing for the same service product based on the duration for which the customer is committing. Enhanced subscription price authoring for service durations allows sales users to incentivize customers to commit to longer contract / service durations to reduce churn and the need to resell the service sooner at renewal time.
For example, two Price Model Items can be added for the EGW-01 Supremo Power Extended Warranty. One item has a 1 year service duration, and the second item has a 2 year service duration. This allows the customer to set different prices based on the service duration.
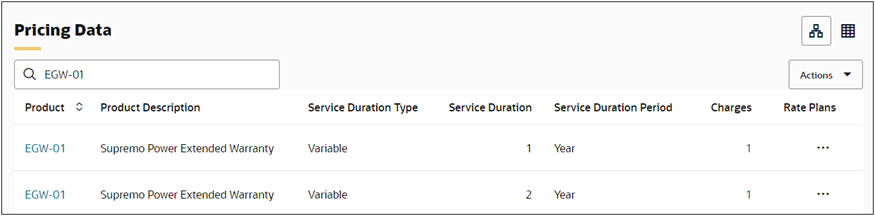
This feature provides an easy way to incentivize customers to commit to longer service durations.
BOM Item Pricing
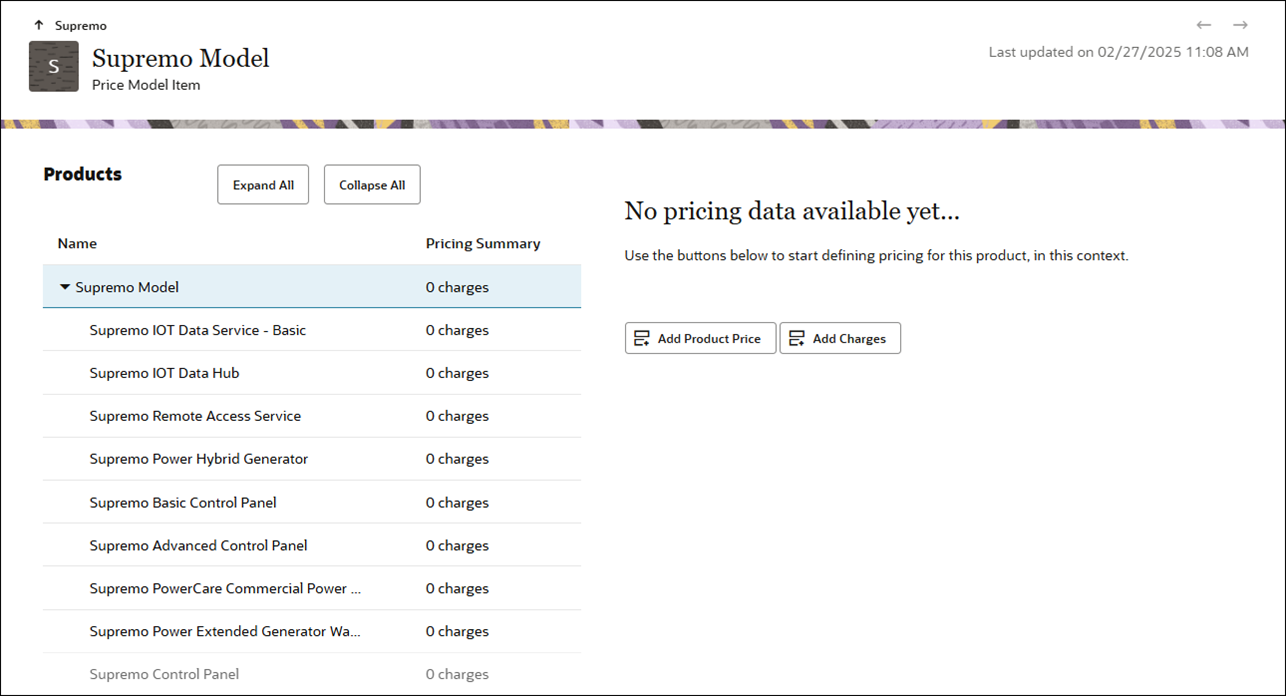
![]() Product Structure View enables the structure or BOM view of pricing in Pricing Portal.
Product Structure View enables the structure or BOM view of pricing in Pricing Portal.
Product Workbench and Pricing Portal provide two different views of the same pricing data, but pricing managers need to be able to easily switch between a product-centric view and a price/discount list view. The product structure view delivers a more functional user experience by providing a complete view of pricing for complex products and reducing the number of clicks required to view or edit pricing.
![]() BOM Item Product Pricing enables the CPQ Pricing Engine to set up and execute different prices for a product based upon the presence and location of the product within a product hierarchy, bundle, or BOM. Products may be either a standalone part or a BOM item defined in a CPQ BOM Item Definition table, including root BOM Items.
BOM Item Product Pricing enables the CPQ Pricing Engine to set up and execute different prices for a product based upon the presence and location of the product within a product hierarchy, bundle, or BOM. Products may be either a standalone part or a BOM item defined in a CPQ BOM Item Definition table, including root BOM Items.
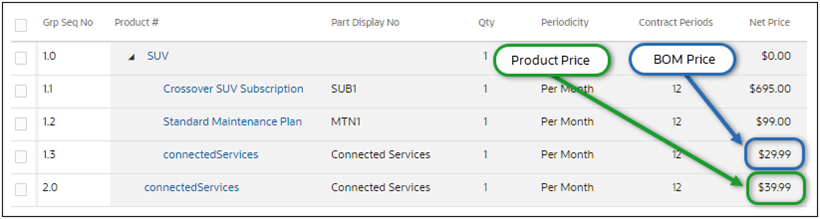
When BOM-related columns are displayed for a Price Model, administrators define pricing data for BOM Items or Products. The following example shows a Price Model with two items:
- The line item outlined in blue defines the price for the Connected Services BOM Item. The BOM item part number or model path is displayed in the Product column.
- The line item outlined in green defines the price for the Connected Services Product when the product is sold stand-alone.
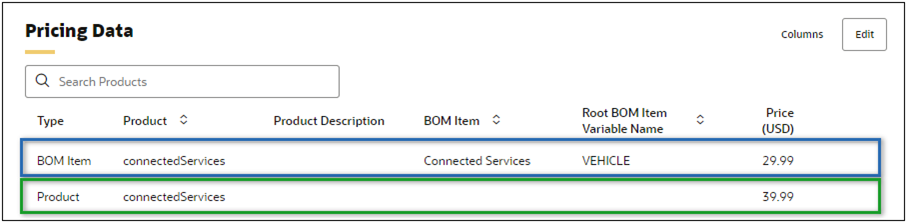
When a sales user adds these items to a quote and criteria from the associated Pricing Rule and Price Model are met, the prices from the Price Model are applied.
Notes:
- The product hierarchy must be defined in BOM Mapping Item Definition table to enable hierarchical product pricing in the Pricing Engine.
- If you wish to price root BOM items using Pricing Engine BOM item pricing, you should not define a price in the Parts database for BOM's root item with an associated part number.
- Bulk upload and download of product prices in Pricing Engine have also been enhanced to support BOM Item pricing.
Price Model Page Descriptions
![]() Price Models List Page This list page allows administrators to view information about available Price Models without opening individual Price Model details.
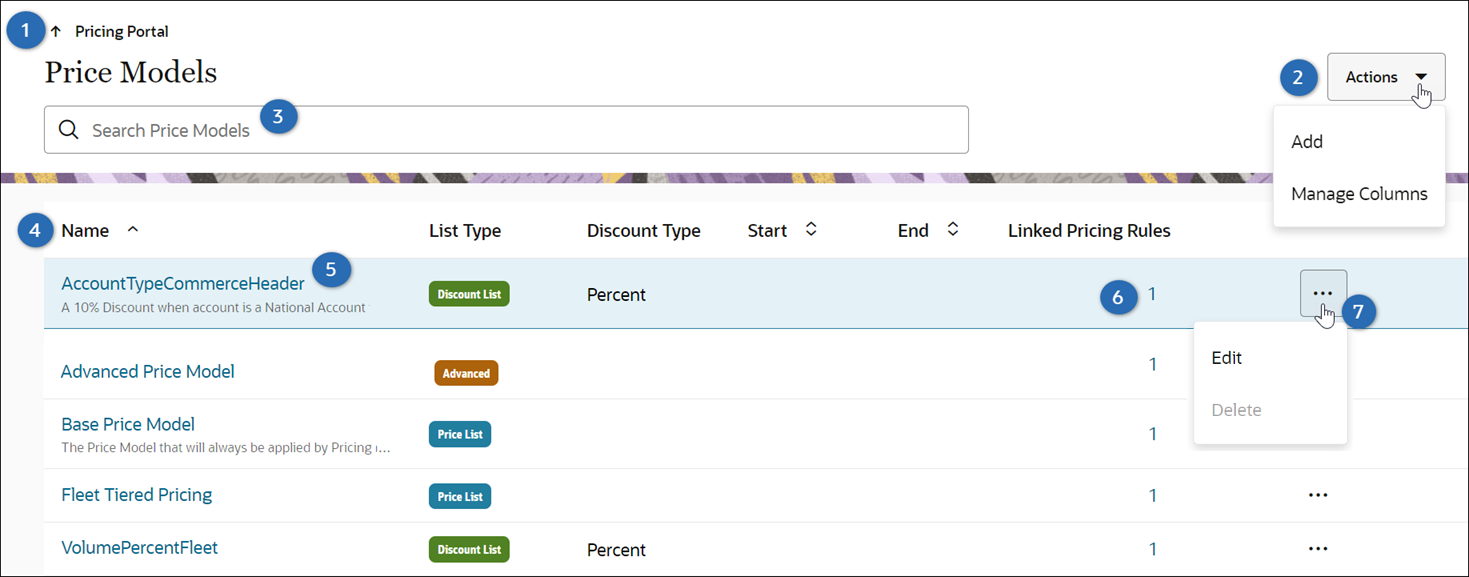
Price Models List Page This list page allows administrators to view information about available Price Models without opening individual Price Model details.
| Item | Description |
|---|---|
|
1 |
Add a new Price Model or Manage Columns that are displayed in the price model list. |
|
2 |
Enter search criteria to filter Price Model results, which remain persistent while navigating within Price Models. |
|
3 |
Sort Price Models using the Name, Variable Name, Start, or End column headers. |
|
4 |
Edit an existing Price Model by clicking on the appropriate Name link or selecting Edit from the line ellipsis drop-down. |
|
5 |
View linked Pricing Rules by clicking on the Linked Pricing Rules number. Click on the Rule link to edit the linked Pricing Rule. See Pricing Rules for editing information. |
|
6 |
Edit or Delete a Price Model by clicking on the line ellipsis. Only Inactive Price Models can be deleted. |
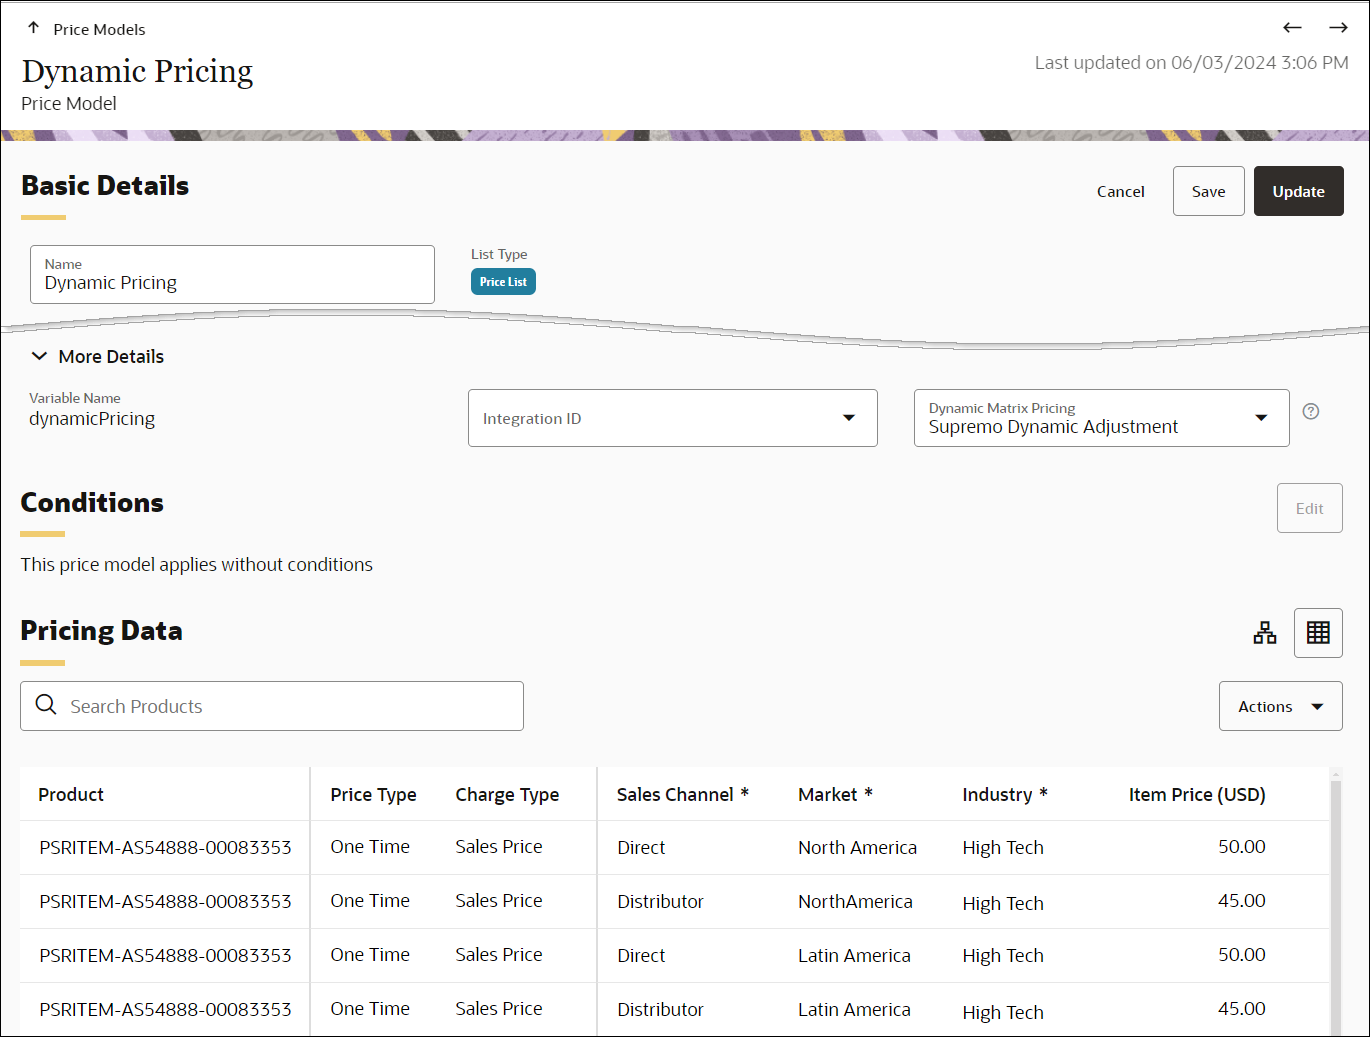
![]() Price Model Page This page allows administrators to manage Basic Details, Conditions, and Pricing Data for a Price Model. The new default structured view for the Price Model Pricing Data provides easy access to manage product Price Model Items.
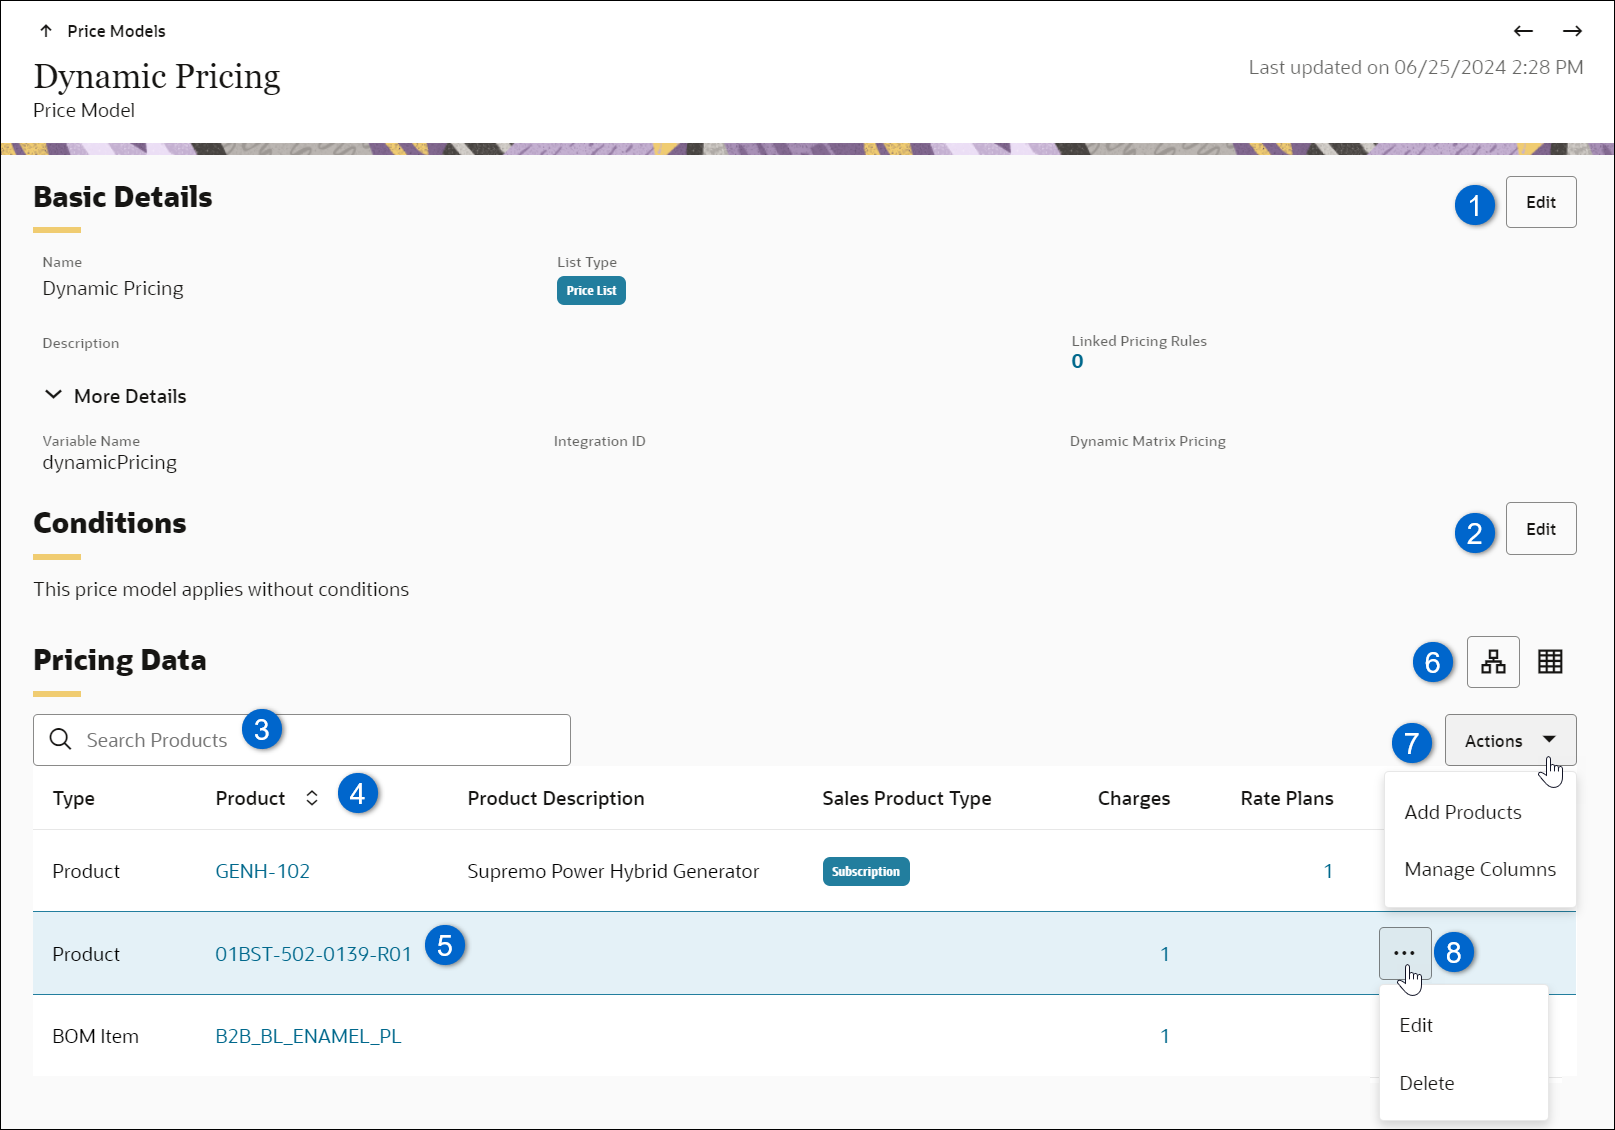
Price Model Page This page allows administrators to manage Basic Details, Conditions, and Pricing Data for a Price Model. The new default structured view for the Price Model Pricing Data provides easy access to manage product Price Model Items.
| Item | Description |
|---|---|
|
1 |
Click Edit in the Basic Details section to modify the Price Model Name, Description, or Integration ID. You can also click the More Details toggle to display or hide the Price Model Variable Name, Integration ID, and Dynamic Matrix Pricing. |
|
2 |
Click Edit in the Conditions section to modify the Price Model conditions. Note: The Base Price Model uses an "Always True" Pricing Rule and an "Always True" Price Model that cannot be deleted, reordered or assigned a condition. |
|
3 |
Enter search criteria to filter Pricing Data results, which remain persistent while navigating within Price Model Items. |
|
4 |
Sort Price Model Items using the Product, BOM Item, BOM Item Variable Name, or Root BOM Item Variable Name column headers. |
|
5 |
Edit an existing Price Model Item by clicking on the appropriate Name link. You can quickly access Charges and Rate Plans defined for a Price Model Item, by clicking the associated links. |
|
6 |
|
|
7 |
Click Actions to Add Products, Import prices, Export prices, check Import/Export Status, or Manage Columns. |
|
8 |
Click on the line ellipsis to Edit or Delete a Price Model Item. |
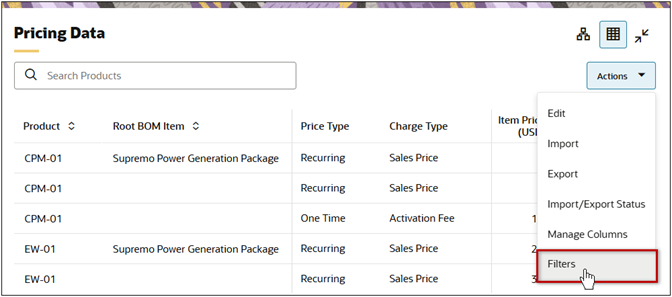
The Table View allows administrators to view a summary of Dynamic Pricing, Charges, Rate Plans, and Rate Cards information for all Price Model Items on a single page. From this view, administrators can click Actions to:
- Edit Prices directly in the Pricing Data section.
- Manage Columns that are displayed in the Pricing Data section.

![]() Search & Filter In Price Models, Price Agreements, and Matrices
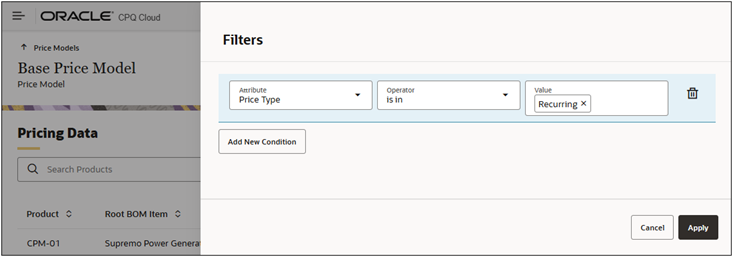
Search & Filter In Price Models, Price Agreements, and Matrices
Enterprise customers may have millions of products and many millions of rows in their Price Models, Price Agreements, and Matrices. Users need to quickly find and filter the specific rows that they want to validate or edit. Oracle CPQ 25C introduces a new filter for Price Model and Price Agreement. The new filter allows pricing administrators to leverage the 25B REST API query enhancements to check and edit the prices and discounts for subsets of products, regions, price types, etc. within a Price Model, Price Agreement, or Matrix.
Perform the following steps to create a new search filter:
-
Navigate to CPQ Admin > Pricing Portal > Price Models or Price Agreements
-
Open the applicable Price Model or Price Agreement.
-
Select Filters from the Actions drop-down.
-
Select Click to add conditions here.
-
Add conditional filter(s).
-
Select an Attribute.
-
Select the Operator.
Note: Chose "is in" to select values from lookups.
-
Select or enter the Value.
-
Click Add New Condition to add another filter condition.
-
Click the Delete icon to remove a filter condition.
-
-
Click Apply to filter pricing data list
This feature enables customers with a large number of products and rows in their Price Models and Matrices to quickly find and filter the specific rows that they want to validate or edit.
![]() Collapsible Price Model Basic Details and Conditions
Collapsible Price Model Basic Details and Conditions
The expand/collapse functionality for the Pricing Data section in Price Models and Price Agreements allows users to click the Pricing Data "Expand" icon to collapse Basic Details and Conditions to allow more viewing area for the pricing list items.
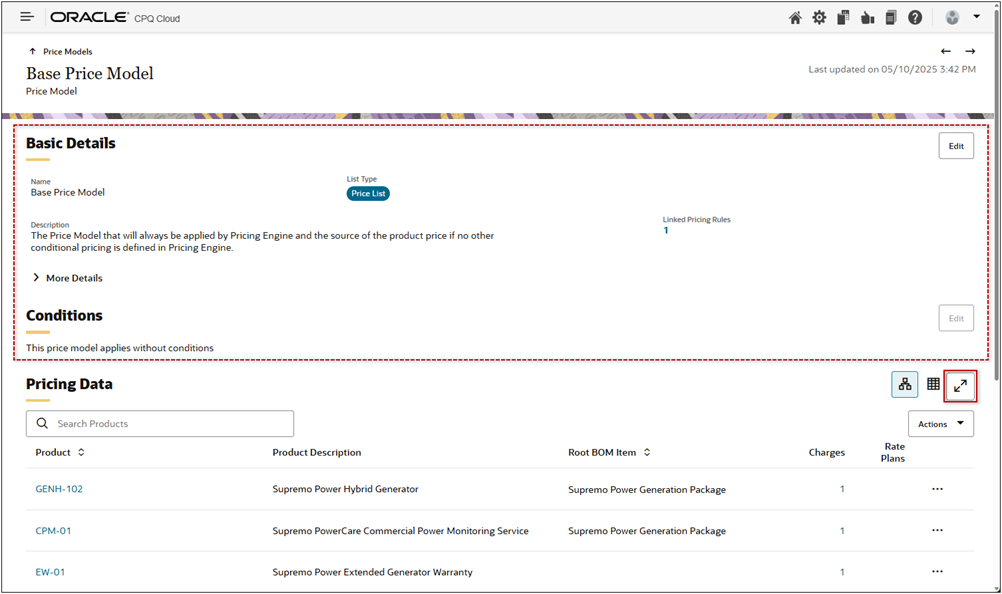
The Basic Details and Conditions are hidden when Pricing Data is expanded. The Pricing Data section must be collapsed to view Basic Details and Conditions.
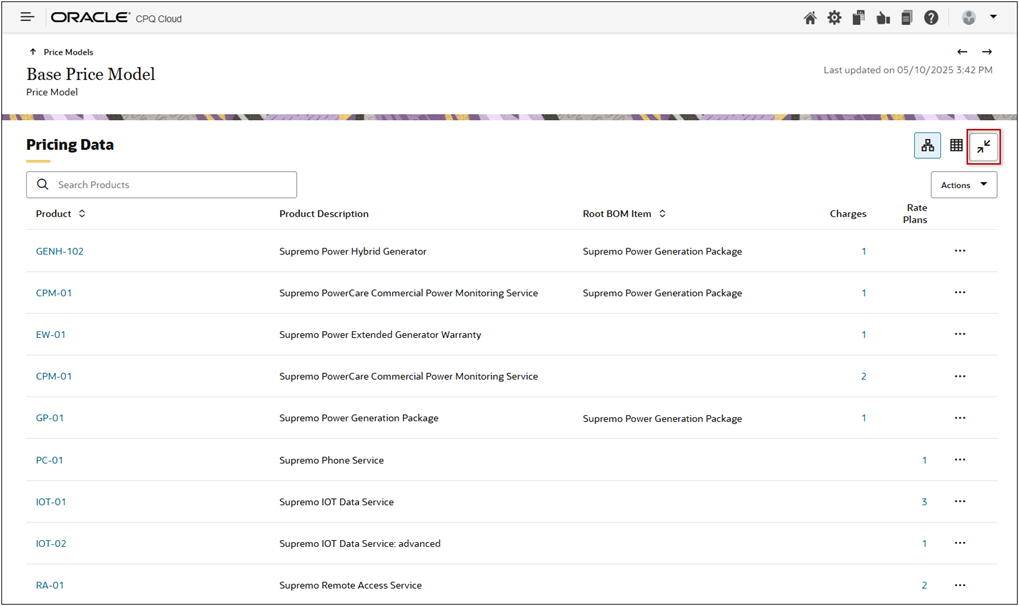
The user's expand/collapse selection for the Pricing Data section is persistent for all Price Models or Price Agreements within the current browser session.
This expanded Pricing Data section allows users to view more pricing items and minimizes scrolling.
Administration
![]() Add a Price List Type Price Model
Add a Price List Type Price Model
Complete the following steps to define a Price List type Price Model with (optional) simple conditions. You can only specify absolute prices for child products added to this list.
-
Navigate CPQ Admin > Pricing Portal > Price Models.
-
Select the Add from the Actions drop-down.
- Create the Price Model:
- Enter a name in the Name field.
- Enter the Variable Name. Variable names can only contain alpha-numeric characters and underscores. The entry can be changed before saving, but after saving the value is read-only.
- Select Price List: from the List Type drop-down.
(optional) Select a Start date. This effective start date value will apply to all child products.
(optional) Select a End date. This effective end date value will apply to all child products.
- (optional) Enter a Description.
- Click Create.
-
(optional)
 Add Simple Conditions.
You do not need to do anything to set an "Always True" condition. New Price Models default to the "Always True" condition.
-
Click the Conditions Edit button.
-
Select Simple from the Condition Type drop-down.
-
Select the Action based on option.
- All Conditions
- Any Conditions
- Complex Conditions
-
Click the Click to add attributes here link to add attributes and condition values.
-
Select the condition Attribute, Operator, and enter a Value.

-
(optional) Click Add New Condition to add another condition.
-
(optional)To delete a conditions click the Delete
 icon.
icon. -
Click Update to save the condition(s).
- Select to one of the following options to add products to this Price Model:
- To add products or product hierarchies (BOM items) proceed to Add a Product.
To use custom dynamic matrix pricing for this price model proceed to Add Attribute-based Matrix Pricing for a Price Model.
Note: You cannot add Dynamic Attribute-based Pricing to a Price Model or a Price Agreement with existing charges unless all existing charges are based on the same attribute-based charge template.
![]() Add a Discount List Type Price Model
Add a Discount List Type Price Model
Complete the following steps to define a Discount List type Price Model with (optional) simple conditions. You can only specify discount pricing adjustments for child products added to this list.
-
Navigate to CPQ Admin > Pricing Portal > Price Models.
-
Select the Add from the Actions drop-down.
- Create the Price Model:
- Enter a name in the Name field.
- Enter the Variable Name. Variable names can only contain alpha-numeric characters and underscores. The entry can be changed before saving, but after saving the value is read-only.
- Select Discount List from the List Type drop-down.
- Select the Adjustment Type.
- Amount: Select this option if you will enter discounts in amounts.
- Percent: Select this option if you will enter discounts in percentages.
(optional) Select a Start date. This effective start date value will apply to all child products.
(optional) Select a End date. This effective end date value will apply to all child products.
- (optional) Enter a Description.
- Click Create.
-
(optional)
Add Simple Conditions.You do not need to do anything to set an "Always True" condition. New Price Models default to the "Always True" condition.
-
Click the Conditions Edit button.
-
Select Simple from the Condition Type drop-down.
-
Select the Action based on option.
- All Conditions
- Any Conditions
- Complex Conditions
-
Click the Click to add attributes here link to add attributes and condition values.
-
Select the condition Attribute, Operator, and enter a Value.
-
(optional) Click Add New Condition to add another condition.
-
(optional)To delete a conditions click the Delete
icon. -
Click Update to save the condition(s).
- Select to one of the following options to add products to this Price Model:
- To add products or product hierarchies (BOM items) proceed to Add a Product.
To use custom dynamic matrix pricing for this price model proceed to Add Attribute-based Matrix Pricing for a Price Model.
Note: You cannot add Dynamic Attribute-based Pricing to a Price Model or a Price Agreement with existing charges unless all existing charges are based on the same attribute-based charge template.
![]() Add Markup List Type Price Model
Add Markup List Type Price Model
Complete the following steps to define a Markup List type Price Model with (optional) simple conditions. You can only specify markup/uplift pricing adjustments for child products added to this list.
-
Navigate CPQ Admin > Pricing Portal > Price Models.
-
Select the Add from the Actions drop-down.
- Create the Price Model:
- Enter a name in the Name field.
- Enter the Variable Name. Variable names can only contain alpha-numeric characters and underscores. The entry can be changed before saving, but after saving the value is read-only.
- Select Markup List: from the List Type drop-down.
- Select the Adjustment Type.
- Amount: Select this option if you will enter markups in amounts.
- Percent: Select this option if you will enter markups in percentages.
(optional) Select a Start date. This effective start date value will apply to all child products.
(optional) Select a End date. This effective end date value will apply to all child products.
- (optional) Enter a Description.
- Click Create.
-
(optional)
Add Simple Conditions.You do not need to do anything to set an "Always True" condition. New Price Models default to the "Always True" condition.
-
Click the Conditions Edit button.
-
Select Simple from the Condition Type drop-down.
-
Select the Action based on option.
- All Conditions
- Any Conditions
- Complex Conditions
-
Click the Click to add attributes here link to add attributes and condition values.
-
Select the condition Attribute, Operator, and enter a Value.
-
(optional) Click Add New Condition to add another condition.
-
(optional)To delete a conditions click the Delete
icon. -
Click Update to save the condition(s).
- Select to one of the following options to add products to this Price Model:
- To add products or product hierarchies (BOM items) proceed to Add a Product.
To use custom dynamic matrix pricing for this price model proceed to Add Attribute-based Matrix Pricing for a Price Model.
Note: You cannot add Dynamic Attribute-based Pricing to a Price Model or a Price Agreement with existing charges unless all existing charges are based on the same attribute-based charge template.
Note: The new type of scripting Price Model is named 'Advanced' whereas legacy scripting Price Models are now renamed Advanced (Legacy) Price Models.
Prerequisites: The following items must be defined prior to adding an Advanced Price Model:
-
Commerce Transaction Line attributes that will be populated by the output values.
-
Lookups with valid values for any menu type attributes you will use in your dynamic pricing.
-
Pricing Attributes for the input and output pricing values.
-
A Scripting Price Model type Pricing Matrix Template to define the specific metadata or columns you will use to define one or more dynamic input and output pricing attributes.
-
Refer to Example Advanced Price Model & Scripting Matrix Template for more information.
Complete the following steps to create an Advanced type Price Model in the CPQ Pricing Portal.
-
Navigate to CPQ Admin > Pricing Portal > Price Models.
-
Select Add from the Actions drop-down.
-
Create the Price Model:
-
Enter the Name.
-
Enter the Variable Name.
-
Select Advanced from the List Type drop-down.
-
Select the applicable Scripting Price Model - Pricing Matrix Template from the Template drop-down.
-
(optional) Select a Start date. This effective start date value will apply to all child products.
-
Select an End date. This effective end date value will apply to all child products.
-
(optional) Enter a Description.
-
Click Create.
-
-
Select Edit from the Actions drop-down.
-
Click Add, and then define the values for the row.
-
Select values from available drop-downs and define the appropriate data values for the row.
-
Repeat this step to enter additional rows.
-
-
Click Update.
![]() Add Attribute-based Matrix Pricing to a Price Model
Add Attribute-based Matrix Pricing to a Price Model
Complete the following steps to create dynamic matrix pricing for a Price Model.
-
Navigate to CPQ Admin > Pricing Portal >Price Models or Price Agreements (as applicable).
-
Select the applicable Price Model or Price Agreement.
-
A Price Model or Price Agreement must be defined by either product prices and charges OR by a Pricing Matrix.
-
You cannot add Dynamic Attribute-based Pricing to a Price Model or a Price Agreement with existing charges unless all existing charges are based on the same attribute-based charge template.
-
-
Click Edit in the Basic Details section.
-
Expand the More Details section.
-
Select the applicable Pricing Matrix Template from the Dynamic Matrix Pricing drop-down.
-
Click Save or Update.
-
Click the Table View icon
 in the Pricing Data section.
 -
Select Edit from the Actions drop-down.
-
Perform one of the following options:
-
To add new product to the pricing matrix, select Add Charge from the Add drop-down.
-
To add a conditional row item to the last product in the pricing matrix, select Add Matrix Row from the Add drop-down.
-
To add a conditional row item for any existing product in the pricing matrix, click on the line ellipse for the applicable product line item and select Add Matrix Row.
-
-
Enter or select the conditional values for each column.
-
Enter the applicable pricing.
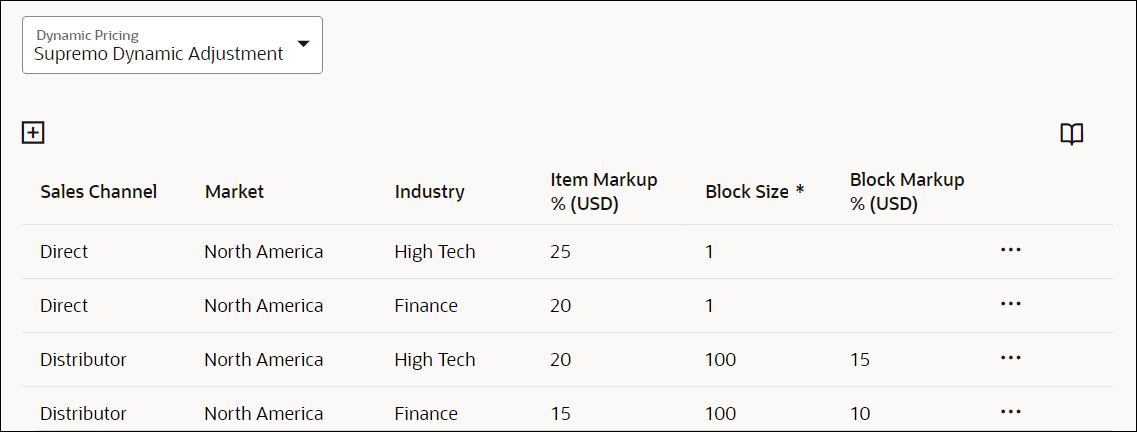
The item pricing is determined by the parent Price Model's or Price Agreement’s list type and adjustment type (for discount and markup lists). For example, Item Markup % is defined by the parent Markup List type Price Model with a Percent adjustment type. If a customer implementation uses block pricing, Block Size and Block Price attributes can also be added.
-
Click Save or Update.
Complete the following steps to add a product to a Price Model.
-
Navigate to CPQ Admin > Pricing Portal > Price Models.
-
Select the applicable Price Model.
-
Select Add Products from the Actions drop-down.
-
Select the applicable item from the Product drop-down.
-
Select a Part or BOM item, or
-
Select All Items to add a discount or markup for all products.
This option is only available for Discount Lists and Markup Lists.
-
-
Click Create.
-
Proceed to Add a Product Price, Add a Rate Plan, or Add a Charge.
Complete the following steps to add a Product Price to a product.
-
Navigate to CPQ Admin > Pricing Portal > Price Models or Price Agreements (as applicable),
- Click on the applicable Price Model or Price Agreement.
-
Click on the applicable product.
-
If the desired product is not listed, refer to Add a Product for instructions.
-
Click Add Product Price - OR - select Add Product Price from the Actions drop-down.
-
When enabled, select a Charge Definition.
Charge Definitions standardize charge categories and define the valid combinations of price types and charge types.
- The Price Type and Charge Type are automatically populated when using Charge Definitions.
- Charge Definitions are highly recommended for customers using charge pricing (vs. legacy product pricing) to simplify the setup of prices.
- Charge Definitions are required when CPQ pricing is integrated with Oracle Fusion Pricing.
- For more information, refer to Charge Definitions.
-
Select a Price Type.
The Pricing Type lookup provides the following standard values: One time, Recurring, Usage. To add custom values, refer to Lookups.
-
If applicable, select the Price Period to define the time frequency, periodicity, or recurrence with which the price is levied or charged.
- Price Periods are only applicable for Recurring and Usage Price Types.
- The Pricing Type lookup provides the following standard values: Per Month, Per Year. To add custom values (e.g. Per Week, Per Year), refer to Lookups.
-
Select one of the following Dynamic Pricing options, and perform the included steps:
None (Static Pricing)- Select None from the Dynamic Pricing drop-down.
- If applicable, select Additional Currencies from the drop-down.
-
Enter the unit price, discount value, or markup value for each applicable currency.
-- OR --
Complete the following to enter Block Pricing:
-
Click the Manage Columns icon and select the Block Size option.
-
Enter the Block Size value that is greater than 1.
-
Enter the Block Price value for each applicable currency.
-
Enter the Item Price value for each applicable currency.
- Select Volume Pricing from the Dynamic Pricing drop-down.
- If applicable, select Additional Currencies from the drop-down.
- Click Add Range.
- Enter the Quantity From value.
- Enter the unit price, discount value, or markup value for each applicable currency.
-
Click Add Range.
-
Enter the Quantity From value for the new tier.
The Quantity To value for the previous tier will be populated with the same value.
-
Enter the unit price, discount value, or markup value for each applicable currency.
-- OR --
Complete the following to enter Block Pricing:
-
Click the Manage Columns icon and select the Block Size option.
-
Enter the Block Size value that is greater than 1.
-
Enter the Block Price value for each applicable currency.
-
Enter the Item Price value for each applicable currency.
-
Repeat Step f - Step h to add additional tiers.
- Select Tier Pricing from the Dynamic Pricing drop-down.
- If applicable, select Additional Currencies from the drop-down.
- Click Add Range.
- Enter the Quantity From value.
- Enter the unit price, discount value, or markup value for each applicable currency.
-
Click Add Range.
-
Enter the Quantity From value for the new tier.
The Quantity To value for the previous tier will be populated with the same value.
-
Enter the unit price, discount value, or markup value for each applicable currency.
-- OR --
Complete the following to enter Block Pricing:
-
Click the Manage Columns icon and select the Block Size option.
-
Enter the Block Size value that is greater than 1.
-
Enter the Block Price value for each applicable currency.
-
Enter the Item Price value for each applicable currency.
-
Repeat Step f - Step h to add additional tiers.
- Select the appropriate Pricing Matrix Template from the drop-down.
-
If additional currencies are required in the pricing matrix complete the following steps.
-
Click the Manage Columns icon.
-
Check the applicable currency items.
-
Click Apply.
-
-
Click the + icon to add a conditional row item.
-
Enter or select the conditional values for each column.
-
Enter the applicable pricing.
-
If a customer implementation uses block pricing, add the Block Size and Block Price attributes.
-
Click the Manage Columns icon and select the Block Size and Block Price options.
-
Enter the Block Size value that is greater than 1.
-
Enter the Block Price value for each applicable currency.
-
Enter the Item Price value for each applicable currency.
-
-
Repeat Step c - Step f to add additional conditional pricing items.
-
Click Create.
Complete the following steps to create a Rate Plan to a product.
-
Navigate to CPQ Admin > Pricing Portal > Price Models or Price Agreements.
- Select the applicable Price Model or Price Agreement.
-
Click on the applicable product.
If the desired product is not listed, refer to Add a Product for instructions.
-
Click Add Rate Plans.
- Enter a Rate Plan Name.
- Enter a variable name in Rate Plan Number.
- (optional) Select a Start date. This effective start date value will apply to all Charges in this Rate Plan.
- (optional) Select an End date. This effective end date value will apply to all Charges in this Rate Plan.
- (optional) Enter a Description.
- Click Create.
- Proceed to Add a Charge.
Complete the following steps to add a charge to a product.
-
Navigate to CPQ Admin > Pricing Portal > Price Models or Price Agreements.
- Select the applicable Price Model or Price Agreement.
-
Click on the applicable product.
If the desired product is not listed, refer to Add a Product for instructions.
-
Perform one of the following:
-
To add non-Rate Plan Charges, click Add Charges - OR - select Add Charges from the Actions drop-down.
-
To add Charges to a Rate Plan, click on the Rate Plan ellipsis, and then select Add Charges.
-
-
When enabled, select a Charge Definition.
Charge Definitions standardize charge categories and define the valid combinations of price types and charge types.
- The Price Type and Charge Type are automatically populated when using Charge Definitions.
- Charge Definitions are highly recommended for customers using charge pricing (vs. legacy product pricing) to simplify the setup of prices.
- Charge Definitions are required when CPQ pricing is integrated with Oracle Fusion Pricing.
- For more information, refer to Charge Definitions.
-
Select a Price Type to define the basis on which a price or charge is levied.
- The Price Type is automatically populated and not editable when using Charge Definitions.
- The Pricing Type lookup provides the following standard values: One time, Recurring, Usage. To add custom values, refer to Lookups.
-
Select a Charge Type to define the value that will be received by the customer for a charge price.
- The Charge Type is automatically populated and not editable when using Charge Definitions.
- The Charge Type lookup provides the following standard value: Sales Price. To add custom values (e.g. Activation Fee, Call Charge, Data Charge), refer to Lookups.
-
If applicable, select the Price Period to define the time frequency, periodicity, or recurrence with which the price is levied or charged.
- Price Periods are only applicable for Recurring and Usage Price Types.
- The Pricing Type lookup provides the following standard values: Per Month, Per Year. To add custom values (e.g. Per Week, Per Year), refer to Lookups.
-
If applicable, select or enter the Usage UOM to define the units of measures for usage quantities.
To add custom values (e.g. Per Week, Per Year), refer to Lookups.
- (optional) Choose a Start Date to set the effective start date for an individual charge.
- (optional) Choose an End Date to set the effective start date for an individual charge.
-
Select one of the following options, and perform the included steps:
None (Static Pricing)- Select None from the Dynamic Pricing drop-down.
- If applicable, select Additional Currencies from the drop-down.
-
Enter the unit price, discount value, or markup value for each applicable currency.
-- OR --
Complete the following to enter Block Pricing:
-
Click the Manage Columns icon and select the Block Size option.
-
Enter the Block Size value that is greater than 1.
-
Enter the Block Price value for each applicable currency.
-
Enter the Item Price value for each applicable currency.
- Select Volume Pricing from the Dynamic Pricing drop-down.
- If applicable, select Additional Currencies from the drop-down.
- Click Add Range.
- Enter the Quantity From value.
- Enter the unit price, discount value, or markup value for each applicable currency.
-
Click Add Range.
-
Enter the Quantity From value for the new tier.
The Quantity To value for the previous tier will be populated with the same value.
-
Enter the unit price or discount value for each applicable currency.
-- OR --
Complete the following to enter Block Pricing:
-
Click the Manage Columns icon and select the Block Size option.
-
Enter the Block Size value that is greater than 1.
-
Enter the Block Price value for each applicable currency.
-
Enter the Item Price value for each applicable currency.
-
Repeat Step f - Step h to add additional tiers.
- Select Tier Pricing from the Dynamic Pricing drop-down.
- If applicable, select Additional Currencies from the drop-down.
- Click Add Range.
- Enter the Quantity From value.
- Enter the unit price, discount value, or markup value for each applicable currency.
-
Click Add Range.
-
Enter the Quantity From value for the new tier.
The Quantity To value for the previous tier will be populated with the same value.
-
Enter the unit price, discount value, or markup value for each applicable currency.
-- OR --
Complete the following to enter Block Pricing:
-
Click the Manage Columns icon and select the Block Size option.
-
Enter the Block Size value that is greater than 1.
-
Enter the Block Price value for each applicable currency.
-
Enter the Item Price value for each applicable currency.
-
Repeat Step f - Step h to add additional tiers.
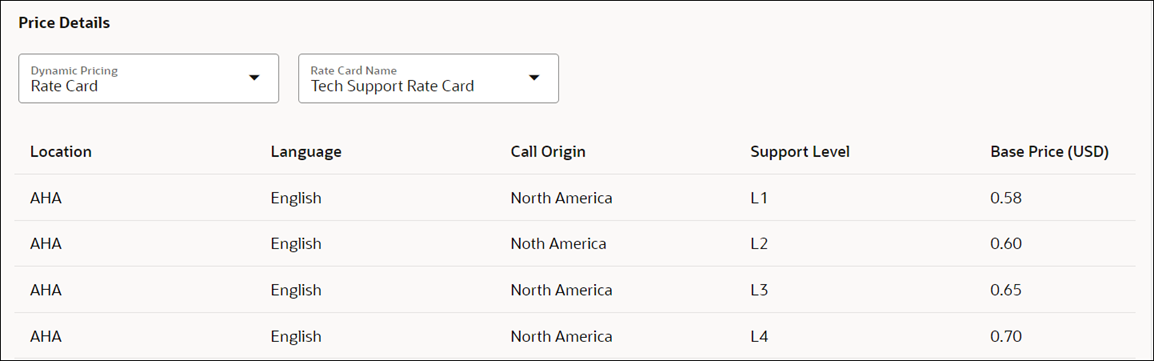
- Select Rate Card from the Dynamic Pricing drop-down.
-
Select the Rate Card Name from the drop-down.
- Rate Cards are only available for Price List type Price Models.
- Rate Cards are only available for Usage Price Types.
- Price values are defined by the applicable Rate Card and can't be modified when defining a charge.
- For more information, refer to Rate Cards and Pricing Matrix Templates.
- Select the appropriate Pricing Matrix Template from the drop-down.
-
If additional currencies are required in the pricing matrix complete the following steps.
-
Click the Manage Columns icon.
-
Check the applicable currency items.
-
Click Apply.
-
-
Click the + icon to add a conditional row item.
-
Enter or select the conditional values for each column.
-
Enter the applicable pricing.
-- OR --
Complete the following to enter Block Pricing:
-
Click the Manage Columns icon and select the Block Size option.
-
Enter the Block Size value that is greater than 1.
-
Enter the Block Price value for each applicable currency.
-
Enter the Item Price value for each applicable currency.
-
Repeat Step c - Step e to add additional conditional pricing items.
-
Click Create.
![]() Inline Import / Export of Prices to Price Models
Inline Import / Export of Prices to Price Models
Beginning in Oracle CPQ 25B, administrators can download and upload the price model items, prices, and charges for a Price Model in a single file. The Price Model UI provides the following actions for the Pricing Data Actions menu:
- Import – import .csv and .zip files as Pricing Data, with dialog boxes showing progress and log links.
- Export – export Pricing Data .zip files, with dialog boxes showing progress and download links.
-
Import/Export Status - view details of all the import/export tasks related to the particular Price Model.
Pricing administrators can view an audit trail of import/export activity and view the logs for each import/export.

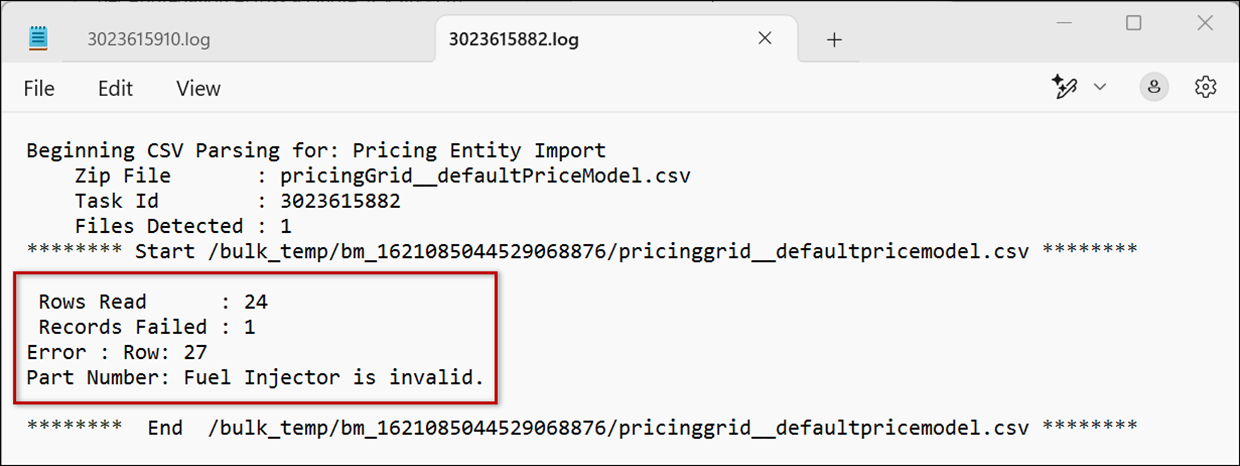
If an upload fails, the invalid row numbers and a descriptive error message aid the user in correcting and successfully uploading the desired pricing.
The recommended process for modifying pricing data is:
-
Export Pricing Data from a Price Model
-
Modify Pricing Data CSV Files
-
Import Pricing Data to a Price Model
Export Pricing Data from a Price Model
Complete the following steps to export pricing data.
-
Navigate to Admin > Pricing Portal > Price Models.
-
Select the applicable Price Model.
-
Select Export from the Actions drop-down.
-
When the export is complete, download the exported pricing data file.
-
Click the pricingGrid_<priceModelVariableName> link on the Export Status dialog.
- - or – -
-
Select Import/Export Status from the Actions drop-down, then click on the applicable pricingGrid_<priceModelVariableName> link.
-
Modify Pricing Data CSV Files
When updating pricing data using an CSV file the first column will specify the action for the line. The following actions can be used:
-
MODIFY: modify or add the column data in the row/record. A new row is created if the record is not found.
-
DELETE: delete all the column data for an existing a row/record.
Complete the following procedure to add, modify, or delete row items to a Price Model pricing data.
-
Unzip the downloaded pricingGrid_<priceModelVariableName>.zip file.
-
Open the pricingGrid_<priceModelVariableName>.csv file.
-
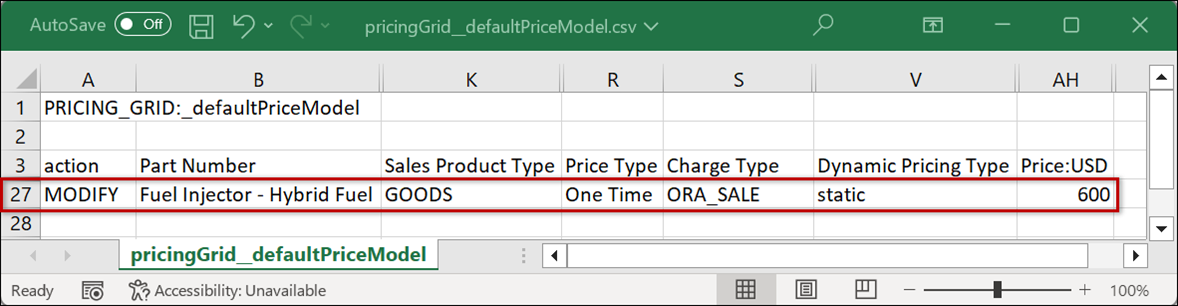
Populate the rows with the desired data. The first column is used to specify the desired action.
For example, the following file will add pricing data for the Fuel Injector – Hybrid Fuel product using the MODIFY action.
-
Save and close the updated pricingGrid_<priceModelVariableName>.csv file.
You can append a version number or other identifier to the end of the file name to make it easier to keep track of your csv files.
Import Pricing Data to a Price Model
Complete the following steps to import a pricing data.
-
Navigate to Admin > Pricing Portal > Price Models.
-
Select the applicable Price Model.
-
Select Import from the Actions drop-down.
-
Drop or upload the updated .csv or .zip file into the Import Pricing Data drawer.
-
Click Import.
![]() Export and Import Matrix Pricing Data
Export and Import Matrix Pricing Data
CPQ provides the ability to ability to author the Price Model and Price Agreement matrix pricing outside of CPQ and use Excel (.CSV) files to load this data directly from the Price Model or Agreement UI. The recommended process for modifying matrix pricing data is:
-
Export Matrix Pricing Data from a Price Model or Price Agreement
-
Modify Matrix Pricing Data Excel Files
-
Import Matrix Pricing Data from a Price Model or Price Agreement
![]() Export Matrix Pricing Data from a Price Model or Price Agreement
Export Matrix Pricing Data from a Price Model or Price Agreement
Complete the following steps to export a pricing matrix.
-
Navigate to the Admin page.
-
Click Pricing Portal in the Products section.
-
Click on the Price Models or Price Agreements card (as applicable).
-
Select the applicable Price Model or Price Agreement.
-
Select Export from the Actions drop-down.
-
When the export is complete, download the exported pricing matrix file.
-
Click the matrixGrid_<priceModelOrPriceAgreementVariableName> link on the Export Status dialog.
-- or –
-
Select Import/Export Status from the Actions drop-down, then click on the applicable matrixGrid_<priceModelOrPriceAgreementVariableName> link.
-
![]() Modify Matrix Pricing Data Excel Files
Modify Matrix Pricing Data Excel Files
When updating a pricing matrix grid using an Excel file the first column will specify the action for the line. The following actions can be used:
-
ADD: add a new row/record if one does not already exist. If one does exist, an error will be thrown.
-
MODIFY: modify or add the column data in the row/record. A new row is created if the record is not found.
-
DELETE: delete all the column data from a row/record.
-
UPDATE: modify all the column data in the row/record. Update will fail if the record is not found.
Complete the following procedure to add, modify, or delete row items to a Price Model or Price Agreement pricing matrix grid.
-
Unzip the downloaded matrixGrid_<priceModelOrPriceAgreementVariableName>.zip file.
-
Open the matrixGrid_<priceModelOrPriceAgreementVariableName>.csv file.
-
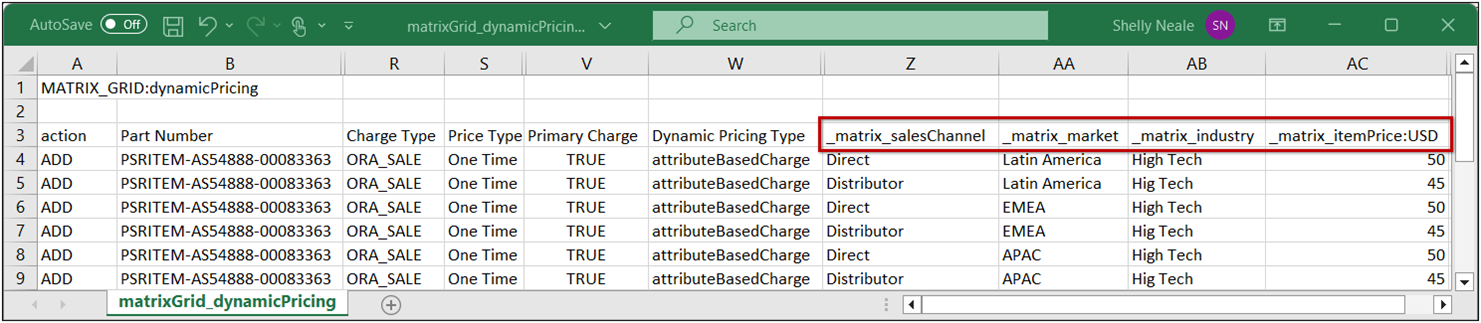
Populate the rows with the desired data. The first column is used to specify the desired action.
For example, the following file will add six row items to the dynamicPricing Price Model pricing matrix grid. The _matrix_<columnVariableName> are from the associated Pricing Matrix Template.
-
Save and close the updated matrixGrid_<priceModelOrPriceAgreementVariableName>.csv file.
![]() Import Matrix Pricing Data from a Price Model or Price Agreement
Import Matrix Pricing Data from a Price Model or Price Agreement
Complete the following steps to import a pricing matrix.
-
Navigate CPQ Admin > Pricing Portal > Price Models or Price Agreements (as applicable).
-
Select the applicable Price Model or Price Agreement.
-
Select Import from the Actions drop-down.
-
Drop or upload the updated .csv or .zip file into the Import Pricing Data drawer.
-
Click Import.
![]() Add Service Duration Price Items
Add Service Duration Price Items
Complete the following steps to add service duration price items.
-
Navigate to CPQ Admin > Pricing Portal > Price Models.
-
Select the applicable Price Model.
-
Select Manage Columns from the Actions drop-down.
-
Check Service Duration Type, Service Duration, and Service Duration Period, and then click Apply.
-
Select Add Products from the Actions drop-down.
-
Select Product or BOM Item from the Type drop-down.
-
Select the desired Part Number or BOM Item from the associated drop-down.
To add multiple service durations for the same Price Model Item the Parts – Service Duration Type must be set to V (Variable).
-
Select the Service Duration Period.
-
Enter the Service Duration.
-
Click Create.
![]() Add an Advanced (Legacy) Price Model
Add an Advanced (Legacy) Price Model
Complete the following steps to add a Price Model with an advanced BML function.
-
Navigate to CPQ Admin > Pricing Portal > Price Models.
-
Select the Add from the Actions drop-down.
-
Enter a Name.
-
Enter a Variable Name.
The Variable Name field populates automatically. Variable names can only contain alpha-numeric characters and underscores. The entry can be changed before saving, but after saving the value is read-only.
-
(optional) Select a Start date. This effective start date value will apply to this Price Model.
-
(optional) Select a End date. This effective end date value will apply to this Price Model.
- (optional) Enter a Description.
-
Click Create.
-
(optional)
Add Simple Conditions.You do not need to do anything to set an "Always True" condition. New Price Models default to the "Always True" condition.
-
Click the Conditions Edit button.
-
Select Simple from the Condition Type drop-down.
-
Select the Action based on option.
- All Conditions
- Any Conditions
- Complex Conditions
-
Click the Click to add attributes here link to add attributes and condition values.
-
Select the condition Attribute, Operator, and enter a Value.
-
(optional) Click Add New Condition to add another condition.
-
(optional)To delete a conditions click the Delete
icon. -
Click Update to save the condition(s).
-
Click Advanced.
- Select the applicable Pricing Attributes, Special Parameters, and Library Functions.
-
Click Next.
-
Enter the applicable BML function.
// Initialize dates to be used as defaults if needed. contractStart = getdate(); asOfDate = getdate(); // Make sure the dates passed are valid. if(oRCL_pRC_contractStartDate <> ""){ contractStart = strtojavadate(oRCL_pRC_contractStartDate, "MM/dd/yyyy"); } if(oRCL_pRC_priceAsOfDate <> ""){ asOfDate = strtojavadate(oRCL_pRC_priceAsOfDate, "MM/dd/yyyy"); } return util.oRCL_pRC_subscriptionBase(__part_number, oRCL_pRC_externalParentKey, oRCL_pRC_quantity, 0, contractStart, asOfDate); - Click Close.
Complete the following steps to delete a Price Model.
-
Navigate to CPQ Admin > Pricing Portal > Price Models.
-
Click the ellipsis at the end of the line for the applicable Price Model and select Delete.
Notes
Notes:
- The relationship between Pricing Rules and Price Models is a many-to-many relationship. In other words, one Pricing Rule may apply to multiple Price Models and one Price Model may be applied by multiple Pricing Rules.
- The sequencing of Pricing Rules and Price Models is very important because it has a direct impact on the pricing order of operations.
- Header and line level attributes can be used in Price Models, however best practice is to use header attributes in Pricing Rule conditions and use line attributes in Price Model conditions.
-
The product hierarchy must be defined in BOM Item Definition table to enable hierarchical product pricing in the Pricing Engine.
-
New BOM Items from an undeployed BOM Item Definition table can be added as a Pricing Data item, but the BOM Item Definition table must be deployed to make the BOM Item available for product Configuration.
-
If you wish to price root BOM items using Pricing Engine BOM item pricing, you should not define a price in the Parts database for BOM's root item with an associated part number.
-
Bulk upload and download of product prices in Pricing Engine have also been enhanced to support BOM Item pricing.
-
Hover tooltips will display the full name of a currency code.
-
If the Value Type is Absolute Price, define amounts in USD and EURO. If there is a EURO specific price, populate the amount with the Price Book price.If the Value Type is Discount Amount or Discount Percent, and no CSP exists in a specific currency, set the amount to "0'.
-
Values in the price model should be populated for all supported currencies for a given part.
Example: If your application supports USD and EURO, when a part is added to a profile, a price/value should be defined for both the USD and EURO currencies. -
The maximum number of Pricing Models is 100. Submit a Service Request (SR) on My Oracle Support to change the maximum number.
-
The maximum number of Pricing Matrix rows is 500. Submit a Service Request (SR) on My Oracle Support to change the maximum number.
-
Oracle CPQ 23D combined dynamic pricing with static pricing so all pricing types can be defined in the same Price Model. Prior to Oracle CPQ 23D, CPQ supported dynamic pricing options at the Price Model level. A Price Model was designated as either a Tier Pricing, Volume Pricing, Advanced, or 'None' Dynamic Pricing type. Beginning in Oracle CPQ 23D, Tier and Volume types of Dynamic Pricing are defined at the Price Model Item level (i.e. a specific product) within any type of Price Model, to provide users additional flexibility and ease of administration. This enhancement simplifies administration and discoverability of pricing in the Pricing Engine. Upon upgrade to Oracle CPQ 23D all Price Models will support tier, volume, and flat pricing on an item by item basis and will retain any tier or volume pricing that has been previously defined.


