Overview
In this example, an Advanced Price Model and a Scripting Price Model type Pricing Matrix Templates are used to set discount corridors (or discount guideline) for Supremo product lines by setting the minimum and maximum discount amounts as shown below.

Prerequisite: You have adopted multi-charges and enabled Charge Definitions.
Note: multiple charges and charge definitions are required for this example but are not required to use a new Advanced Price Model.
The process to implement enhanced scripting for charges and other extensible output values using Advanced type Price Models and Scripting Price Model type Pricing Matrix Templates involves the following steps:
-
Define the Commerce Transaction Line attributes that will be populated.
-
Define Pricing Lookups with valid values for any menu type attributes you will use in your dynamic pricing.
-
Define Pricing Attributes for the input and output pricing values.
-
Create a Scripting Price Model type Pricing Matrix Template to define the specific metadata or columns you will use to define one or more dynamic input and output pricing attributes.
-
Create an Advanced Price Model and select the applicable Scripting Price Model - Pricing Matrix Template Pricing Matrix Template.
-
Define the specific column values and the resulting output values for each combination of these values.
-
Link the Advanced Price Model to a Pricing Rule.
Define Commerce Attributes
-
Navigate to Admin > Process Definition > Documents > Transaction > Attributes
-
Add Commerce Transaction attributes.
Example Transaction (Menu-type) Attributes
Sales Channel
-
Direct (Variable Name:
direct) -
Distributor (Variable Name:
distributor)
-
-
Navigate to Admin > Process Definition > Documents > Transaction Line > Attributes
-
Add Commerce Transaction Line attributes.
Example Transaction Line (Currency-type) Attributes
-
Maximum Discount
-
Minimum Discount
-
Define Pricing Lookups
-
Navigate to Admin > Pricing Portal > Pricing Lookups.
-
Add Pricing Lookups to define valid values for any menu type attributes you will use in your dynamic pricing.
Example Pricing Lookups
Name Document
Attribute
Attribute Type
Comment
Sales Channels Transaction
Sales Channel
Menu
Menu Options: direct, distributor
Sales Product Types Transaction Line
Part Attributes > Part Sales Product Type
String
Expose the Part Attributes > Part Sales Product Type in the "Part Attributes" Attribute Set. Refer to Manage Part Attributes.
Define Pricing Attributes
-
Navigate to Admin > Pricing Portal > Pricing Attributes.
-
Add Pricing Attributes for the input and output pricing values.
Example Pricing Attributes
Pricing Entity
Name
In/Out
Lookup Visibility
Mapped To
Header Sales Channel Input Sales Channels Data Source:<Commerce Process Name>
Source Attribute: Sales Channel
Source Entity: Header
Line Sales Product Type Input Sales Product Types Data Source: Item Attributes
Source Attribute: Sales Product Type
Source Entity: Part
Line
Line Maximum Discount
Output
Data Source: <Commerce Process Name>
Source Attribute: Maximum Discount
Source Entity: Transaction Line
Line
Line Minimum Discount
Output
Data Source: <Commerce Process Name>
Source Attribute: Minimum Discount
Source Entity: Transaction Line
Charge
Maximum Discount
Output
Administration, Runtime
Charge
Minimum Discount
Output
Administration, Runtime
-
Navigate to Admin > Process Definition > Documents > Transaction Line > Attributes.
-
Click Synchronize Charge Definition.
-
Deploy the Commerce process.
Create a Scripting Price Model - Pricing Matrix Template
Complete the following steps to create a Scripting Price Model type Pricing Matrix Template in the CPQ Pricing Portal.
-
Navigate to Admin > Pricing Portal > Pricing Matrix Templates.
-
Select Add from the Actions drop-down.
-
Enter the Name.
-
Enter the Variable Name.
-
Select Scripting Price Model from the Template Type drop-down.
-
(optional) Enter a Description.
-
Click Create.
-
-
Select Add from the Actions drop-down.
-
Enter the following data to create a template column.
-
Enter the Name.
-
Enter the Variable Name.
-
Select the Data Type.
-
If applicable, select a Lookup. (Lookups are only available for String Data Types)
-
If applicable, enter of select a Default Value.
-
Check Default Value Overridable if the default value can be modified.
-
Check Required to make this field mandatory.
-
Check Key to identify this field as a unique identifier.
-
Repeat this step to enter additional columns.
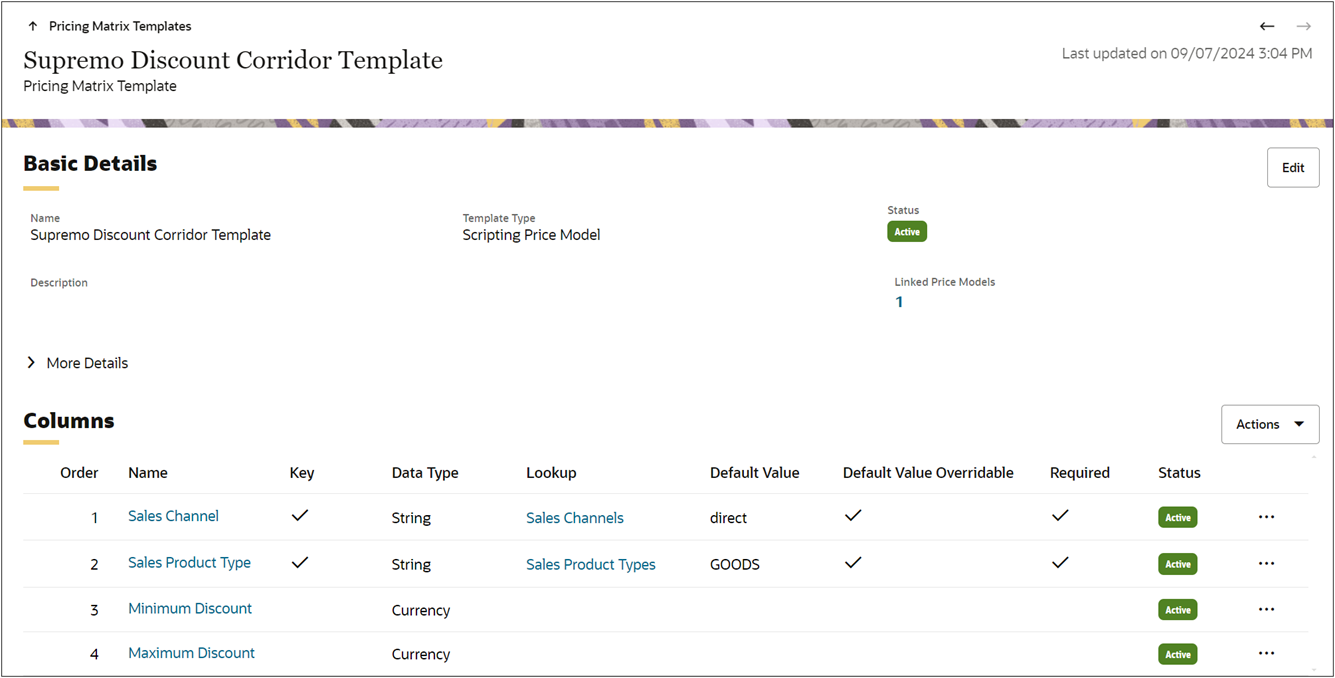
Example Scripting Price Model - Pricing Matrix Template

-
-
Enter BML Script for the Scripting Price Model - Pricing Matrix Template.
-
Click Edit (In the Basic Details section).
-
Expand More Details, and click the Advanced Script Edit link.
-
Select the applicable attributes from the Pricing Document Attributes tab.
Example Pricing Document Attributes
-
_currencyCode
-
salesChannel_c
-
lineMaximumDiscount_c
-
lineMinimumDiscount_c
-
salesProductType_c
-
calculationInfo
-
chargeDefinitionCode
-
chargeType
-
dynamicPricingType
-
maximumDiscount_c
-
minimumDiscount_c
-
pricePeriod
-
priceType
-
priceType
-
-
Select
_currentMatrixfrom the Special Parameters tab. -
Click Next.
-
Enter the BML Script. See BML Script Example
-
Click Save and Close.
-
-
Click Update.
BML Script Example
salesChannel = jsonget(pricingDocument,"salesChannel_c","string", "direct");

// Loop through lines
lines = jsonget(pricingDocument,"lines","jsonarray");
indexes = range(jsonarraysize(lines));
for index in indexes {

    line = jsonarrayget(lines, index, "json");
    salesProductType = jsonget(line,"salesProductType_c","string", "GOODS");

    // Query the Pricing Data of this price model to get the discount corridor
    minDiscount = 0.;
    maxDiscount = 0.;
    resultSet = bmql("select minDiscount, maxDiscount from $_currentMatrix where salesChannel = $salesChannel and salesProductType = $salesProductType");
    for result in resultSet {
       minDiscount = getfloat(result, "minDiscount");
       maxDiscount = getfloat(result, "maxDiscount");
    }

    // Apply the discount corridor on all charges
    charges = jsonget(line,"charges","jsonarray");
    if (isnull(charges)) {
       continue;
    }
    chargeIndexes = range(jsonarraysize(charges));
    for chargeIndex in chargeIndexes {
        charge = jsonarrayget(charges, chargeIndex, "json");
        isProductPrice = jsonget(charge, "isProductPrice", "boolean");
        if (isProductPrice) {
          jsonput(line, "lineMinimumDiscount_c", minDiscount);
          jsonput(line, "lineMaximumDiscount_c",  maxDiscount);
        } else {
          jsonput(charge, "minimumDiscount_c", minDiscount);
          jsonput(charge, "maximumDiscount_c",  maxDiscount);
       }
    }

}

return pricingDocument;
Create an Advanced Price Model
Complete the following steps to create an Advanced Price Model in the CPQ Pricing Portal.
-
Navigate to Admin > Pricing Portal > Price Models.
-
Select Add from the Actions drop-down.
-
Enter the Name.
-
Enter the Variable Name.
-
Select Advanced from the List Type drop-down.
-
Select the applicable Scripting Price Model - Pricing Matrix Template from the Template drop-down.
-
(optional) Select a Start date. This effective start date value will apply to all child Price Model Items.
-
(optional) Select an End date. This effective end date value will apply to all child Price Model Items.
-
(optional) Enter a Description.
-
Click Create.
-
-
Select Edit from the Actions drop-down.
-
Click Add, and then define the values for the row. See Advanced Price Model Example
-
Select values from available drop-downs and define the appropriate data values for the row.
-
Repeat this step to enter additional rows.
-
-
Click Update.
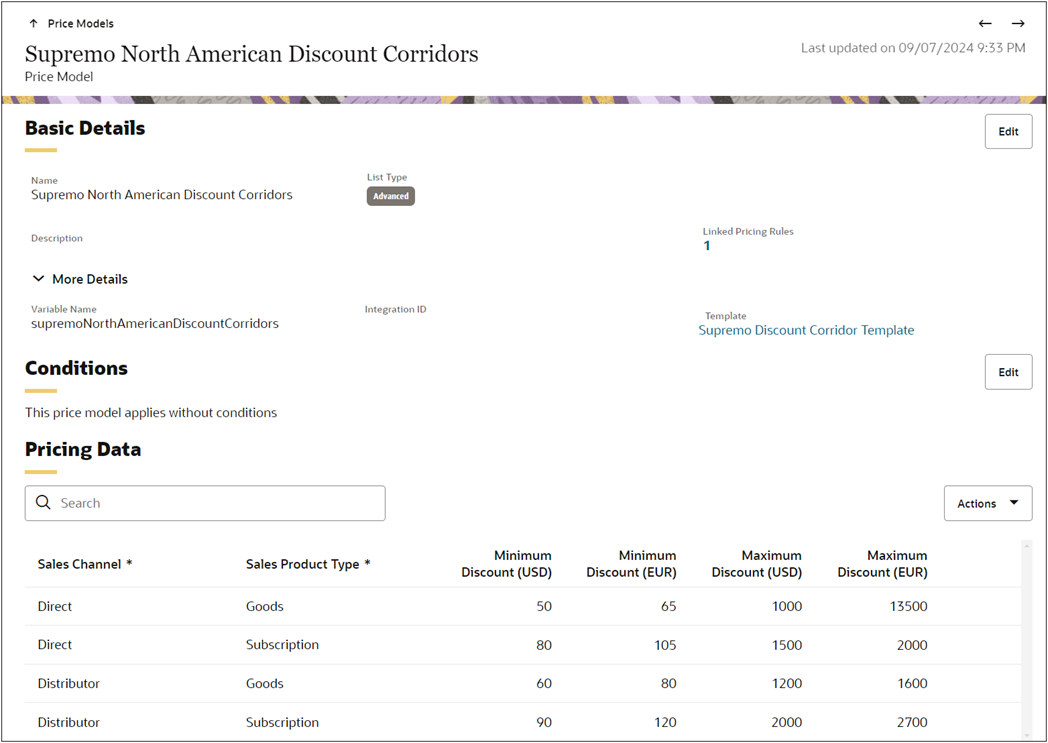
Example Advanced Price Model

Link Advanced Price Model to Pricing Rule
Complete the following steps to create an Advanced Price Model in the CPQ Pricing Portal.
-
Navigate to Admin > Pricing Portal > Pricing Rules.
-
Click on the applicable Pricing Rule. (e.g. Base Pricing Rule)
-
Select Add from the Linked Price Models Actions drop-down.
-
Select the applicable Price Model (e.g. Supremo North America Discount Corridors.
-
Click Add.


