Pricing Matrix Templates
Overview
Pricing for many industries require that pricing be calculated based on multiple inputs (multiple UIs, from / to country, value in excess of an allocated value, etc.) and in some cases that multiple charges or prices also be output from the Pricing Engine (e.g. a price for Mobile and a separate one for Landline call minutes).
The Pricing Matrix Templates module supports pricing that requires the Pricing Engine to use a custom dynamic matrix as the basis for calculating runtime prices. Pricing Matrix Templates can be used to price both one-time or recurring product prices and charges. Usage charges require a Rate Card since a specific unit price cannot be determined until later when actual usage metrics are available. Pricing Matrix Templates are used to define the specific metadata or columns that will be used to specify conditional pricing.
Oracle CPQ 24B introduced dynamic attribute-based matrix pricing for a product to support pricing that requires the Pricing Engine to use a custom dynamic matrix as the basis for calculating runtime prices. Oracle CPQ 24C provided the ability to define similar table-based pricing at the Price Model level. Pricing Attributes that can be mapped to Configuration, Parts, or Commerce attributes are used to define conditional input columns for a Pricing Matrix Template. The Pricing Matrix Templates output column uses the Item Price attribute for the calculated pricing. This enables pricing natively in Pricing Engine rather than requiring a custom data table and BML script to perform complex, multi-dimensional price lookups for input columns.
Oracle CPQ 24D enabled scripting support for charges and other extensible output values using the new Advanced type Price Models and Scripting Price Model type Pricing Matrix Templates.
Beginning in Oracle CPQ 25A administrators can define additional extensible output values for charges, product prices, or quote lines within a pricing matrix without using a script. This productizes support for multiple price points for a single Price Model Item price and any other pricing-related output values such as distributor price, end-customer price, or maximum discount. As in the past, Pricing Matrices with extensible output columns can be associated or used by any type of Price Model other than Advanced Models that use a script. The type of Price Model using a Template will determine how the Unit Price value in the template will be interpreted. A Price List type Price Model will write unit currency values to this Unit Price whereas a Discount or Markup Percent type Price Model will apply a discount percentage adjustment.
The process for defining a dynamic attribute-based matrix pricing involves the following steps:
-
Define Lookups with valid values for any menu type attributes you will use in your dynamic pricing.
-
Create a Pricing Matrix Template to define the specific metadata or columns you will use to define one or more dynamic pricing attributes (ex. market, industry) use Lookups to define the list of valid values.
-
Select the Pricing Matrix Template as the Dynamic Pricing type for a product charge.
-
Define the specific column values and the resulting per unit prices for each combination of these values.
Pricing Matrix Template Pages
 Pricing Matrix Template List Page
The Pricing Matrix Templates page lists available Attribute-based Charge Templates and Rate Card Templates.
Note: The Rate Card Templates are now supported inside the Pricing Matrix Templates module and are no longer a stand-alone Pricing Portal module. Rate Card Template functionality has not been changed.
Each Attribute-based Charge Pricing Matrix Template can be used to define one or more Charges.
Pricing administrators can perform the following tasks from this page:

|
1
|
Navigate to the Pricing Portal.
|
|
2
|
Enter search criteria to filter Pricing Matrix Templates.
|
|
3
|
Add a new Pricing Matrix Template (Attribute-based Charge or Rate Card) or manage columns.
|
|
4
|
Sort Pricing Matrix Templates using the Name, Variable Name, Template Type, or Status column headers.
|
|
5
|
Edit an existing Pricing Matrix Template by clicking on the Name link or selecting Edit from the line ellipsis drop-down.
|
|
6
|
View linked Price Models or Rate Cards by clicking on the Linked Objects number. |
|
7
|
Edit or Delete an existing Pricing Matrix Template by clicking on the line ellipsis.
Note: Pricing Matrix Templates with linked Price Models cannot be inactivated or deleted.
|
Pricing Matrix Template Page
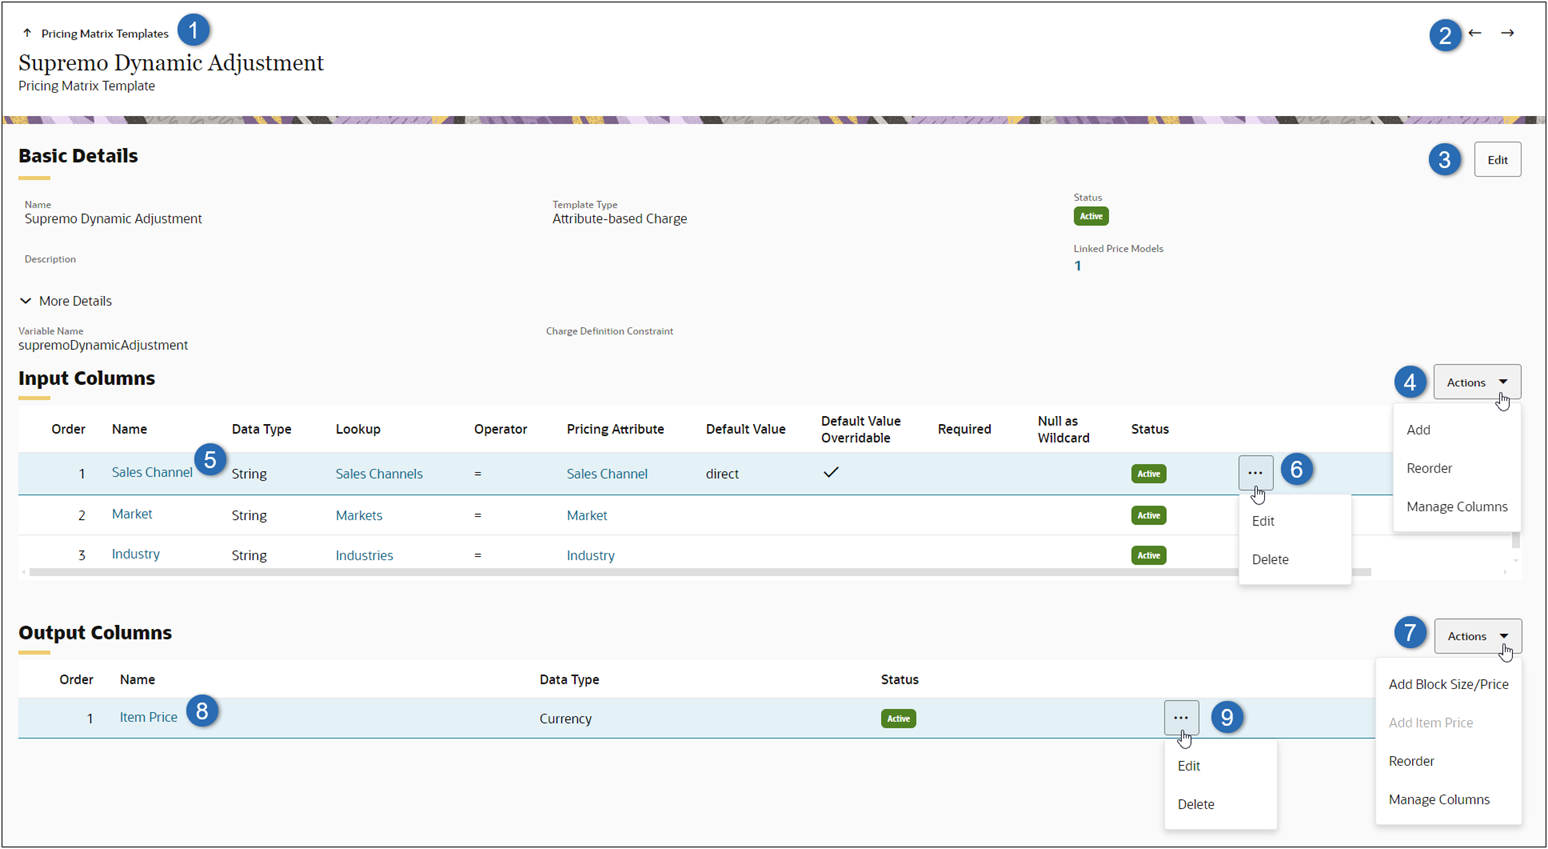
The Pricing Matrix Template page for an Attribute-based Charge type Template shows the basic details. It also lists the Input Columns and Output Columns that define the custom dynamic matrix. Pricing administrators can perform the following tasks from this page:
|
1
|
Navigate to Pricing Matrix Templates list page. |
|
2
|
Navigate to Next or Previous Pricing Matrix Template in the Pricing Matrix Template list or filtered Pricing Matrix Template search results list.
|
|
3
|
Modify the Basic Details for the Attribute-based Charge Template. If applicable, a Charge Definition Constraint can be specified in this section.
|
|
4
|
Add, Reorder, or Manage Columns for the input column lines.
|
|
5
|
Edit an existing input column by clicking on the Name link or selecting Edit from the line ellipsis drop-down.
|
|
6
|
Edit or Delete an existing input column by clicking on the line ellipsis. |
|
7
|
Add Block Size/Price attributes, Add an Item Price Attribute, Add More Columns, Reorder, or Manage Columns for output columns.
Note: Both Block Size and Block Price attributes are added when Add Block Size/Price is selected. Correspondingly, if the Block Size attribute or the Block Price attribute is deleted, both of these interdependent attributes are also deleted.
|
|
8
|
Edit an existing output column by clicking on the Name link or selecting Edit from the line ellipsis drop-down.
|
|
9
|
Edit or Delete an existing output column by clicking on the line ellipsis.
|
Dynamic Matrix Pricing
Oracle CPQ 24B introduced attribute-based matrix pricing for products to enable the use of custom dynamic matrices for calculating runtime prices. Attribute-based Matrix Pricing and the associated Pricing Matrix Templates can be used to define pricing that requires the Pricing Engine to use a custom dynamic matrix as the basis for calculating runtime prices, thus replacing the need for data tables and custom BML.
Beginning in Oracle CPQ 24C, customers can define similar table-based pricing at the Price Model and Price Agreement level.
-
Attribute-based Matrix Pricing is available for Price List, Discount List, and Markup List type Price Models and Price Agreements.
-
Conditional pricing for a single or multiple products can then be defined by using the pre-defined columns to specify the criteria for desired conditions.
Dynamic Matrix Pricing for Price Models and Price Agreements
Pricing Matrix Template – Price Model / Price Agreement Relationship
The following image shows the relationship between Pricing Matrix Template fields and Dynamic Matrix Pricing for a Price Model or Price Agreement.
-
After a Pricing Matrix Template has been defined, it can be added as a Dynamic Pricing type for relevant Price Models or Price Agreements.
-
Input Columns in the Pricing Matrix Template define fields to specify the criteria for desired conditional pricing for single or multiple products in a Price Model or Price Agreement.
-
Output Columns in the Pricing Matrix Template define the pricing fields that will be returned as output from the Pricing Engine and written to quote lines. Pricing values are defined for each row item in the pricing matrix grid. The output value is limited to a single (list) unit price in Oracle CPQ 24C. However, when Block Pricing is desired, the Block Size and Block Price attributes can be added as Output Columns in the Pricing Matrix Template.
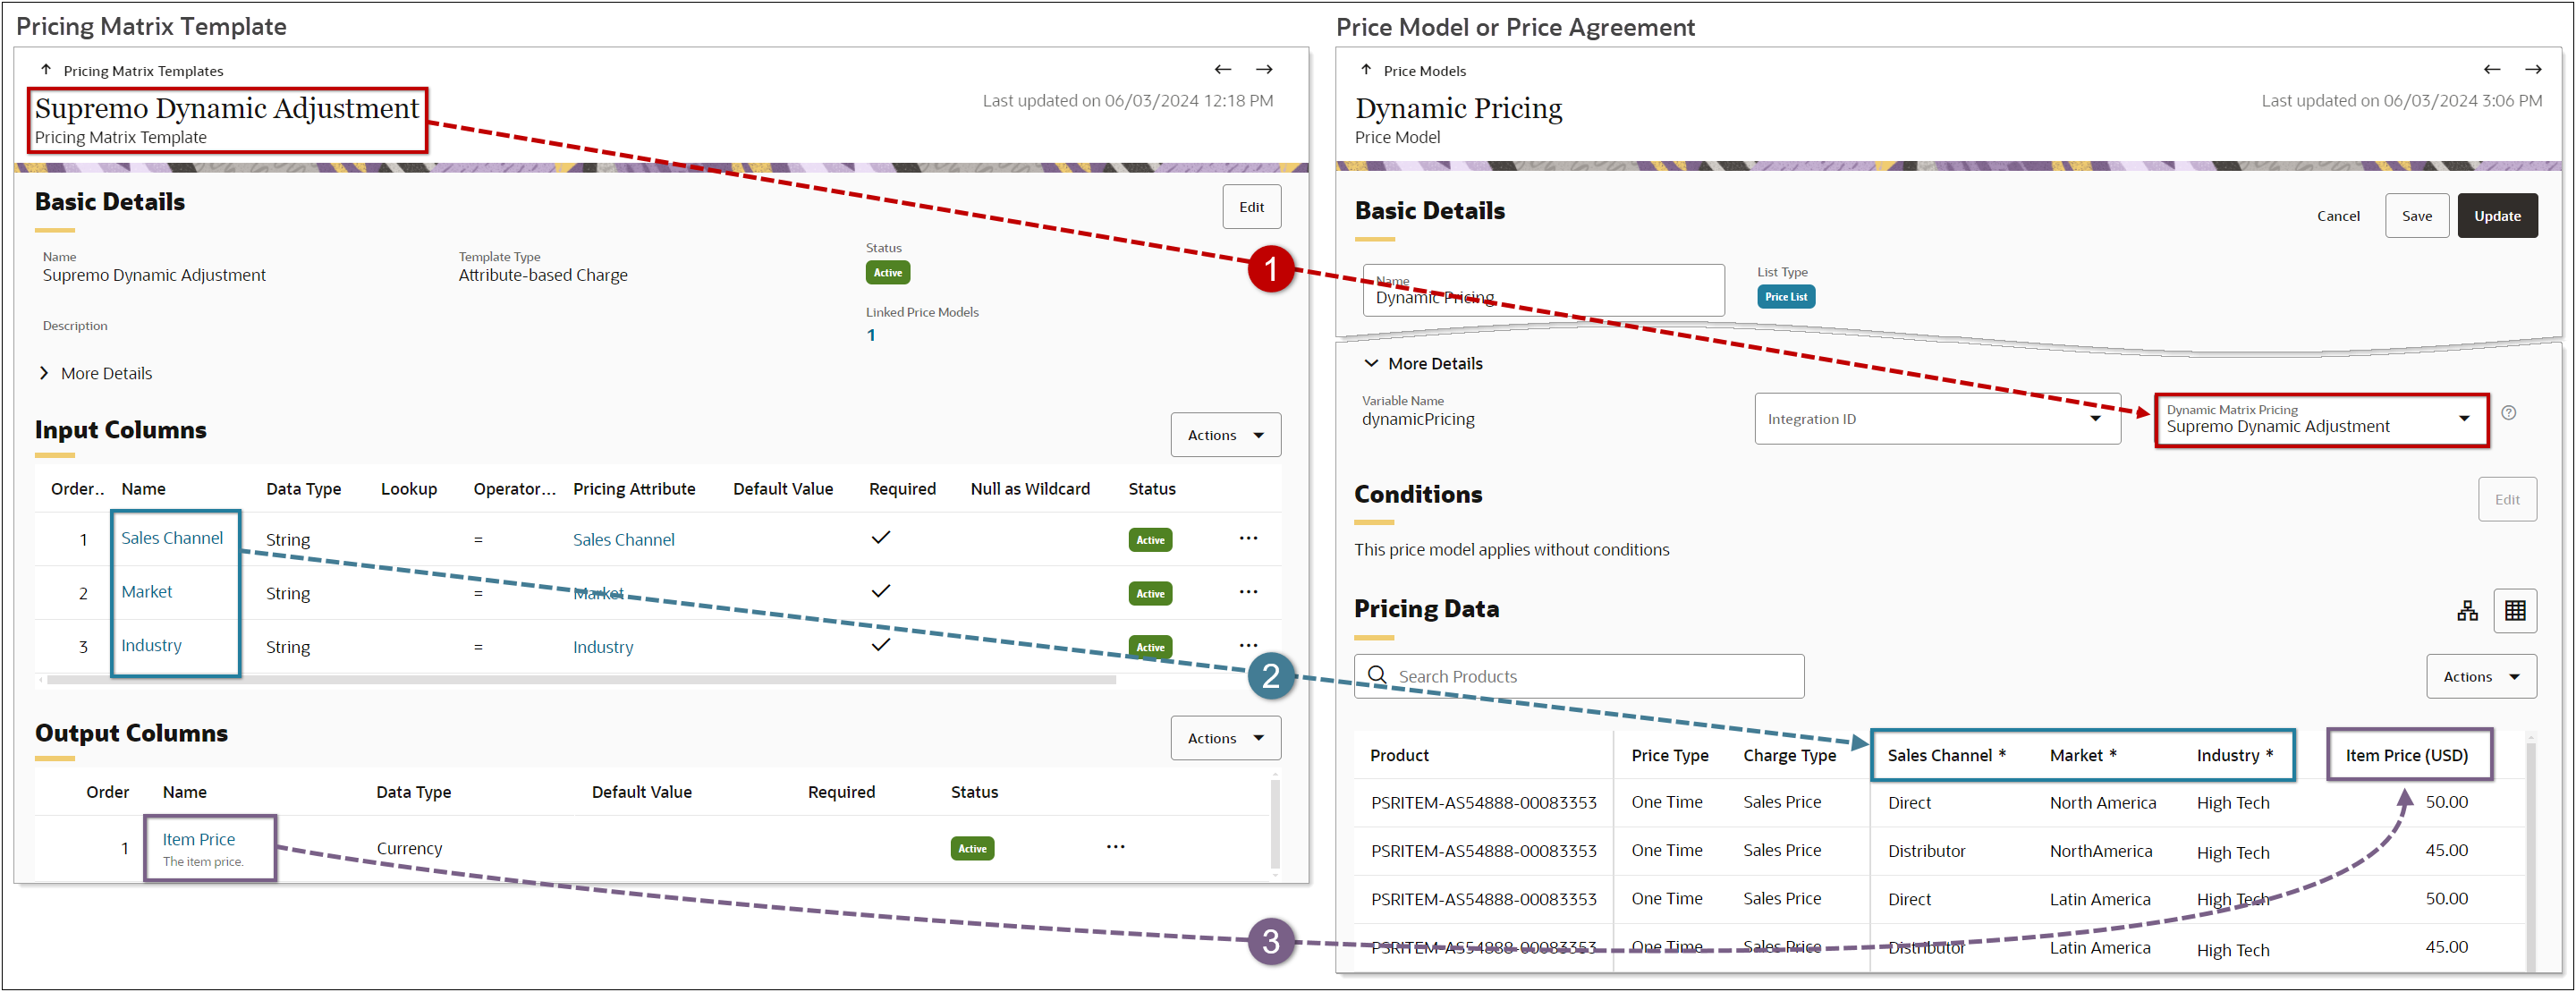
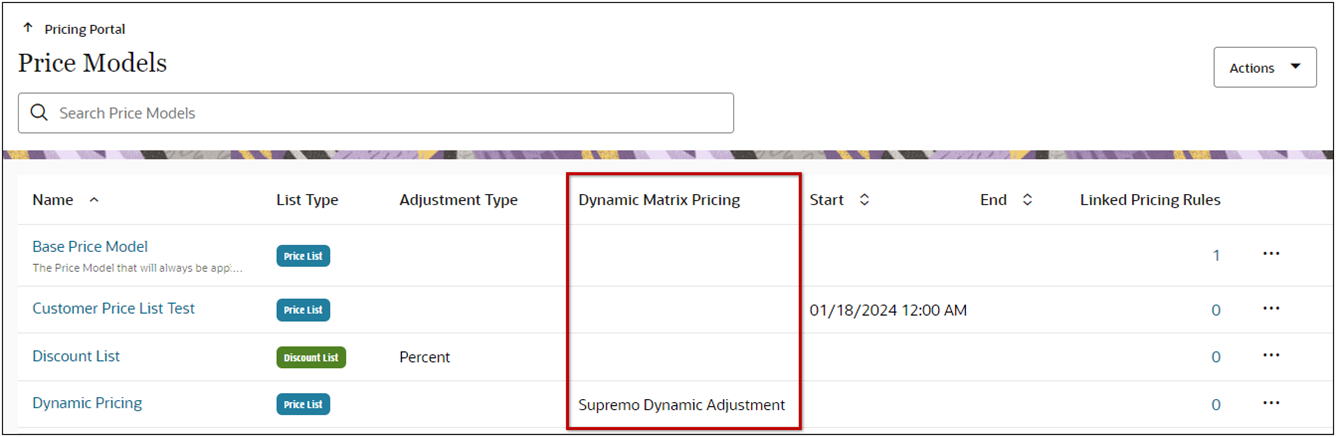
When the Template column is enabled on the Price Model and Price Agreement list pages, associated templates are displayed for applicable Price Models or Price Agreements.
Dynamic Matrix Pricing for Products
Pricing Matrix Template - Product Charge Relationship
The following image shows the relationship between Pricing Matrix Template fields and Dynamic Attribute-based Matrix Pricing for a product price or charge.
-
After a Pricing Matrix Template has been defined, it can be selected as a Dynamic Pricing type when creating a product price or charge.
-
Input Columns in the Pricing Matrix Template define fields to specify the criteria for desired conditional pricing in the product price or charge.
-
Output Columns in the Pricing Matrix Template define the pricing fields that are available. Pricing values are defined for each condition in the product price or charge. When Block Pricing is desired, the Block Size and Block Price attributes are added as Output Columns in the Pricing Matrix Template.
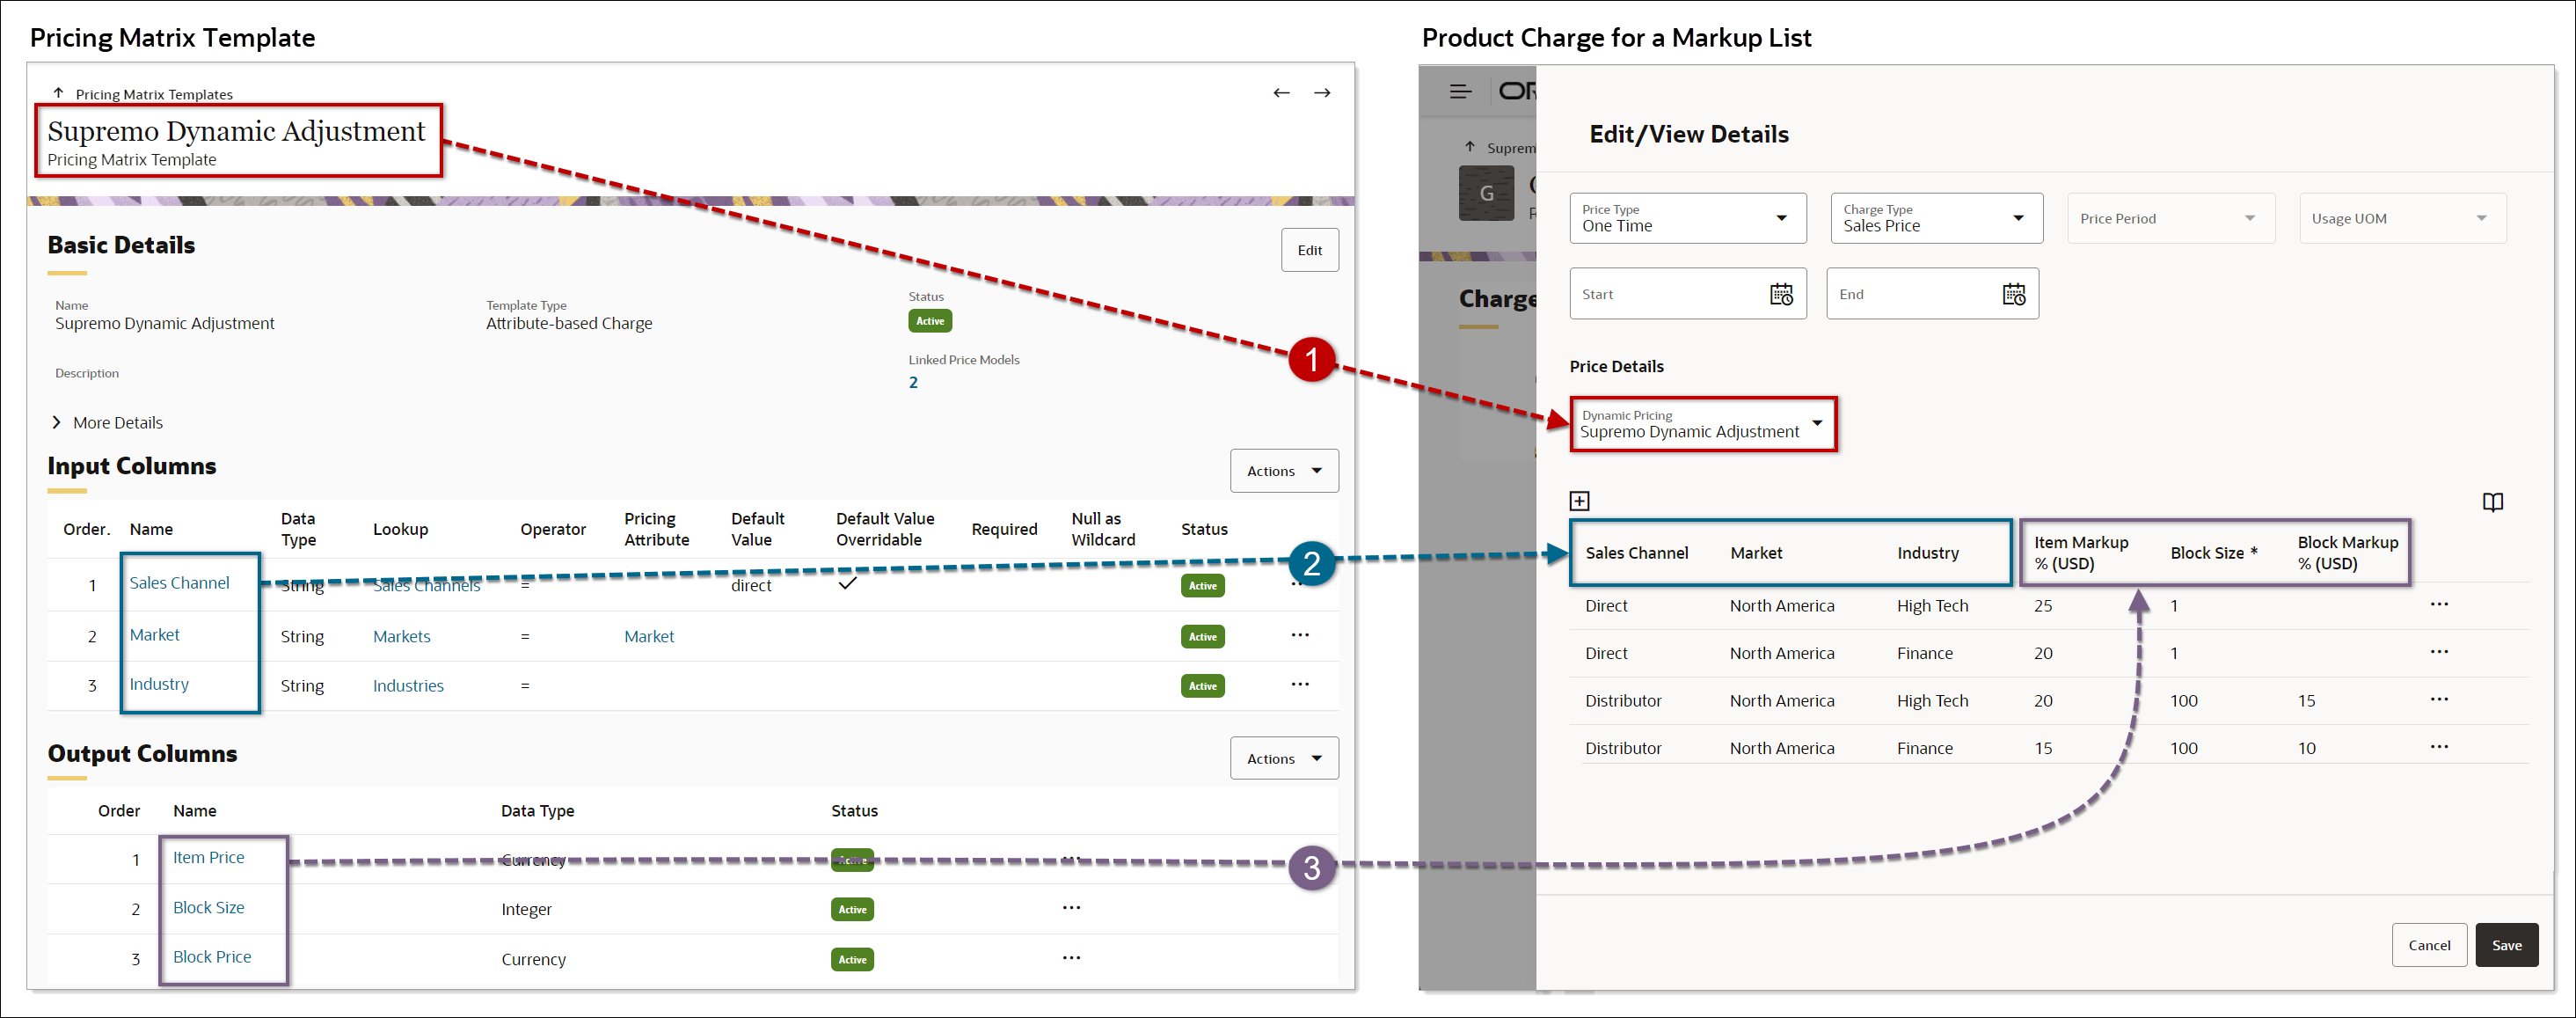
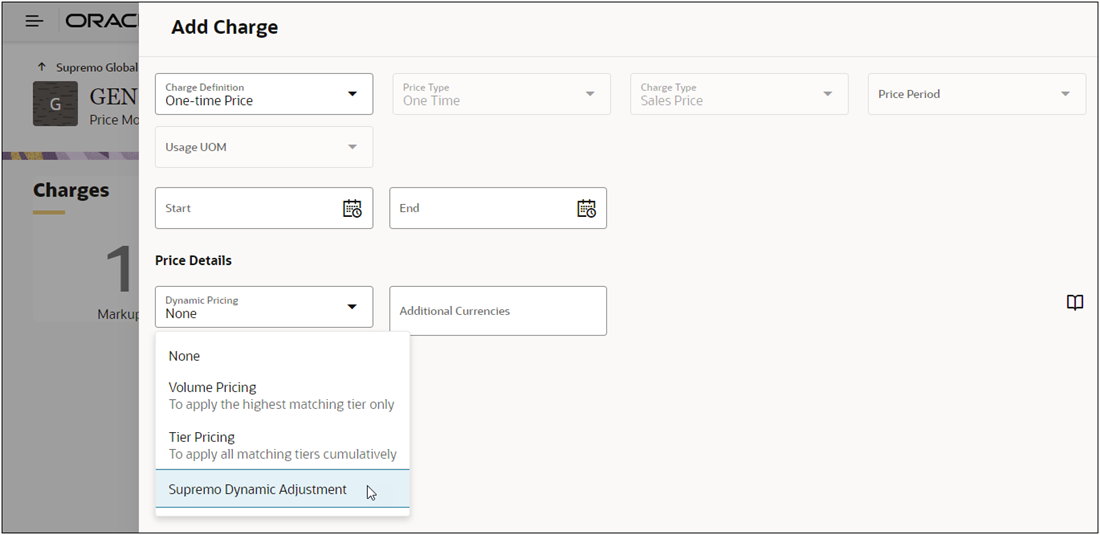
To add dynamic matrix pricing to a Price Model Item product price or charge, the pricing administrator begins by selecting a customer pre-defined Pricing Matrix Template from the Dynamic Pricing drop-down.
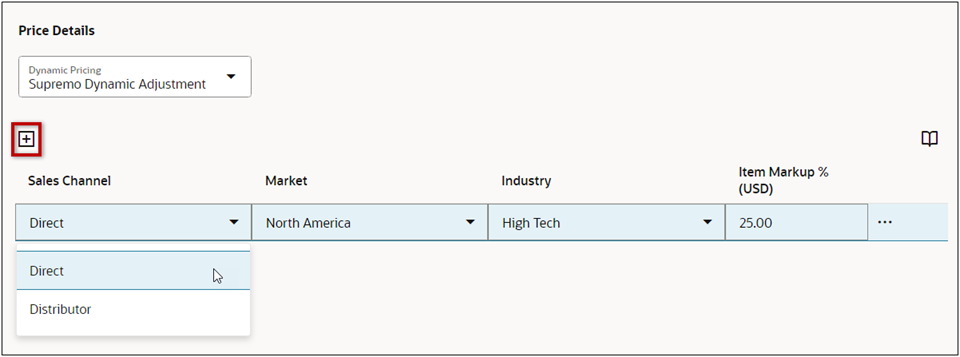
After selecting the appropriate Pricing Matrix Template, the pricing administrator clicks the + icon to add a conditional row item to specify conditions and pricing.
-
The conditional column items are determined by the selected Pricing Matrix Template Input Column definitions. In the example below, the selected definitions are Sales Channel, Market, and Industry.
-
The column menu items are defined by the Lookup item selected for the given column in the Pricing Matrix Template. For example, the Sales Channel column from the Supremo Dynamic Adjustment template is linked to a Lookup that provides the 'Direct' and 'Distributor' values.
-
The item pricing is determined by the selected Pricing Matrix Template Input Column definitions and the parent Price Model's list type and adjustment type (for discount and markup lists).
For example, Item Markup % is defined by the parent Markup List type Price Model with a Percent adjustment type. If a customer implementation uses block pricing, Block Size and Block Price attributes can also be added.
Scripting Price Model Pricing Matrix Templates
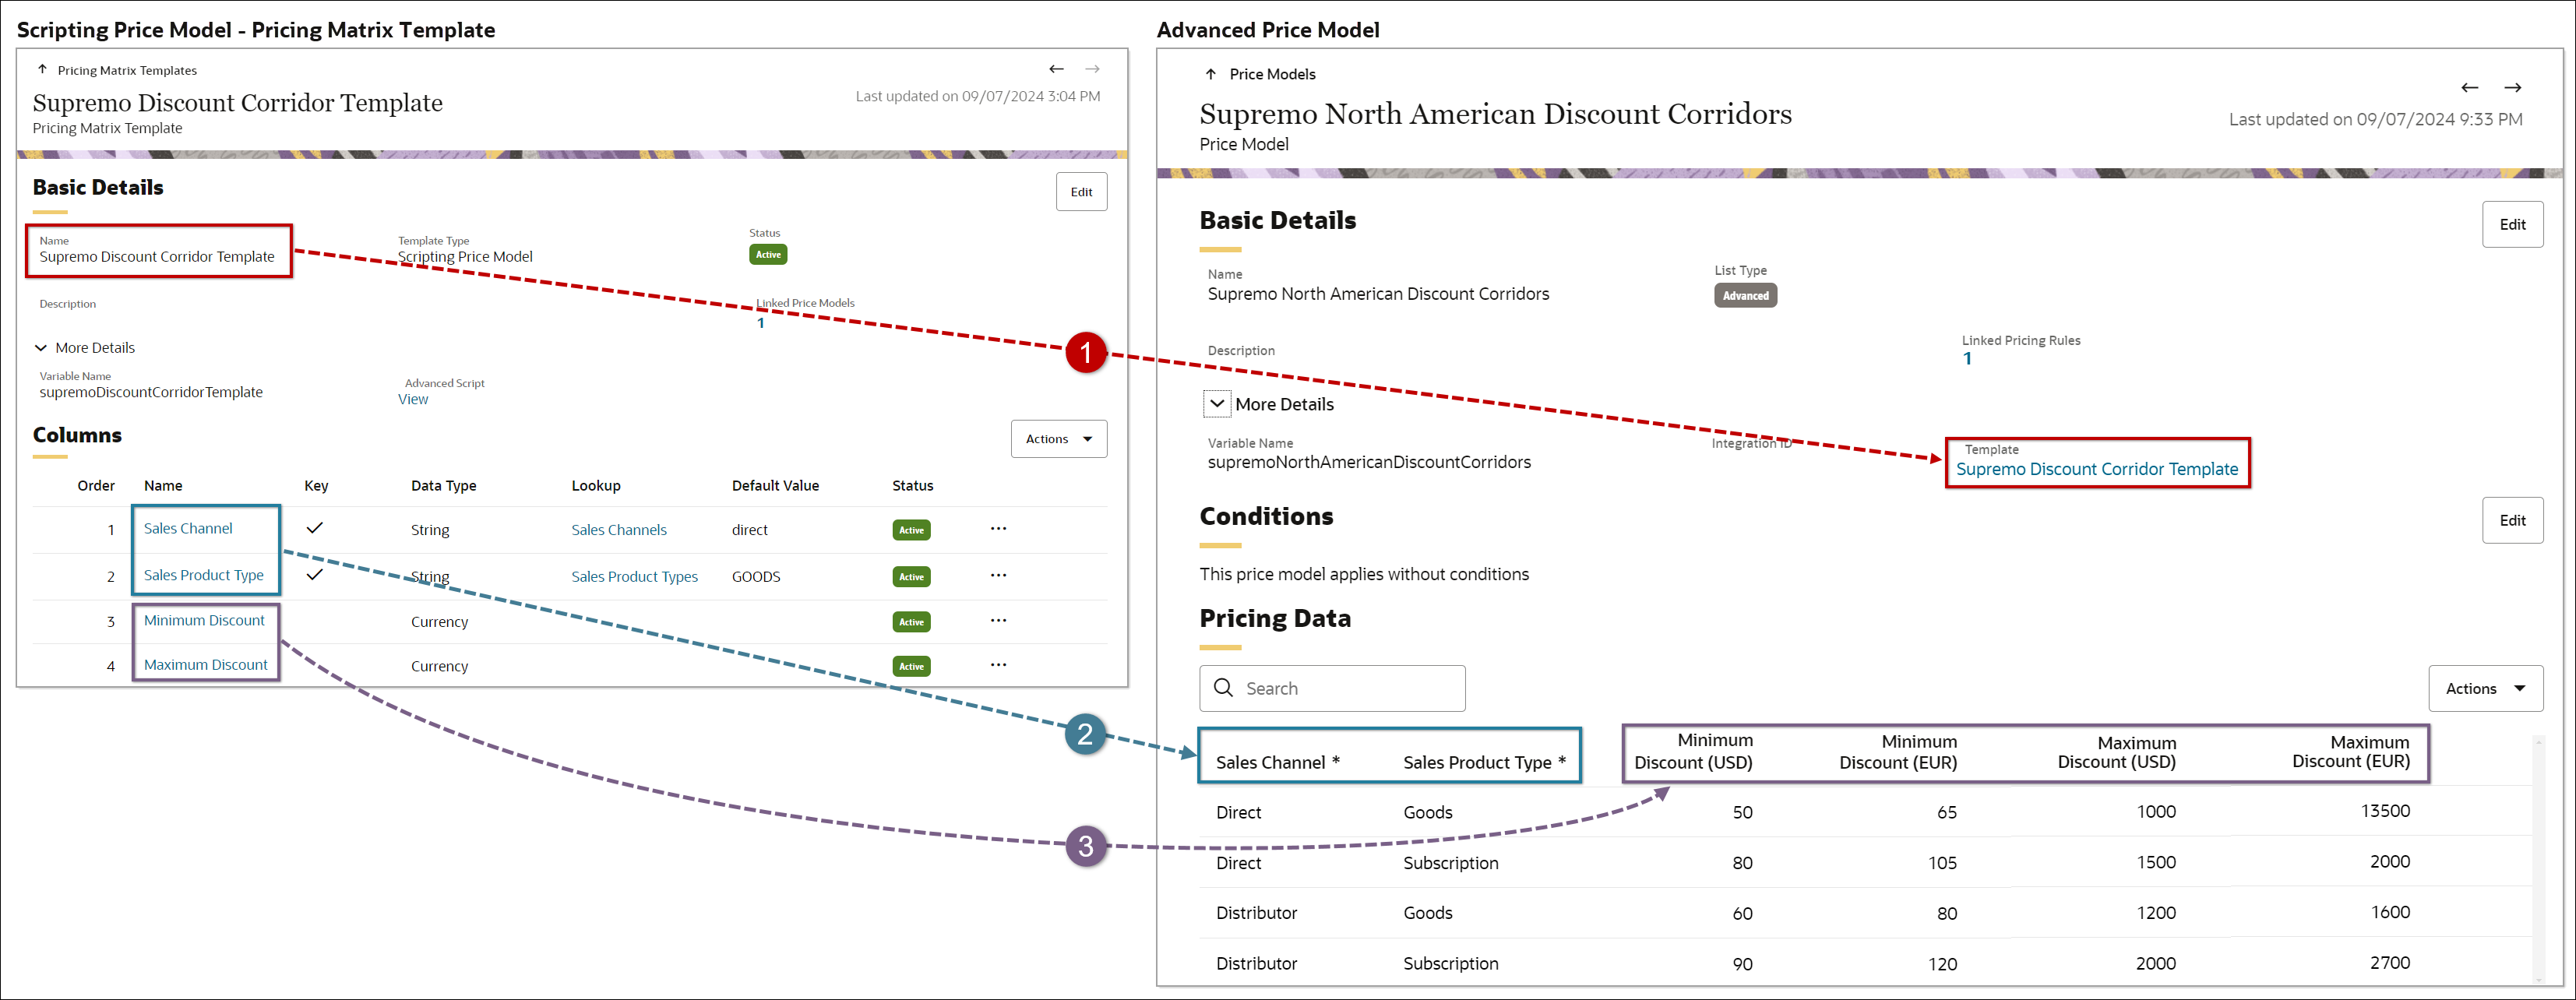
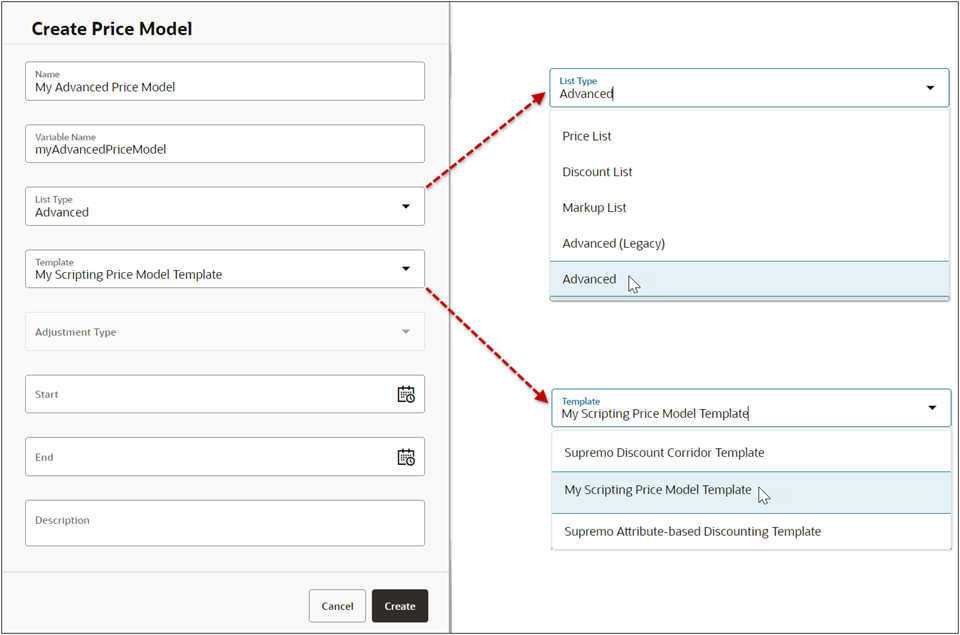
Scripting Price Model Pricing Matrix Template - Advanced Price Model Relationship
The following image shows the relationship between Scripting Price Model - Pricing Matrix Template fields and an Advanced Price Model.
-
After a Scripting Price Model Matrix Template has been defined, it can be selected as a Template for Advanced Price Models.
-
"Input" Columns in the Scripting Price Model Matrix Template define fields to specify the criteria for dynamically calculated interim output charge values.
The "Input" columns use Pricing Attributes with the In/Out parameter set to Input. See Pricing and Charge Attributes for more information.
-
"Output" Columns in the Scripting Price Model Matrix Template define attribute values that will be written as outputs from pricing.
The "Output" columns use Pricing Attributes with the In/Out parameter set to Output. See Pricing and Charge Attributes for more information.
Add a Scripting Price Model Pricing Matrix Template
The Scripting Price Model type Pricing Matrix Template is used in combination with the new Advanced Price Models. Advanced Price Models require an associated Scripting Price Model type of Pricing Matrix Template to define the standard and custom attributes that will be accessed in the BML scripts.
Add Scripting Price Model Pricing Matrix Template to an Advance Price Model
To add dynamic matrix pricing to an Advanced Price Model, the pricing administrator creates an Advanced Price Model and then selects a customer pre-defined Scripting Price Model Pricing Matrix Template from the Template drop-down.
After selecting the appropriate Scripting Price Model type Pricing Matrix Template, the pricing administrator clicks the + icon to add a conditional row item to specify conditions and pricing.
In this example, an Advanced Price Model and a Scripting Price Model type Pricing Matrix Template is used to set discount corridors (or discount guideline) for Supremo product lines by setting the minimum and maximum discount amounts as shown below.

Refer to Example Advanced Price Model & Scripting Matrix Template for more information.
Export, Import, and Migration of Matrix Pricing Data
Export, Import, and status UIs allow customers to maintain Price Model and Price Agreement matrix pricing data outside of CPQ using Excel (.CSV) files. For more information, refer to Export and Import Matrix Pricing Data.
Customers can also migrate Price Models with dynamic matrix pricing. Associated Pricing Matrix Templates are provided as dependencies for the applicable Price Model.
Note: Price Agreements cannot be migrated, but they can be moved between sites using bulk services.
Administration
Create an Attribute-based Charge Pricing Matrix Template
Complete the following steps to create an Attribute-based Charge type Pricing Matrix Template in the CPQ Pricing Portal.
-
Navigate to CPQ Admin > Pricing Portal > Pricing Matrix Templates.
-
Select Add from the Actions drop-down.
-
Enter the following information:
-
Enter the Name.
-
Enter the Variable Name.
-
Select Attribute-based Charge from the Template Type drop-down.
-
(optional) Enter a Description.
-
Click Create.
-
If required, complete the following to add a Charge Definition Constraint.
-
Click the Basic Details Edit button.
-
Click on More Details.
-
Click inside the Charge Definition Constraint field, and the select the applicable Charge Definitions.
-
Click the Basic Details Update button.
Add Pricing Matrix Template Input Columns
-
Complete the following to add Pricing Matrix Template Input Columns.
-
Select Add from the Input Columns - Actions drop-down.
-
Enter a Name for the input column.
-
Enter the Variable Name for the input column.
-
Select the Data Type.
-
Select the Operator function to use for the specified Pricing Attribute.
-
Select the applicable Header or Line Pricing Attribute.
Note: You can enter text in the Pricing Attribute field to filter the Pricing Attributes list.
-
Select a Pricing Lookup from the Lookup drop-down.
Note: This field is only available for string data types. Refer to Lookups for more information.
-
(optional) Select or enter a Default Value.
Notes:
-
When a Pricing Attribute has a pre-defined a Lookup and Default Value, the associated values are auto-populated for the template column.
-
Administrators can select different default values if required.
-
The default value cannot be specified for currency data types.
-
Only True or False values can be selected for Boolean data types.
-
Check Default Value Overridable if the default value can be modified during creation or modification of an attribute based charge.
Note: This option is only editable when a Default Value is specified.
-
Check Required to make this field mandatory.
-
Check Null as Wildcard to regard a Null value in the pricing matrix as a wildcard in matching the input condition.
For example, a customer has the following discounts for T-shirt based on sizes and colors. (When the Size is large, the discount is 10% regardless of Color):
-
Size: large, Color: red, Discount: 10%
-
Size: large, Color: white, Discount: 10%
Size: small, Color: red, Discount: 5%
-
Size: small, Color: white, Discount: 15%
When this option is enabled, the setup can be simplified by setting Color as Null instead of enumerating all color choices. (Size: large, Color: null, Discount: 10%)
-
(optional) Enter a Description.
-
Click Create.
-
Repeat this step to create additional input columns.
Add Pricing Matrix Template Output Columns
Note: The Item Price attribute is automatically populated as a default output column.
-
If required, select Add Block Size/Price from the Output Columns - Actions drop-down to add block pricing output columns.
Note: Both Block Size and Block Price attributes are added when Add Block Size/Price is selected. Correspondingly, if the Block Size attribute or the Block Price attribute is deleted, both of these interdependent attributes are also deleted.
-
If required, add more Pricing Matrix Template output columns
-
Select Add More Columns from the Output Columns - Actions drop-down.
-
Enter a Name for the output column.
-
Enter the Variable Name for the output column.
-
Select the Data Type.
-
Select the applicable Line Pricing Attribute.
Note: You can enter text in the Pricing Attribute field to filter the Pricing Attributes list.
-
If applicable, select a Pricing Lookup from the Lookup drop-down.
Note: This field is only available for string data types. Refer to Lookups for more information.
-
(optional) Select or enter a Default Value.
Notes:
-
When a Pricing Attribute has a pre-defined a Lookup and Default Value, the associated values are auto-populated for the template column.
-
Administrators can select different default values if required.
-
The default value cannot be specified for currency data types.
-
Only True or False values can be selected for Boolean data types.
-
Check Default Value Overridable if the default value can be modified by a sales user.
-
Check Required to make this field mandatory.
-
(optional) Enter a Description.
-
Click Create.
-
Repeat this step to create additional output columns.
Create a Rate Card Template Oracle CPQ 24B and Later
Beginning in Oracle CPQ 24B, Rate Card Templates are defined in the Pricing Matrix Templates module. To add a Rate Card Template for releases prior to Oracle CPQ 24B (releases 23D - 24A), refer to Rate Cards.
Complete the following steps to create a Rate Card Template for releases Oracle CPQ 24B and Later.
-
Navigate to CPQ Admin > Pricing Portal > Pricing Matrix Templates.
-
Select Add from the Actions drop-down.
-
Enter the following information:
-
- Enter the Name.
- Enter the Variable Name.
- Select Rate Card for the Template Type drop-down.
- (optional) Enter a Description.
- Click Create.
Add Pricing Matrix Template Columns
-
Complete the following to add Pricing Matrix Template Columns.
- Select Add from the Actions drop-down.
- Enter a Name for the Pricing Matrix Template column.
- Enter the Variable Name for the Pricing Matrix Template column.
- Select the Data Type.
-
Select a Lookup from the Lookup drop-down.
- This field is only available for string data types.
- Refer to Lookups for more information.
-
(optional) Select or enter a Default Value.
- The default value cannot be specified for currency data types.
- Only True or False values can be selected for Boolean data types.
- When a Lookup is selected, you can select a default value from values defined in Lookups.
-
Check the Default Value Overridable option if the default value can be modified a sales user.
-
Check Negotiable to allow modification of this attribute at runtime.
-
Check Key to identify this field as a unique identifier.
-
Check Required to make this field mandatory.
-
optional) Enter a Description.
-
Click Create.
-
Repeat this step to create additional columns.
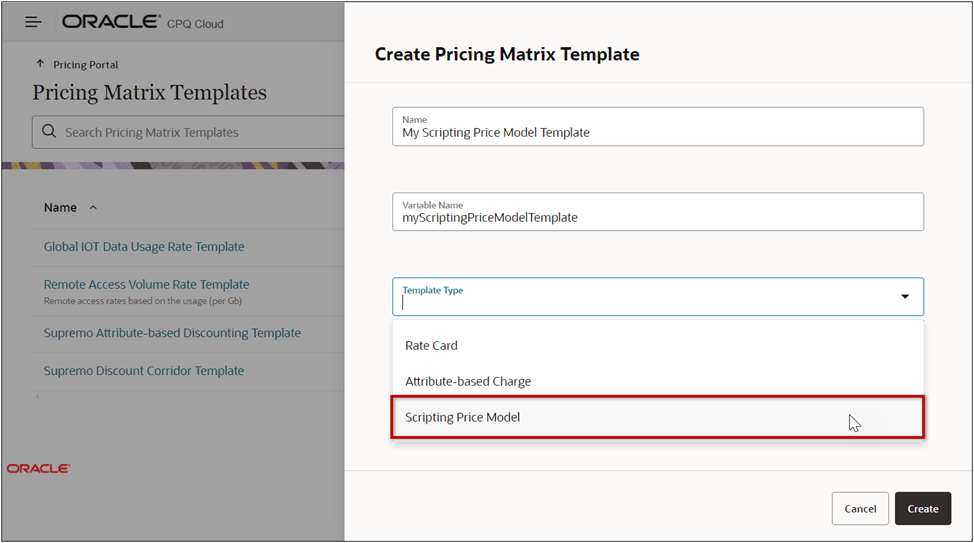
Create a Scripting Price Model type Pricing Matrix Template
Complete the following steps to create a Scripting Price Model type Pricing Matrix Template in the CPQ Pricing Portal.
-
Navigate to Admin > Pricing Portal > Pricing Matrix Templates.
-
Select Add from the Actions drop-down.
-
Enter the Name.
-
Enter the Variable Name.
-
Select Scripting Price Model from the Template Type drop-down.
-
(optional) Enter a Description.
-
Click Create.
-
Select Add from the Actions drop-down.
-
Enter the following data to create a template column.
-
Enter the Name.
-
Enter the Variable Name.
-
Select the Data Type.
-
If applicable, select a Lookup. (Lookups are only available for String Data Types)
-
If applicable, enter of select a Default Value.
-
Check Default Value Overridable if the default value can be modified.
-
Check Required to make this field mandatory.
-
Check Key to identify this field as a unique identifier.
-
Repeat this step to enter additional columns.
-
Enter BML Script for the Scripting Price Model Pricing Matrix Template.
-
Click Edit (In the Basic Details section).
-
Expand More Details, and click the Advanced Script Edit link.
-
Select the applicable attributes from the Pricing Document Attributes tab.
-
Select _currentMatrix from the Special Parameters tab.
-
Click Next.
-
Enter your BML Script.
-
Click Save and Close.
-
Click Update.
Notes
Notes:
-
Rate Card Templates and columns are no longer supported in bulk service, but they continued to be supported in Migration.
This is consistent with CPQ's direction to use migration for moving schema-type data.
-
Pricing Matrices, including Rate Cards, are not supported in Migration.
-
Fields not relevant to a specific row in the CSV file are ignored.
(e.g. Block Size, Block Price for a charge that is defined by a rate card or attribute-based matrix are ignored in the PART_PRICES.csv)
-
Uploading pre-24B CSV files with the older rate card entity names are still supported.
-
Incremental migration for Pricing Matrix Templates is not supported when a matrix template column with the same variable name has been created independently in n-1 and n sites.
-
The maximum number of Pricing Matrix columns is 20. Submit a Service Request (SR) on My Oracle Support to change the maximum number.
Related Topics
See Also


