Overview
Pricing Rules determine when the Pricing Engine will invoke the specified price models.
Pricing Rule Types: There are four pricing rule types:
- Always True Rules CPQ introduces a new "Always True" condition for Pricing Engine Pricing Rules. The "Always True" condition provides a simplified method for creating Pricing Rules that are always true. Customers no longer need to create a script or artificial condition and row grouping to make a Pricing Rule always apply.
- Customer Specific Rules (previously known as Basic Pricing Rules) allow administrators to create a rule for select accounts, and then select a pricing profile. The pricing profile will be applied to the selected accounts for the specified dates.
- Simple Pricing Rules allow administrators to easily create simple conditions for pricing rules without creating BML scripts in an Advanced type pricing rule. Administrators can select the necessary condition attributes and comparison operators, and then specify the values of the attributes for which the pricing rule is invoked. Administrators can also search and specify available account names for a condition input.
- Advanced Pricing Rules allow administrators to define BML functions to establish more flexible criteria for a Pricing Rule and to feed input values to the Pricing Engine. Advanced functions for Pricing Rules can reference only main document Pricing Attributes and must return TRUE or FALSE to indicate if the associated Pricing Profiles should be applied.
Pricing Rule Page Descriptions
![]() Pricing Rules List Page - This list page allows administrators to view the pricing rule Name, Variable Name, Value Type, Dynamic Pricing, and the number of Linked Pricing Rules without opening individual Price Model details.
Pricing Rules List Page - This list page allows administrators to view the pricing rule Name, Variable Name, Value Type, Dynamic Pricing, and the number of Linked Pricing Rules without opening individual Price Model details.
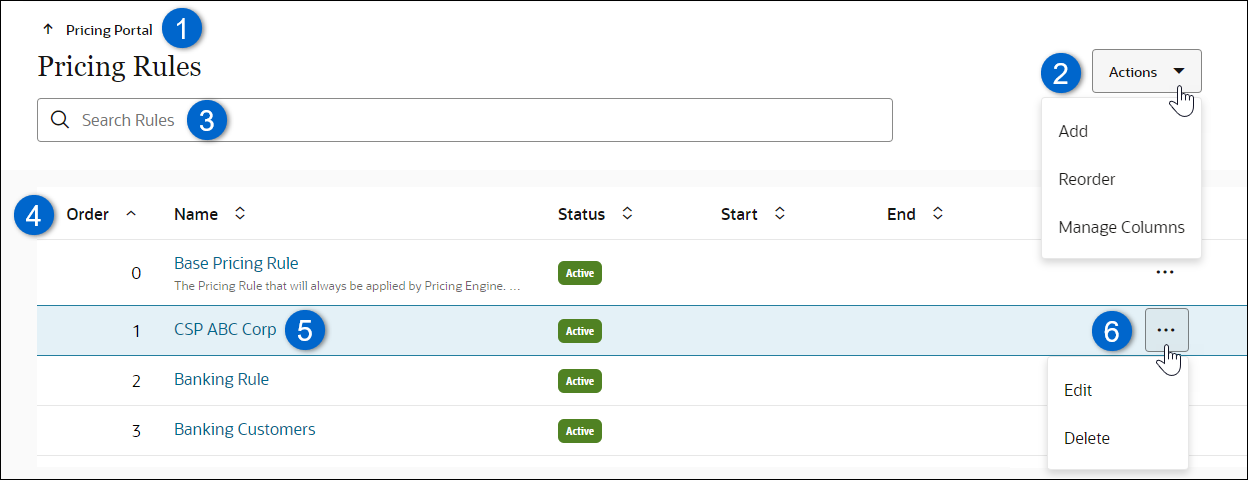
| Item | Description |
|---|---|
|
1 |
Navigate to Pricing Portal. |
|
2 |
Add a new Pricing Rule, Reorder existing rules, or Manage Columns for the Pricing Rules list. |
|
3 |
Enter search criteria to filter Pricing Rules results, which remain persistent while navigating within Pricing Rules. |
|
4 |
Sort Pricing Rules using the Order, Name, Variable Name, Status, Start or End column headers. |
|
5 |
Edit an existing Pricing Rule by clicking on the appropriate Name link or clicking on the line ellipsis and clicking Edit. |
|
6 |
Edit or Delete a Pricing Rule by clicking on the line ellipsis and selecting appropriate action. |
![]() Pricing Rule Page - This page allows administrators to manage Basic Details, Conditions, and Pricing Data for a price model.
Pricing Rule Page - This page allows administrators to manage Basic Details, Conditions, and Pricing Data for a price model.
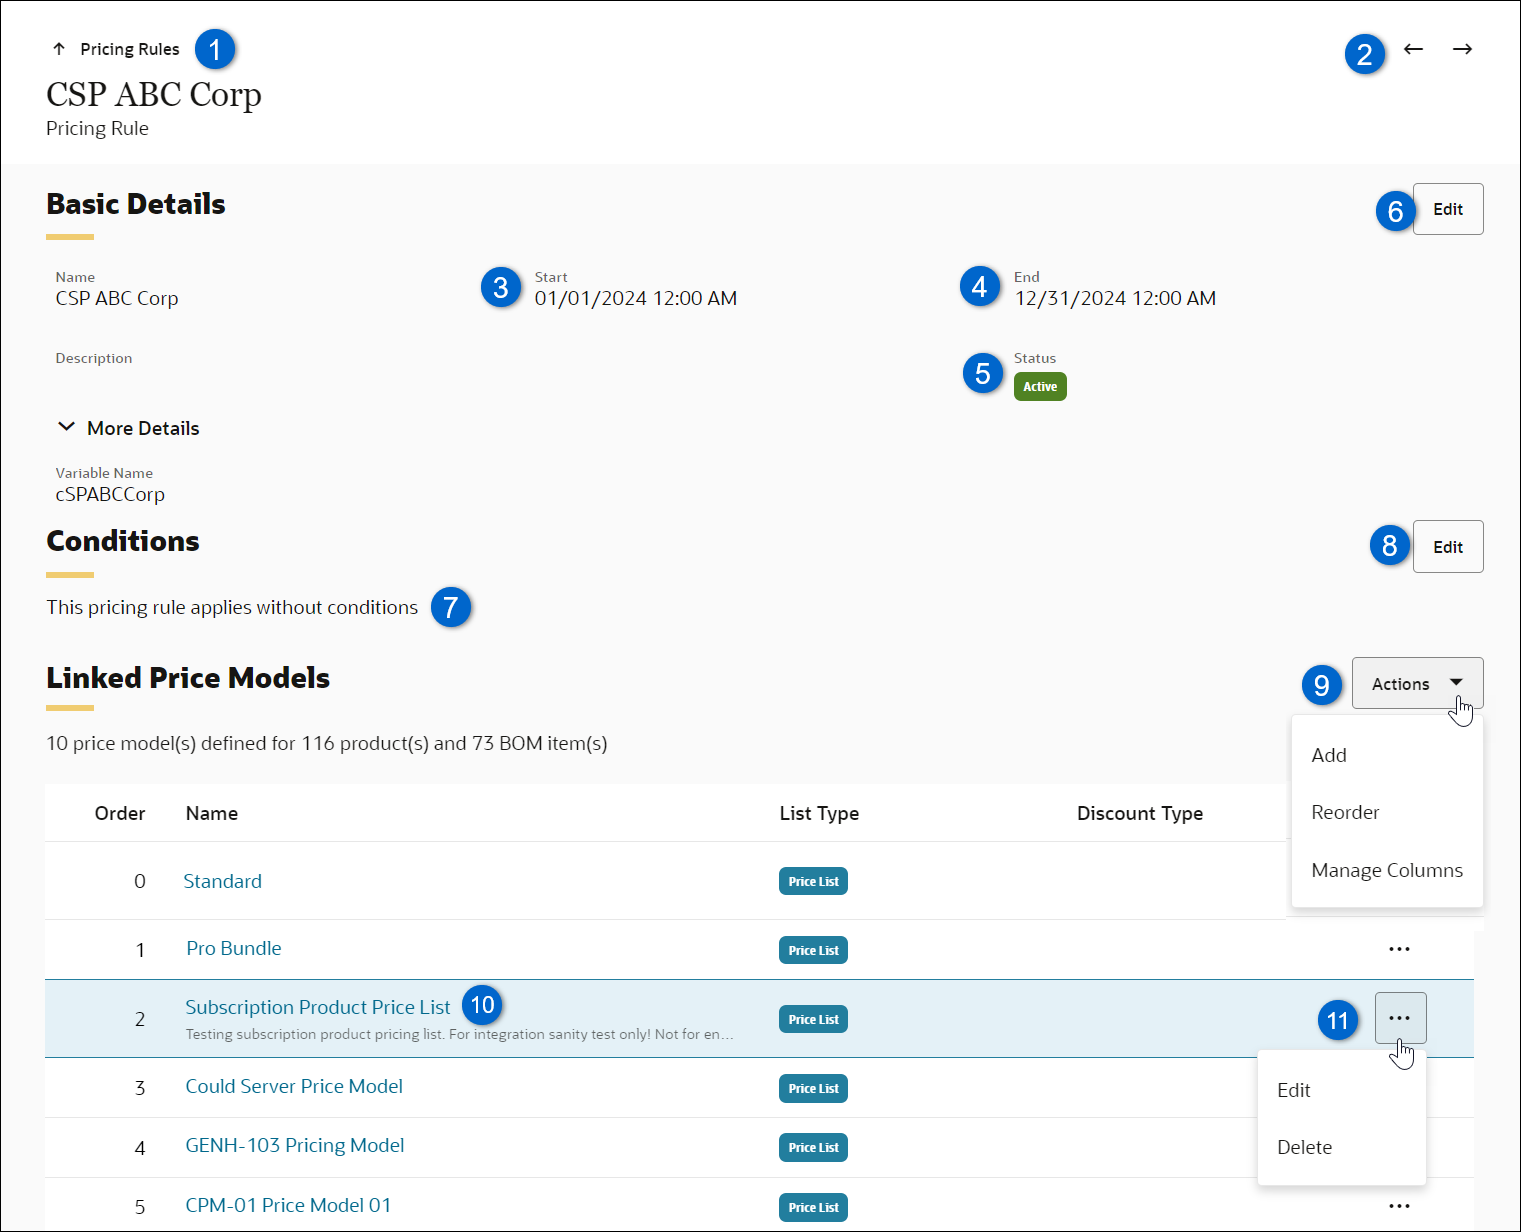
| Item | Description |
|---|---|
|
1 |
Navigate to the Pricing Rules list page. |
|
2 |
Navigate to Next or Previous price model in the pricing rules list or filtered pricing rule search results list. |
|
3 |
The Start date and time (previously named 'From') is the beginning date and time that a pricing rule will be effective. The Start field is no longer required on Pricing Rules and may be set to a historical date and time. As a result, both retroactive and evergreen Pricing Rules are now supported and you can use Status to govern their effectivity. |
|
4 |
The End date and time (previously named 'To') is the ending date and time that a pricing rule will be effective. |
|
5 |
Status (previously named 'Active') is used to set the pricing rule to Active or Inactive. |
|
6 |
Edit the pricing rule Name, Description, Start date and time, End date and time, or Status. |
|
7 |
Conditions can be set to Always True, Customer Specific, Simple, or Advanced. See Pricing Rule Types for condition type descriptions. |
|
8 |
The conditions Edit allow administrators to modify and change the pricing rule conditions. The pricing rule condition type can not be changed for releases prior to CPQ 23A, |
|
9 |
Actions provide the ability to Add new Linked Price Models, Reorder existing Linked Price Models, or Manage Columns for the linked Price Models list. Simple pricing rules can't be linked to Advanced price models. |
|
10 |
Click on the Model link or click the line ellipsis and select Edit to edit the linked Price Model. See Price Models for editing information. |
|
11 |
Edit or Delete a Linked Price Model by clicking on the line ellipsis and selecting the appropriate action. This operation does not delete the associated price model. |
Pricing Rule Enhancements
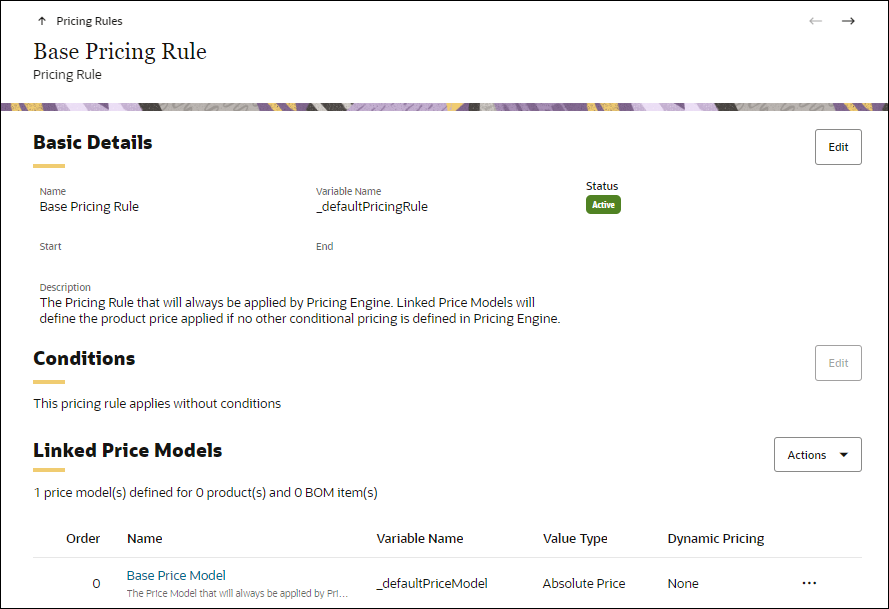
![]() Base Pricing Rule - CPQ provides a seeded Pricing Rule called ‘Base Pricing Rule’. The Base Pricing Rule enhances the pricing administrator user experience by predefining the setup for the Base Price Model at run-time.
Base Pricing Rule - CPQ provides a seeded Pricing Rule called ‘Base Pricing Rule’. The Base Pricing Rule enhances the pricing administrator user experience by predefining the setup for the Base Price Model at run-time.
The seeded Base Pricing Rule has Base Price Model linked where both cannot be deleted, reordered or assigned a condition. These Base objects will unconditionally apply "Base" pricing; therefore, simplifying the required pricing setup in CPQ.
Administration
-
Navigate CPQ Admin > Pricing Portal > Pricing Rules.
-
Select Add from the Actions drop-down.
-
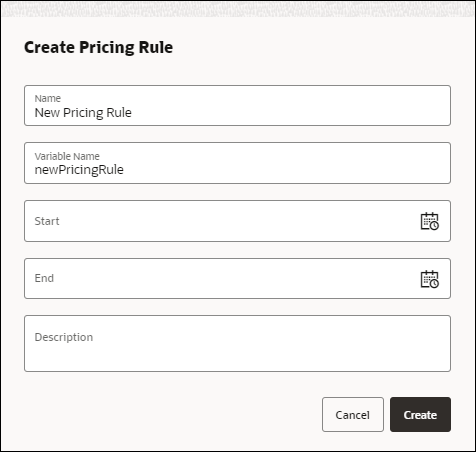
Enter the following information:
-
Enter a name in the Name field.
-
Enter the Variable Name. Variable names can only contain alpha-numeric characters and underscores.
The entry can be changed before saving, but after saving the value is read-only. -
(Optional) Enter a Start date and time.
-
(Optional) Enter an End date and time.
-
(Optional) Enter a Description.
-
-
Click Create.
-
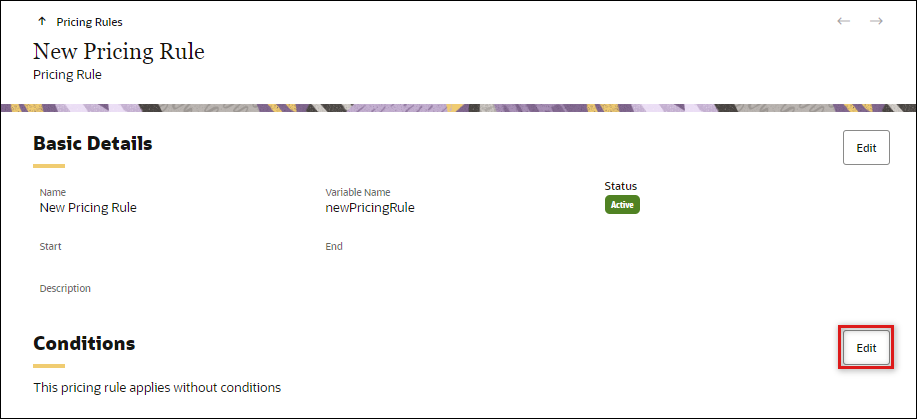
Click the Conditions Edit button.
-
Select the applicable rule type.
- Select Always True from the Condition Type drop-down.
- Click Update.

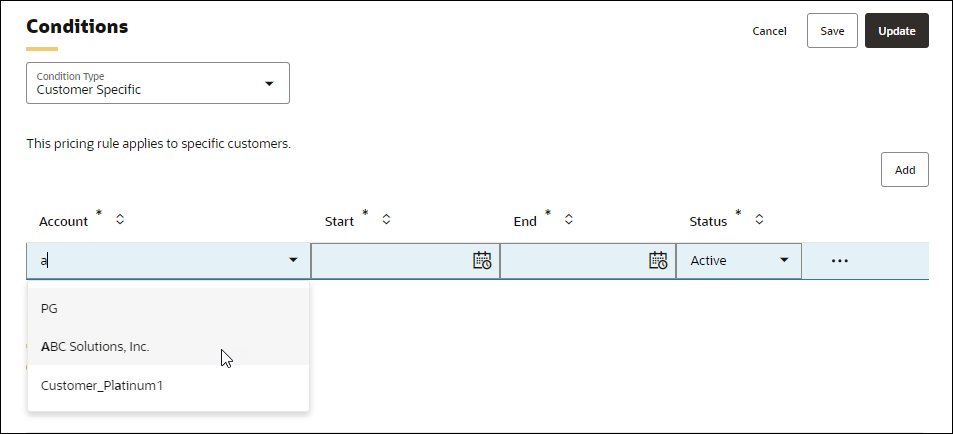
- Select Customer Specific from the Condition Type drop-down.
-
Click the Add button.
-
Select the appropriate account from the Account drop-down.
As you begin typing, the available accounts will begin to filter.
-
Enter Start and End dates and times for each account in the pricing rule.
-
(Optional) If you want to inactive the pricing rule for the account, select Inactive from the Status drop-down.
-
Click Save when you've finished editing the account.
- To add additional accounts, click Add and repeat sub-steps a - d.
- To edit an account line, click inside the desired field(s) to modify the values, then click Save when you've finished editing.
- To delete an account line, click the ellipsis at the end of the line and select Delete.
-
Click Update after adding, editing, or deleting accounts.
-
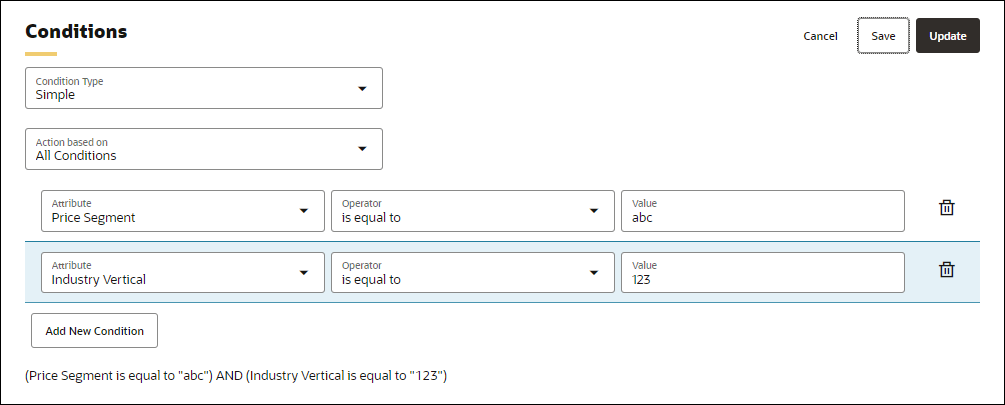
Select Simple from the Condition Type drop-down.
-
Select the Action based on option:
-
All Conditions will apply the pricing rule when all of the specified conditions are met.
For example,
(Price Segment is equal to "abc") AND (Industry Vertical is equal to "123") -
Any Conditions will apply the pricing rule when any of the specified conditions are met.
For example,
(Price Segment is equal to "abc") OR (Price Segment is equal to "xyz") -
Complex Conditions will apply the pricing rule when a complex conditions are met.
For example,
(Price Segment is equal to "abc") OR (Price Segment is equal to "xyz") AND (Industry Vertical is equal to "123")
-
-
Select Click to add attributes here.
-
Select the desired Attribute.
Only Header Pricing Attributes are available for selection. For more information on Pricing Attribute options, refer to Pricing Attributes.
- Select the Operator.
-
Enter the desired Value.
- Click Save when you've finished editing the attribute line.
- To add additional conditions, click the Add New Conditions, repeat sub-steps d - g.
- To edit a condition line, click inside the applicable field and modify value, then click Save when you've finished editing.
- To delete a condition, click the Delete
 icon .
-
For Complex Conditions, enter the Complex Grouping.
For example,
(Price Segment is equal to "abc") OR (Price Segment is equal to "xyz") AND (Industry Vertical is equal to "123") - Click Update.
-
Select Advanced from the Condition Type drop-down.
-
Click the Advanced link.

-
If the Pricing Attributes and Library Functions tabs aren't displayed, click Reselect.
-
Select the applicable Pricing Attributes and Library Functions.
-
Click Next.
-
Enter the applicable BML function.
Sample BML:
if (quoteType == “subscription”) { return true; } return false; -
Click Save and Close.
-
Proceed to Link, Unlink, or Reorder Price Models to link price models to this pricing rule.
![]() Link, Unlink, or Reorder Price Models
Link, Unlink, or Reorder Price Models
-
Navigate to CPQ Admin > Pricing Portal > Pricing Rules.
-
Click on the applicable Pricing Rule.
-
Select one of the following options:
 Link Price Model(s) to a Pricing Rule
-
Select Add from the Linked Price Models Actions drop-down.

-
Check the applicable Price Model(s).
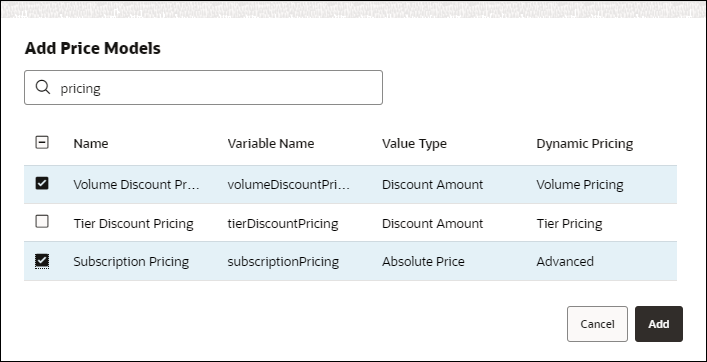
- Click Add.
 Unlink Price Model from a Pricing Rule
Click the ellipsis at the end of the line and select Delete.

Note: This operation does not delete the associated price model.
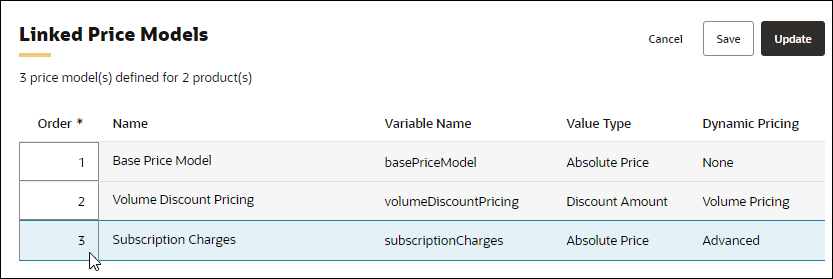
- Select Reorder from the Actions drop-down.
- Enter the desired order number in the Order field
- Click Update.
-
Note: Click on the applicable Price Model to edit a linked Price Model.
Refer to Price Models for editing information.
-
Navigate to CPQ Admin > Pricing Portal > Pricing Rules.
-
Click on the applicable pricing rule Name link.
Modify Basic Details
-
Click on the Basic Details Edit button to modify the name, status, start / end dates, or description.
-
Modify the applicable field.
- Click in the Name or Description field to update values.
- Set the Status switch to Active or Inactive.
- Click in the Start field to set the beginning date and time that a pricing rule will be effective.
- Click in the End field to set ending date and time that a pricing rule will be effective.

-
Click Update.
Modify Conditions
-
Click the Conditions Edit button to change the Condition Type or modify existing conditions.
-
Select the new Condition Type from the drop-down.
You will lose your previous condition setup.
- Select Always True from the Condition Type drop-down.
- Click Update.

- Select Customer Specific from the Condition Type drop-down.
-
Click the Add button.

-
Select the appropriate account from the Account drop-down.
As you begin typing, the available accounts will begin to filter.
-
Enter Start and End dates and times for each account in the pricing rule.
-
(Optional) If you want to inactive the pricing rule for the account, select Inactive from the Status drop-down.
-
Click Save when you've finished editing the account.
- To add additional accounts, click Add and repeat sub-steps a - d.
- To edit an account line, click inside the desired field(s) to modify the values, then click Save when you've finished editing.
- To delete an account line, click the ellipsis at the end of the line and select Delete.
-
Click Update after adding, editing, or deleting accounts.
-
Select Simple from the Condition Type drop-down.
-
Select the Action based on option:
-
All Conditions will apply the pricing rule when all of the specified conditions are met.
For example,
(Price Segment is equal to "abc") AND (Industry Vertical is equal to "123") -
Any Conditions will apply the pricing rule when any of the specified conditions are met.
For example,
(Price Segment is equal to "abc") OR (Price Segment is equal to "xyz") -
Complex Conditions will apply the pricing rule when a complex conditions are met.
For example,
(Price Segment is equal to "abc") OR (Price Segment is equal to "xyz") AND (Industry Vertical is equal to "123")
-
-
Select Click to add attributes here.

-
Select the desired Attribute.
Only Header Pricing Attributes are available for selection. For more information on Pricing Attribute options, refer to Pricing Attributes.
- Select the Operator.
-
Enter the desired Value.
- Click Save when you've finished editing the attribute line.
- To add additional conditions, click the Add New Conditions, repeat sub-steps d - g.
- To edit a condition line, click inside the applicable field and modify value, then click Save when you've finished editing.
- To delete a condition, click the Delete
 icon .
-
For Complex Conditions, enter the Complex Grouping.
For example,
(Price Segment is equal to "abc") OR (Price Segment is equal to "xyz") AND (Industry Vertical is equal to "123") - Click Update.
-
Select Advanced from the Condition Type drop-down.
-
Click the Advanced link.

-
If the Pricing Attributes and Library Functions tabs aren't displayed, click Reselect.
-
Select the applicable Pricing Attributes and Library Functions.
-
Click Next.
-
Enter the applicable BML function.
Sample BML:
if (quoteType == “subscription”) { return true; } return false; -
Click Save and Close.
Modify Linked Price Models
-
Select this option to link, unlink, or reorder price models.
 Link Price Model(s) to a Pricing Rule
-
Select Add from the Linked Price Models Actions drop-down.

-
Check the applicable Price Model(s).

- Click Add.
 Unlink Price Model from a Pricing Rule
Click the ellipsis at the end of the line and select Delete.

Note: This operation does not delete the associated price model.
- Select Reorder from the Actions drop-down.
- Enter the desired order number in the Order field
- Click Update.

Note: Click on the applicable Price Model to edit a linked Price Model.
Refer to Price Models for editing information.
-
Notes
-
Important: Switching pricing Version options may affect existing pricing and transactions. Oracle recommends thoroughly testing the impact of the new version before implementing the change into a production environment. Once Version 2 or Version 3 is enabled in a production environment, returning transactional data to Version 1 may require significant effort.
Error messages are not clear in bulk upload/download. Error message will currently not tell you why records have failed. Errors can be viewed in the application Error Logs.
-
Siebel Integration is not currently supported.
Notes:
-
The maximum number of Pricing Rules is 100. Submit a Service Request (SR) on My Oracle Support to change the maximum number.
-
Pricing rules will only be shown in Commerce once an Account has been synced; the Account ID field must be populated.
-
Values in the price model should be populated for all supported currencies for a given part.
Example: If your application supports USD and EURO, when a part is added to a profile, a price/value should be defined for both the USD and EURO currencies.


