Overview
Organizations using Oracle CPQ rely heavily on Oracle CPQ Commerce to sell their product offerings to customers and capture the orders. In the quote life cycle, there is a lot of information that needs to be captured at the Transaction and Transaction Line level. Some of this information is repetitive, but dynamically varies from one Transaction to another. This requires customers to maintain a large number of attributes and control their access through rules. Transaction Arrays allow customers to group multiple, scalar attributes using a single array structure to capture repeatable data and reduce administrative overhead. The array attributes can then be instantiated multiple times at runtime without explicitly defining each instance.
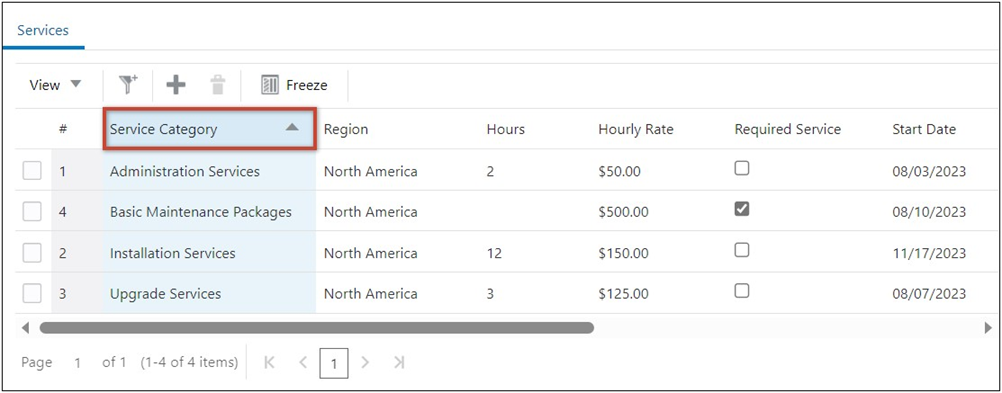
![]() View User Side Transaction UI with a Transaction Array
View User Side Transaction UI with a Transaction Array
After a Transaction Array has been created, it can be added to a JET Responsive Layout, and displayed to customers on a Transaction UI page. The following image shows a Transaction Array that has been added to a JET Transaction UI.
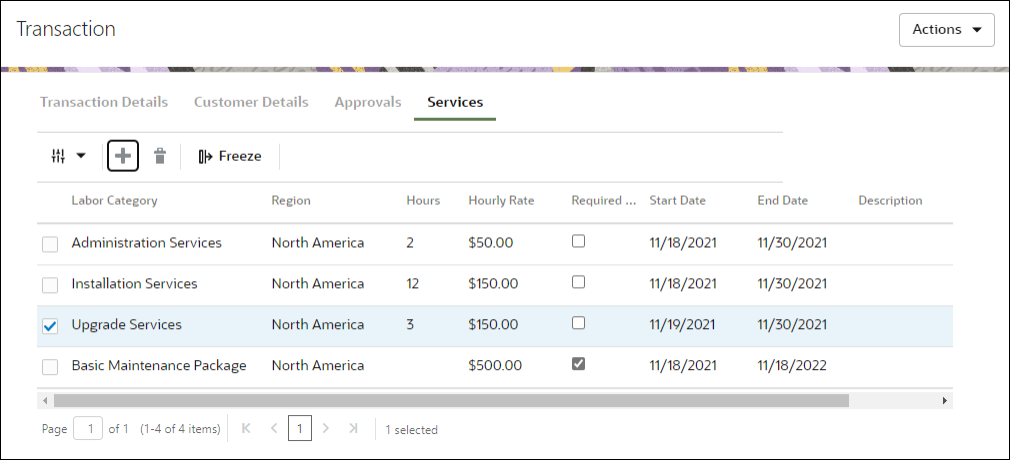
Note: The Transaction Array Add and Remove buttons are executed as Auto Update functions. As a result, inserted and deleted rows are not saved to the database until a Modify action is invoked (e.g. clicking the Save button).
Selection Checkboxes for Transaction Arrays
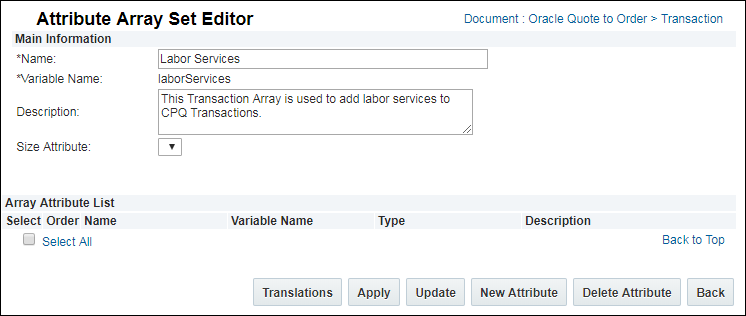
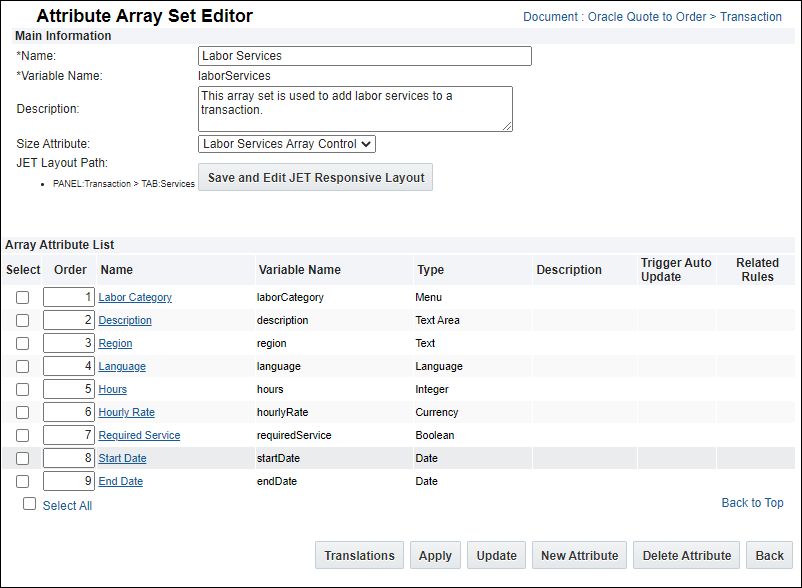
Administrators use Commerce attributes to create and manage Transaction Arrays. The Array Set Commerce attribute type was introduced in Release 18D to support Transaction Arrays. The Array Set attribute is created using the Attribute Editor.
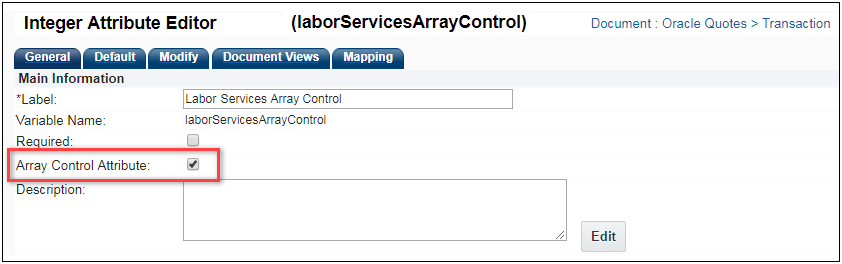
For Transaction Arrays, array attributes are created directly within the array set. Boolean, Currency, Date, Float, Integer, Language, Single Select and Multi-Select Menus, Text, and Text Area type attributes are supported. Array attribute properties are managed on the Attribute Editor page for each individual array attribute. General, Default, and Document Views tabs are available for array attributes. Array Control Attributes can be used to set the size of an array set.
Tabs for Transaction Array Attributes
Depending on which type of attribute is being edited, different tabs are visible in the Attribute Editor. The tabs include: General, Default, Modify.
Mapping tabs are not available for Transaction Array attributes.
| Attribute Type | General | Default | Modify |
|---|---|---|---|
| Boolean | X | X | X |
| Currency | X | X | X |
| Date | X | X | X |
| Float | X | X | X |
| Integer | X | X | X |
| Language | X | X | X |
| Menu | X | X | X |
| Text | X | X | X |
| Text Area | X | X | X |
Additional General Tab Sections for Transaction Array Attributes
The following table shows which attributes have extra sections on the General tab. These sections include: Validation Fields, Menu Population, and Conversion Fields.
The Groups field is not available for Transaction Array attributes.
| Attribute Type | Validation Fields | Menu Population | Conversion Fields |
|---|---|---|---|
| Boolean | X | - | - |
| Currency | X | - | - |
| Date | X | - | - |
| Float | X | - | X |
| Integer | X | - | - |
| Language | - | X | - |
| Menu | - | X | - |
| Text | X | - | - |
| Text Area | - | - | - |
Array Control Attributes can be used to set the size of an array set. Integer and Menu attributes can be designated as an Array Control Attribute. A single Array Control Attribute can be associated with multiple array sets.
Array Control Attribute Behavior
The Array Control Attribute for array sets is optional. If the Array Control Attribute is not defined, the size of the array set is controlled by create and delete actions. This behavior is intentionally different from Configuration, where the array set size is always "1" when the Array Control attribute is not defined.
Note: If Access Rules are used to hide a transaction array, administrators should designate an Array Controller Attribute for the transaction array and set the minimum value to one or more.
The following conditions exist when an Array Control Attribute is defined:
- When an Array Control Attribute is an Integer attribute, the validation of attribute is changed to Check Range, with the minimum set to 0. The minimum and maximum values can be modified.
- When an Array Control Attribute is a Menu attribute, it must be Single-Select Menu.
The variable names of the menu items must be non-negative integers. - The add and delete actions are dynamically enabled and disabled as described below:
- When the Array Control Attribute is set to read-only or hidden by workflow steps, Add and Delete buttons are disabled.
- When an array set reaches the maximum size, add is disabled.
- When an array set reaches the minimum size, delete is disabled.
- When the Array Control Attribute is a Menu attribute, add and delete buttons are disabled.
- When the Array Control Attribute controls more than one array set, add and delete buttons are disabled.
![]() Access Rules using Transaction Arrays
Access Rules using Transaction Arrays
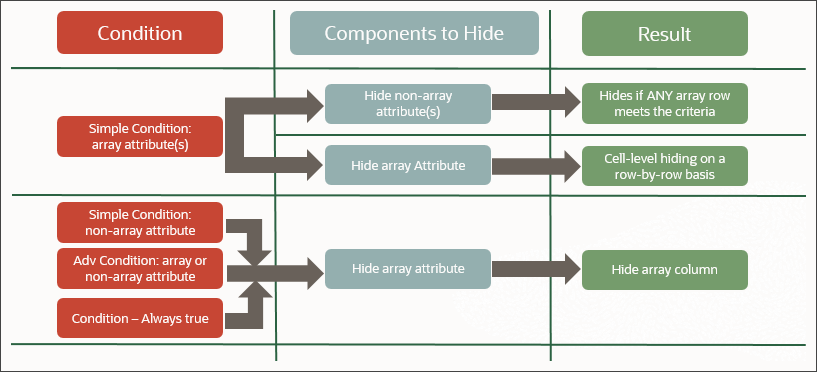
Administrators can use transaction array set attributes in the Commerce Access Rules. Array attributes can be used in both simple and advanced modes for the Condition and for the Components to Hide/Read-only sections of the access rules. Transaction array hiding behaviors are similar to Configuration array set behaviors.
Transaction array attribute hiding behaviors are as follows:
- If an array attribute is used as a simple condition and the components to hide only uses document attributes, the result is that the document attributes are hidden if any array row meets the condition.
- If an array attribute is used as a simple condition and the components to hide also use array attributes, the result is cell-level hiding as determined on a row-by-row basis.
- If a simple condition exists without referencing an array attribute and the components to hide uses array attributes, the result is that the entire array column is hidden.
- If an advanced condition is used either with or without array attributes and the components to hide uses array attributes, the result is that the entire array column is hidden.
- If a condition is "Always True" and the components to hide uses array attributes, the result is that the entire array column is hidden.
![]() Increased Pagination Limit for JET Transaction Arrays 21B
Increased Pagination Limit for JET Transaction Arrays 21B
In Oracle CPQ 21A and earlier, a maximum of 50 array records could be displayed per page for JET transaction arrays. Beginning in Oracle CPQ 21B, the number of viewable records is increased for transaction arrays.This UI enhancement allows users to view array information easily and reduces the number of pages to click through when displaying arrays with a large quantity of line items.
-
The pagination size limit is increased to 100 records for transaction arrays.
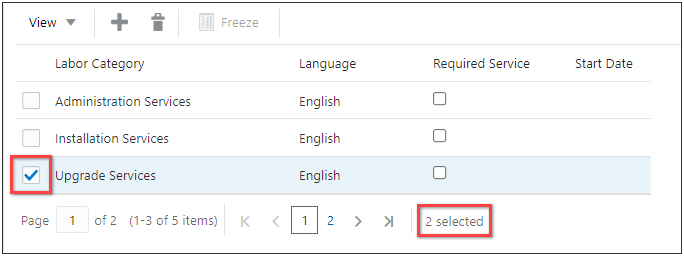
![]() Selection Checkboxes for Transaction Arrays 21B
Selection Checkboxes for Transaction Arrays 21B
Oracle CPQ 21B delivers Selection Checkboxes for the JET Transaction UI Transaction Arrays. In prior releases, selecting multiple line items was limited to the current page, and was not possible for users on touch-screen devices. Beginning in Oracle CPQ 21B, the selection checkboxes are displayed at the start of each array row. Item selection is retained when the user navigates through array pages. In addition, the Transaction Array table footer indicates the number of currently selected rows.
The following image show a Transaction Array with two items selected. One item is on the page 1 and the second item is on page 2. Note that the footer at the bottom of the table shows "2 selected".
![]() Sort and Filter Transaction Arrays
Sort and Filter Transaction Arrays
Beginning in Oracle CPQ 23D, CPQ will allow sales users to filter and sort main and sub-document transaction arrays. Sales users can click the ascending or descending arrows in the column header to sort a transaction array.
The Simple Filter supports quick text or numeric searches. To use the Simple Filter, click on the table toolbar Simple Filter icon, and then type the desired keyword or phrase and then press <Enter> or <Return> to filter results. If the keyword is present in any column, the resulting lines are returned. To deactivate the filter, click on the active Simple Filter icon.

Administration
![]() Create an Array Set and Array Attributes
Create an Array Set and Array Attributes
Perform the following steps to create an array set with array attributes:
-
Navigate to the Attribute List page.
Admin > Commerce and Documents > Process Definition > Documents > Attributes
-
Scroll to the bottom of the page and click Add.
The Attribute Editor page opens.
-
Enter the Label and Variable Name of the attribute.
The Variable Name field populates automatically. Variable names can only contain alpha-numeric characters and underscores. You can change the entry before saving. After saving, the value is read-only.
- Select Array Set from the Attribute Type drop-down.
-
Click Add.
The Attribute Array Set Editor page opens.
- If required, enter a Description.
-
If required, select an Array Control Attribute from the Size Attribute drop-down.
Notes:
- If Access Rules are used to hide a transaction array, administrators should designate an Array Controller Attribute for the transaction array and set the minimum value to one or more.
- If there are no Array Control Attributes listed refer to Designate an Attribute as an Array Control Attribute.
-
Click New Attribute to add an array set attribute.
The Attribute Editor page opens.
-
Enter the Label and Variable Name of the attribute.
The Variable Name field populates automatically. Variable names can only contain alpha-numeric characters and underscores. You can change the entry before saving. After saving, the value is read-only.
-
The Attribute Editor page opens.
-
Choose an Attribute Type from the drop-down, then click Add.
The applicable Attribute Editor page opens.
 Boolean - Creates a Boolean field consisting of two radio buttons.
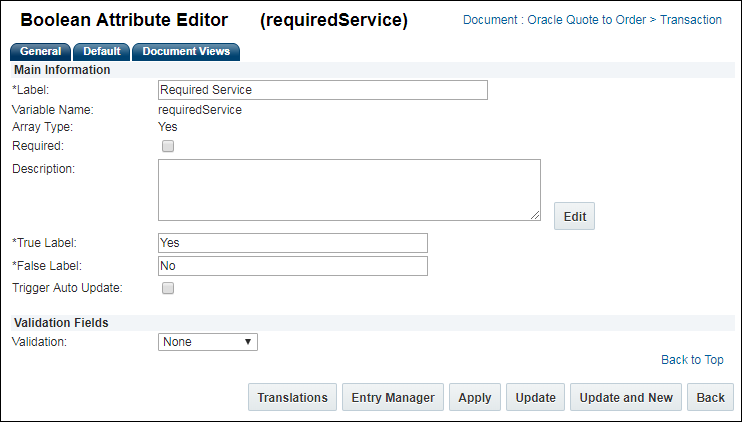
Define the following fields:
- Required: Select this option to require the user to select an option before proceeding.
- Description: If required, enter a brief description.
- *True Label: If required, modify the label value. The default value is "True".
- *False Label: If required, modify the label value. The default value is "False".
-
Trigger Auto Update: If required, select this option to have the attribute updated by the system without the user invoking an action.
Validation Fields
-
Validation: If required, select a validation option:
- None
- Must be True
- Must be False
-
If translations are required, click Translations and provide translated values for the label and description fields.
Select Order Entry to provide True and False Label translations.
- If required, click Order Entry to change the order of the True and False Labels or provide translated values for the True and False Labels.
-
If required, select the Default tab to define a default value.
-
If required, select the Document Views tab to define attribute access.
For more information, refer to Accessing, Hiding, and Reading Attributes.
-
Select one of the following options:
- Click Apply to save changes and remain on the Attribute Editor page
- Click Update to save changes and return to the Attribute Array Set Editor page
- Click Update and New to define another attribute for the array set
- Click Back to return to the Attribute Array Set Editor page without saving changes
Currency - Creates an input field and validations for monetary inputs.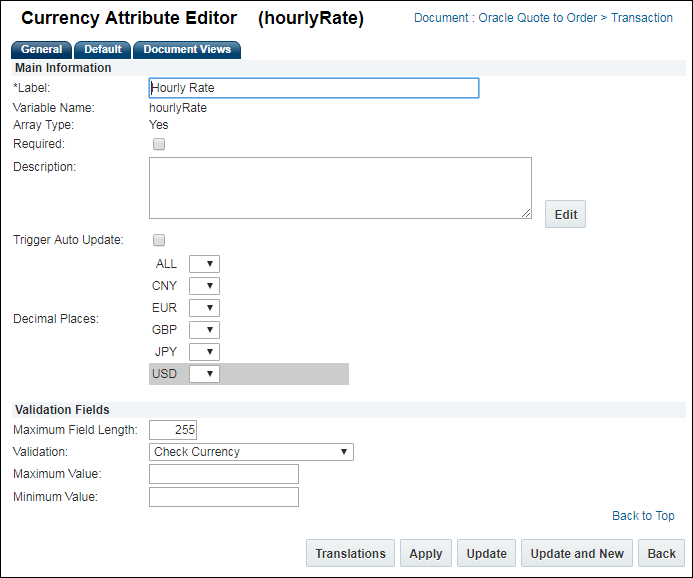
Define the following fields:
- Required: Select this option to require the user to select an option before proceeding.
- Description: If required, enter a brief description.
-
Trigger Auto Update: If required, select this option to have the attribute updated by the system without the user invoking an action.
-
Decimal Places: If required, choose how many decimal places are allowed for supported currency types.
Validation Fields
-
Maximum Field Length: If required, define the maximum number of characters that can be input into the field. The valid range for this value is 1 through 255.
-
Validation: If required, select one of the following options:
- Check Currency
- Check Currency in Range
- Check Currency for Maximum
- Check Currency for Minimum
- Check Currency for Non-negative
-
Maximum Value: If required, define the maximum monetary value that can be input into the currency attribute.
This field must be specified if Check Currency in Range or Check Currency for Maximum validation is selected. -
Minimum Value: If required, define the minimum monetary value that can be input into the currency attribute. The minimum value must be less than the maximum value.
This field must be specified if Check Currency in Range or Check Currency for Minimum validation is selected. -
If translations are required, click Translations and provide translated values for the label and description fields.
-
If required, select the Default tab to define a default value.
-
If required, select the Document Views tab to define attribute access.
For more information, refer to Accessing, Hiding, and Reading Attributes.
- Select one of the following options:
- Click Apply to save changes and remain on the Attribute Editor page
- Click Update to save changes and return to the Attribute Array Set Editor page
- Click Update and New to define another attribute for the array set
- Click Back to return to the Attribute Array Set Editor page without saving changes
Date - Creates an input field and validations for date inputs.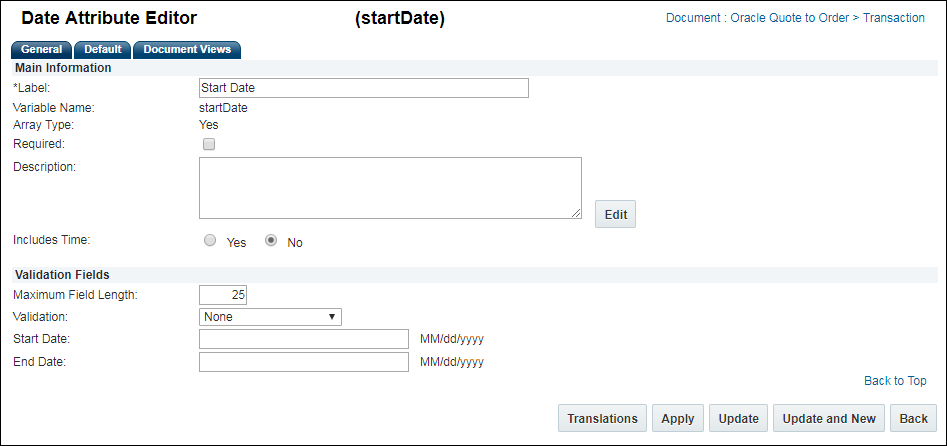
Define the following fields:
- Required: Select this option to require the user to select an option before proceeding.
- Description: If required, enter a brief description.
- Includes Time: If required, select this checkbox to include a timestamp is with the date.
Validation Fields
-
Maximum Field Length: If required, define the maximum number of characters that can be input into the field. The valid range for this value is 1 through 255.
-
Validation: If required, select a validation option:
- None
- Check for Future Date
- Check Date in Range
-
Start Date: If required, define the start date value that can be input into the date attribute.
This field must be specified if Check Date in Range validation is selected. -
End Date: If required, define the end date value that can be input into the date attribute.
This field must be specified if Check Date in Range validation is selected.
-
If translations are required, click Translations and provide translated values for the label and description fields.
Select Order Entry to provide True and False Label translations.
- If required, click Order Entry to change the order of the True and False Labels or provide translated values for the True and False Labels.
-
If required, select the Default tab to define a default value.
-
If required, select the Document Views tab to define attribute access.
For more information, refer to Accessing, Hiding, and Reading Attributes.
-
Select one of the following options:
- Click Apply to save changes and remain on the Attribute Editor page
- Click Update to save changes and return to the Attribute Array Set Editor page
- Click Update and New to define another attribute for the array set
- Click Back to return to the Attribute Array Set Editor page without saving changes
Float - Creates an input field and validations for floating point numbers.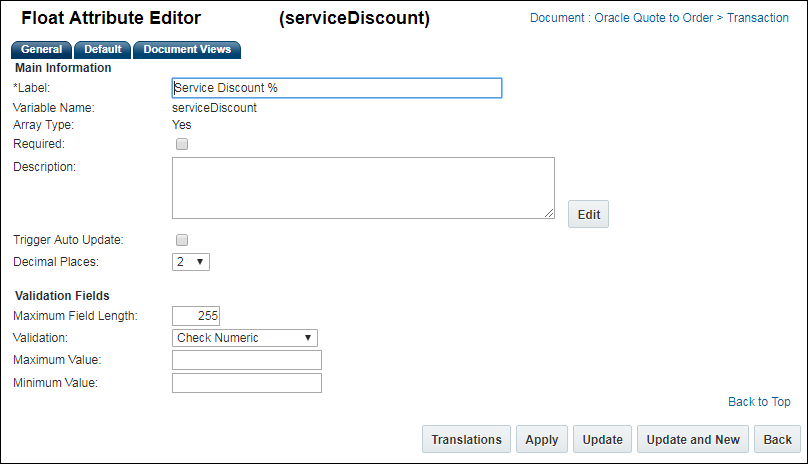
Define the following fields:
- Required: Select this option to require the user to select an option before proceeding.
- Description: If required, enter a brief description.
-
Trigger Auto Update: If required, select this option to have the attribute updated by the system without the user invoking an action.
-
Decimal Places: If required, choose how many decimal places are allowed for supported currency types. The maximum number of decimal places that can be supported is 16.
Validation Fields
-
Maximum Field Length: If required, define the maximum number of characters that can be input into the field. The valid range for this value is 1 through 255.
-
Validation: If required, select one of the following options:
- Check Numeric
- Check Positive
- Check in Range
- Check Positive or Zero
-
Maximum Value: If required, define the maximum value that can be input into the float attribute.
This field must be specified if Check in Range validation is selected.
-
Minimum Value: If required, define the minimum value that can be input into the float attribute. The minimum value must be less than the maximum value.
This field must be specified if Check in Range validation is selected.
-
If translations are required, click Translations and provide translated values for the label and description fields.
-
If required, select the Default tab to define a default value.
-
If required, select the Document Views tab to define attribute access.
For more information, refer to Accessing, Hiding, and Reading Attributes.
- Select one of the following options:
- Click Apply to save changes and remain on the Attribute Editor page
- Click Update to save changes and return to the Attribute Array Set Editor page
- Click Update and New to define another attribute for the array set
- Click Back to return to the Attribute Array Set Editor page without saving changes
Integer - Creates an input field and validations for integer numbers.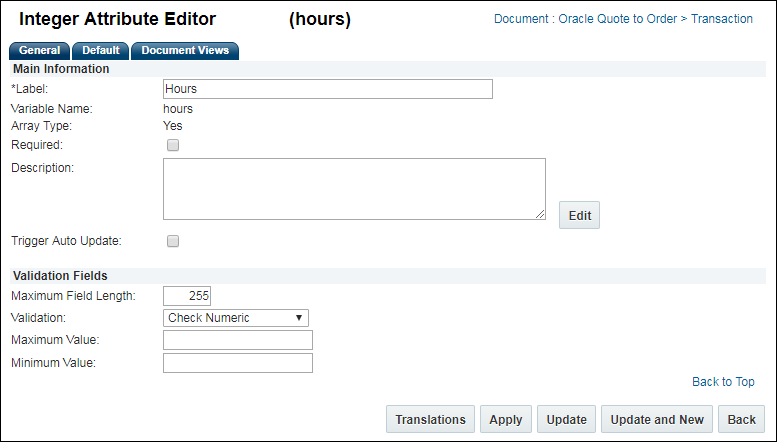
Define the following fields:
- Required: Select this option to require the user to select an option before proceeding.
- Description: If required, enter a brief description.
-
Trigger Auto Update: If required, select this option to have the attribute updated by the system without the user invoking an action.
Validation Fields
-
Maximum Field Length: If required, define the maximum number of characters that can be input into the field. The valid range for this value is 1 through 255.
-
Validation: If required, select one of the following options:
- Check Numeric
- Check Positive
- Check in Range
- Check Positive or Zero
-
Maximum Value: If required, define the maximum value that can be input into the integer attribute.
This field must be specified if Check in Range validation is selected.
-
Minimum Value: If required, define the minimum value that can be input into the integer attribute. The minimum value must be less than the maximum value.
This field must be specified if Check in Range validation is selected.
-
If translations are required, click Translations and provide translated values for the label and description fields.
-
If required, select the Default tab to define a default value.
-
If required, select the Document Views tab to define attribute access.
For more information, refer to Accessing, Hiding, and Reading Attributes.
- Select one of the following options:
- Click Apply to save changes and remain on the Attribute Editor page
- Click Update to save changes and return to the Attribute Array Set Editor page
- Click Update and New to define another attribute for the array set
- Click Back to return to the Attribute Array Set Editor page without saving changes
Language - Creates a single-select menu for Language Attribute.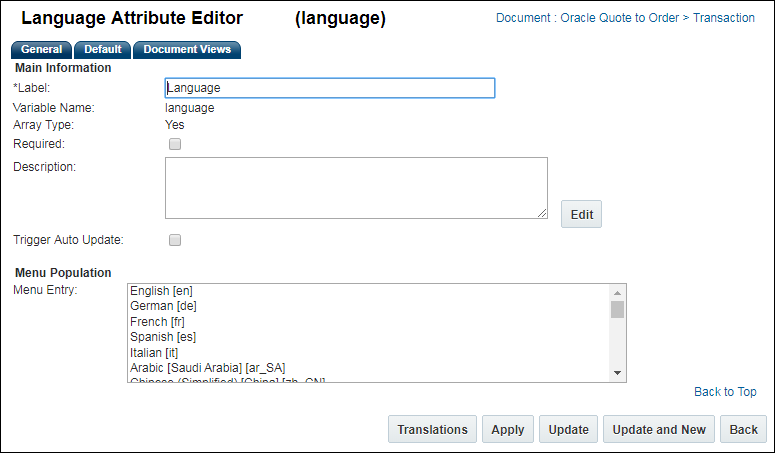
Define the following fields:
- Required: Select this option to require the user to select an option before proceeding.
- Description: If required, enter a brief description.
-
Trigger Auto Update: If required, select this option to have the attribute updated by the system without the user invoking an action.
-
Menu Population: If required, select which languages are listed in the language menu.
-
If translations are required, click Translations and provide translated values for the label and description fields.
-
If required, select the Default tab to define a default value.
-
If required, select the Document Views tab to define attribute access.
For more information, refer to Accessing, Hiding, and Reading Attributes.
- Select one of the following options:
- Click Apply to save changes and remain on the Attribute Editor page
- Click Update to save changes and return to the Attribute Array Set Editor page
- Click Update and New to define another attribute for the array set
- Click Back to return to the Attribute Array Set Editor page without saving changes
Menu - Creates a menu field which may be multi-select or single select.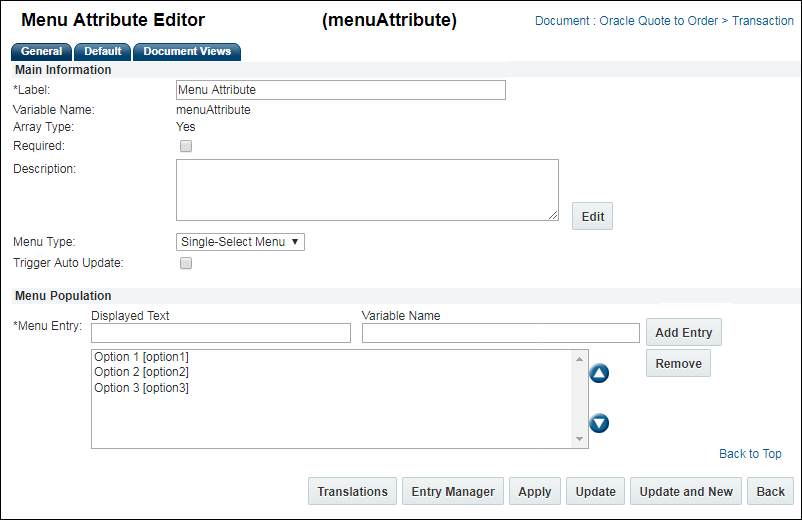
Define the following fields:
- Required: Select this option to require the user to select an option before proceeding.
- Description: If required, enter a brief description.
-
Menu Type: Specify if the menu attribute is a Single Select or Multi-select Menu.
The default value is Single Select Menu. -
Trigger Auto Update: If required, select this option to have the attribute updated by the system without the user invoking an action.
Menu Population
This section is used to create options for the menu attribute.
- To add a menu item, enter the item name in the Menu Entry field, and click Add.
- To remove a menu item, highlight the item name, and click Delete.
-
Menu items appear in the order they are listed in the menu entries list box.
To reorder the list, highlight an item, and click the corresponding Up
 or Down
  button.
 The Entry Manager can also be used to manage menu items.
-
If translations are required, click Translations and provide translated values for the label and description fields.
- If required, click Order Entry to change the order of the menu items and provide translated values for the menu items.
-
If required, select the Default tab to define a default value.
-
If required, select the Document Views tab to define attribute access.
For more information, refer to Accessing, Hiding, and Reading Attributes.
- Select one of the following options:
- Click Apply to save changes and remain on the Attribute Editor page
- Click Update to save changes and return to the Attribute Array Set Editor page
- Click Update and New to define another attribute for the array set
- Click Back to return to the Attribute Array Set Editor page without saving changes
Text - Creates an input field for short strings.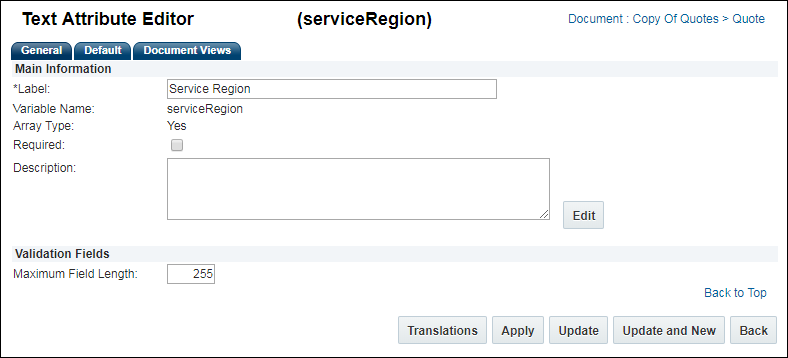
Define the following fields:
- Required: Select this option to require the user to select an option before proceeding.
- Description: If required, enter a brief description.
Validation Fields
-
Maximum Field Length: If required, define the maximum number of characters that can be input into the field. The valid range for this value is 1 through 255.
-
If translations are required, click Translations and provide translated values for the label and description fields.
-
If required, select the Default tab to define a default value.
-
If required, select the Document Views tab to define attribute access.
For more information, refer to Accessing, Hiding, and Reading Attributes.
-
Select one of the following options:
- Click Apply to save changes and remain on the Attribute Editor page
- Click Update to save changes and return to the Attribute Array Set Editor page
- Click Update and New to define another attribute for the array set
- Click Back to return to the Attribute Array Set Editor page without saving changes
Text Area - Creates a text area field for strings that are greater than 255 characters in length.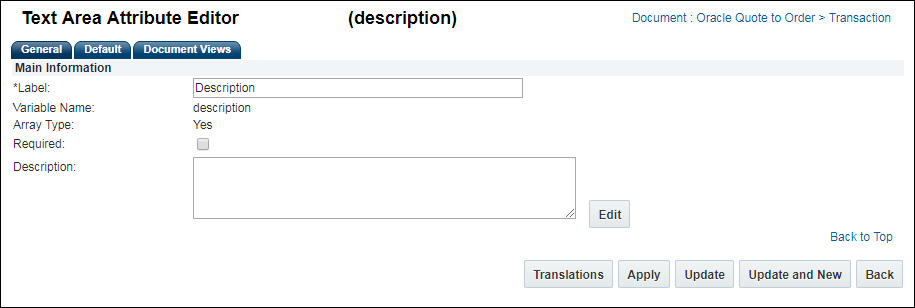
Define the following fields:
- Required: Select this option to require the user to select an option before proceeding.
- Description: If required, enter a brief description.
-
If translations are required, click Translations and provide translated values for the label and description fields.
-
If required, select the Default tab to define a default value.
-
If required, select the Document Views tab to define attribute access.
For more information, refer to Accessing, Hiding, and Reading Attributes.
-
Select one of the following options:
- Click Apply to save changes and remain on the Attribute Editor page
- Click Update to save changes and return to the Attribute Array Set Editor page
- Click Update and New to define another attribute for the array set
- Click Back to return to the Attribute Array Set Editor page without saving changes
- To re-order the array set attributes, update the values in the Order column.
- To delete attributes, check the Select option next to the applicable attribute, and then click Delete Attribute.
- If translations are required, click Translations and provide translated values for the label and description fields.
-
After all of the desired attributes have been created, select one of the following options:
- Click Apply to save changes and remain on the Attribute Array Set Editor page
- Click Update to save changes and return to the Attribute List page
- Click Back to return to the Attribute List page without saving changes
![]() Designate an Attribute as an Array Control Attribute
Designate an Attribute as an Array Control Attribute
Perform the following steps to designate an array control attribute:
-
Navigate to the Attribute List page.
Admin > Commerce and Documents > Process Definition > Documents > Attributes
The Attribute List page opens.
-
Select an integer or menu attribute.
The applicable Attribute Editor page opens.
-
Select the Array Control Attribute option.
Changing to Array Control Attribute introduces range validation, which might cause legacy issues.
-
After all of the desired attributes have been created, select one of the following options:
- Click Apply to save changes and remain on the Attribute Array Set Editor page
- Click Update to save changes and return to the Attribute List page
- Click Back to return to the Attribute List page without saving changes
Notes:
- When an Array Control Attribute is an Integer attribute, the validation of attribute is changed to Check Range, with the minimum set to 0. The minimum and maximum values can be modified.
- When an Array Control Attribute is a Menu attribute, it must be Single-Select Menu.
The variable names of the menu items must be non-negative integers. - The add and delete actions are dynamically enabled and disabled as described below:
- When the Array Control Attribute is set to read-only or hidden by workflow steps, Add and Delete buttons are disabled.
- When an array set reaches the maximum size, add is disabled.
- When an array set reaches the minimum size, delete is disabled.
- When the Array Control Attribute is a Menu attribute, add and delete buttons are disabled.
- When the Array Control Attribute controls more than one array set, add and delete buttons are disabled.
![]() Edit Array Set or Array Set Attribute
Edit Array Set or Array Set Attribute
Perform the following steps to edit an array set:
-
Navigate to the Attribute List page.
Admin > Commerce and Documents > Process Definition > Documents > Attributes
-
Click on the name of the applicable array set attribute.
The Attribute Array Set Editor page opens.
- If required, edit the Name.
- If required, edit the Description.
-
If required, select an Array Control Attribute from the Size Attribute drop-down.
If no Array Control Attributes are listed refer to Designate an Attribute as an Array Control Attribute.
-
To edit an attribute, click on the name of the applicable attribute.
The applicable Attribute Editor page opens.
If required, edit the following fields:
- Required: Select this option to require the user to select an option before proceeding.
- Description: If required, enter a brief description.
- *True Label: If required, modify the label value. The default value is "True".
- *False Label: If required, modify the label value. The default value is "False".
-
Trigger Auto Update: If required, select this option to have the attribute updated by the system without the user invoking an action.
Validation Fields
-
Validation: If required, select a validation option:
- None
- Must be True
- Must be False
-
If translations are required, click Translations and provide translated values for the label and description fields.
Select Order Entry to provide True and False Label translations.
- If required, click Order Entry to change the order of the True and False Labels or provide translated values for the True and False Labels.
-
If required, select the Default tab to define a default value.
-
If required, select the Document Views tab to define attribute access.
For more information, refer to Accessing, Hiding, and Reading Attributes.
-
Select one of the following options:
- Click Apply to save changes and remain on the Attribute Editor page
- Click Update to save changes and return to the Attribute Array Set Editor page
- Click Update and New to define another attribute for the array set
- Click Back to return to the Attribute Array Set Editor page without saving changes
If required, edit the following fields:
- Required: Select this option to require the user to select an option before proceeding.
- Description: If required, enter a brief description.
-
Trigger Auto Update: If required, select this option to have the attribute updated by the system without the user invoking an action.
-
Decimal Places: If required, choose how many decimal places are allowed for supported currency types.
Validation Fields
-
Maximum Field Length: If required, define the maximum number of characters that can be input into the field. The valid range for this value is 1 through 255.
-
Validation: If required, select one of the following options:
- Check Currency
- Check Currency in Range
- Check Currency for Maximum
- Check Currency for Minimum
- Check Currency for Non-negative
-
Maximum Value: If required, define the maximum monetary value that can be input into the currency attribute.
This field must be specified if Check Currency in Range or Check Currency for Maximum validation is selected. -
Minimum Value: If required, define the minimum monetary value that can be input into the currency attribute. The minimum value must be less than the maximum value.
This field must be specified if Check Currency in Range or Check Currency for Minimum validation is selected. -
If translations are required, click Translations and provide translated values for the label and description fields.
-
If required, select the Default tab to define a default value.
-
If required, select the Document Views tab to define attribute access.
For more information, refer to Accessing, Hiding, and Reading Attributes.
- Select one of the following options:
- Click Apply to save changes and remain on the Attribute Editor page
- Click Update to save changes and return to the Attribute Array Set Editor page
- Click Update and New to define another attribute for the array set
- Click Back to return to the Attribute Array Set Editor page without saving changes
If required, edit the following fields:
- Required: Select this option to require the user to select an option before proceeding.
- Description: If required, enter a brief description.
- Includes Time: If required, select this checkbox to include a timestamp is with the date.
Validation Fields
-
Maximum Field Length: If required, define the maximum number of characters that can be input into the field. The valid range for this value is 1 through 255.
-
Validation: If required, select a validation option:
- None
- Check for Future Date
- Check Date in Range
-
Start Date: If required, define the start date value that can be input into the date attribute.
This field must be specified if Check Date in Range validation is selected. -
End Date: If required, define the end date value that can be input into the date attribute.
This field must be specified if Check Date in Range validation is selected.
-
If translations are required, click Translations and provide translated values for the label and description fields.
Select Order Entry to provide True and False Label translations.
- If required, click Order Entry to change the order of the True and False Labels or provide translated values for the True and False Labels.
-
If required, select the Default tab to define a default value.
-
If required, select the Document Views tab to define attribute access.
For more information, refer to Accessing, Hiding, and Reading Attributes.
-
Select one of the following options:
- Click Apply to save changes and remain on the Attribute Editor page
- Click Update to save changes and return to the Attribute Array Set Editor page
- Click Update and New to define another attribute for the array set
- Click Back to return to the Attribute Array Set Editor page without saving changes
If required, edit the following fields:
- Required: Select this option to require the user to select an option before proceeding.
- Description: If required, enter a brief description.
-
Trigger Auto Update: If required, select this option to have the attribute updated by the system without the user invoking an action.
-
Decimal Places: If required, choose how many decimal places are allowed for supported currency types. The maximum number of decimal places that can be supported is 16.
Validation Fields
-
Maximum Field Length: If required, define the maximum number of characters that can be input into the field. The valid range for this value is 1 through 255.
-
Validation: If required, select one of the following options:
- Check Numeric
- Check Positive
- Check in Range
- Check Positive or Zero
-
Maximum Value: If required, define the maximum value that can be input into the float attribute.
This field must be specified if Check in Range validation is selected.
-
Minimum Value: If required, define the minimum value that can be input into the float attribute. The minimum value must be less than the maximum value.
This field must be specified if Check in Range validation is selected.
-
If translations are required, click Translations and provide translated values for the label and description fields.
-
If required, select the Default tab to define a default value.
-
If required, select the Document Views tab to define attribute access.
For more information, refer to Accessing, Hiding, and Reading Attributes.
- Select one of the following options:
- Click Apply to save changes and remain on the Attribute Editor page
- Click Update to save changes and return to the Attribute Array Set Editor page
- Click Update and New to define another attribute for the array set
- Click Back to return to the Attribute Array Set Editor page without saving changes
If required, edit the following fields:
- Required: Select this option to require the user to select an option before proceeding.
- Description: If required, enter a brief description.
-
Trigger Auto Update: If required, select this option to have the attribute updated by the system without the user invoking an action.
Validation Fields
-
Maximum Field Length: If required, define the maximum number of characters that can be input into the field. The valid range for this value is 1 through 255.
-
Validation: If required, select one of the following options:
- Check Numeric
- Check Positive
- Check in Range
- Check Positive or Zero
-
Maximum Value: If required, define the maximum value that can be input into the integer attribute.
This field must be specified if Check in Range validation is selected.
-
Minimum Value: If required, define the minimum value that can be input into the integer attribute. The minimum value must be less than the maximum value.
This field must be specified if Check in Range validation is selected.
-
If translations are required, click Translations and provide translated values for the label and description fields.
-
If required, select the Default tab to define a default value.
-
If required, select the Document Views tab to define attribute access.
For more information, refer to Accessing, Hiding, and Reading Attributes.
- Select one of the following options:
- Click Apply to save changes and remain on the Attribute Editor page
- Click Update to save changes and return to the Attribute Array Set Editor page
- Click Update and New to define another attribute for the array set
- Click Back to return to the Attribute Array Set Editor page without saving changes
If required, edit the following fields:
- Required: Select this option to require the user to select an option before proceeding.
- Description: If required, enter a brief description.
-
Trigger Auto Update: If required, select this option to have the attribute updated by the system without the user invoking an action.
-
Menu Population: If required, select which languages are listed in the language menu.
-
If translations are required, click Translations and provide translated values for the label and description fields.
-
If required, select the Default tab to define a default value.
-
If required, select the Document Views tab to define attribute access.
For more information, refer to Accessing, Hiding, and Reading Attributes.
- Select one of the following options:
- Click Apply to save changes and remain on the Attribute Editor page
- Click Update to save changes and return to the Attribute Array Set Editor page
- Click Update and New to define another attribute for the array set
- Click Back to return to the Attribute Array Set Editor page without saving changes
If required, edit the following fields:
- Required: Select this option to require the user to select an option before proceeding.
- Description: If required, enter a brief description.
-
Menu Type: Specify if the menu attribute is a Single Select or Multi-select Menu.
The default value is Single Select Menu. -
Trigger Auto Update: If required, select this option to have the attribute updated by the system without the user invoking an action.
Menu Population
This section is used to create options for the menu attribute.
- To add a menu item, enter the item name in the Menu Entry field, and click Add.
- To remove a menu item, highlight the item name, and click Delete.
-
Menu items appear in the order they are listed in the menu entries list box.
To reorder the list, highlight an item, and click the corresponding Up
or Down button. The Entry Manager can also be used to manage menu items.
-
If translations are required, click Translations and provide translated values for the label and description fields.
- If required, click Order Entry to change the order of the menu items and provide translated values for the menu items.
-
If required, select the Default tab to define a default value.
-
If required, select the Document Views tab to define attribute access.
For more information, refer to Accessing, Hiding, and Reading Attributes.
- Select one of the following options:
- Click Apply to save changes and remain on the Attribute Editor page
- Click Update to save changes and return to the Attribute Array Set Editor page
- Click Update and New to define another attribute for the array set
- Click Back to return to the Attribute Array Set Editor page without saving changes
If required, edit the following fields:
- Required: Select this option to require the user to select an option before proceeding.
- Description: If required, enter a brief description.
Validation Fields
-
Maximum Field Length: If required, define the maximum number of characters that can be input into the field. The valid range for this value is 1 through 255.
-
If translations are required, click Translations and provide translated values for the label and description fields.
-
If required, select the Default tab to define a default value.
-
If required, select the Document Views tab to define attribute access.
For more information, refer to Accessing, Hiding, and Reading Attributes.
-
Select one of the following options:
- Click Apply to save changes and remain on the Attribute Editor page
- Click Update to save changes and return to the Attribute Array Set Editor page
- Click Update and New to define another attribute for the array set
- Click Back to return to the Attribute Array Set Editor page without saving changes
If required, edit the following fields:
- Required: Select this option to require the user to select an option before proceeding.
- Description: If required, enter a brief description.
-
If translations are required, click Translations and provide translated values for the label and description fields.
-
If required, select the Default tab to define a default value.
-
If required, select the Document Views tab to define attribute access.
For more information, refer to Accessing, Hiding, and Reading Attributes.
-
Select one of the following options:
- Click Apply to save changes and remain on the Attribute Editor page
- Click Update to save changes and return to the Attribute Array Set Editor page
- Click Update and New to define another attribute for the array set
- Click Back to return to the Attribute Array Set Editor page without saving changes
- To re-order the array set attributes, update the values in the Order column.
- To delete attributes, check the Select option next to the applicable attribute, and then click Delete Attribute.
- If translations are required, click Translations and provide translated values for the label and description fields.
-
After all of the desired attributes have been created, select one of the following options:
- Click Apply to save changes and remain on the Attribute Array Set Editor page
- Click Update to save changes and return to the Attribute List page
- Click Back to return to the Attribute List page without saving changes
- To re-order the array set attributes, update the values in the Order column.
- To delete attributes, check the Select option next to the applicable attribute, and then click Delete Attribute.
- If translations are required, click Translations and provide translated values for the label and description fields.
-
Select one of the following options:
- Click Apply to save changes and remain on the Attribute Array Set Editor page
- Click Update to save changes and return to the Attribute List page
- Click Back to return to the Attribute List page without saving changes
Perform the following steps to delete an array set:
-
Navigate to the Attribute List page.
Admin > Commerce and Documents > Process Definition > Documents > Attributes
The Attribute List page opens.
- Check the Select option next to the applicable array set attribute.
- Click Delete.
Perform the following steps to delete an array set:
-
Navigate to the Attribute List page.
Admin > Commerce and Documents > Process Definition > Documents > Attributes
The Attribute List page opens.
-
Click on the name of the applicable array set attribute.
-
The Attribute Array Set Editor page opens.
- Check the Select option next to the applicable attribute.
- Click Delete Attribute.
-
After all of the desired attributes have been delete, select one of the following options:
- Click Apply to save changes and remain on the Attribute Array Set Editor page
- Click Update to save changes and return to the Attribute List page
![]() Populate a Commerce Transaction Array from a Data Table
Populate a Commerce Transaction Array from a Data Table
-
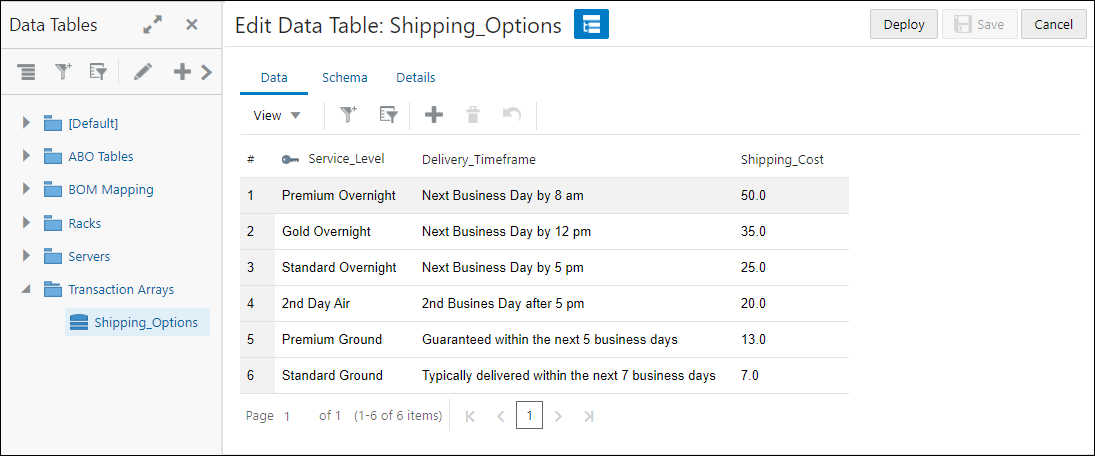
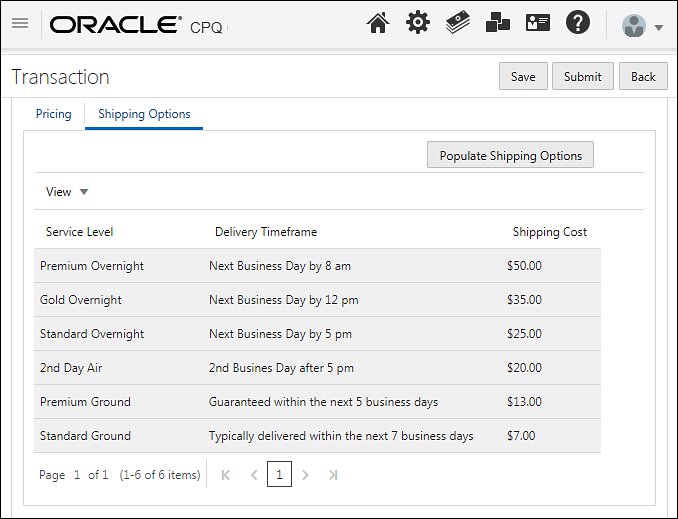
Create a data table (e.g. Shipping_Options Data Table)
This table contains three columns; Service_Level (String), Delivery_Timeframe (String), and Shipping_Cost (Float).
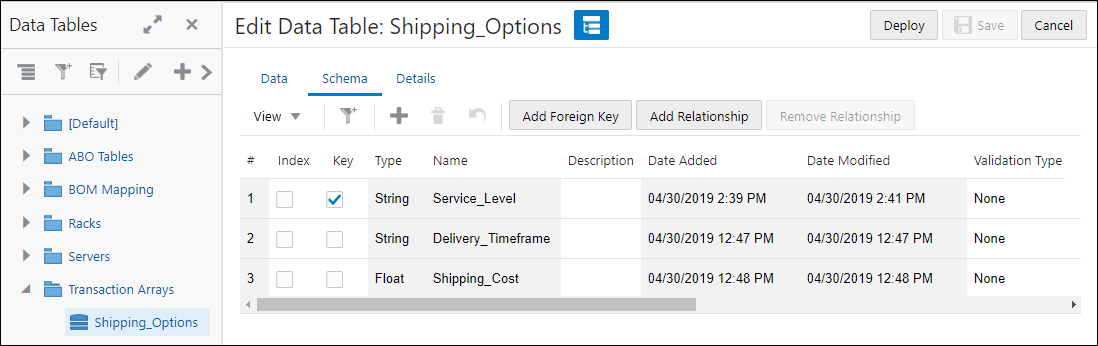
The table is populated with different shipping service levels:
For more detailed instructions, refer to Data Table Maintenance.
-
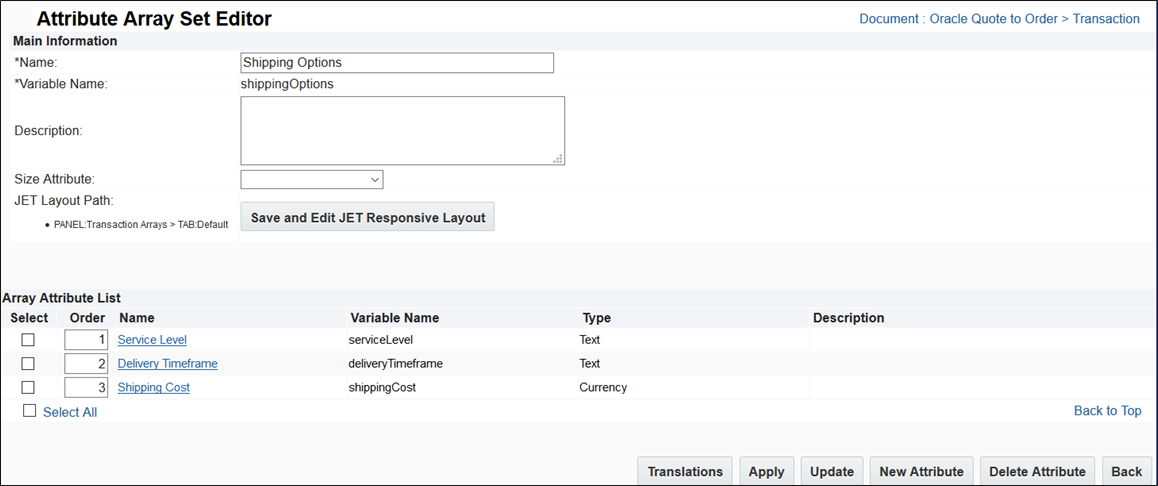
Create a transaction array (e.g. Shipping Options Transaction Array)
The Shipping Options (shippingOptions) Commerce Array Set Attribute contains three array attributes: Service Level (serviceLevel), Delivery Timeframe (deliveryTimeframe), and Shipping Cost (shippingCost). These attributes correspond to the columns in the Data Table.
For more detailed instructions, refer to Create an Array Set and Array Attributes.
-
Create a Commerce Modify type action to populate the transaction array (e.g. populateShippingOptions)
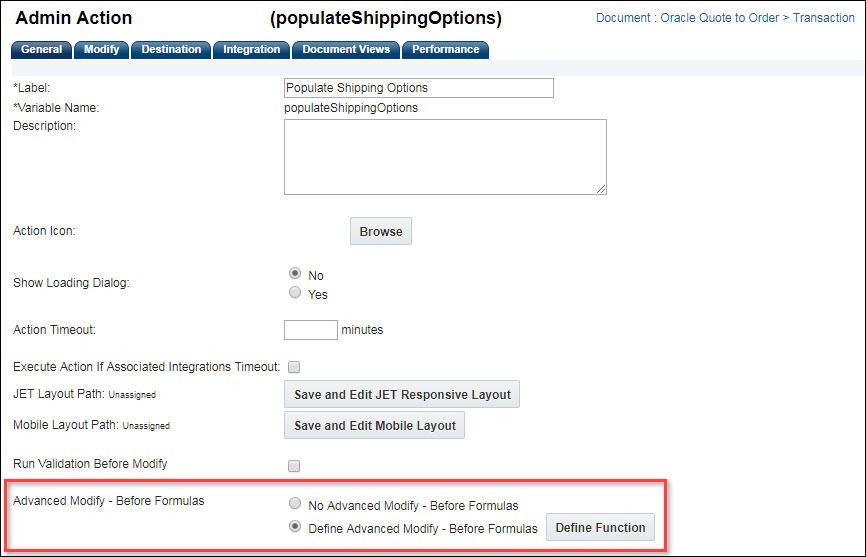
This example uses an Advanced Modify - Before Formula to define a function for the action.
- Select an attribute (e.g.Variable Name for (Transaction) tab > _transaction_document_number)
-
Enter the BML script into the BML Editor and click Save.
//  Define the String parameter that will be returned by the function.
returnString = "";

//  Define a JSON Array to hold the extracted data from the Data Table.
shippingMethods = jsonArray();

//  Perform BMQL Query of the "Shipping Options" Data Table to gather all of data rows.
optionList = bmql("select Service_Level, Delivery_Timeframe, Shipping_Cost from Shipping_Options");

//  Perform a loop over the returned Data Table rows.
for option in optionList {
//      Create a JSON string containing the data from the rows of the Data Table.
        optionJson = json();
//      Put into the optionJson string the Key:Value pairs for each column in the table.
	jsonput(optionJson,"serviceLevel",get(option,"Service_Level"));
	jsonput(optionJson,"deliveryTimeframe",get(option,"Delivery_Timeframe"));
	jsonput(optionJson,"shippingCost",get(option,"Shipping_Cost"));

//      Append the optionJson string to the shippingMethods JSON Array object.  Each iteration adds one row to the JSON Array.
	jsonarrayappend(shippingMethods, optionJson);
}

//  Build the returnString, adding the transaction_document_number (which is required), the Array Set Commerce attribute (shippingOptions)
//  and the JSON Reference ID of the shippingMethods JSON Array.
returnString = returnString + _transaction_document_number + "~shippingOptions~" + jsonarrayrefid(shippingMethods) + "|";

return returnString;
For more detailed instructions, refer to Commerce Actions and Commerce Function Editor.
- Add transaction array to JET Responsive Layout
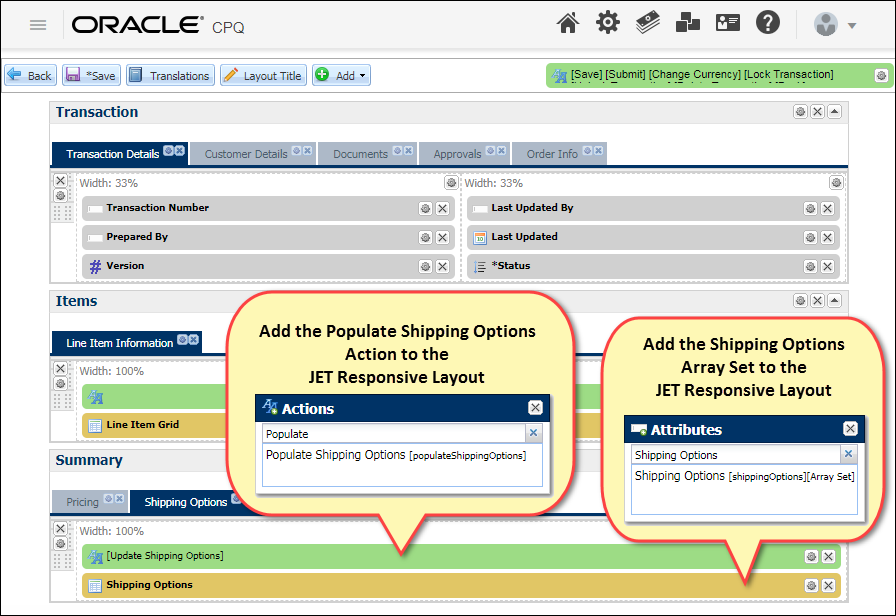
For more detailed instructions, refer to JET Responsive Editor.
The following image shows the resulting transaction array and action button on the JET Transaction UI.
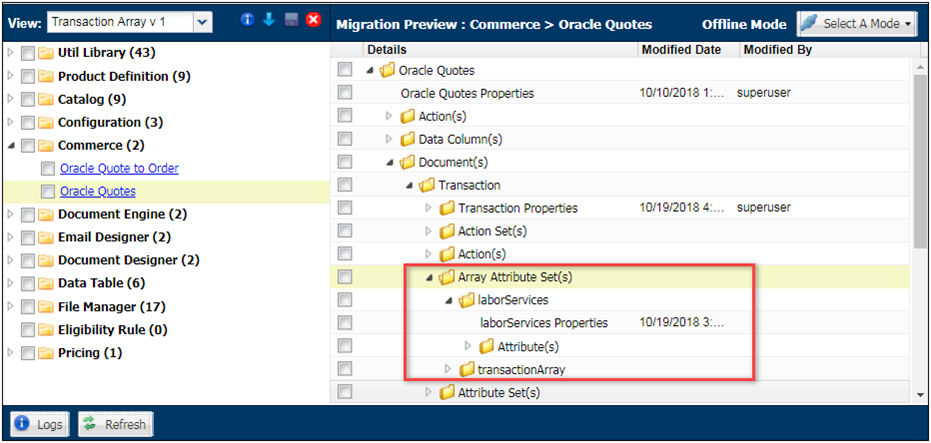
![]() Bulk Data Services and Migration Support for Array Sets
Bulk Data Services and Migration Support for Array Sets
The Migration Center is the user interface where all migration takes place within CPQ. Array Attribute Set(s) displays as a granular item under the applicable Commerce document. Administrators can migrate all or individual array attribute sets in a migration package using the Migration Center functionality available in prior releases.
![]() Migrating Document Designer Documents with Transaction Arrays
Migrating Document Designer Documents with Transaction Arrays
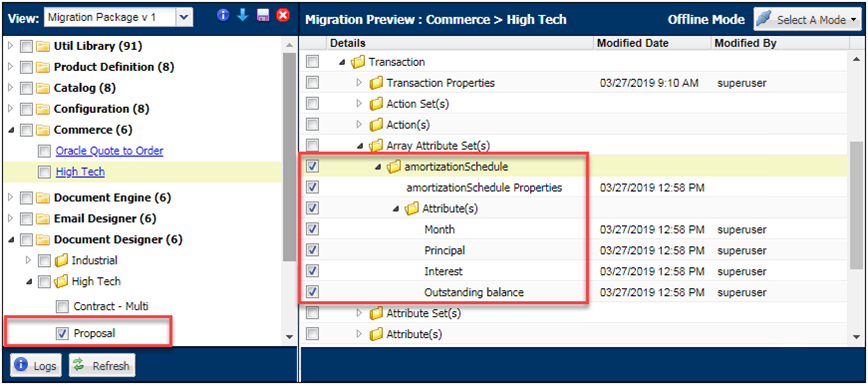
When migrating Document Designer or Email Designer templates that contain transaction arrays, administrators should ensure that the array set and all array set attributes are also migrated.
For example, the following image shows a migration package containing the Document Designer "Proposal" document, note that the "amortizationSchedule" array set and all of its child attributes are also selected.
- Administrators can use Bulk Data Services to update array set data in bulk. Refer to the Bulk Downloads and Bulk Uploads topics.
- For more information regarding migration services, refer to Migration Management Overview.
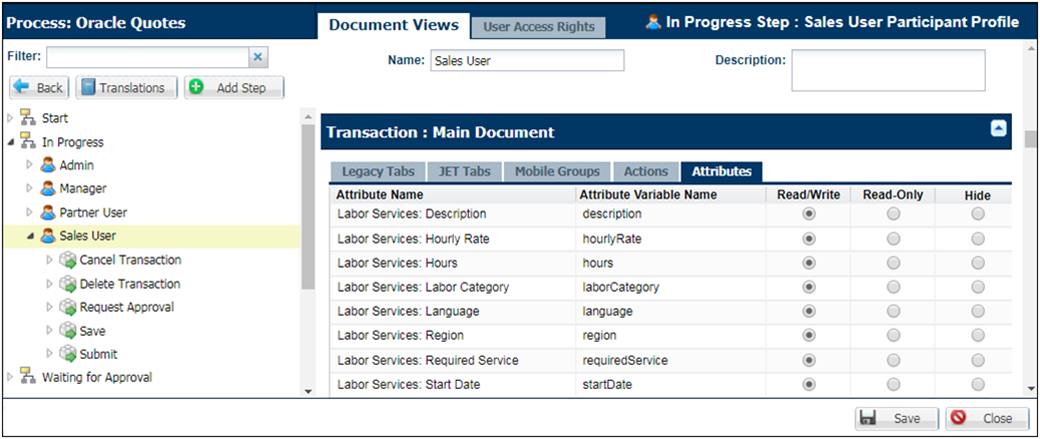
![]() Commerce Steps Administration for Transaction Arrays
Commerce Steps Administration for Transaction Arrays
Commerce Steps are used to define states and permissions for array attributes. Administrators navigate to Admin > Commerce and Documents > Process Definition > Steps to access Commerce Steps. Array attributes are listed on the Attributes tab under the Document Views tab for the applicable document. Array attribute permissions can be set to Read/Write, Read-Only, or Hidden. The attribute name is displayed as "{array set label}: {array attribute label}" (e.g. Labor Services: Description).
![]() XML Integration Support for Transaction Arrays
XML Integration Support for Transaction Arrays
The bulk of back-end integration is accomplished by exchanging XML data between Oracle CPQ and other third party systems. Oracle CPQ Release supports array set data for outbound XML integrations. Real-Time Integration is the mechanism that sends Transaction XML to a third party server when a transition rule is fired.
The following sample displays an XML fragment for the "feeArraySet"
<feeArraySet maxRowNum="4">
    <_array_set_row _row_number="1">
        <feeType>
            <![CDATA[ water ]]>
        </feeType>
        <feeAmount>
          <![CDATA[ 100.0 ]]>
        </feeAmount>
    </_array_set_row>
    <_array_set_row _row_number="3">
        <feeType>
            <![CDATA[ gas ]]>
        </feeType>
        <feeAmount>
          <![CDATA[ 200.0 ]]>
        </feeAmount>
    </_array_set_row>
</feeArraySet>
Oracle CPQ Release 18D does not supports inbound integration for Transaction Arrays.
Notes
Notes:
-
The default row limit for transaction arrays is 500 rows. To increase the default row size, open a ticket on My Oracle Support.
-
Error messages for invalid values are not displayed when Advanced Validation is set to Save without Validating for actions that modify a transaction array or line item attributes.
Custom Variable Name Conventions
In Oracle CPQ 23D, CPQ adopted Oracle CX Sales variable naming conventions for custom items. When an administrator creates a new custom Commerce item, the "_c" suffix is appended to the variable name. The new naming convention for custom variable names provides more consistency for integrations with Oracle Sales.
Beginning in Oracle CPQ 24C, customers can submit a service request to disable the "_c" suffix on variable names for custom Commerce entities (Actions, Analytics, Attributes, Data Columns, Integrations, Library Functions, Rules, Steps, etc.). The "_c" suffix is enabled by default for standard and legacy Commerce processes.
- Customers can submit a Service Request (SR) on My Oracle Support to disable the "_c" suffix on variable names for custom Commerce entities
- When the "_c" is disabled, the "_c" variable name suffix will not be required for newly created custom Commerce entities.
- Disabling the "_c" variable name suffix for custom Commerce entities will not change existing variable names.
- The "_c" suffix setting will not impact existing variable names when cloning a Commerce process or migrating Commerce items. Target variable names will be the same as the variable names from the source Commerce process.
Edits are not visible until the process is deployed (or redeployed).
Related Topics
For additional support information, refer to the following topics:
- BML Support for Transaction Arrays
- Transaction Array Support for Commerce Action REST APIs
- To add a Transaction Array to the JET Transaction UI, refer to JET Responsive Editor.


