Overview
Bulk Upload is used for several reasons.
- To enter large sets of data into Oracle CPQ
- To add, update or delete different types of data
- To move XML/CSV files containing upload data from your local system to an internal server.

There are several ways to move data and files in CPQ. See the table below to determine which help topic to open for more information.
| To move... | See... |
|---|---|
|
Data to Oracle CPQ tables, in bulk |
This document |
|
Data from Oracle CPQ tables, in bulk |
Bulk Downloads |
|
Data Tables |
Import & Export of Data Tables |
|
File Manager files, such as images, .PDFs, or XSL files |
File Manager |
|
Documents in Document Engine |
Document Migration: Document Engine |
|
Migration changes between Oracle CPQ environments |
Migration Management Overview |
General Requirements
![]() Data Types Available for Bulk Upload and Download
Data Types Available for Bulk Upload and Download
The following table shows the Data Types that can be uploaded and downloaded, and in which format.
All data that can be uploaded into the system can also be downloaded. For the XML data type, all downloaded data can be uploaded. However, only some downloaded CSV data can be uploaded.
| Data Type | XML | CSV |
|---|---|---|
|
Account/User Associations |
X | |
|
Accounts |
X | X |
|
Commerce Processes * 1 |
X | |
|
Commerce Transactions * 2 |
X | |
|
Company |
X | X |
|
Configuration Attributes |
X | X |
|
Configuration Rules |
X | |
|
Data Tables * 3 |
X | |
|
Event Logs |
X | |
|
File Manager * 3 |
X | X |
|
Library Functions |
X | |
|
Part Associations |
X | X |
|
Part Extended Descriptions |
X | X |
|
Part Pricing Rule Information |
X | |
|
Parts |
X | X |
|
Price Book Associations |
X | X |
|
Printer Friendly Document |
X | |
|
Product Definition |
X | |
|
Serial Number Associations |
X | X |
|
Serial Numbers |
X | X |
|
Text Administration |
X | |
|
Translations * 4 |
X | |
|
User Login History * 5 |
X | |
|
User * 6 |
X | X |
Notes:
-
The Commerce Process can also be obtained from the Process Definition Deployment center, by using "Import Process".
-
Commerce Transactions cannot be added or deleted, so the <action> tag can only be update, and the
<action_var_name>tag must be populated with this valid action. -
Downloading Data Tables and File Manager is useful if you want to download all Data Tables or all File Manager files in a single ZIP file. However, specific tools, besides Bulk Upload and Download, are used to manage Data Tables and File Manager. See Import and Export Data Tables and File Manager for more information.
If a data table with a secure column is exported or downloaded using a bulk download, then the same content is uploaded using import or a bulk upload, values are double encoded, changing their value.
-
See Localization for more translation-related information.
-
For the User Login History bulk download, the User Login is the user being logged into directly or the target user being proxy logged into. The Proxy Login is the user that performed the proxy login to that specific user, if they are not logged in directly.
-
Users cannot be deleted. Instead, change a user's status to Inactive.
![]() Transferring the Product Family Data Type
Transferring the Product Family Data Type
The following data types require that a Product Family be specified in order to be transferred between sites, such as through migration or bulk download/upload:
- Catalog Data (requires Product Family)
- Configuration Data (requires Product Family)
-
Migrate the Product Definition first, because it contains the information of what Product Family has been defined.
- This will add the reference of the Product Family to the site.
- If the Product Family already exists on the site, then you can see the categories that are listed.
- Manually add the Product Family under Catalog Definition.
- Continue migrating the Product Line.
- Migrate the Catalog.
- Migrate Configuration data.
- Migrate Attributes.
- Migrate Rules.
Data with the same Natural Keys as pre-existing data in the table is considered a duplicate record. For more information, see the topic Natural Keys and Data Table Imports.
- During a CSV Upload, changes occur row by row; it is not a batch upload process. Because of this, duplicate records are updated with the record information in the CSV file.
- During an XML Upload, duplicate records are deleted from the database and replaced with the new records in the XML file.
Administration
Creating Bulk Upload Files
The easiest way to create a file for bulk upload is to download a file for the same data type, and then use that downloaded file as a template. Just add your data to the template to create the upload file.
![]() Creating CSV Bulk Upload Files
Creating CSV Bulk Upload Files
-
Using a downloaded file as a template, create a CSV file containing the records you want to change.
We recommend that you create a different file for each data type.
Upload of Multi-byte characters is not supported for CSV.
Notes:
- All values, including leading and trailing spaces, are trimmed by the system.
- The default value for all fields with a specified value is an empty string.
-
In the Action column, for each row of data, enter an Action type from the table below.
Action Requirements Description add
All tags downloaded can be used to add new data. Example: <action>add</action>Will add a new row/record if one does not already exist. If one does exist, an error will be thrown. modify
All tags downloaded can be used to add or modify data.
Example:
<action>modify</action>Modify will create a new part or row record if it's not found. If the part/row is found, modify will update the data. delete
All tags downloaded can be used to delete data.
Example:
<action>delete</action>Will delete all the column data from a row/record. delete_all
All tags downloaded can be used to delete all of the data.
Example:
<action>delete all</action>Will delete all row and column data. delete_by_criteria
Only available for mass delete of parts based on custom field value. update
All tags downloaded can be used to update data.
Example:
<action>update</action>Update will fail if the row/record is not found. If the record is found, it will modify all the column data in the row. -
If you are uploading File Manager files, create an \IMG directory and place all .PDF, .PNG, or .JPG files in that directory.
Image files must have .PDF, .PNG, or .JPG extensions. Most file types are supported for non-image file attachments. -
Zip each individual CSV file and ZIP the \IMG directory.
ZIP file names can only contain the characters (0-9, a-z, A-Z or _).
![]() Creating XML Bulk Upload Files
Creating XML Bulk Upload Files
-
Using a downloaded file as a template, create an XML file containing the records you want to change.
- We recommend that you create a different file for each data type.
- All values, including leading and trailing spaces, are trimmed by the system.The default value for all fields with a specified value is an empty string.
-
In the Action column, for each row of data, enter an Action type from the table below.
Upload Category Category Name Add Update* Modify Delete Delete All Account/User Associations
bm_crm_user_assoc
X X X X X Accounts
bm_crm
X X X X X Catalog Data
CATALOG
X X X Commerce Processes
bm_cm_version
X X X Commerce Transaction
bm_cm_bs_data
X Company
bm_company
X X X Configuration Attributes
bm_config_att
X X X X Configuration Data
CONFIGURATION
X X X Configuration Rules
bm_config_rules
X X X X Data Tables
bm_script_data
X X X X X File Manager
bm_shared_file
X X X X X Library Functions
LIBRARY
X X X Models
model
X X X X X Part Extended Description
bm_part_extended
X X X Parts
bm_part
X X X X X Parts Associations
bm_parts_associations
X X X Price Book Associations
price_book_variable_name
X X X X Printer Friendly Document
DOCENGINE
X X X Product Definition
PRODUCTFAMILY
X X X Product Lines
product_line
X X X X X Serial Number Associations
bm_part_in_sn
X X X Serial Numbers
bm_serial_number
X X X X X Text Administration
bm_itn_override
X X X User Accounts
bm_user
X X X *An Update action pertains to records that already exist.
-
Confirm that the XML file has the required tags.
- XML Required Tags change every release.
- The easiest way to obtain a current XML template is to download an item of the same category. For more information on downloading data, see the topic Bulk Downloads.
Tag Tag Function <record_list>
Starts and ends the file. <each_record>
Defines the boundaries of a single record (for example, user record, part record, and so on.) <category>
Determines the type of data included in the record (for example, bm_customer, model, and so on.) <action>
Informs the system what to do with the record: either add, update, modify, delete, or delete all. -
If you are uploading File Manager files, create an \IMG directory and place all the files in that directory.
Image files must have .PDF, .PNG, or .JPG extensions. Most file types are supported for non-image file attachments. -
ZIP each individual XML file and ZIP the \IMG directory.
- The site version must be included in the tag <site_version>. You can download XML from a site of one version and upload it to a site of the same major version.
- For example, if you are on 2014 R2 Update 2, (2014.2.2) you must specify the version to be at least 2014.2.X. Specifying the version as 2014.1.X will cause an error.
![]() Required Structure for Single XML Record
Required Structure for Single XML Record
<record_list>
  <each_record>
    <category>[category name]</category>
    <action>[action name]</action>
    <... category specific tags ...>
    <![CDATA[ etc. etc. etc. ]]>
    </ ...>
  </each_record>
</record_list>
![]() Required XML for a Line Action
Required XML for a Line Action
<each_record>
  <category>bm_cm_bs_data</>
  <action>update</>
  <id> <![CDATA[ 9831574]]></>
  <data_xml>
    <document
      document_var_name="quote"
      data_type="0">
      <sub_document>
        <document
          document_number="3">
          <_price_quantity><![CDATA[ 10 ]]></>
          <applicationcomments_quoteline>test -Another2</>
        </>
      </>
    </>
  </>
  <action_data>
    <action_var_name>update_quoteline</>
  </>
</>
<each_record>
  <category>bm_cm_bs_data</>
  <action>update</>
  <id>20134654</>
  <data_xml>
    <document document_var_name="order1">
  </>
</>
  <action_data>
    <action_var_name>accept_order</>
  </>
</>
Uploading Files
![]() Uploading Data Files Using the User Interface
Uploading Data Files Using the User Interface
- Navigate to the Admin Home page.
-
Click - Upload under Bulk Data Services in the Utilities section.
-
Click Choose File.
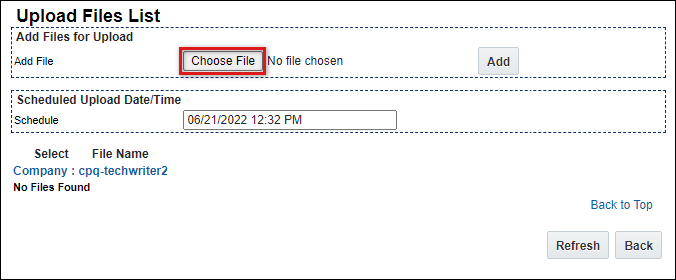
-
Navigate to and select the ZIP file you wish to upload, and then click Open.
XML files must be uploaded using FTP. For more information, see the section Uploading Data Using FTP. -
Click Add, on the Upload Files List page.
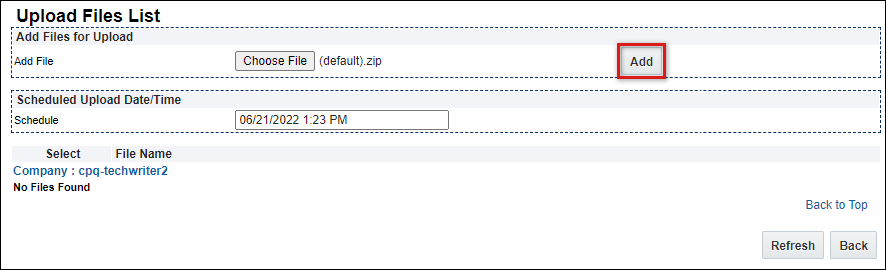
- If desired, repeat Steps 3 - 5 to add additional ZIP files.
- If desired, modify the date and time in
mm/dd/yyyy hh:mmformat in the Schedule field. -
Select the applicable file(s), and then click Upload.
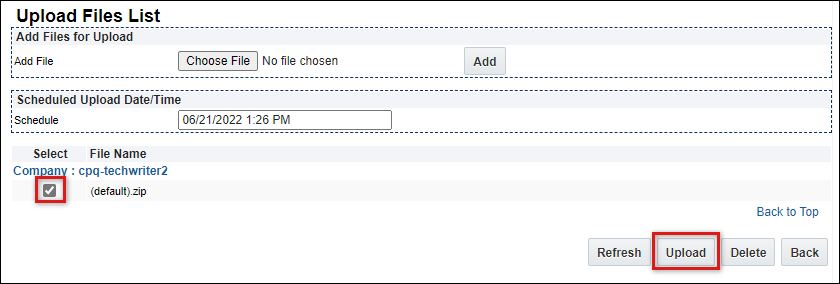
-
Monitor the uploaded task on the Upload Status page; the status is listed in the Status column.
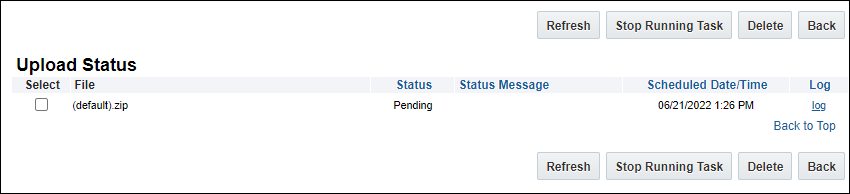
The task displays Pending until the upload begins. Finished uploads display either Completed or Failed.
After the bulk upload process finishes, a bulk upload error log is generated containing a summary of the upload process, including a list of error messages. View the error log by clicking log in the Log column for the file record you are interested in.
The Application Administrator receives an email notice when an upload process completes. The automatically generated email contains a summary of the upload, including number of records successfully uploaded and the number of failures.
Detailed errors only appear in the bulk upload error log.
Use FTP (File Transfer Protocol) to upload files without using the Oracle CPQ User Interface. FTP uploads are available for both .CSV and XML files. For more information on FTP, see the topic FTP Automation.
-
Create an XML file that starts with the "
upload_list" prefix.For example,
upload_list1.xml,upload_list2.xml, orupload_listA.xml
- In the XML file, list all the .ZIP files that will be uploaded, in the order that you want them to be uploaded.
-
The upload list XML file should fill in the
<file>nodes with the name of the .ZIP files to be uploaded.In this example, the only .ZIP file being uploaded is CustomerAddress.ZIP.
Sample Format
<?xml version="1.0" encoding="UTF-8"?>
<files>
  <file>
    <name>CustomerAddress.zip</name>
    <type>DATA_TABLES_CSV</type>
  </file>
  <file>
    <name>CustomerAddress_Deploy.zip</name>
    <type>REGULAR</type>
  </file>
</files>
- Organize any referenced attachment files into a folder called IMG, and put that folder into the same directory as the XML file.
-
Zip the attachments into a single .ZIP file.
The file name can only contain the characters (0-9, a-z, A-Z or _).
The file must not contain any path names.
- If you have not done so already, open a ticket for Ops to create an FTP profile for you and an automated folder (one that pulls files regularly, on a timer) on the FTP server.
Inform Ops of your application URL and company/client name.
- Copy the ZIP files to the FTP location supplied by Ops.
-
Copy the
upload_list.xmlfile last.Once this file has been copied, it will execute and upload the ZIP files in the order they are listed.
If you need to upload the files at a specific time, use Middleware or something similar to schedule the push of the files to the FTP location.
-
Monitor the uploaded task on the Upload Status page; the status is listed in the Status column.
The task displays Pending until the upload begins. Finished uploads display either Completed or Failed.
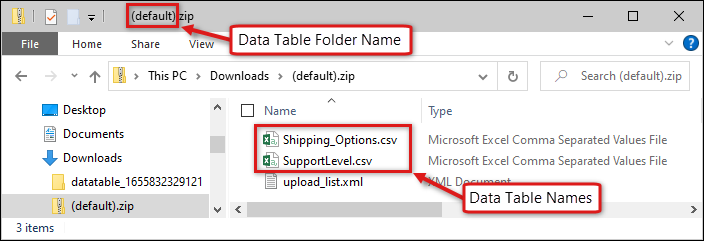
![]() Bulk Uploading of CSV Data Tables
Bulk Uploading of CSV Data Tables
Oracle CPQ requires some way to determine which bulk upload .ZIP files should go to. This is determined by a file called upload_list.xml.
Create a file called upload_list.xml.
<type>DATA_TABLES_CSV</type>is the type for CSV Data Tables only.-
<type>REGULAR</type>is used for all other bulk uploads.- For other data that is being uploaded (which could be any other category that is under the Bulk Download/Upload within the XML format), define the type to be REGULAR, or not define a type at all.
- If no type is defined, Oracle CPQ assumes that the type is REGULAR and that an XML file is in the .zip file.
Bulk Uploading of Data Tables is more convenient that using the Import/Export functionality because, with Import/Export through the UI, you can only do one table at a time. With Bulk Uploads, you can include multiple zipped Data Table CSV files within upload_list.xml.
This is typical for weekly updates to Data Table information or daily updates to Data Tables. This allows you to easily bulk update Data Tables.
You can view the status of all upload tasks scheduled during the previous week.
- Successful uploads with Completed in the Status column are removed from the Upload Status page every 7 days.
- Upload tasks with any status other than Completed are not removed from the Upload Status page.
- Navigate to the Admin Home page.
-
Click the (Status)link next to Upload under Bulk Data Services in the Utilities section.
The Upload Files List page opens.Using this page, you can:
- Click Refresh to update the data on the page.
-
Sort the details based on Status, Status Message, Scheduled Date/Time, and Log.
Click the appropriate heading to sort the details in the order you want to view them in.
-
View error logs for a file by clicking log in the Log column for that row.
This displays a new window with all the log entries for the errors and warnings resulting from the upload process selected.
To stop a currently running upload, check the check box for the upload filename you want to stop, and click Stop Running Task. Uploads with a status of Running can be stopped.
-
Remove listings for old uploads by selecting the files to be deleted and clicking Delete. Uploads with a status of Pending or Completed can be deleted from the Upload Status page.
To prevent an upload from happening in the future, check the check box for the upload filename you want to cancel, and click Delete.
| Status | Description |
|---|---|
|
Pending |
Pending uploads are awaiting scheduling. As soon as a file is scheduled for upload, the uploaded (via FTP) Zip file is automatically deleted from the system. |
|
Loaded |
Loaded uploads means the file is in the queue. Only one upload process can run at a time, so when multiple uploads are scheduled, the system loads them into a queue and then processes each upload file one at a time. |
|
Running |
Running indicates that the file is being uploaded. This status can only display for a single upload file at a time because only one upload process can happen at a time. |
|
Completed |
Uploads showing a completed status have finished. You can view the error logs corresponding to completed uploads to verify the success of each upload process. |
|
Failed |
This status indicates that either the user stopped the upload process or a system error occurred. When a user stops an upload that is currently running, the data uploaded up until that point is not backed out of the system. |
- If an upload fails, retry the process. If you cannot get an upload to succeed, contact an implementation engineer.
- If you want to wait for an upload process to complete, click Refresh to refresh the content of the Upload Status page.
- Data already uploaded into the system is not saved when an upload process is stopped. It will not be added to the database.
- To add the data, re-run the upload process.
Examples
You can delete multiple parts by XML upload based on Parts Field Values. Use the delete_by_criteria action in the upload XML to specify the criteria for which the parts must be deleted.
The criteria is defined by specifying the part field, the value of the field, and the comparator with which the comparison should be made. When the criteria is satisfied, the part is deleted.
![]() Parts Fields Available for Use
Parts Fields Available for Use
- Part Number
- Direct Buy
- Description
- Units
- Lead Time
- All deployed part custom fields (except multi-select menu types)
- =
- LIKE
- <
- >
- >=
- <=
- <>
![]() Sample XML: delete_by_criteria Action
Sample XML: delete_by_criteria Action
<!-- Specify Action Name -->
<action>delete_by_criteria</action>
<!-- Specify Criteria -->
<criteria>
  <!-- Specify Field Name, Value and comparator.  In this example, delete all parts where _part_custom_field2 = test  -->
  <field>_part_custom_field2</field>
  <value>test</value>
  <comparator>=</comparator>
</criteria>
<!-- Specify Action Name -->
<action>delete_by_criteria</action>
<!-- Specify Criteria -->
<criteria>
  <!-- Specify Field Name, Value and comparator.  In this example, delete all parts where part number contains "abc"  -->
  <field>part_number</field>
  <value>%abc%</value>
  <comparator>LIKE</comparator>
</criteria>
- The Like comparator can only be used for string type fields.
- To use this comparator, specify the wildcard "%" or "_" in the value.
- Example: The above script will delete all parts that have abc in the Part Number field.
![]() Deleting Parts with Multiple Criteria
Deleting Parts with Multiple Criteria
Multiple criteria can be declared within each_record tag. The criteria will have an implicit AND between them.
To achieve a criterion's OR, use multiple each_record tags and specify the OR criteria in different each_record tags.
Example: You want to delete all parts where _part_custom_field2 = "Domestic" and lead_time > 5. Upload an XML file where the delete_by_criteria action allows the user to specify the two criteria for which the parts must be deleted.
![]() Sample XML: Deleting Parts by Multiple Criteria
Sample XML: Deleting Parts by Multiple Criteria
<!-- Upload XML to delete Parts when the lead time is greater than 5 AND _part_custom_field2 = "Domestic"--><?xml version="1.0" encoding="UTF-8"?>
<record_list>
  <!-- Provide appropriate site version -->
  <site_version><![CDATA[9.2]]></site_version>
  <each_record>
    <category>bm_part</category>
    <action>delete_by_criteria</action>
    <criteria>
      <field>lead_time</field>
      <value>5</value>
      <!-- All comparators with the exception of "=" and "LIKE" must be wrapped in CDATA tags  -->
      <comparator><![CDATA[ >]]></comparator>
    </criteria>
    <criteria>
      <field>_part_custom_field2</field>
      <value>Domestic</value>
      <comparator>=</comparator>
    </criteria>
  </each_record>
</record_list>
Troubleshooting
After the bulk upload process finishes, a bulk upload error log is generated containing a summary of the upload process, including a list of error messages. Application Administrators also receive email notice when an upload process occurs. The automatically generated email contains a summary of the upload, including number of records successfully uploaded and number of failures.
Detailed errors only appear in the bulk upload error log.
| Cases | Add | Update |
|---|---|---|
|
column missing |
default value | leave value unchanged |
|
blank cell (in Excel) |
default value | leave value unchanged |
|
$EMPTY$ |
treat as blank value (no data) | treat as blank (no data) |
|
required fields validation |
throw error | ignore if value available in database |
|
IGNORE action |
ignores an entire row of data | ignores an entire row of data |
- Error messages in a Parts/Price Book export sometimes refer to a record number. If you are viewing the CSV of the list being uploaded, subtract the top three rows from this number, and the number will point straight to the offending record.
- You can also delete the top three rows in Excel, so that the row count matches the error in CPQ.
- To upload a blank field (that is, one without data) in CSV: $EMPTY$
- File size is limited to 10 MB.
The Upload error log reports errors that occur during the bulk upload process. The upload error log header contains the number of items uploaded successfully, the number of items that experienced some type of failure, and the time it took for the upload process to complete. Specific errors appear below the log header.
Error messages are severe in that they prevent specific records from being uploaded. When errors occur, the log file reports the failed record's data and a reason for the error.
Warning messages display below the list of error messages. The difference between a warning message and an error message is its severity. Warnings call out minor errors that do not prevent an item from being uploaded.
Example: If a part references an image file that is not included in the ZIP file, the part will be uploaded, but the image will not be associated with it.
Similar to error messages, warning messages contain information to help you pinpoint the problem, such as the line number of the record containing the warning, the cause of the warning, and a suggested solution.
![]() How do I correct a problem reported in an upload error log?
How do I correct a problem reported in an upload error log?
You can correct error log warnings and errors in several ways:
- If the errors are due to a problem in the XML file, then the XML file can be corrected, re-zipped, and re-uploaded via FTP.
- When the error is due to an image file, then the image file can be re-zipped (with an XML file), and re-uploaded.
-
Use the Oracle CPQ system's administration area to manually correct warnings and errors.
The method you choose to correct error log problems should take into consideration the number of problems that need to be fixed. If many problems need to be fixed, then manually entering the information could be a time consuming process. In such cases, it is often quicker to fix the errors directly in the XML files and then re-upload everything.
![]() Why are so many errors logged?
Why are so many errors logged?
The error log is there to help in debugging problems. Every time an "illegal" input is applied to a field, the error is caught by a lower level of the Oracle CPQ software and propagated up to the surface before it is displayed to the user.
Example: if a user were to enter the string "Two" where a number was expected, an error would be caught on the server side and an error would be passed back along with the stack trace, the nested calls to lines of code within the server-side of CPQ.
This is all very complex and meant to be kept transparent. The end result of this is an error message to be displayed towards the top of the window. This is mirrored, along with the stack trace, in the error log. Fore example,
"Encountered " ")" ") "" at line 1, column 81. Was expecting one of:
<NUMBER> ...
<STRING> ..."
If a user were to use trial and error, and enter "Two", then "two", then "TWO", then "2", 3 errors with stack traces would be produced, adding up to possibly 500 lines in the error log.
Notes
- With User Interface upload, only one file (a document with sub-documents) can be processed at a time.
-
The delimiter for CSV data is a comma.
-
The system validates all Commerce and Asset Management data generated through the XML upload, or XML Integration, process.
Each field must contain the data type the system expects.
Use the download process to generate upload templates for each type of data. See the topic Bulk Downloads for more information. -
A single XML/CSV file can contain any combination of data categories, if it is well-formatted.
For example, you can upload new pricing information for parts and new pricing rules for models at the same time. Or you can add new user accounts and CRM customer records in the same XML file.
Each individual category will be defined within each record in the XML, meaning:
<each_record> <category>bm_cm_bs_data/category> <action>update</action>
... Other XML ...
</each_record>
<each_record>
<category>bm_part</category>
<action>update</action>... Other XML ...
</each_record>
<each_record>
<category>bm_crm</category>
<action>modify</action>... Other XML ...
</each_record>
-
There is no limit to the number of records you can upload at the same time.
The more records included in an upload file, the longer it takes for the process to complete. However, individual records are visible on the system as soon as they are uploaded.
- If you use the Delete action and provide only the folder name, then the system checks for the folder name and deletes the folder (with all files in it).
- If you use the Delete action for the [Default] folder, then all the files inside this folder are deleted but the [Default] folder is not deleted.
- If you use the Delete action with the specific folder name and file name, then only that file is deleted from the specific location.
-
If you want to delete multiple files in a folder (and not the folder), use multiple delete actions.
To use the Delete action for a File Manager Bulk Upload process, you must have either the file name or the folder name. A Delete action does not work if you only use tags as a description.


