Rate Plans and Rate Plan Charges
Overview
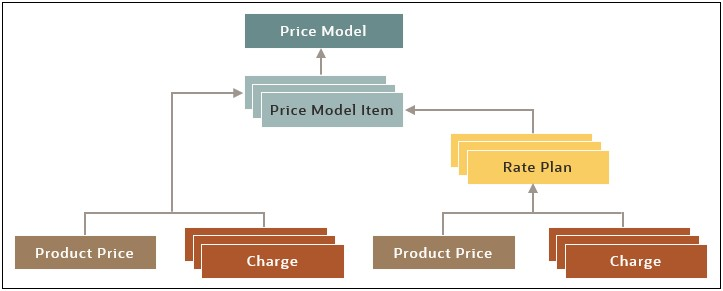
CPQ provides support for the Rate Plan business object to define groups of charges that can be optionally applied to the pricing for a subscription product (e.g. Monthly vs. Quarterly Subscription Plan). Rate Plans provide an alternative to non-Rate Plan charges and product prices. Rate Plans can be defined using either the Pricing Portal or Product Workbench. A Rate Plan is a collection of charges for a product that is added as Price Model Items within a CPQ Pricing Engine Price Model. A Price Model Item can have zero to many Rate Plans, or zero to one product price and zero to many non-Rate Plan stand-alone charges. A Rate Plan can also have zero to one product price and zero to many charges. If a product has more than one Rate Plan, one of the Rate Plans is designated as the default Rate Plan.
Rate Plans are also available in the Product Workbench (aka Product Launch) for Oracle Sales integrated customers. Product managers can now define, select, and apply Rate Plans for subscription-based products that are linked to CPQ Pricing Engine Price Models.
When pricing is invoked, CPQ Pricing will calculate prices using the requested Rate Plan. When no Rate Plan is requested by a sales user, pricing applies the default Rate Plan if defined, or any stand-alone non-Rate Plan charges and product prices.
The pricing output will include the applied Rate Plan and other available Rate Plans, if applicable.

Applying Rate Plans
Rate Plans provide a way for vendors to provide pricing-related options to their customers. For example, the same product (or quote line) can be sold either with a one time sale price, OR the customer could elect to pay for it via a recurring charge per month for 3 years (i.e. with subscription billing). Rate Plans are setup in both CPQ Pricing Engine/Portal and Oracle Subscriptions Management then are available for selection by sales representatives or self-service users using CPQ quoting.
During the CPQ quoting or ordering process, a default Rate Plan is applied initially on the quote line (the 'Applied Rate Plan'), and the user is presented with listings of the Rate Plans available for their selection (the ‘Available Rate Plans’ and 'Requested Rate Plans'). When the user selects a Rate Plan from the Requested Rate Plan drop-down on the Line Item Grid, it is captured in the UI as the 'Requested Rate Plan'', but the line is NOT repriced until a SAVE action occurs. At that point the pricing on the quote line will reflect the selected Requested Rate Plan as the Applied Rate Plan.
-
User adds
product to the quote
|
-
Product is
priced
-
Quote line is added
|
Product is shown in LIG with the
default Applied Rate Plan
|
Pay One Time
|
Pay One Time
Pay As You Go
|
Pay One Time
Pay As You Go
|
-
User Selects a
different Rate Plan ‘Pay Over Time’ from Requested Rate Plans
|
|
UI displays the user’s selections
|
Pay One Time
|
Pay One Time
Pay As You Go
|
Pay As You Go (selected)
Pay One Time
|
-
User SAVES
transaction
|
-
Write Selected
Available Rate Plan to the Requested Rate Plan
-
Newly selected
Rate Plan is priced
|
(at completion)
UI displays the pricing for the
new, selected Rate Plan
|
Pay As You Go
|
Pay One Time
Pay As You Go
|
Pay As You Go (selected)
Pay One Time
|
Rate Plan Administration
Rate Plans are available in the Product Workbench (aka Product Launch), allowing product managers to define, select, and apply Rate Plans for subscription-based products that are linked to CPQ Pricing Engine Price Models. When pricing is invoked, CPQ Pricing will calculate prices using the requested Rate Plan. When no Rate Plan is requested by a sales user, pricing applies the default Rate Plan if defined, or any stand-alone non-Rate Plan charges and product prices. The pricing output will include the applied Rate Plan and other available Rate Plans, if applicable.
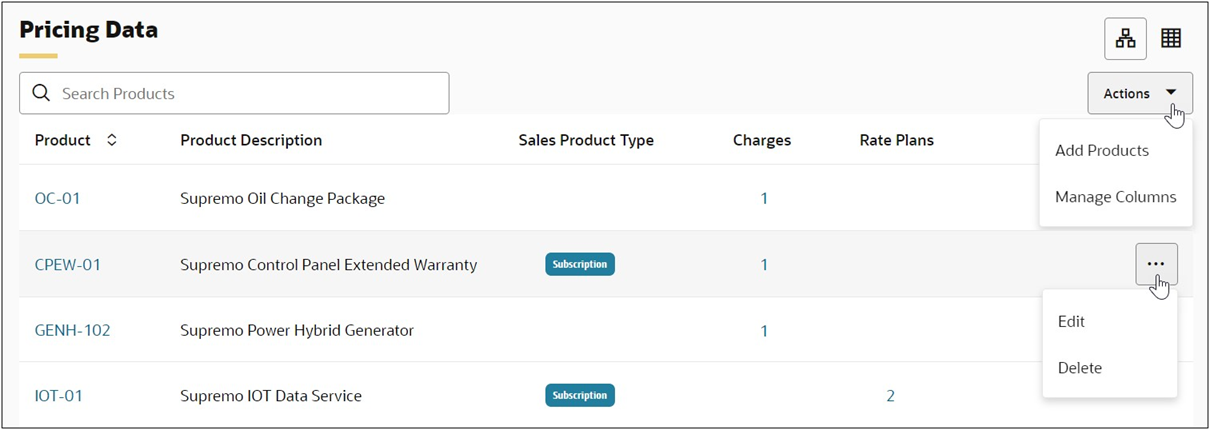
Similar to non-Rate Plan stand-alone charges, the Rate Plans will reside in the Pricing Data section of the applicable Price Model. The default structured view for the Price Model Pricing Data provides easy access to manage product Price Model Items.
 View Rate Plans
Pricing administrators can perform the following tasks within the structured view:
- Click on the table view icon to view.
- Enter search criteria to filter the products for which prices have been defined.
- Manage columns and add new product Price Model Items.
- Edit or delete existing Price Model Items.
- Quickly access related charges or Rate Plans.

 Create and Manage Rate Plans
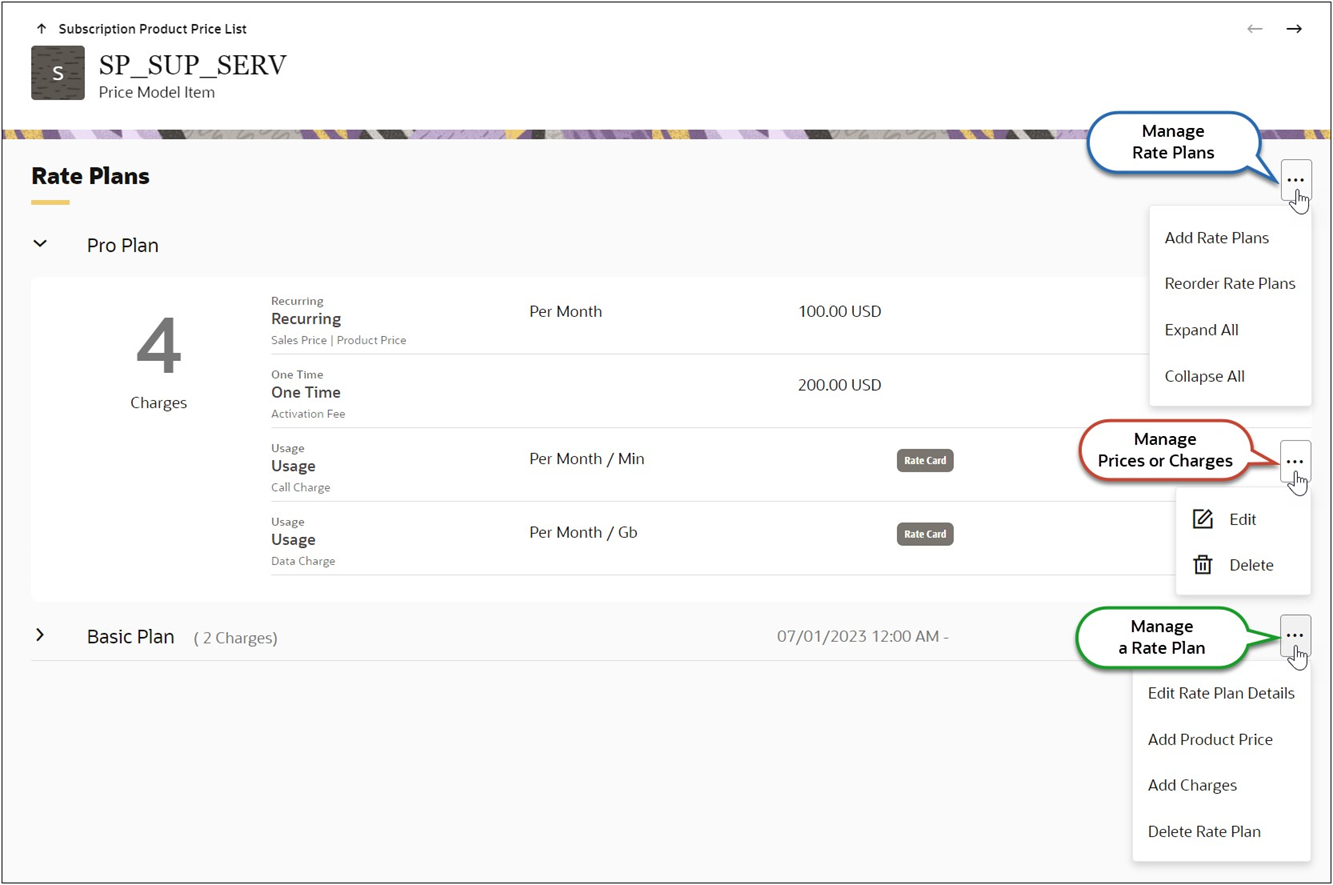
When a pricing administrator edits a new subscription type product, they can add a product price, add charges (i.e. non-Rate Plan stand-alone charges), or add a Rate Plan.

After creating a Rate Plan, pricing administrators can perform the following:
- Add Rate Plans, Expand or Collapse All Rate Plans.
- Reorder Rate Plans to define the default Plan to apply (the first) and the sequence in which the Plans will display in a drop-down menu.
- Edit or Delete existing product prices or charges.
- Edit Rate Plan Details, Add a Product Price or Add Charges to an existing Rate Plan, or Delete Rate Plan.

Administration
 Add a Rate Plan in CPQ Pricing
Complete the following steps to create a Rate Plan to a product.
-
Navigate to CPQ Admin > Pricing Portal > Price Models or Price Agreements.
- Select the applicable Price Model or Price Agreement.
-
Click on the applicable product.
If the desired product is not listed, refer to Add a Product for instructions.
-
Click Add Rate Plans.
- Enter a Rate Plan Name.
- Enter a variable name in Rate Plan Number.
- (optional) Select a Start date. This effective start date value will apply to all Charges in this Rate Plan.
- (optional) Select an End date. This effective end date value will apply to all Charges in this Rate Plan.
- (optional) Enter a Description.
- Click Create.
- Proceed to Add a Charge.
 Add a Charge in CPQ Pricing
Complete the following steps to add a charge to a product.
-
Navigate to CPQ Admin > Pricing Portal > Price Models or Price Agreements.
- Select the applicable Price Model or Price Agreement.
-
Click on the applicable product.
If the desired product is not listed, refer to Add a Product for instructions.
-
Perform one of the following:
-
To add non-Rate Plan Charges, click Add Charges - OR - select Add Charges from the Actions drop-down.
-
To add Charges to a Rate Plan, click on the Rate Plan ellipsis, and then select Add Charges.
-
When enabled, select a Charge Definition.
Charge Definitions standardize charge categories and define the valid combinations of price types and charge types.
- The Price Type and Charge Type are automatically populated when using Charge Definitions.
- Charge Definitions are highly recommended for customers using charge pricing (vs. legacy product pricing) to simplify the setup of prices.
- Charge Definitions are required when CPQ pricing is integrated with Oracle Fusion Pricing.
- For more information, refer to Charge Definitions.
-
Select a Price Type to define the basis on which a price or charge is levied.
- The Price Type is automatically populated and not editable when using Charge Definitions.
- The Pricing Type lookup provides the following standard values: One time, Recurring, Usage. To add custom values, refer to Lookups.
-
Select a Charge Type to define the value that will be received by the customer for a charge price.
- The Charge Type is automatically populated and not editable when using Charge Definitions.
- The Charge Type lookup provides the following standard value: Sales Price. To add custom values (e.g. Activation Fee, Call Charge, Data Charge), refer to Lookups.
-
If applicable, select the Price Period to define the time frequency, periodicity, or recurrence with which the price is levied or charged.
- Price Periods are only applicable for Recurring and Usage Price Types.
- The Pricing Type lookup provides the following standard values: Per Month, Per Year. To add custom values (e.g. Per Week, Per Year), refer to Lookups.
-
If applicable, select or enter the Usage UOM to define the units of measures for usage quantities.
To add custom values (e.g. Per Week, Per Year), refer to Lookups.
- (optional) Choose a Start Date to set the effective start date for an individual charge.
- (optional) Choose an End Date to set the effective start date for an individual charge.
-
Select one of the following options, and perform the included steps:
 None (Static Pricing)
- Select None from the Dynamic Pricing drop-down.
- If applicable, select Additional Currencies from the drop-down.
-
Enter the unit price, discount value, or markup value for each applicable currency.
-- OR --
Complete the following to enter Block Pricing:
-
Click the Manage Columns icon and select the Block Size option.
-
Enter the Block Size value that is greater than 1.
-
Enter the Block Price value for each applicable currency.
-
Enter the Item Price value for each applicable currency.
 Volume Pricing
- Select Volume Pricing from the Dynamic Pricing drop-down.
- If applicable, select Additional Currencies from the drop-down.
- Click Add Range.
- Enter the Quantity From value.
- Enter the unit price, discount value, or markup value for each applicable currency.
-
Click Add Range.
-
Enter the Quantity From value for the new tier.
The Quantity To value for the previous tier will be populated with the same value.
-
Enter the unit price or discount value for each applicable currency.
-- OR --
Complete the following to enter Block Pricing:
-
Click the Manage Columns icon and select the Block Size option.
-
Enter the Block Size value that is greater than 1.
-
Enter the Block Price value for each applicable currency.
-
Enter the Item Price value for each applicable currency.
-
Repeat Step f - Step h to add additional tiers.
 Tier Pricing
- Select Tier Pricing from the Dynamic Pricing drop-down.
- If applicable, select Additional Currencies from the drop-down.
- Click Add Range.
- Enter the Quantity From value.
- Enter the unit price, discount value, or markup value for each applicable currency.
-
Click Add Range.
-
Enter the Quantity From value for the new tier.
The Quantity To value for the previous tier will be populated with the same value.
-
Enter the unit price, discount value, or markup value for each applicable currency.
-- OR --
Complete the following to enter Block Pricing:
-
Click the Manage Columns icon and select the Block Size option.
-
Enter the Block Size value that is greater than 1.
-
Enter the Block Price value for each applicable currency.
-
Enter the Item Price value for each applicable currency.
-
Repeat Step f - Step h to add additional tiers.
 Rate Card
- Select Rate Card from the Dynamic Pricing drop-down.
-
Select the Rate Card Name from the drop-down.
- Rate Cards are only available for Price List type Price Models.
- Rate Cards are only available for Usage Price Types.
- Price values are defined by the applicable Rate Card and can't be modified when defining a charge.
- For more information, refer to Rate Cards and Pricing Matrix Templates.
 Matrix Pricing
- Select the appropriate Pricing Matrix Template from the drop-down.
-
If additional currencies are required in the pricing matrix complete the following steps.
-
Click the Manage Columns icon.
-
Check the applicable currency items.
-
Click Apply.
-
Click the + icon to add a conditional row item.
-
Enter or select the conditional values for each column.
-
Enter the applicable pricing.
-- OR --
Complete the following to enter Block Pricing:
-
Click the Manage Columns icon and select the Block Size option.
-
Enter the Block Size value that is greater than 1.
-
Enter the Block Price value for each applicable currency.
-
Enter the Item Price value for each applicable currency.
-
Repeat Step c - Step e to add additional conditional pricing items.
-
Click Create.
Notes
Notes:
- Rate Plans are only available for subscription type products.
- When Rate Plans are used for a product you cannot have non-Rate Plan charges or product prices. The use of a Rate Plan for a product is mutually exclusive to non-Rate Plan pricing.
Related Topics
 See Also

![]() Add a Rate Plan in CPQ Pricing
Add a Rate Plan in CPQ Pricing


