Generic Integration
Overview
This integration type defines a connection to an arbitrary third party system. Once defined, system integrators can use BML to retrieve these connection details prior to making a Web Service call to that system. Refer to Commerce Integrations for additional information.
Oracle CPQ 25C introduced the following generic integrations:
-
Fusion Product Integration is used for synchronizing parts and product structures for an Oracle CPQ and Salesforce integrated site. Once the connections are established, Oracle Sales Product Information Master (SPIM) integration can be used to synchronize products and product structures. Parts and BOM synchronization can be regularly scheduled or a be a one-time synchronization event.
-
Generative AI is used to develop Generative AI (GenAI) Quote Summaries for Customer Relationship Management (CRM) integrated Oracle CPQ sites (for example, Salesforce or Microsoft Dynamics). Oracle CPQ leverages Generative AI (GenAI) to automatically generate comprehensive quote summaries. Users can then choose to use the generated quote summary when communicating with customers or internal stakeholders. The GenAI quote summaries are available for Redwood Quote UI and JET Transaction UI.
Note: Oracle Sales integrated sites do not need to create a Generic Integration to utilize Generative AI Quote Summaries.
Administration
 Set Up a Generic Integration
To create a generic integration type, complete the following steps:
- Navigate to the Integration Center.
- Click Admin to go to the Admin Home Page.
Click Integration Center in the Integration Platform section.
The Integration Center page opens.
- Click Create Integration.
- Select Generic Integration from the Type drop-down. The Generic Integration field entries display.
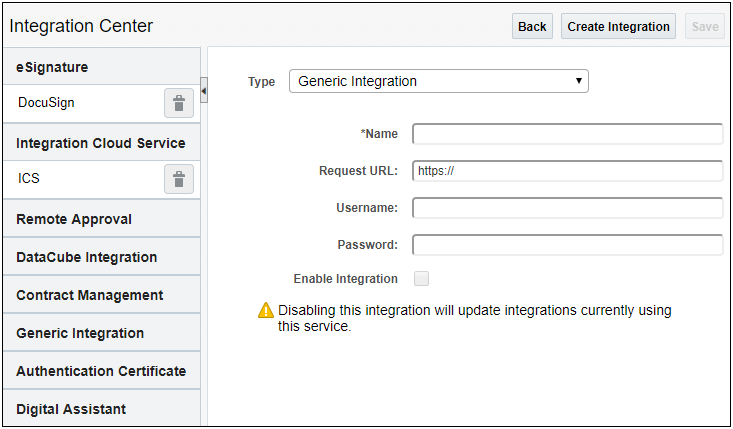
- In the Name field, enter a name that describes the integration.
- In the Request URL field, enter the URL of the third-party system.
- In the Username and Password fields, enter the login credentials for the third-party system.
- Select the Enable Integration check box to enable the integration.
- Click Save.
Once the generic integration is active, unselecting the Enable Integration checkbox disables any integrations which use it. Run-time integrations will not execute and some administrative features may not be available.
Set Up a Fusion Product Information Generic Integration for Salesforce Product Synchronization
To create a Fusion Product Information Generic integration type, complete the following steps:
- Navigate to the Integration Center.
- Click Admin to go to the Admin Home Page.
Click Integration Center in the Integration Platform section.
The Integration Center page opens.
- Click Create Integration.
- Select Generic Integration from the Type drop-down.
- Enter "Fusion Product Information" in the Name field.
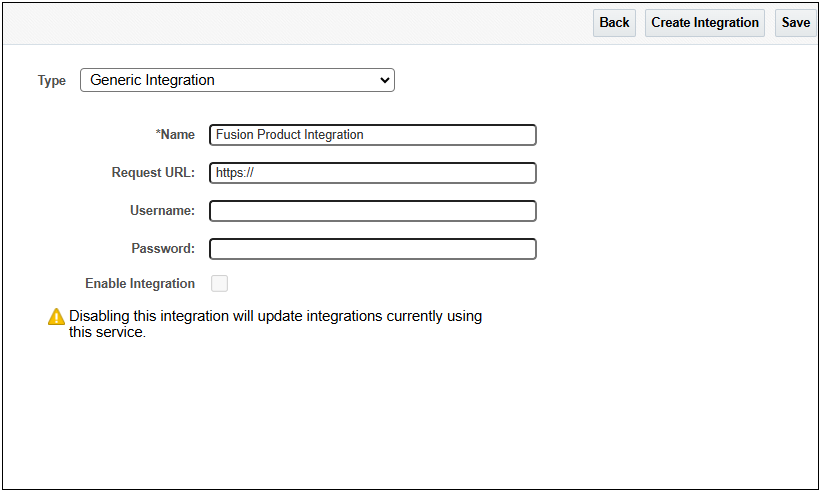
- Enter the Fusion Product Integration environment URL in the Request URL field.
- Enter the Username and Password credentials.
- Select the Enable Integration check box to enable the integration.
- Click Save.
To maintain integrity of products and product structures, we recommended that when using this integration you only export part information to Salesforce and do not import part information from Salesforce.
Once the integration is active, unselecting the Enable Integration checkbox disables any integrations which use it. Run-time integrations will not execute and some administrative features may not be available.
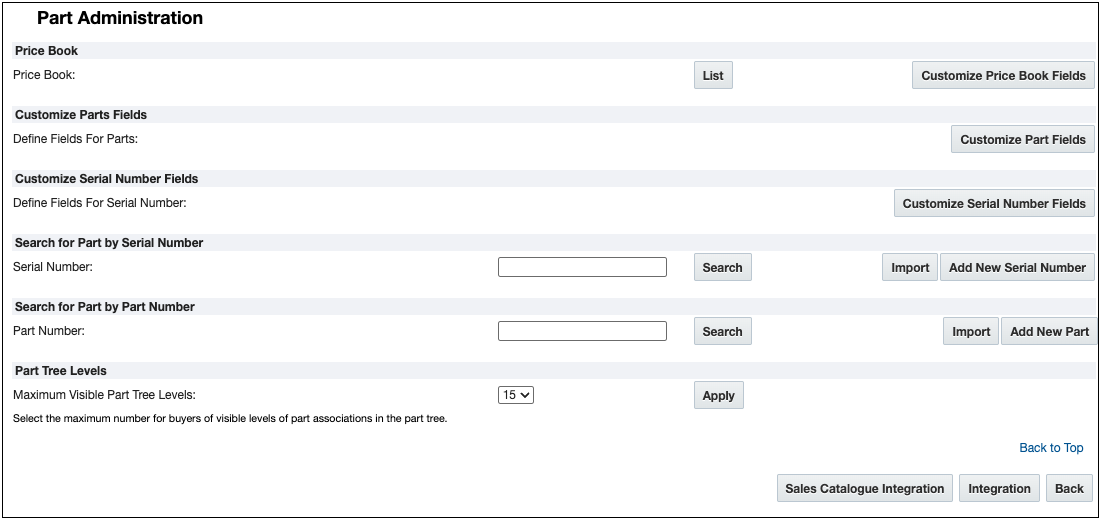
Once the Fusion Product Integration is setup, the Parts Administration page provides the available parts information and ability to veiw regularly scheduled synch or initiate a one-time synchronization event.
-
Log into Oracle CPQ as a parts administrator or as a Full Access user.
-
Navigate to the Admin Home page
-
Click Parts in the Products section. The Parts Administration page opens.
The Integration button allows you to view the Salesforce CRM product integration.
-
Click Sales Catalogue Integration to view the Part and BOM Sync Request status or to perform a One-Time Sync Request.

-
To view a sync log, click the link under Log.
-
To initiate a One Time Sync Request for Part or BOM sync, enter one of the following:
-
Part Identifier - enter a list of comma-separated part numbers
-
BOM Identifier - enter a list of comma-separated Bill Sequence IDs
-
From Date - enter the date or select the calander date for either the Part or BOM one time sync request
Notes:
-
When running the One-Time Part or BOM Sync, only specify one of the entry options. An error will occur is you provide both the Identifier and a From Date.
-
The log file name will identify if a specific run occurred as part of the recurring synchronization or it was a one-time sync triggered by a user.
-
Unlike batch synchronization, the One-Time Part or BOM Sync is NOT triggered after the One-Time Part Sync.
-
Click Run.
Set Up a Generative AI Generic Integration for Non-Oracle CRM-Integrated Sites
Target Audience
Non-Oracle Sales Cloud integrated customers
Note: Oracle Sales integrated sites do not need to create a Generic Integration to utilize Generative AI Quote Summaries.
Pre-Requisites
-
Customers must have a provisioned Oracle Fusion environment.
-
Contact My Oracle Support to enable GenAI features on the Oracle Fusion environment.
-
Set the Quote Summary Prompt:
Set Up a Generative AI Generic Integration for Non-Oracle CRM-Integrated Sites
- Navigate to the Integration Center.
- Click Admin to go to the Admin Home Page.
Click Integration Center in the Integration Platform section.
The Integration Center page opens.
- Click Create Integration.
- Select Generic Integration from the Type drop-down.
- Enter "Generative AI" in the Name field.
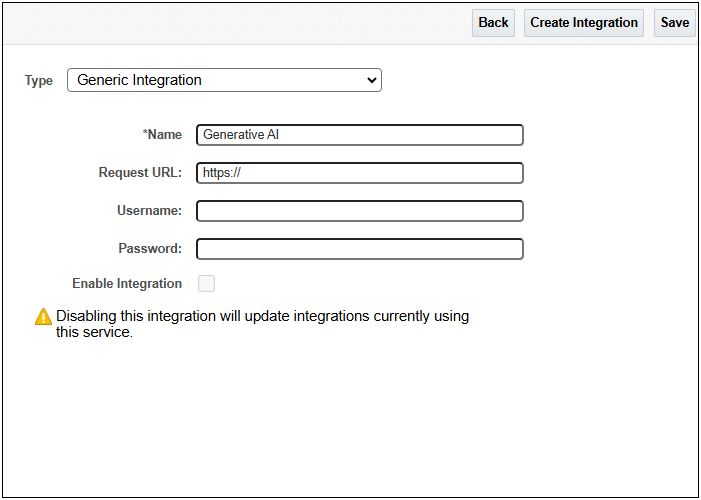
- Enter the Fusion environment URL in the Request URL field.
- Enter the Username and Password credentials.
- Select the Enable Integration check box.
- Click Save.
Once the integration is active, unselecting the Enable Integration checkbox disables any integrations which use it. Run-time integrations will not execute and some administrative features may not be available.
NOTES
After the Generic integration has been created, the details can be retrieved using BMQL and used in a BML integration to send messages to the external service. Example BMQL is provided below.
intSettings = bmql(“select username, password, requestUrl FROM integration.genericIntegration WHERE name = $intName");
For password security, do not include in thowerror message or print the password value within the BML script. Otherwise when the BML print log is enabled, the cleartext password will be visible in the bm.log.
Related Topics
See Also


