Overview
The JET Transaction UI (also known as the JET Responsive Transaction UI) provides a modernized and fully responsive user experience for viewing and editing Transactions and sales orders on any device and in any language. CPQ’s JET Transaction UI supports virtually all of the most commonly used Legacy UI features combined with full extensibility and improved usability.
Oracle CPQ is committed to making our product accessible, which includes supporting the use of assistive technology such as keyboard access, screen readers, and screen magnifiers. See Accessibility Support.
The JET Transaction UI is an option that can easily be enabled for some or all of your users. With the addition of the JET UI, Oracle CPQ customers now have the choice between three different standard interfaces for the Transaction UI all provided by Oracle: the JET Transaction UI, the Legacy Transaction UI, and the Salesforce Lightning Transaction UI.
The following image illustrates how layout elements are displayed on the user side Transaction page.
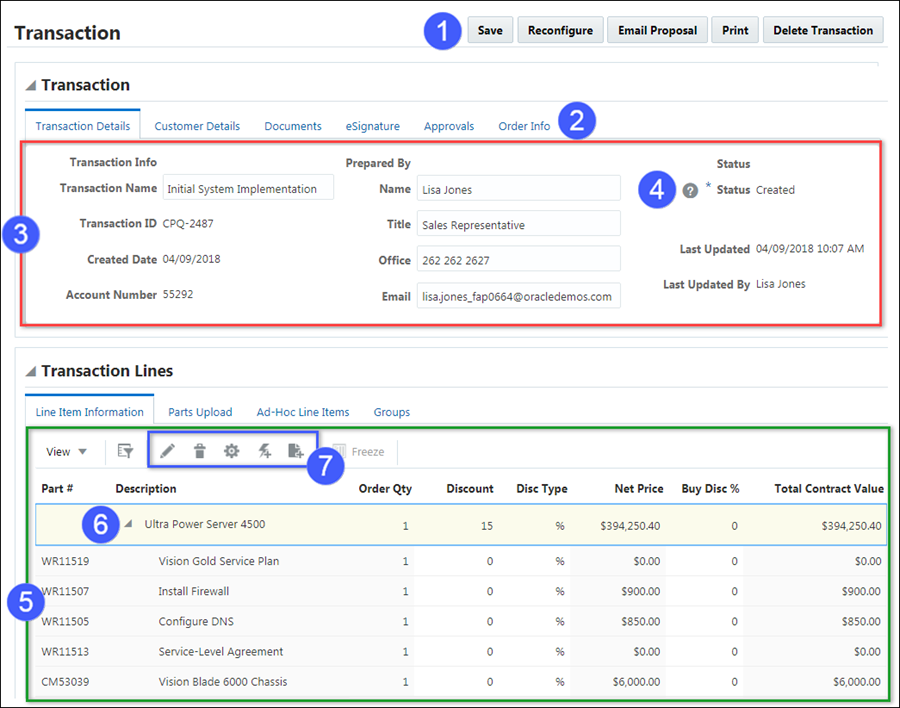
| Item | Description |
|---|---|
| 1 |
Action Bar |
| 2 |
Tabs |
| 3 |
Panel |
| 4 |
Help Icon |
| 5 |
Line Item Grid |
| 6 |
Collapse Line Items |
| 7 |
Enhanced Action Icons |
JET Transaction UI Enhancements
When customers enable the JET Responsive Layout, the new layout is generated based on the contents and layout of the Legacy Desktop Transaction. Oracle CPQ retains most of the Transaction functionality from prior releases and users gain improvements from the new JET layout components, including several Line Item Grid enhancements. Future releases will build upon the functionality of the new JET UI, prioritized based on customer feedback. Full parity of functionality is the ultimate goal of the JET Transaction UI.
![]() Action Drop-Down Menu (Oracle CPQ 18D)
Action Drop-Down Menu (Oracle CPQ 18D)
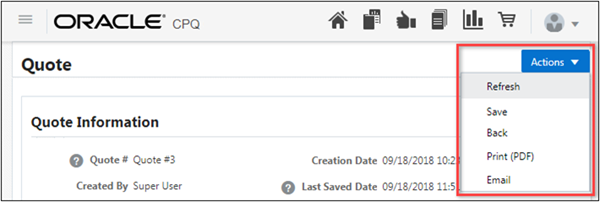
JET Transaction UI action items can be displayed as Buttons or an Action Menu. If all actions are hidden because of the user profile or access rules, the Action menu will be empty.
In the following image, actions are displayed as buttons

In the following image, actions are displayed as an actions menu.
![]() Add Favorite Products to a Transaction (Oracle CPQ 24D)
Add Favorite Products to a Transaction (Oracle CPQ 24D)
CPQ Favorites allows customers to save, share, and add favorite products to a transaction. Beginning in Oracle CPQ 24D customers can retrieve and add favorite products to a transaction using Commerce REST API endpoints for modify-type actions now support adding favorites to a transaction.
Add Favorites Example
{
  "documents": {
    "transactionLine": {
      "items": [{
          "_favorite_id": 3023140143,
          "_sequence_number": 3
        }
      ]
    }
  }
}
![]() Add Products with Fixed Structure to a Commerce Transaction (Oracle CPQ 23C)
Add Products with Fixed Structure to a Commerce Transaction (Oracle CPQ 23C)
Products with fixed structures (BOM hierarchies) can be selected and added to the quote from Quick Add, Parts Search, Multi-part search, etc. Fixed structure products are accessible via the Quick Add functionality when the following conditions are met:
- The root BOM item and does not have a model configuration defined with it. The root BOM can have a hierarchy under it in the BOM Item Definition table.
- The product is marked as Direct-buy in the parts definition.
- The BOM Item Definition ModelPath is empty for the root BOM item.
- The following BOM Item Definition values are set for the root BOM item and all its child items:
- Optional is set to 'N'
- ItemType is NOT set to 'Option Class'
The root item icon ![]() is displayed in the Quick Add drop-down for BOM root items.
is displayed in the Quick Add drop-down for BOM root items.
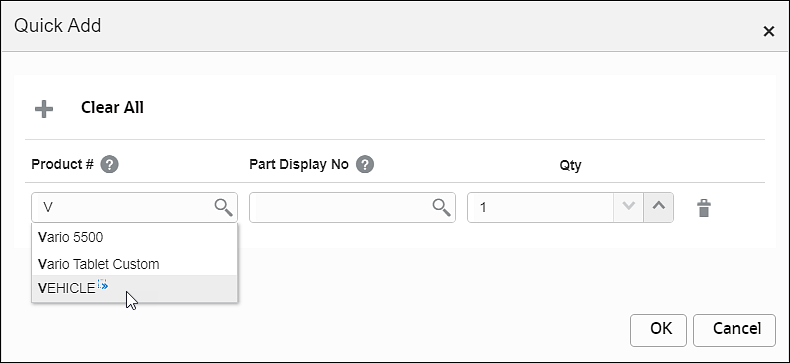
If the selected product is a root item, the associated BOM hierarchy is added to the Line Item Grid.

Notes:
- The Commerce Options > Enable Fixed Product Structure expansion on Commerce transactions option must be set to Yes to support adding products with fixed structures to a transaction. This setting is enabled by default.
- Configurable products cannot be added to a transaction when this option is enabled.
-
Administrators should redeploy the BOM Item Definition Data Table if your site has the Commerce Options > Enable Fixed Product Structure expansion on Commerce transactions option enabled, but users can't expand BOM items after adding a products with fixed structures (BOM hierarchies) to a transaction.
- Supported capability / flows for Fixed Product structures:
- Copy Line Items
- Copy to Favorite
- Add From Catalog
- Add From Favorites
- Add From Parts
- Add from Multi Parts Buy
- Import Line Item
- Add From BML
- Add from Quick Add
- Revenue Line Item Import
- Via Rest API
- Add to Shopping Cart
- Create Quote from Shopping Cart
- Non-Supported flows:
- Recommended Items
![]() Add Unconfigured Models to a Transaction (Oracle CPQ 24C)
Add Unconfigured Models to a Transaction (Oracle CPQ 24C)
Beginning in Oracle CPQ 24C, Commerce will support adding unconfigured models to a transaction. When an unconfigured model is added to a transaction, the unconfigured state icon is displayed for that item in the Line Item Grid. Sales users can select an unconfigured model and then reconfigure any unconfigured models.
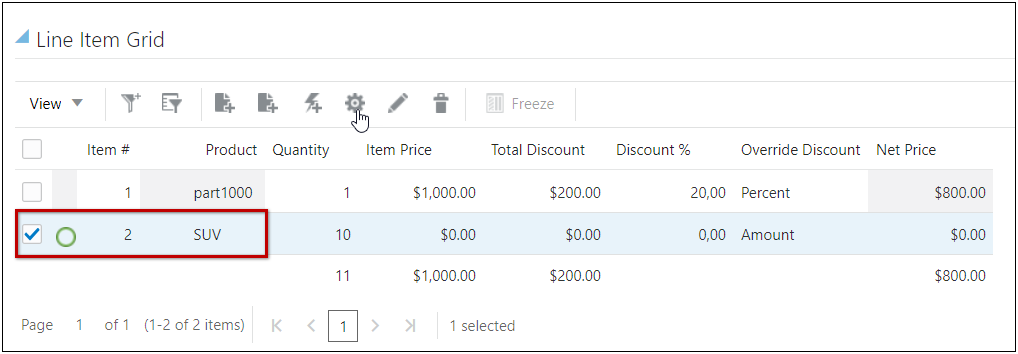
Commerce REST API endpoints for modify-type actions now support adding unconfigured models to a transaction.
Add Unconfigured Model Example
{
  "documents": {
    "transactionLine": {
      "items": [{
          "_part_number": "part1",
          "_price_quantity": "1",
          "_price_book_var_name": "_default_price_book",
          "_sequence_number": 1,
        }, {
          "_model_path": "configvisionVehicles:consumerVehicles:sUV",
          "_price_quantity": "1",
          "_sequence_number": 2,
        }
      ]
    }
  }
}
![]() Allow Table Height Control for Line Item Grid (Oracle CPQ 24B)
Allow Table Height Control for Line Item Grid (Oracle CPQ 24B)
When enabled, the Allow Table Height Control option in the Commerce Layout Editor allows sales users to define the number of rows to be visible in the Line Item Grid. When this option is enabled, sales users can specify how many line items they want to display per page. User preferences can be saved to User Personalizations.

The option is disabled by default.
![]() Applied Rate Plan Selection for Transaction Lines (Oracle CPQ 24A, updated in Oracle CPQ 25A)
Applied Rate Plan Selection for Transaction Lines (Oracle CPQ 24A, updated in Oracle CPQ 25A)
When a Rate Plan is applied to a subscription type product, CPQ Pricing will apply the associated Rate Plan charges. For a given subscription/service product, the contract start date, end date, and contracted period will be applicable to all recurring and/usage charges, and pricing roll up attributes for this line item will be calculated accordingly.
Sales users can view the applied Rate Plan data for the subscription item in the Line Item Grid. Just like stand-alone charges, sales user can view associated charges from a Rate Plan in the Charge Details drawer.

The following text type attributes are added to the sub-document price attribute set to support Rate Plans:
- Applied Rate Plan (
_price_applied_ratePlan) - Applied Rate Plan Number (
_price_applied_ratePlan_number) - Applied Rate Plan Integration ID (
_price_applied_ratePlan_integrationId)
Rate Plan Selection
Note: Beginning in Oracle CPQ 25A, the Requested Rate Plan (_requestedRatePlan) attribute replaces the Available Rate Plans (_availableRatePlans) attribute for newly created standard processes. Pre-existing Available Rate Plans attributes are changed to non-standard attributes, but they are not removed from existing standard processes upon upgrade to Oracle CPQ 25A.
Sales users can view all applicable Rate Plans and select an alternative Rate Plan. The Requested Rate Plan menu attribute (previously known as Available Rate Plans) allows sales users to see the available Rate Plans and to select the desired Rate Plan from the list. When a new Rate Plan is selected, the Applied Rate Plan value is updated.
Note: The line item is NOT repriced until a SAVE action occurs. At that point the pricing on the quote line will reflect the selected Requested Rate Plan pricing values.
When multiple Rate Plans are set up for a given subscription product on a quote sourced from the Pricing Engine, sales users can now select an alternative Rate Plan from the available list. The Line Item Grid now has an Available Rate Plan drop-down to select an alternate Rate Plan.

The Transaction Line details page also provides a Requested Rate Plan menu attribute (previously known as Available Rate Plans) drop-down to select alternate Rate Plans. When multiple Rate Plans are set up for a given subscription product, the Request Rate Plan drop-down displays the available Rate Plan items.
Refer to Available Rate Plan Array Set for more information.
![]() Available Rate Plans changed to Requested Rate Plan (Oracle CPQ 25A)
Available Rate Plans changed to Requested Rate Plan (Oracle CPQ 25A)
Note: Beginning in Oracle CPQ 25A, the Requested Rate Plan (_requestedRatePlan) attribute replaces the Available Rate Plans (_availableRatePlans) attribute for newly created standard processes. Pre-existing Available Rate Plans attributes are changed to non-standard attributes, but they are not removed from existing standard processes upon upgrade to Oracle CPQ 25A.
Refer to the following for more information:
![]() BOM Attributes for Line Item Grid (Oracle CPQ 23A)
BOM Attributes for Line Item Grid (Oracle CPQ 23A)
Oracle CPQ 23A exposes the following attributes in Commerce to display BOM-related data in the Line Item Grid:
Line BOM Name (_line_bom_name) – This is the name from the BOM Item Definition table.
Line BOM Variable Name (_line_bom_variable_name) – This is the variable name from the BOM Item Definition table.
Line Item Type (_line_item_type) – This is the item type from the BOM Item Definition table.
Line Display Name (_line_display_name) – This value contains one of the following values:
Note the first value that is populated is used for the _line_display_name value.
- DISPLAY_NAME target value from BOM Attribute mapping
- The Name from the BOM Item Definition table
- Model name
- Part display name
For example, in the following configuration the DISPLAY_NAME target value from the BOM Attribute mapping is populated, so this is the value that _line_display_name will contain.
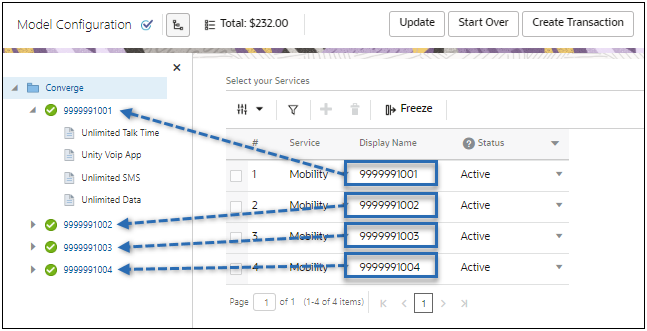
When a sales user creates a transaction from the configuration shown above, the new BOM attributes are displayed in the Line Item Grid. The new BOM-related attributes are outlined in red in the image below. The Line Display Names outlined in blue are using the DISPLAY_NAME target value from the BOM Attribute mapping. The remaining Line Display Names are populated using the Name from the BOM Item Definition table.
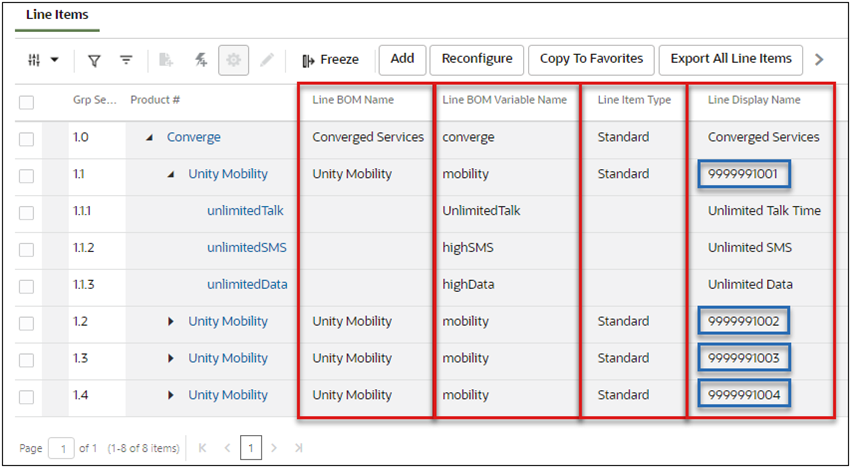
The new attributes will be added to existing Commerce processes and will be present when a new sub-document is created. These attributes are treated as system attributes and can be referenced in the same applicable areas as similar attributes.
Notes:
- The new line attributes will not be populated for lines created in versions before Oracle CPQ 23A.
- The new BOM attributes are exposed for display purposes only. If administrator makes the Line Item Grid attributes editable, changes made to Line Item Grid values will not be impact the BOM attribute values. Best practices is to make these new BOM-related attributes non-editable.
- For more information about BOM Mapping attribute relationships, refer to Oracle CPQ Administrator Online Help > Configuration > BOM Mapping > BOM Tables.
![]() Charge Definition Support for Transaction Lines (Oracle CPQ 23D)
Charge Definition Support for Transaction Lines (Oracle CPQ 23D)
When Charge Definitions are used to provide standardized charge categories for a usage-based product, this information is displayed for the applicable charges in the Charge Details drawer. Sales users can also view Charge Definition and Rate Card data on the transaction line details page.
The Transaction Line Charge Array Set allows customers to synchronize the pricing charge schema with Commerce to enable multiple charges for transaction line items. The pricing charge schema is defined by standard and extensible custom charge attributes. The Synchronize Charge Array Set action allows administrators to synchronize the Transaction Line Charge Array Set with the pricing charge schema. Refer to Charge Array Set to view all attributes.
Notes:
- To enable multiple charges for transaction line items, refer to Synchronize Charge Array Set.
- If the Transaction Line Charge Array Set doesn’t exist, it will be created when the Synchronize Charge Array Set action is invoked.
- Refer to Pricing Portal > Charge Attributes for more information about pricing charge attributes.
![]() Charge Details Support for Transaction Lines (Oracle CPQ 23C)
Charge Details Support for Transaction Lines (Oracle CPQ 23C)
CPQ supports multiple charges for Add From Catalog, Quick Add, Opportunity Import, and corresponding REST APIs. In Oracle CPQ 23C, the Standard Quote Process’s pricing rollup attributes, like Price Type (rollup), Net Price (rollup), etc. are updated to incorporate Charges in the standard calculation logic.
For example, If a given subscription product line on a quote has both product pricing and multiple charges, then the Contract Value (Net Rollup) attribute will reflect the total calculated contract price value for all the price points.
The Multi-Charge indicator is displayed in the Line Item Grid for line items with multiple charges.

Sales users can select a line item with multiple charges and click on Charge Details to view the charge breakdown. The charge panel displays the charge type, price type, unit price, price period, and discount amount for all associated charges.
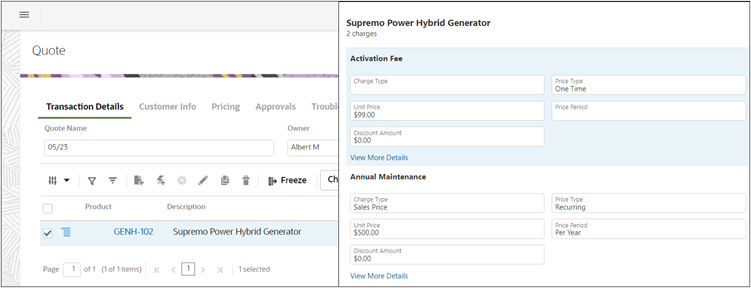
Sales users can also click View More Details to navigate to a charge’s detailed view page to modify charge item fields that are designated as negotiable in Pricing.
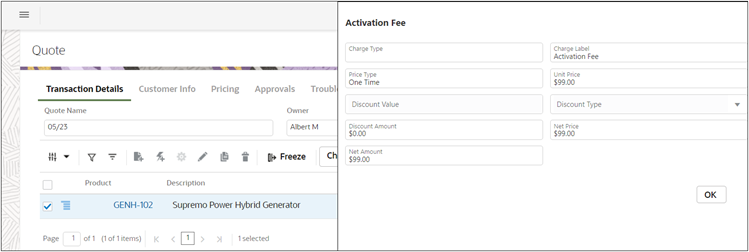
Notes:
- Refer to Charge Attributes administration information.
- To enable multiple charges for transaction line items, administrators need to Synchronize Charge Array Set. If a Transaction Line Charge Array Set doesn’t exist, it will be created when the Synchronize Charge Array Set action is invoked.
- Charge Amount calculations apply their parent line's quantity as they do not have their own quantity.
- CPQ supports usage of charge set attributes in Document Designer documents and Workflow Steps.
- The Commerce Standard Process supports multiple charges for transaction line items.
![]() Collapse All By Default Option for Line Item Grid (Oracle CPQ 24B)
Collapse All By Default Option for Line Item Grid (Oracle CPQ 24B)
The Collapse All By Default option in the Commerce Layout Editor allows administrators to set default collapsed or expanded behavior for hierarchical products in the Line Item Grid. The option is disabled by default.
When Collapse All By Default is disabled, sales users can:
-
Use the Collapse All menu item to collapse all models / product hierarchies, or
-
Click on an individual Collapse icon to collapse the selected item.
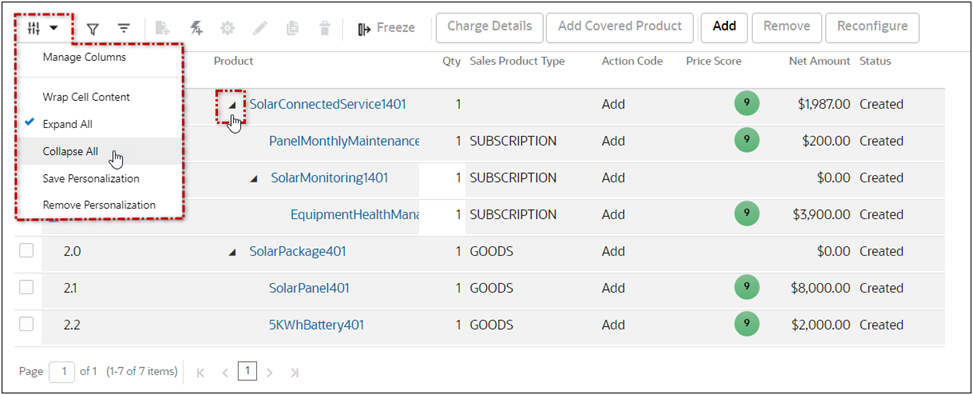
When Collapse All By Default is enabled, sales users can:
-
Use the Expand All menu item to expand all models / product hierarchies, or
-
Click on an individual Expand icon to view all items within the selected model / product hierarchy.

![]() Commerce Stage Badge (Oracle CPQ 25A)
Commerce Stage Badge (Oracle CPQ 25A)
Beginning in Oracle CPQ 25A a stage badge is displayed on the transaction UI for transactions in the Quote and Agreement stages. When stages are enabled, the stage badge is displayed for both legacy and standard processes. A badge is not displayed for transactions in the "Quote" stage. The new stage badge quickly identifies subsets of transactions that are in the agreement or ordering phase of the transaction lifecycle.
The following image shows the badge display for Quote, Order, and Agreement stages.

Refer to Commerce Layout Editor: Layout Settings to enable the stage badge.
![]() Display Status Dialog for In Progress Actions (Oracle CPQ 24D)
Display Status Dialog for In Progress Actions (Oracle CPQ 24D)
Beginning in Oracle CPQ 24D, the JET Transaction UI will display a Status dialog for in progress actions when the respective main and sub-document actions have Show Loading Dialog set to Yes. The Status dialog is shown when an enabled action is triggered, and the dialog will automatically close when the action is finished. When multiple actions are performed, the Status dialog displays all invoked actions. Actions are removed from the dialog as soon as they are completed, and the Status dialog will automatically close when the last action is finished.

This feature makes the JET Transaction UI loading dialog behavior consistent with Legacy Transaction UI.
By default, Show Loading Dialog is set to Yes for main and sub-document actions. If you need to modify this setting, refer to Commerce Actions.
![]() Display Volume and Tier Pricing in Transaction Charge Details (Oracle CPQ 24A)
Display Volume and Tier Pricing in Transaction Charge Details (Oracle CPQ 24A)
Beginning in Oracle CPQ 24A, tier and volume price structures are displayed for recurring charges when applicable. This allows sales users to clearly see how prices change based on quantity or volume, so they can communicate this information more effectively to their customers.
Sales users select the applicable line item and click Charge Details to open the charge details drawer.
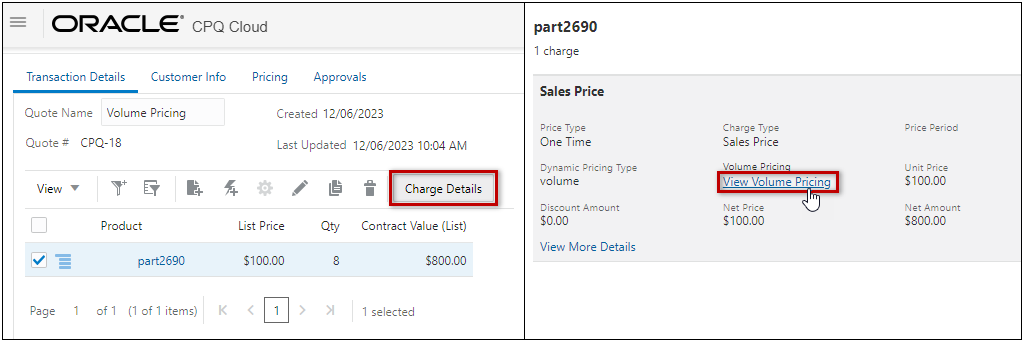
The sales user then clicks the volume or tier pricing link to view the volume or tier pricing structure.

Sales users can then update the product quantity in the line item grid to take advantage of better pricing by moving the customer to a higher tier. Pricing will be reevaluated according to the tier pricing definition and the charge value will be updated to reflect the quantity change.
![]() Error Messages (Oracle CPQ 20A)
Error Messages (Oracle CPQ 20A)
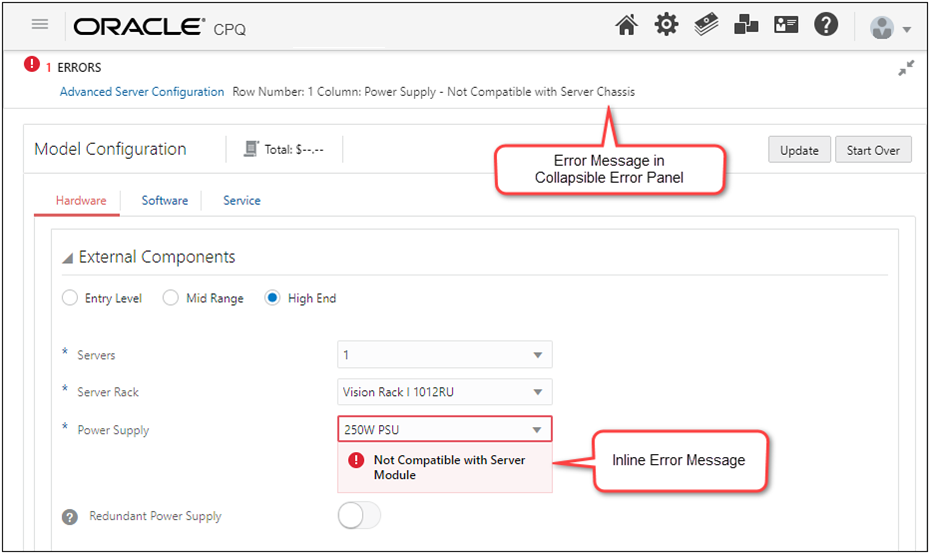
CPQ provides several error message enhancements for the JET Transaction UI. Similar to the JET Configuration UI, the JET Transaction UI errors will now display inline and in a collapsible sticky header bar Error Panel. The Error Panel provides a consistent look and feel and improves usability.
![]() GenAI Quote Summaries (Oracle CPQ 25B)
GenAI Quote Summaries (Oracle CPQ 25B)
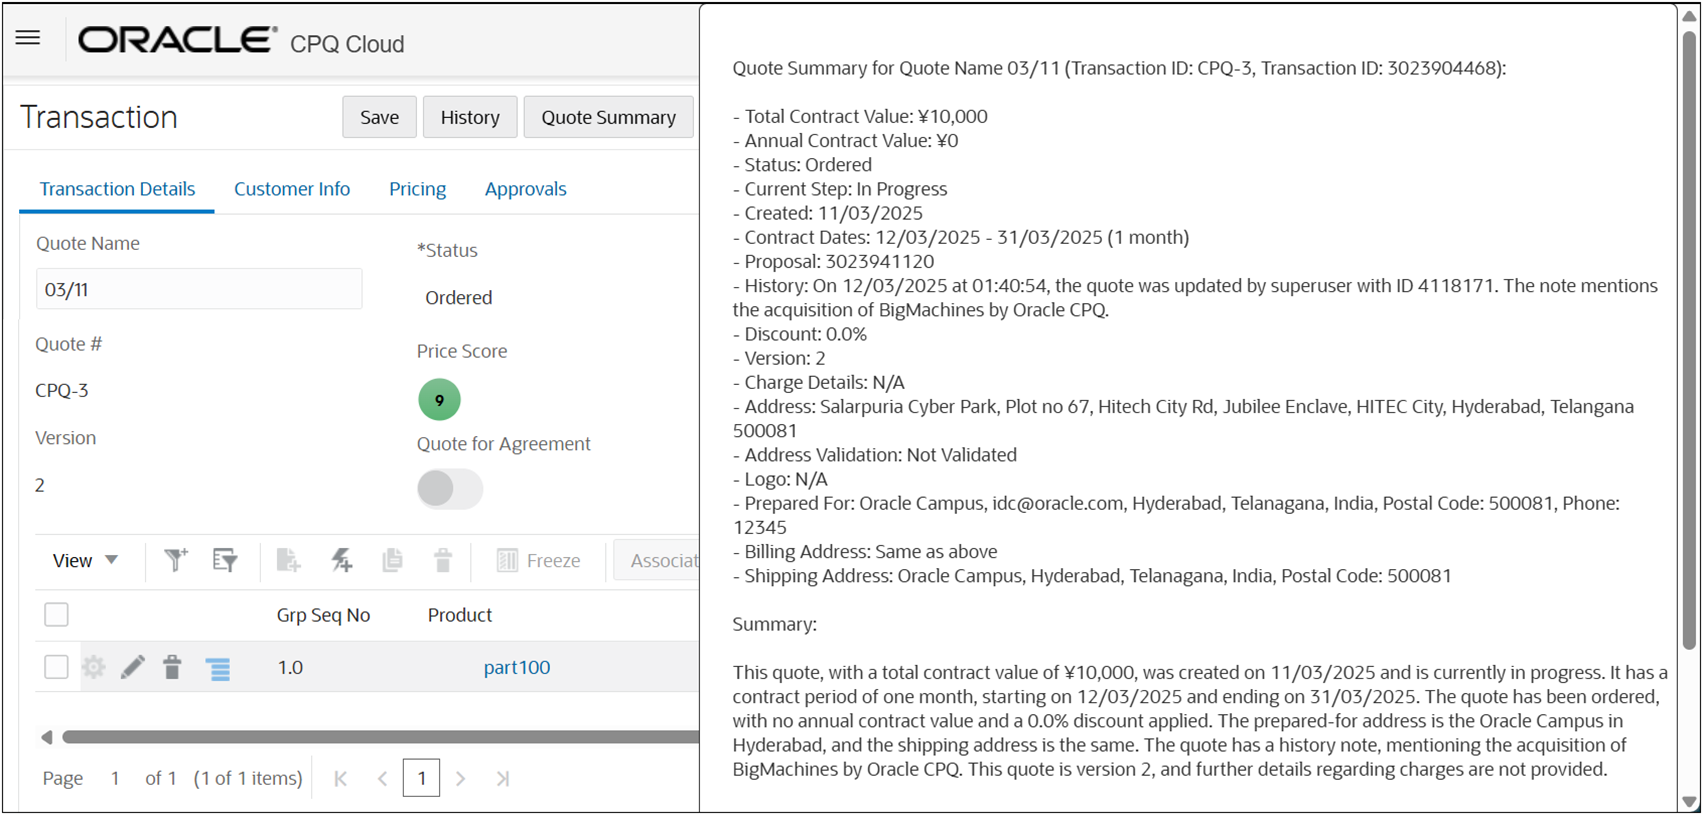
Oracle CPQ leverages Generative AI (GenAI) to automatically generate comprehensive quote summaries. Users can then choose to use the generated quote summary when communicating with customers or internal stakeholders, as needed. The new main document Generate Quote Summary type action is used to retrieve the GenAI summary from an integrated Oracle Sales site. The new GenAI quote summaries are available for Redwood Quote UIs and JET Transaction UIs.
GenAI quote summaries provide the following business benefits:
-
Enhanced Communication: Providing a rich, GenAI quote summaries improves the clarity and effectiveness of communications with approvers, buyers, and customers.
-
Time Efficiency: Automating the generation of quote summaries reduces the time and effort required by sales representatives and administrators.
-
Consistency: Ensures consistent and accurate presentation of quote details across different scenarios and communication channels.
After a CPQ administrator creates the GenAI Assist type action and adds it to the Transaction UI, sales users can invoke the action to display the quote summary. When a sales user clicks the Quote Summary action, a new drawer opens to display the quote summary.
Notes:
-
If the Quote Summary action doesn't exist, refer to Create a Quote Summary Action.
-
AI-generated quote summaries are intended as a drafting aid and should not be considered final or legally binding. Sales users must review the content for accuracy, relevancy, and appropriateness before sharing content with customers or including in formal agreements.
-
Beginning in Oracle CPQ 25C, the GenAI quote summaries are available for Oracle Sales and non-Oracle CRM (e.g Salesforce or Microsoft Dynamics) integrated sites.
-
For Oracle Sales integrated sites, the Fusion CRM Integration, in the CPQ Integration Center, is used to acquire quote summaries from Oracle Fusion.
-
For non-Oracle CRM (e.g Salesforce or Microsoft Dynamics) integrated sites a Generative AI Generic Integration for Non-Oracle CRM-Integrated Sites is required to acquire quote summaries from Oracle Fusion.
Pre-Requisites
-
Customers must have a provisioned Oracle Fusion environment.
-
Contact My Oracle Support to enable GenAI features on the Oracle Fusion environment.
-
Set the Quote Summary Prompt:
-
Refer to Administration Interface to Manage Prompts Used for Generative AI Features
-
Seeded prompt code -
cx.cpq.quote_summary
-
-
![]() Help Icon for Line Item Grid Attributes (Oracle CPQ 24B)
Help Icon for Line Item Grid Attributes (Oracle CPQ 24B)
When enabled, the Show help icon option in the Commerce Layout Editor displays a help icon for Commerce attributes in the Line Item Grid column header. When a user hovers over the help icon the attribute description is displayed. The option is disabled by default.
![]()
![]() Import and Export JET Transaction Line Items to .XLSX File Format (Oracle CPQ 21B)
Import and Export JET Transaction Line Items to .XLSX File Format (Oracle CPQ 21B)
CPQ provides the ability to export Line Item Grid data to a Microsoft Excel (.XLSX) file on an end user's local computer. End users can export the current Transaction's line item information to run formulas and calculations on the Transaction data quickly and easily.
CPQ also provides the additional ability to import line item data from a modified CPQ-exported Microsoft Excel (.XLSX) file. This feature leverages Microsoft Excel with Oracle CPQ Commerce to add new or modify existing transaction line data. End users can perform analysis and approval activities before importing line item modifications into the CPQ Transaction. Independent line items or unconfigured Model line items can be added to the CPQ export .XLSX file. The export .XLSX file provides necessary identification data to determine modifications to a pre-existing CPQ Line Item.
Filter JET Transaction UI Lines when Exporting to .XLSX File Format
The Export Line Item action contains an additional option to allow the export of only the Line Item Grid data that is visible to the end user on the current step, taking into account Commerce access rules and Line Item filter rules.
For more information, refer to JET Transaction Line Item .XLSX Export and Import.
![]() JavaScript Wrapper Enhancements for Attribute States (Oracle CPQ 21B)
JavaScript Wrapper Enhancements for Attribute States (Oracle CPQ 21B)
Oracle CPQ JavaScript methods for attribute states that allow administrators to hide or set attributes to read-only. Custom JavaScript methods can be used to set visible and updatable states, offering administrators greater flexibility in their custom implementations.
Refer to the following resources for more information:
![]() JET UI HTML Help Messages (Oracle CPQ 20A)
JET UI HTML Help Messages (Oracle CPQ 20A)
JET UI help messages can display Rich Text, links, and HTML content on the JET Configuration and Transaction UIs. The help icon will display plain text content in a tooltip format if there is no Rich text or HTML content present in that help icon's content.
For example: When HTML/Rich Text content is present, the user is prompted by a tooltip to click the icon which opens a dialog box containing the help information. The dialog box is automatically sized based on the content and browser size. The user can resize, move and close the dialog as desired.
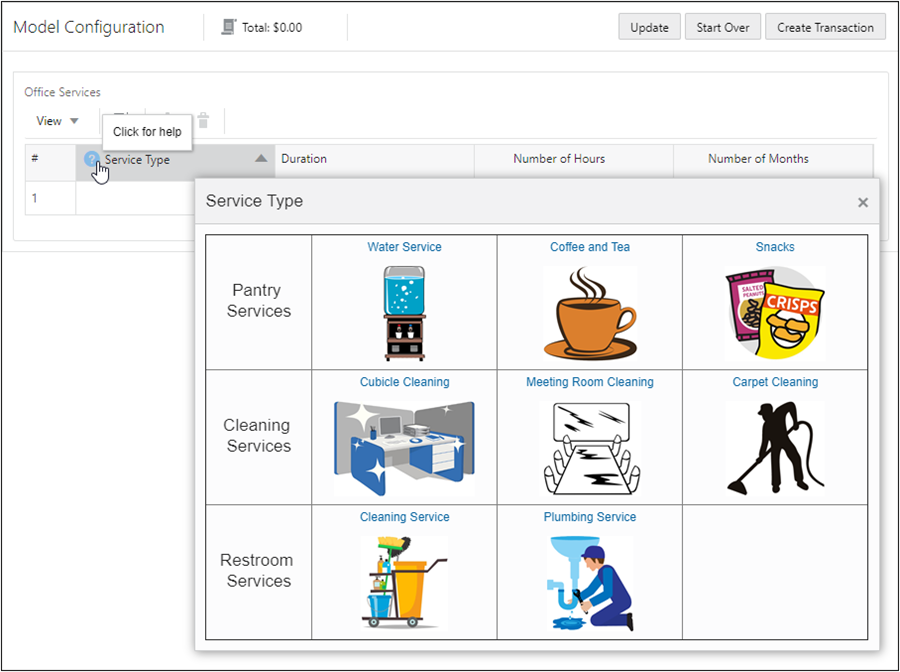
Refer to the Attribute Help Icons topic for detailed help icon information and instructions.
![]() JET Inline Rich Text Editor (Oracle CPQ 20C)
JET Inline Rich Text Editor (Oracle CPQ 20C)
Oracle CPQ 20C introduces a new inline editor for rich-text editable attributes (RTE). The new JET editor includes more text formatting options than the legacy editor. Features include undo/redo, images, links, table tools, and functions with the browser's native spell check. See JET Inline Rich Text Editor for more information.
Notes:
- Templates selected to display as the default value are supported.
- JET Transaction UI inline editor user-defined RTE templates cannot be shared with other users.
-
Some of the formatting options will be hidden if the layout width of a Rich Text attribute is not wide enough to display the toolbar for the JET Inline Rich Text Editor. To view all functions the user must maximize the editor screen to a full-page view. Placing an RTE attribute into a multi-column layout can cause this issue, therefore it is recommended that RTE attributes are placed in single column layouts.
![]() Line Item Grid Checkbox Selection (Oracle CPQ 20B)
Line Item Grid Checkbox Selection (Oracle CPQ 20B)
Selection Checkboxes are available for the JET Transaction UI Transaction Arrays. The selection checkboxes are displayed at the start of each array row. In addition, the Transaction Array table footer indicates the number of currently selected rows.
For example, the following image displays a Transaction with two rows selected. Note the number of items selected displays under the Transaction Array.
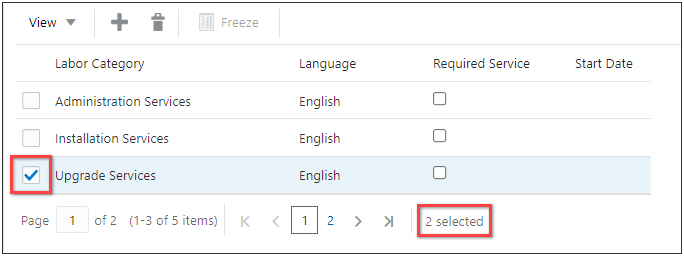
Users can also click the checkbox in the first column header to select or deselect all lines across all pages. In this example "All selected" displays under the Line Item Grid, indicating line items from all pages are selected.
![]() Line Item Grid Column Freeze/Unfreeze and Hide/Unhide Menu Actions (Oracle CPQ 20B)
Line Item Grid Column Freeze/Unfreeze and Hide/Unhide Menu Actions (Oracle CPQ 20B)
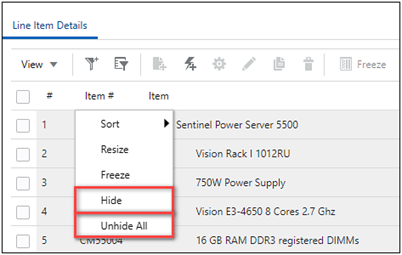
Freeze/Unfreeze and Hide/Unhide actions are available from the context menu on the Line Item Grid column headers.
- To freeze a column, right-click on the column header and then select Freeze from the context menu.
- To unfreeze a column, right-click on a frozen column header and then select Unfreeze from the context menu.

Users can also quickly Hide a column or Unhide All columns from the context menu.
![]() Line Actions for Line Item Grid Lines (Oracle CPQ 24B)
Line Actions for Line Item Grid Lines (Oracle CPQ 24B)
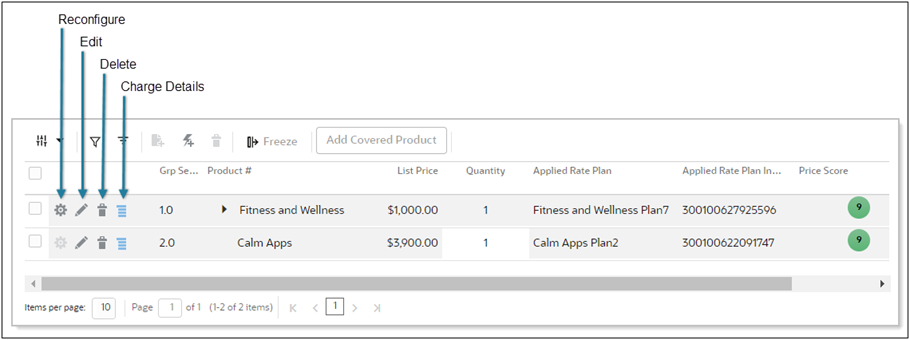
When the Display Actions on Line option in the Commerce Layout Editor option is enabled, sales users can invoke available actions for the applicable line item using a single click action. This option is disabled by default.
![]() Line Item Grid Default Collapsed Mode for Hierarchical Products (Oracle CPQ 23D)
Line Item Grid Default Collapsed Mode for Hierarchical Products (Oracle CPQ 23D)
Hierarchical models and products are displayed in collapsed mode by default. Sales users can identify collapsed items, and then select an individual item or use the Expand All option to view all items within the model or product hierarchy. When a sales user selects the Expand All option, their viewing preference is persistent and will be saved to their Line Item Grid personalization as well. A checkmark has been added to the view menu drop-down to indicate the selected preference.

By defaulting to the Collapsed mode for the hierarchical items in the Line Item Grid, sales users can interact with the products at the root level and when needed, see more details of the product hierarchy by Expanding the line item hierarchy.
![]() Line Item Grid Display Indicator Icons for Editable Fields (Oracle CPQ 20C)
Line Item Grid Display Indicator Icons for Editable Fields (Oracle CPQ 20C)
Administrators can choose to display indicator icons for easier recognition of editable Line Item Grid fields. Previously, display indicator icons only displayed when a field was selected for editing. Read-only fields will not display these indicators.
![]()
See the Commerce Layout Editor > Edit Line Item Grid for instructions to display indicator icons for editable Line Item Grid fields.
![]() Line Item Grid Expand and Collapse All Models (Oracle CPQ 20B)
Line Item Grid Expand and Collapse All Models (Oracle CPQ 20B)
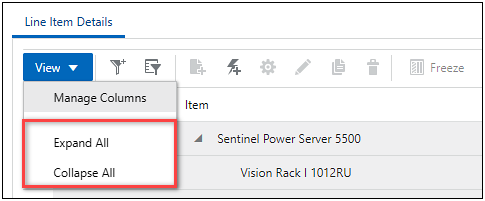
CPQ provides Expand All and Collapse All actions available from the Line Item Grid's View menu for all models within the Line Item Grid. This functions across all pages of the Line Item Grid. The expanded/collapsed state is also persistent for the user across sessions.
![]() Line Item Grid Freeze Columns with the Sticky Header Enabled (Oracle CPQ 20B)
Line Item Grid Freeze Columns with the Sticky Header Enabled (Oracle CPQ 20B)
CPQ provides consistent behavior of the Transaction UI sticky headers while using frozen columns. Column Freeze settings are retained across logins on the same browser.
![]() Line Item Grid Personalization (Oracle CPQ 23D)
Line Item Grid Personalization (Oracle CPQ 23D)
Oracle CPQ provides sales users with the flexibility of selecting columns, arranging columns, and applying filters in the Line Item Grid. Previously, Line Item Grid personalization was not retained when users cleared their cache, changed browsers, or switched between devices. Sales users can save Line Item Grid personalization, and then apply their saved Line Item Grid personalization to subsequent user sessions. Refer to Personalize Line Item Grid for more information.
![]() Line Item Grid Wrap Text Option (Oracle CPQ 20C)
Line Item Grid Wrap Text Option (Oracle CPQ 20C)
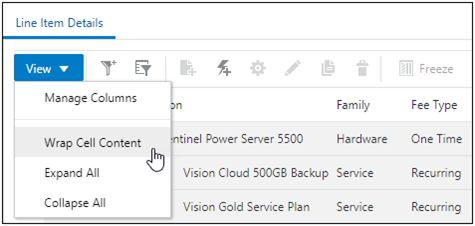
To improve usability, CPQ provides a new View menu option to wrap cell content for the JET Line Item Grid. Rows will expand as needed to fit additional lines of content.
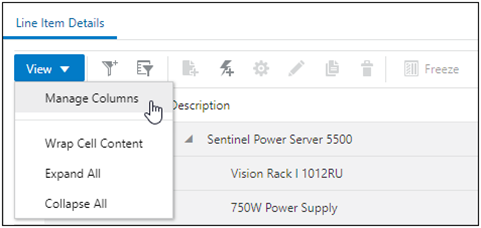
To wrap cell content, select Manage Columns from the JET Transaction UI Line Item Grid View menu.
![]() Oracle Sales Custom Variable Name Conventions in Commerce (Oracle CPQ 23D/24C)
Oracle Sales Custom Variable Name Conventions in Commerce (Oracle CPQ 23D/24C)
In Oracle CPQ 23D, CPQ adopted Oracle CX Sales variable naming conventions for custom items. When an administrator creates a new custom Commerce item, the "_c" suffix is appended to the variable name. The new naming convention for custom variable names provides more consistency for integrations with Oracle Sales.
Beginning in Oracle CPQ 24C, customers can submit a service request to disable the "_c" suffix on variable names for custom Commerce entities (Actions, Analytics, Attributes, Data Columns, Integrations, Library Functions, Rules, Steps, etc.). The "_c" suffix is enabled by default for standard and legacy Commerce processes.
- Customers can submit a Service Request (SR) on My Oracle Support to disable the "_c" suffix on variable names for custom Commerce entities
- When the "_c" is disabled, the "_c" variable name suffix will not be required for newly created custom Commerce entities.
- Disabling the "_c" variable name suffix for custom Commerce entities will not change existing variable names.
- The "_c" suffix setting will not impact existing variable names when cloning a Commerce process or migrating Commerce items. Target variable names will be the same as the variable names from the source Commerce process.
![]() Preview Price Waterfall for Charges and Product Pricing (Oracle CPQ 25B)
Preview Price Waterfall for Charges and Product Pricing (Oracle CPQ 25B)
Price Waterfall Visualization helps businesses determine the factors impacting net revenue and profitability. In the final pricing for a quoted product, several factors come into play, such as pre-set promotions and special pricing for a selected set of accounts based on status, geography, industry, etc. Additionally, sales users can apply manual discounts as part of the negotiation with the customer. Currently, all of this data is captured on the quote, but it is difficult for users to visualize the full picture.
The quoting Price Waterfall provides the following business benefits:
-
Transparency for Sales Teams: Sales representatives can have a clear breakdown of the pricing components, helping them understand the impact of discounts, additional charges, and other factors on the final price. This transparency empowers sales teams during negotiations and discussions with customers.
-
Informed Customer Decision-Making: Sales representatives can see a transparent breakdown of the price components, allowing them to understand the value customers will be receiving and the factors contributing to the final cost. This transparency builds trust and facilitates more informed decision-making.
-
Negotiation Insights: The breakdown helps sales teams identify areas for negotiation. For example, if a customer is concerned about a high shipping cost, the sales representative can explore options to address that specific component of the price.
Beginning in Oracle CPQ 25B users can view a quoting price waterfall in the JET Transaction UI. The price waterfall enables users to understand how the final price is derived. When enabled, the price waterfall displays in the charge drawer and the sub-document UI.
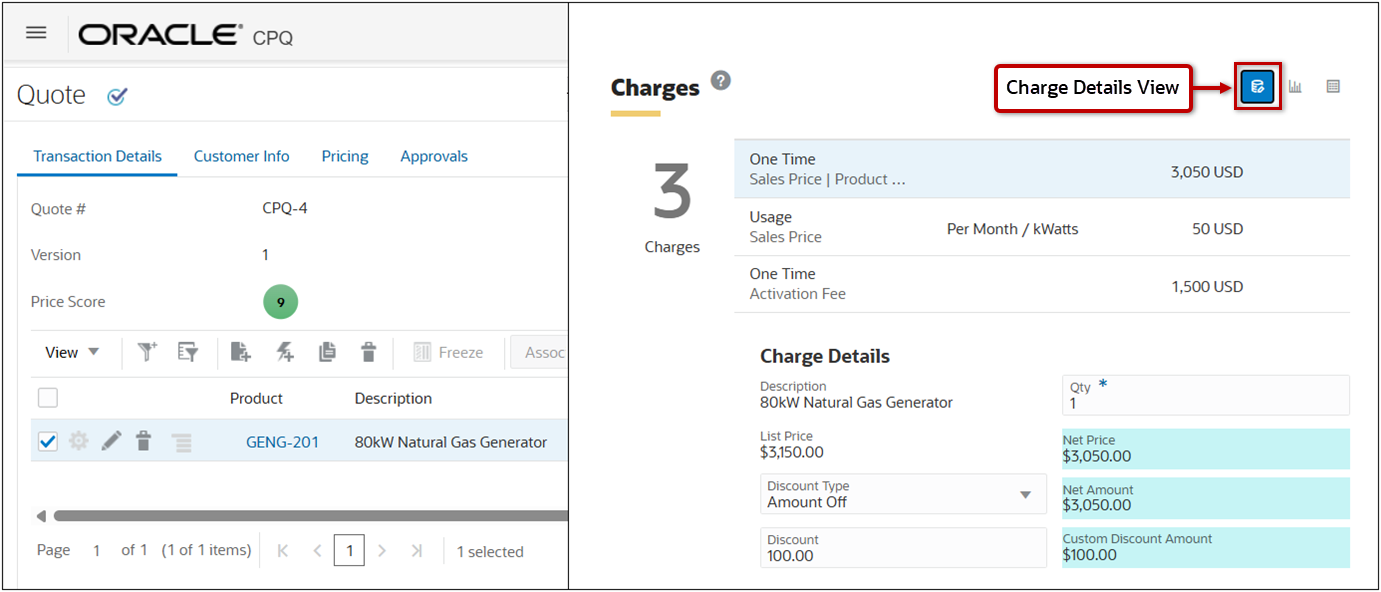
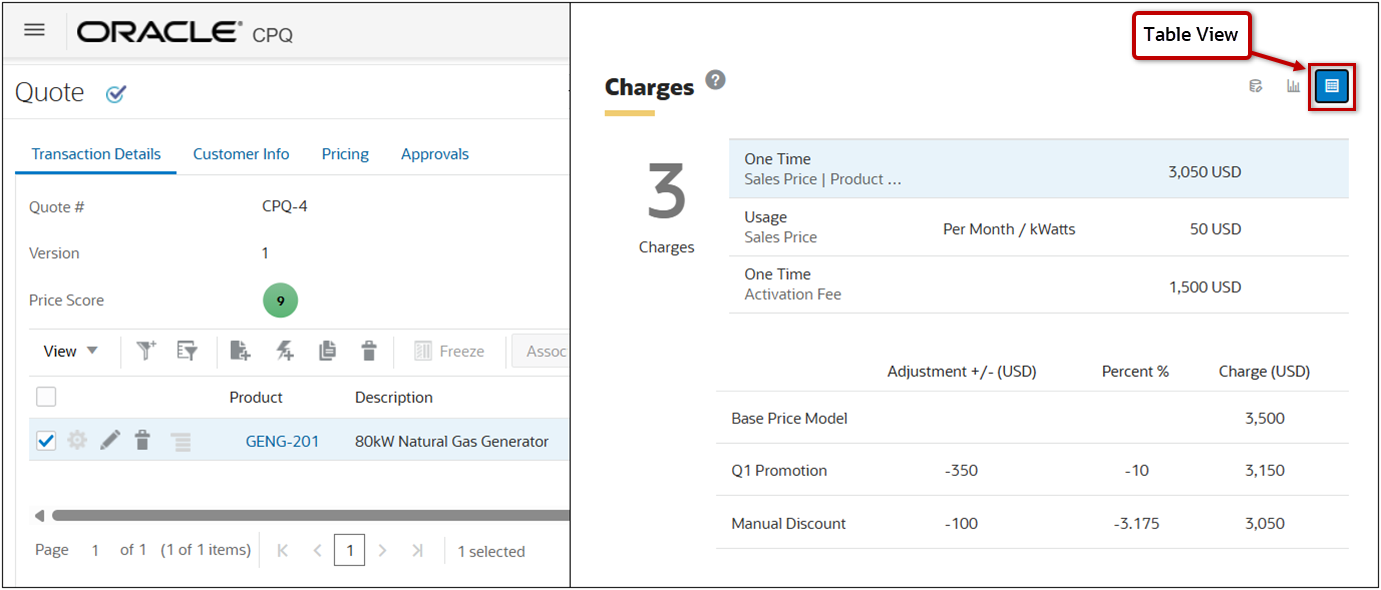
For example, the GENG-201 80kW Natural Gas Generator the base price is $3,500.
- The Q1 Promotion applies a %10 discount, reducing the price to $3,150
- An additional Manual Discount of $100 is also applied.
The following views are available: Charge Details View, Graph View, and Table View.
Charge Details View
The Charge Details View displays the charge information and also displays additional selected attributes for price waterfall.
Graph View
Users can open the Graph View icon to display a visualization of the price waterfall. Users can hover over the graph items to display the exact amount for the item.

Table View
Users can open the Table View to display a summary of adjustments for the selected charge item.
Notes:
-
Administrators should review the Pricing Models and ensure that it's appropriate for their sales users to see all pricing information in the transaction price waterfalls. Do not enable this feature if you don't want your sales users to view all pricing information from the Pricing Models. Granular access control on Pricing Model views for price waterfall is not supported in Oracle CPQ 25B.
-
Refer to the Display Price Waterfall in Commerce to enable and set options for price waterfall.
![]() Pipeline Viewer Support (Oracle CPQ 18D)
Pipeline Viewer Support (Oracle CPQ 18D)
Oracle CPQ supports for the JET Transaction UI Pipeline Viewer. The Commerce Pipeline Viewer allows administrators to debug and troubleshoot Commerce rules and AJAX formulas impacting the current Transaction. When an administrator clicks Pipeline Viewer, the Pipeline Viewer window opens and displays active Commerce rules, the rule types, and identifies which main document (Transaction) or sub-document (Transaction Line) attributes and actions are impacted. Transaction attributes and actions are listed in the Main Doc column and are displayed in blue type. Transaction Line attributes and actions are listed in the Sub Doc column and are displayed in purple italic type.
![]() Progress Indicator During Queue Processing (Oracle CPQ 20B)
Progress Indicator During Queue Processing (Oracle CPQ 20B)
Similar to the JET Configuration UI, the JET Transaction UI now displays a Progress Indicator in the page header. This provides an immediate visual indication that the user's action has had an effect. When the user performs an action, an animated icon displays beside the page title notifying the user that the action is in process.

A tooltip note is available on this icon to provide more details.

Some or all actions may be temporarily disabled while the system is processing, but the user is able to continue working during this time. Once completed, the indicator changes to show that the processing is complete.

![]() Quick Add Enhancements (Oracle CPQ 18D)
Quick Add Enhancements (Oracle CPQ 18D)
CPQ provides the following enhancements for the Quick Add window:
- Keyboard access to navigate through fields
- Resize Quick Add window functionality
- UI buttons to add items, delete items, and close the Quick Add window.
Refer to the Quick Add topic for Quick Add information.
![]() Rate Card Support for Transaction Lines (Oracle CPQ 23D)
Rate Card Support for Transaction Lines (Oracle CPQ 23D)
When enabled, the Pricing Rate Cards can be used to capture complex usage pricing for subscription products. The Rate Card data will be synchronized from CPQ Pricing to the charge array set and can be included in output documents to fully communicate to the customer the pricing that will be applied to consumption-based services. If Rate Card charges are applied to a subscription product from the Product Workbench or a Pricing Engine Price Model, a "View Rate Card" link is displayed in the Transaction's Charges Details drawer to allow sales to view the Rate Card data for the applicable line item.
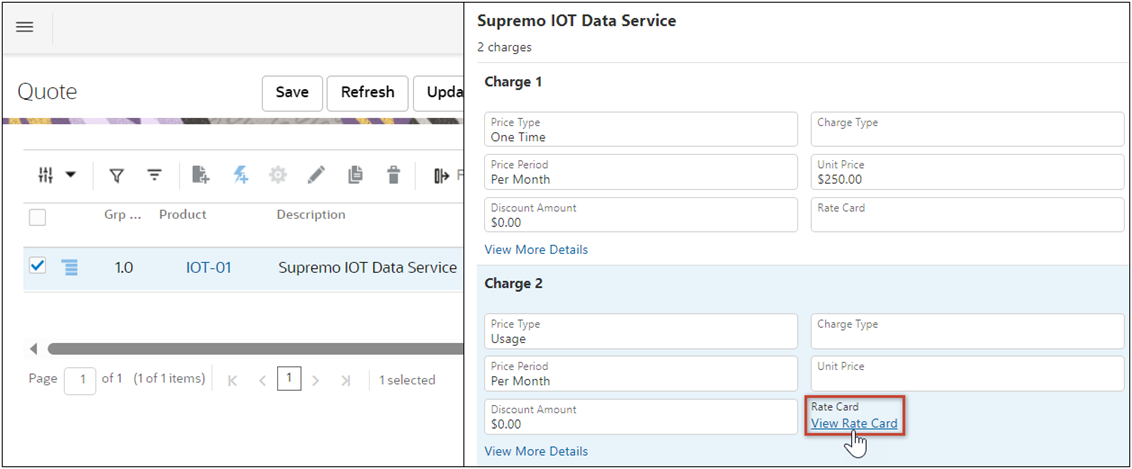
This allows sales user to view the custom dynamic pricing matrix used in determining the invoice amounts to be billed on a periodic basis.
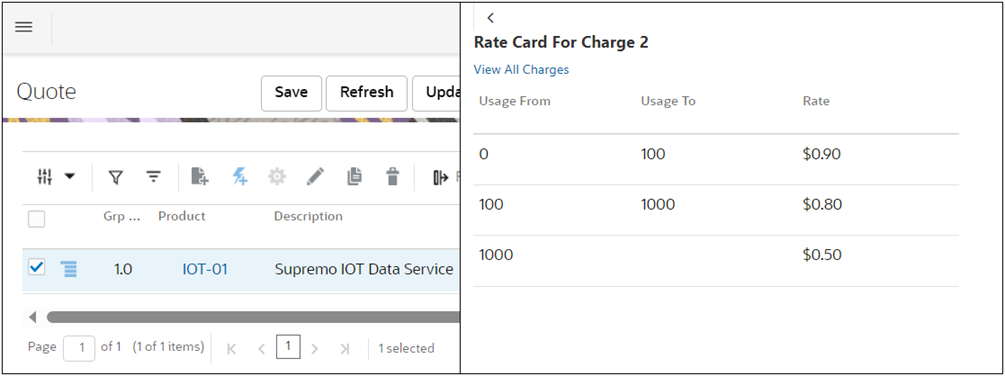
Note: Rate Card data is read-only in Oracle CPQ 23D and cannot be modified from the Transaction UI.
![]() Sales Agreement Pricing and Authoring in Commerce (Oracle CPQ 24B/24D)
Sales Agreement Pricing and Authoring in Commerce (Oracle CPQ 24B/24D)
-
Oracle CPQ 24B introduced Price Agreements in CPQ Pricing Engine to define customer-specific Sales Agreement pricing for products or services. When products or services belonging to a pre-existing agreement are added, the Price Agreement pricing and information is applied on these quote lines.
-
Beginning in Oracle CPQ 24D, CPQ sales users can author and negotiate a new sales agreement within CPQ using a productized CPQ quote for agreement, without a dependency or integration with Oracle Sales Contracts.
-
Refer to Sales Agreements in Oracle CPQ for more information.
![]() Select Alternate Address from JET Transaction UI (Oracle CPQ 18D)
Select Alternate Address from JET Transaction UI (Oracle CPQ 18D)
CPQ allows the selection of an alternate address from the JET Transaction UI. Users can select an alternate address for a JET Transaction from the available customer addresses in integrated CRM systems.
Note: To display Select Alternate Address action, the Select an Alternate Address action must be included on the JET Transaction layout. For JET Transaction layout administration information, refer to the Commerce Layout Editor topic.
When the Customer ID field associated with a Transaction has multiple addresses in an integrated CRM, the Select An Alternate Address action can be displayed on the JET Transaction UI.
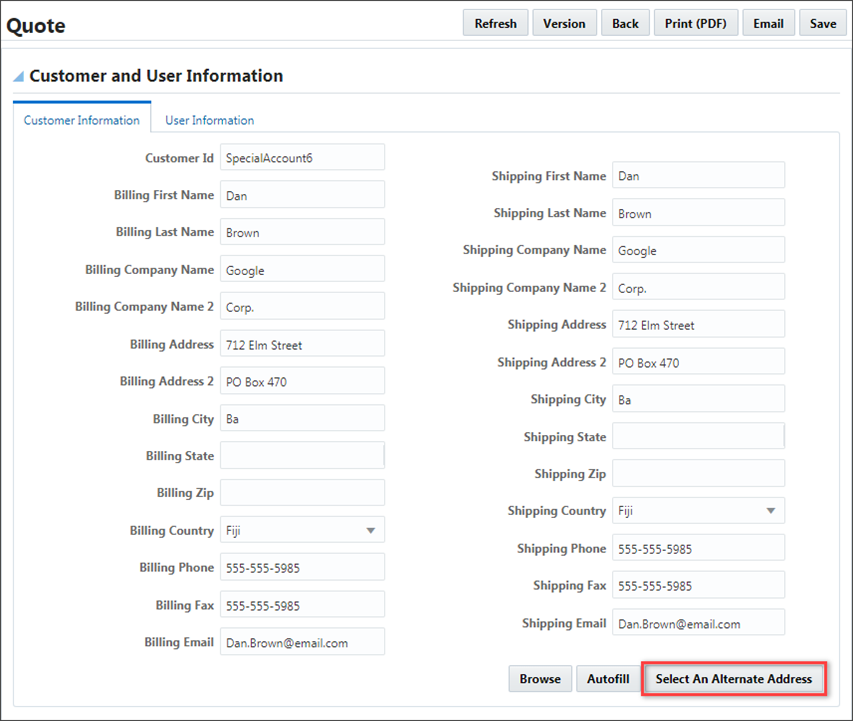
When a user clicks Select An Alternate Address, the Select Alternate Address dialog opens. If an alternate address is selected, the Transaction is updated with the alternate billing and shipping information.
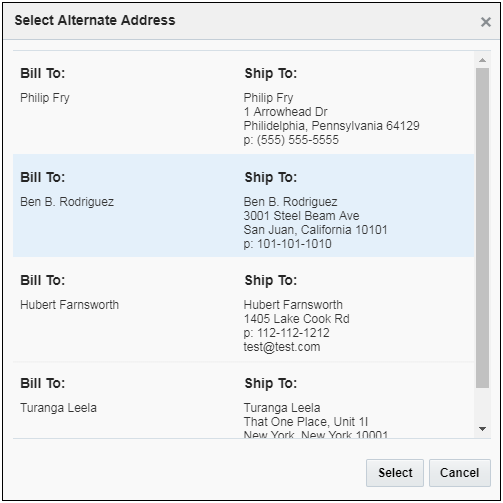
For Retrieve and Select Alternate Address REST API information, refer to the REST APIs for Commerce Transactions topic.
![]() Simple and Advanced Filters (Oracle CPQ 18D)
Simple and Advanced Filters (Oracle CPQ 18D)
The Simple and Advanced Filters provide the functionality previously available from the Query By Example (QBE) filter. Just as with the QBE filter, users can define filter criteria for multiple column items using the Advanced Filter. In addition to defining a multiple column filter, the Advanced Filter allows users to specify if the results match any or match all filter criteria. The Simple Filter searches all columns and then filters results based on a user-defined keyword or phrase.
Simple Filter
The Simple Filter supports quick text or numeric searches, such as Part Number searches. The Simple Filter Icon is located in the toolbar above the associated table for JET UI pages.
![]()
To use the Simple Filter, perform the following steps:
-
Click on the table toolbar Simple Filter icon.

The keyword entry field appears in the table toolbar.

-
Type the desired keyword or phrase and then press <Enter> or <Return> to filter results.
If the keyword is present in any column, the resulting lines are returned.
- To deactivate the filter, click on the active Simple Filter icon.

Advanced Filter
The Advanced Filters supports use cases where multiple criteria are required to focus on a subset of lines. A wide range of operators and the Match all or Match any option expand the user's ability to fine tune their filtering. The Advanced Filter icon is located in the toolbar above the associated table for JET UI pages.
![]()
![]() Use the JET UI Advanced Filter
Use the JET UI Advanced Filter
To use the Advanced Filter, perform the following steps:
-
Click on the table toolbar Advanced Filter icon.

The Advanced Filter window opens.
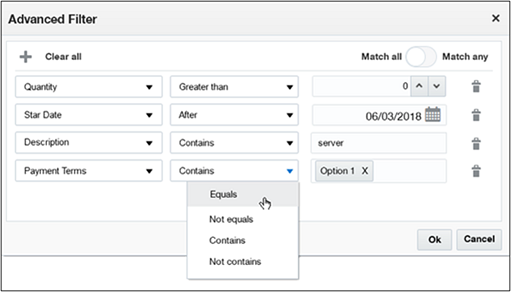
- Define the filter criteria:
- If required, click the Add Row icon.

- In the first column, select the desired table column names.
- In the second column, select the applicable operator.
- In the third column, define the criteria for the column filter.
- To delete a row, click the Delete Row icon.

- Select Match all or Match any.
- If required, click the Add Row icon.
-
Click OK to filter results.
The resulting lines are returned.
- To modify the filter criteria, select Edit Filter.
- To deactivate the filter, click on the active Advanced Filter icon.

![]() Table Columns - Manage Columns and Views (Oracle CPQ 20C)
Table Columns - Manage Columns and Views (Oracle CPQ 20C)
Reset and Reorder Viewed Columns for JET Transaction UI Tables
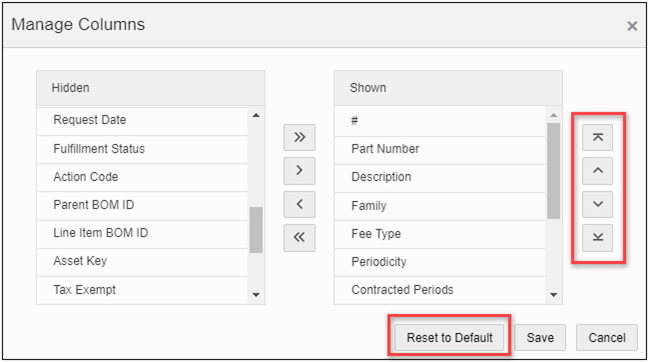
CPQ allows end users to re-order JET Transaction UI Line Item Grid and Transaction Array columns. In addition to the reorder options, the Manage Columns window provides a reset function to return the table column display options to their default settings. If enabled, the user's column order settings are persistent for the user across sessions.
To use the reorder and reset default functions, select Manage Columns from the JET Transaction UI Line Item Grid and Transaction Array View menu.
The Manage Columns window provides the Reset to Default function and displays the new reorder options to the right of the "Shown" column panel.
The user preferences are reset when:
-
a Commerce deployment is performed, as it can apply changes to the Line Item Grid, attributes, or user access to attributes.
- the user's browser storage is cleared or a security setting blocks local storage (the settings are saved locally in the user's browser cache).
Manage Viewed Columns for JET Transaction UI Tables
CPQ provides a new Manage Columns dialog for JET Transaction UI tables, such as the Line Item Grid and Transaction Arrays. Previously, users could only show or hide columns one column at a time, which was very time-consuming for tables with a large number of columns. The Manage Columns dialog allows users to quickly hide or show multiple columns.
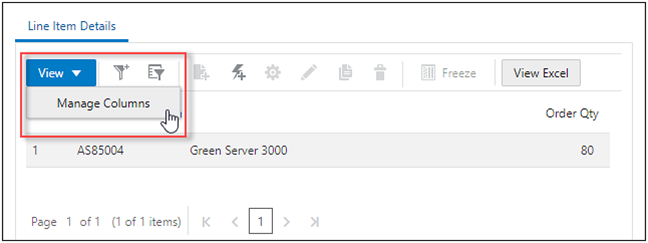
Users select Manage Columns from the View menu to select columns for the JET Transaction UI table.
-
To show columns, use the shuttle controls to move columns from the Hidden list to the Shown list.
-
To hide columns, use the shuttle controls to move columns from the Shown list to the Hidden list.
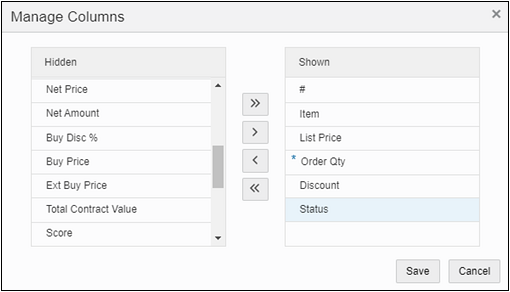
Required attributes are indicated with an asterisk (*) in the Hidden and Shown lists.
![]() Table Error Messages (Oracle CPQ 20C)
Table Error Messages (Oracle CPQ 20C)
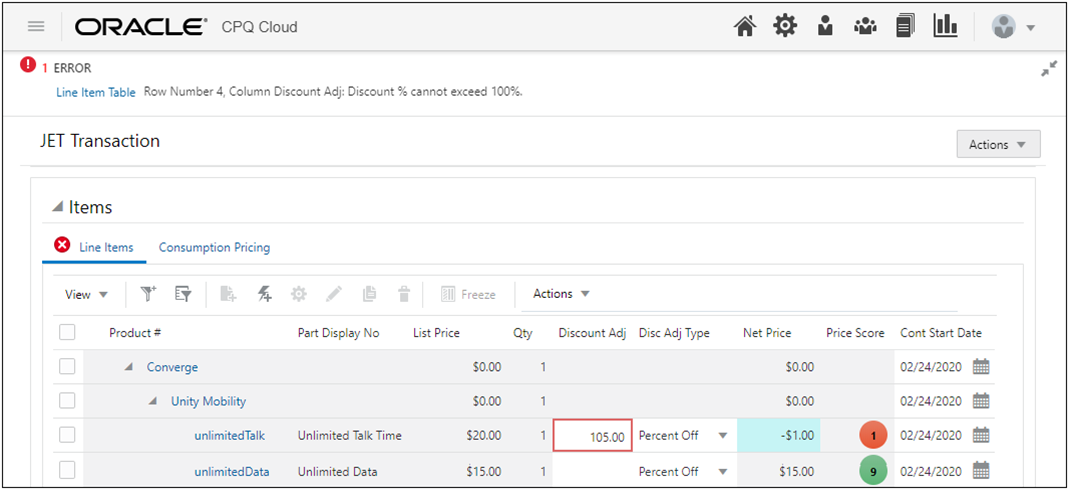
In addition to the existing inline display, JET Transaction UI Line Item Grid and Transaction Array error messages will now display at the top of the page in the collapsible sticky header bar Error Panel. Error notifications describe the error, list error occurrences, and provide links to the location of the attribute triggering the message.
![]() Table Resize Columns (Oracle CPQ 20B)
Table Resize Columns (Oracle CPQ 20B)
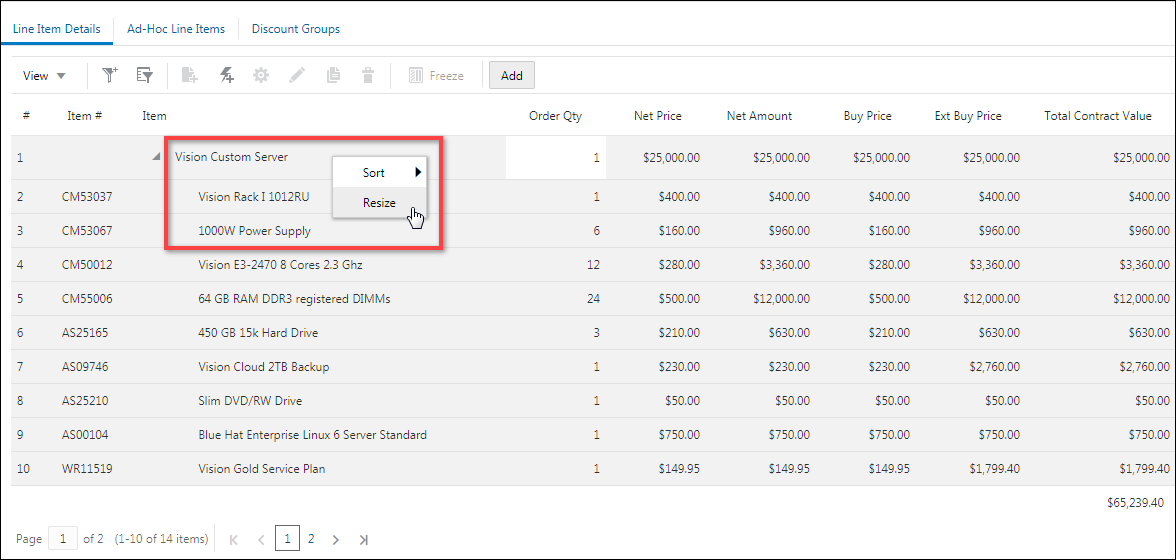
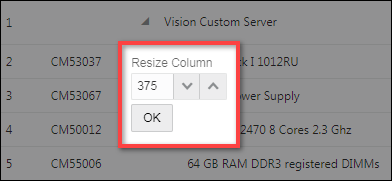
The column resize dialog is now available for all JET UI tables. The dialog provides a user-friendly method to resize columns, is much easier for tablet and phone displays, and allows users to enter a precise column width.
Users can right-click on the column header, select Resize, and then enter the column width. For tablet and phone displays, users tap and hold the column header to access the Resize option.
The Resize Column dialog allows users to specify the exact column width.
![]() Transaction Line Details Page Navigation (Oracle CPQ 22C)
Transaction Line Details Page Navigation (Oracle CPQ 22C)
CPQ provides navigation functionality for the JET UI Commerce Line Item Details page. Users can now navigate between different line items without navigating back to the Transaction UI. The line item order will reflect user filters and sorting applied to the Line Item Grid. The Open Transaction Line REST API will also support navigation parameters. When a sales user opens the details page for a transaction line item, a navigation toolbar is displayed in the page header row.

Note: The line item details page navigation references the users cache for filters and sorting applied to the Line Item Grid. When using collaborative quoting, additional line items that are added by other users are not visible until the current user refreshes their cache. Therefore, to support navigation to additional line items added by other collaborative users, the navigation arrows are not grayed out when a user is on the first or last line item.
![]() View File Attachments in Line Item Grid Lines
View File Attachments in Line Item Grid Lines
Administrators can enable Editability for File Attachment attributes in the Line Item Grid in the Commerce Layout Editor. When enabled, sales users can add and delete a file attachment to a Line Item Grid line item. The attached filename is displayed in the File Attribute type field when an attachment has been added. To add an attachment, click inside the File Attribute type field, click Choose File, then locate and select the desired file.

To remove an attachment, click on the filename, and then select Remove.

JET Transaction UI Key Changes, Limitations, and Known Issues
The following list provides descriptions of key changes, limitations, and known issues present in the JET Transaction UI.
![]() Support for Previous Functionality
Support for Previous Functionality
The new JET Transaction UI supports virtually all of the most commonly used Legacy UI features.
- Fully Responsive UI: Content will flow to fit the user's display, allowing users to view and edit Transactions across multiple device types using the same Transaction layout.
- Improved Scrolling behavior: Transaction header and toolbar remain "sticky" at the top of the screen while the user scrolls vertically through page content. Line Item Table column headers and toolbar also remain "sticky" as the user scrolls through the line items.
- Click-to-Edit Behavior: Click directly on an editable field in a line item to modify its value.
-
Line Item Toolbar: This toolbar contains integrated buttons that allow users to add, reconfigure, copy, quick-add, and remove line items from the Line Item Grid. Additional text-only buttons can also be placed here.
- View Menu: This menu allows users to hide and show columns in the Line Item Grid.
- Freeze Columns: Keep selected columns in place while horizontally scrolling through the columns to the right.
The Freeze button is located on the Line Item Toolbar. - Filter Line Items: Simplified filter allows user to filter line items that match entered text.
The Filter icon in the Line Item toolbar toggles the filter field display.
- Column Sorting: Sort columns by clicking the ascending or descending arrows in the column header.
- Column Resizing: Resize columns by clicking and dragging the edge of the column header.
- Hierarchical Display: View the hierarchical relationship between models and parts in the Line Item Grid and click to expand or collapse parent lines.
- Display Totals: Show totals in the line item grid by enabling the Display Sum setting for the layout.
- Secure text: Capture and mask sensitive data with secure attributes.
-
Copy Line Items: Create a new Line Item(s) by copying an existing Transaction Line or Lines.
Copy Transaction: Create a new Transaction from an existing Transaction in the Transaction Manager. The copied Transaction will contain the attributes as defined by the Copy action Initialization tab. The Transaction ID, User Name, and Creation Date are updated accordingly.
- Automatic Updates: Upon changing an Oracle CPQ attribute’s value, the value automatically updates without having to invoke an action.
- Inline Highlighting: Inline highlighting provides immediate feedback for invalid data entries.
- JET-specific CSS: A single JET-specific CSS file reduces complexity and provides a customized, seamless aesthetic for the JET Transaction UI and future JET UI enhancements.
- Translation Support: Oracle CPQ supports translations for Transactions, Transaction lines, and approval and menu attributes. Right to Left languages, such as Arabic, are also supported and will affect the alignment of text and elements in the Alta UI.
- Asset-Based Ordering: Use ABO interaction to create a quote with one or more Asset Line Items.
- Deal Management: Display Deal Negotiation features such as Price Score metrics and Price Comparison scatterplots.
- Integration Support: Users can create or open JET Transactions from within Oracle Sales and Salesforce.
![]() Planning for JET Transaction UI Adoption
Planning for JET Transaction UI Adoption
The following information will aid existing Oracle CPQ customers plan for the adoption of the new JET Transaction UI.
Oracle JavaScript Extension Toolkit (JET) is a modular open source toolkit based on modern JavaScript, CSS3 and HTML5 design and development principles. It's a collection of open source JavaScript libraries along with a set of Oracle contributed JavaScript libraries that make it as simple and efficient as possible to build and extend cloud-based, client-side applications.
Beginning in Release 18C, Oracle CPQ offers three UI options for the Commerce or Transaction user experience: JET Transaction UI, Legacy UI, and the native Salesforce Lightning UI.
Oracle CPQ will continue to support the Legacy Transaction UI option. However, many new usability features now available in the JET Transaction UI, such as filtering of quote line items, are not available in the current Legacy UIs. Additionally, in the future many new features may be available only in the new UIs.
Customers should evaluate the new JET UIs and Salesforce Lightning UIs and plan to upgrade their Oracle CPQ Commerce user experience at their convenience. The new UIs can be implemented incrementally for selected groups of users in order to ease training and change management requirements.
The 18C JET Transaction UI is the first release of CPQ’s new JET user experience, which over time will replace all Legacy UIs in Oracle CPQ (i.e. Configuration, Transaction Manager, Homepage, etc.) with JET-based, fully responsive UIs. The JET UX is expected to be CPQ’s modern standard for UIs.
Alternatively, customers using Salesforce CRM desiring a seamless, native Lightning user experience should explore the option of CPQ’s native Salesforce Lightning UI. The native Oracle CPQ Lightning UIs provide the option for a seamless, native Lightning user experience across both Salesforce CRM and Oracle CPQ interactions. With the new Oracle CPQ Salesforce Adapter customers can easily switch sales users from embedded Legacy Oracle CPQ UIs, Oracle CPQ JET Transaction UIs, or native Lightning UIs, as appropriate for their needs. Customers should examine both performance and the lower information density of Salesforce Lightning UIs when considering these options.
Lastly, CPQ’s new REST APIs enable customers to easily build and deliver customized UIs to provide a truly unique user experience within the Oracle CPQ platform. Currently, Transactional and Transaction UI Metadata APIs provide full support for custom UIs to leverage CPQs Commerce business objects and business rules. Upcoming releases will support additional Oracle CPQ modules such as Configuration and Homepage.
![]() What improvements does the JET Transaction UI provide for users?
What improvements does the JET Transaction UI provide for users?
- The JET Transaction UI provides a clean, streamlined user experience that is fully responsive across desktop, tablet and phone devices, eliminating the need for administration of separate UI Layouts for desktop and mobile users.
- Updates to the page no longer require a full page refresh, accelerating editing and providing an uninterrupted user experience.
- The editing process is enhanced by use of modern controls such as toggles, spin boxes, and vertical tabs.
- Usability of the quote lines items has been substantially enhanced with persistent ‘sticky’ column headers, sorting, and personalization of the user’s display of quote lines.
- Columns can be frozen to provide context when scrolling horizontally
- Columns can be selectively hidden/ viewed and resized.
- Users can filter the lines displayed via a new text search feature to quickly find a product or line.
- The tree structure for complex nested hierarchies of configured products can be viewed, expanded, and collapsed with simple and intuitive controls.
- Experienced users can more efficiently navigate quote pages using standard keyboard controls.
- The Quick Key feature has been enhanced to enable search on Part Display Number, in addition to the Part Number search available in the Legacy UI, for added flexibility in rapid creation of transaction lines.
![]() What improvements does the JET Transaction UI provide for administrators?
What improvements does the JET Transaction UI provide for administrators?
Administration of UI styling is simplified by the consolidation into a single unified stylesheet for JET Transaction UI, eliminating the need to maintain three or more stylesheets with different classes and ids.
Accessibility for repetitive and disabled users is optimized by complete and consistent keyboard controls on all UI elements.
![]() When should I adopt the JET Transaction UI?
When should I adopt the JET Transaction UI?
Customers should align their UX roadmap with the UI options most appropriate for their CRM integration to assure consistency of user experience across the entire flow of user interactions, refer to Which UI should I use?.
The JET Transaction UI applies pagination for displaying transaction lines (the line item grid). Customers can configure page sizes up to a maximum of 500 lines, which will support most use cases for large quotes and avoid pagination. Alternatively, customers with lengthy quotes running into the hundreds of lines will want to introduce the new UI to sales users by showing them how the simple search and sort features allow them to easily ‘home in’ on the lines they need to review or edit.
Customers using Oracle CPQ for high volume entry of transaction lines will want to evaluate the user interactions used in the new Quick Key feature to determine applicability to their users. Additional enhancements are planned in this area to support more efficient keyboard access.
While CPQ’s JET UI delivers functional parity with nearly all legacy commerce UI features, there are some gaps and the user interactions for some features are a bit different in JET. Customers should review details of the Oracle CPQ Release (18C) What’s New document for details of the features not yet available. Customers will also need to provide an introduction to these new UX patterns for existing users and should plan their adoption to accommodate needed training.
![]() How do I prepare for adoption of the JET Transaction UI?
How do I prepare for adoption of the JET Transaction UI?
CPQ’s JET Transaction UI uses the JET JavaScript Framework and consolidates UI styling into a single CSS file. As a result, with adoption of the JET Transaction UI, Oracle CPQ administrators will need to:
- Test and potentially update JavaScript site customizations.
- Update the default JET styling to replicate customized styling.
- Many customers have implemented custom JavaScript to add usability features, such as sticky headers, that are now available in the JET Transaction UI. This JavaScript can now be removed, simplifying site implementations.
-
For those additional JavaScript Commerce customizations developed with other JavaScript frameworks such as Angular or React, customers may need to re-factor for design patterns and syntax that differ from JET-standard features and syntax. Oracle CPQ estimates that less than half of site JS customizations will require an update. Customizations requiring update are identifiable by testing with JET enabled on a development or test site.
Note: As in the past, Oracle CPQ cannot guarantee the behavior of custom JavaScript.
- CPQ’s JET Transaction UI applies its own Stylesheet with its own set of classes and IDs, different from the Legacy and Desktop UI stylesheets. Classes are prefixed with the ‘oj’ for Oracle JET. Existing customizations of Commerce UI styling will need to be reapplied to the new JET Stylesheet.
-
There is not a JET Transaction UI template available for downIoad. Customers will reference the default JET CSS using a web development tool, create any desired modifications to the styling, and then upload the added and updated styling elements to CPQ.
Best Practice: For optimal performance, it is recommended that only changes to the default JET styling be implemented in the JET CSS file.
- Training videos, tutorials, and working examples are available to assist your development team in making this transition at https://oracle.com/goto/jet.
- Oracle CPQ Release (18C) working examples and code (JET version 4.1.0) for are available at: http://jet.us.oracle.com/4.1.0/jetCookbook.html.
![]() How do I enable the JET Transaction UI?
How do I enable the JET Transaction UI?
Administrators have the option of enabling the new JET Responsive Layout while maintaining the existing Legacy Desktop layout and assigning user access to the layouts based on user type and user group. With both layouts enabled, existing customers can make the transition to the JET Responsive layout at their own pace.
CPQ’s JET Transaction UI is easily enabled on the Commerce Process Administration page, for detailed instructions refer to Enable the JET Responsive Layout procedure.
-
Beginning in Oracle CPQ Release 18C, the JET Transaction UI is disabled by default.
-
When customers currently using the Alta Transaction UI upgrade to Release 18C, the Alta Transaction UI will be upgraded to the JET Responsive layout and the JET Transaction UI is enabled.
![]() Tips for enabling the JET Transaction UI
Tips for enabling the JET Transaction UI
-
Enable JET for a limited group of users at first.
-
Set Line Item Grid columns wide enough to show the header text. This header text does not wrap, so try to abbreviate or shorten. Users can resize columns, but it is best to start with a width that suits the content for each column.
-
For Line Item Grid table height, choose a number that is not too high. Depending on your users' average screen size, they should be able to see 15-20 line items. Remember that users can filter to view a subset of line items across pages.
-
Use only one set of panel columns per panel. Since the JET layout is responsive, panel columns will wrap and redistribute on smaller screens. More than one set of panel columns in a single panel can result in a jumbled layout.
-
Administrators should test with a variety of Transactions, using different computers.
![]() How can I provide input to the Oracle CPQ UX direction?
How can I provide input to the Oracle CPQ UX direction?
CPQ’s User Experience team conducts periodic, ongoing usability testing to gather feedback on our UX enhancements and to validate that our new UI design patterns are intuitive and easy to learn by your users. By participating in this testing your company has an ability to preview and provide input on CPQ’s UX direction.
Please contact the CPQ's User Experience team (cpq_cloud_pm_ww_grp@oracle.com) to participate.
![]() View JET Transaction UI Limitations
View JET Transaction UI Limitations
|
User Interface Element |
Description of Key Changes, Limitations, and Known Issues |
|---|---|
|
Concurrent Quote Access Banner |
The yellow banner notification of concurrent user access to a Transaction does not display in the JET Transaction UI. In the JET Transaction UI, users are notified of concurrent access when they attempt a modify action, rather than when the other user performs an action. Instead of clicking on the Refresh action in the yellow banner, Oracle CPQ offers a new ‘Refresh’ action type that administrators can add to the UI so that users can refresh the page to continue editing. As in the legacy UI, when a concurrent access event occurs the current user may lose some of their edits when the Transaction is refreshed. |
|
JET CSS Stylesheet |
JET uses a different CSS stylesheet from the legacy standard and alt stylesheets. As a result, CSS customizations may need to be refactored to work correctly with the JET Transaction UI. For additional details, refer to Oracle CPQ JET CSS: Branding and Styling (Doc ID 2462711). |
|
JET HTML DOM |
JET uses a different Document Object Model (DOM) from legacy UI pages. As a result, JavaScript customizations may need to be refactored to work correctly with the JET Transaction UI. For additional details, refer to Oracle CPQ JET Configuration and Transaction UI: Refactoring Existing JavaScript Customizations (Doc ID 2490016). In addition, elements such as attributes that are hidden in the UI by Step or Access Rules cannot be referenced in the DOM. These attributes can be referenced in BML. |
|
Label and Field Widths |
Non-Line Item Grid label and field widths are customizable with percentage values only, consistent with the fully responsive behavior of the JET Transaction UI. |
|
Line Item Grid – Column Width and Labels |
Column Header Labels are truncated by default, when the label width exceeds the specified column width. When column widths are set to ‘auto-width’, the width does not automatically resize based upon column contents as in the legacy UI. The ‘auto-width’ setting defaults column width to 100 pixels. The View menu contains an option for users to choose Wrap Cell Content, which causes the row to expand in height to fully show the content. Additionally, users can hover on Column Headers or resize columns to view the full labels.
|
|
Line Item Grid – Drag and Drop of Lines |
Drag and Drop of line items is not supported in the JET Transaction UI. Line items can be re-sequenced by editing the Sequence Number attribute in the Line Item Grid. |
|
Multiple Main Documents |
Multiple Main Documents for a Commerce Process are not supported. |
|
Print Preview Updates a Single View |
When the user clicks a print action to open a Print Preview when a Print Preview has already been opened, the previous Print Preview will be updated. In Legacy, additional Print Previews would open separately. |
|
Read-only BOM Table (ROBOM) |
The JET Transaction UI Line Item Grid includes native support for the hierarchical display of models with System Configuration and BOMs. As a result, the read-on BOM table (ROBOM) is not needed and should be removed from the implementation to avoid CSS conflicts with the JET Transaction UI. |
|
Summation Attribute |
JET does not support the Commerce Summation attribute type, which was deprecated in 2016 R1. |
| View Action | The View action (_view_crm_action) is not supported on the JET Transaction UI. |
Administration
![]() Enable the JET Responsive Layout
Enable the JET Responsive Layout
Administrators have the option of enabling the new JET Responsive layout while maintaining the existing Legacy Desktop layout and assigning user access to the layouts based on user type and user group. With both layouts enabled, existing customers can make the transition to the JET Responsive layout at their own pace.
For example: Before enabling the JET Responsive layout for an entire sales team, customers may decide to gradually transition the sales team and initially enable the JET Responsive layout for select sales users and sales managers in limited scenarios, such as when reviewing and approving quotes.
-
Beginning in Oracle CPQ Release 18C, the JET Transaction UI is disabled by default.
-
When customers currently using the Alta Transaction UI upgrade to Release 18C, the Alta Transaction UI will be upgraded to the JET Responsive layout and the JET Transaction UI is enabled.
Complete the following steps to apply the JET Responsive layout to a specific Commerce process.
- Navigate to the Admin Home page.
-
Under Commerce and Documents, click Process Definition.
The Processes page opens.
-
Click the name of the Commerce process for which you are enabling the JET Responsive layout.
The Process Administration page opens.
-
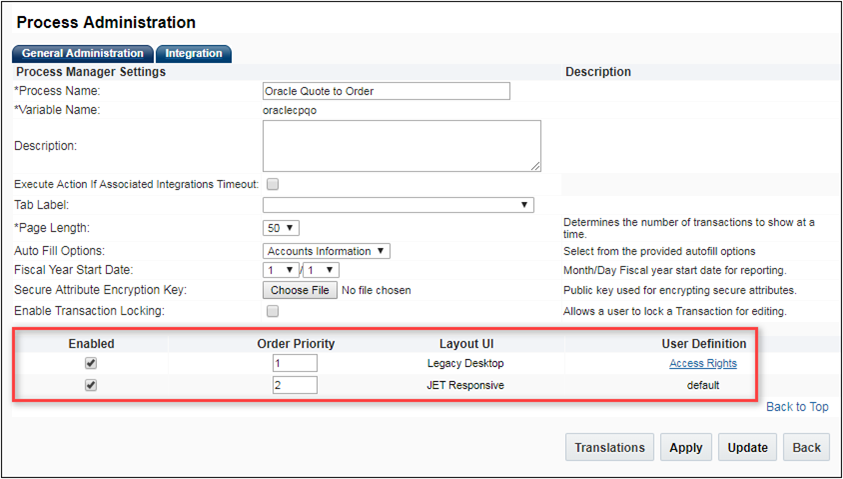
To enable the JET Responsive layout for some users and the existing Legacy Desktop layout for other users, select both the Legacy Desktop checkbox and the JET Responsive checkbox.
-or-
To enable the JET Responsive layout for all users, select the JET Responsive checkbox and unselect the Legacy Desktop checkbox.
-
Use the Order Priority fields to define the priority of each layout. Sales users with access to multiple layouts can view the layouts based on the defined priority.
-
The Legacy Desktop layout is the default layout for existing Commerce processes, which means the layout displays for users or groups not assigned access to any other assigned UI.
-
The enabled layout with the highest priority is the default layout. Administrators cannot define access rights for the default layout or disable the default layout.
-
The Priority field is editable and accepts integer values.
-
-
Click Apply.
A confirmation message displays, asking for confirmation that you want to enable the JET Responsive layout.
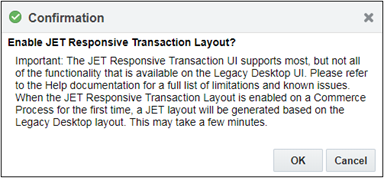
For a list of JET UI limitations, refer to JET Transaction UI Limitations.
-
Click OK.
After enabling the JET Responsive layout, an Access Rights link displays next to the JET Responsive option on the Process Administration page.

The Access Rights link is only available for enabled layouts and is not available for default layouts.
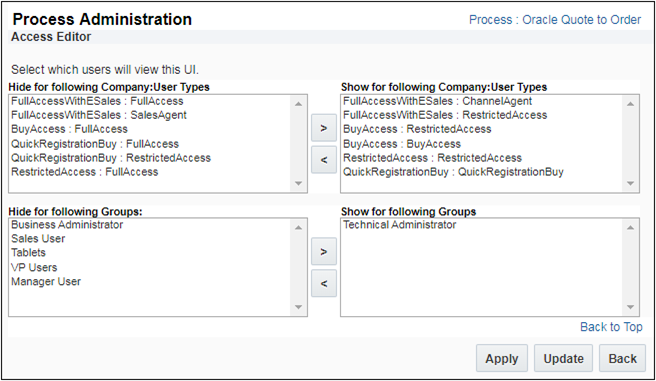
- Click the Access Rights link to open the Process Administration Access Editor, which lists all available user types and user groups.
-
Specify the user types and user groups who can access the Priority 1 layout. Only the users of the type or groups assigned to the Show column will view this layout. All others will view the Default layout.
- Click Apply or Update to apply the changes made in the Process Administration Access Editor.
- Navigate to the Admin Home page.
-
Under Commerce and Documents, click Process Definition.
The Processes page opens.
-
Select Documents from the Navigation drop-down menu for the appropriate Commerce process.
-
Click List.
The Document List page opens.
-
Select JET Responsive Layout from the Navigation drop-down menu next to either a main document (i.e. Transaction or Quote) or a sub-document (i.e. Transaction Line)

-
Click List.
Refer to the Layout Editor topic for detailed instructions.
![]() Display Editable Line Item Grid Fields Icons
Display Editable Line Item Grid Fields Icons
Complete the following steps to display editable field icons.
-
Navigate to the Commerce Processes page.
Admin > Commerce and Documents > Process Definition
- For the applicable process, select Documents in the Navigation column and click List.
-
For the applicable document, select JET Responsive Layout in the Navigation column and click List.
The Commerce Layout Editor opens.
- Click the Line Item Grid.
- Click on Settings in the side panel.
- Select the Display Editable Field Icons option to display indicator icons for editable JET Transaction UI line items.
- Click Save to retain the layout changes or Cancel to exit the layout editor without saving the changes.
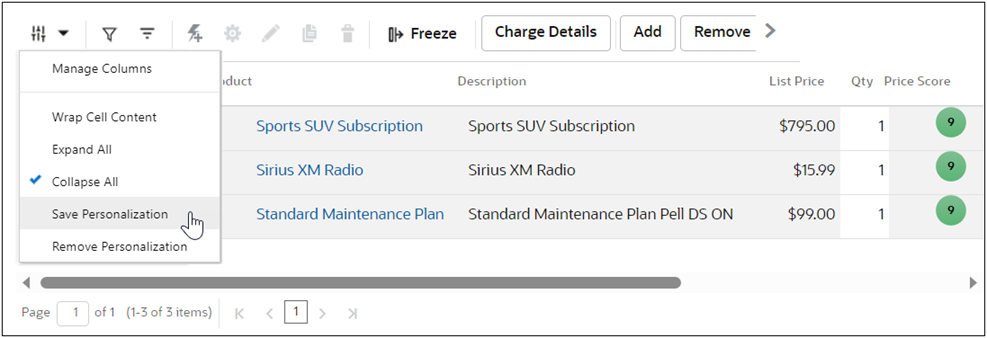
Beginning in Oracle CPQ 23D, sales users can personalize the Line Item Grid and save their respective preferences. The user's personalized Line Item Grid is retained for all transactions user has access to and all subsequent user sessions.
- Select Save Personalization from the Line Item Grid View drop-down to save preferences.
- Select Remove Personalization from the Line Item Grid View drop-down to return to the default Line Item Grid view.
![]() Create a Generate Quote Summary Action
Create a Generate Quote Summary Action
Pre-Requisites
-
Beginning in Oracle CPQ 25C, the GenAI quote summaries are available for Oracle Sales and non-Oracle CRM (e.g Salesforce or Microsoft Dynamics) integrated sites.
-
For Oracle Sales integrated sites, the Fusion CRM Integration, in the CPQ Integration Center, is used to acquire quote summaries from Oracle Fusion. Refer to How do I get started with the Revenue Transformation Solution? Oracle Sales Playbook for information on the Oracle Sales to Oracle CPQ integration.
-
For non-Oracle CRM (e.g Salesforce or Microsoft Dynamics) integrated sites a Generative AI Generic Integration for Non-Oracle CRM-Integrated Sites is required to acquire quote summaries from Oracle Fusion.
-
-
Additionally, customers must have a provisioned Oracle Fusion environment.
-
Contact My Oracle Support to enable GenAI features on the Oracle Fusion environment.
-
Set the Quote Summary Prompt:
-
Refer to Administration Interface to Manage Prompts Used for Generative AI Features
-
Seeded prompt code -
cx.cpq.quote_summary
-
Create a Generate Quote Summary Action
Complete the following steps to create a GenAI Assist type action.
-
Navigate to the Admin page.
-
Click Process Definition in the Commerce and Documents section.
-
Click on the applicable Commerce process.
-
Select Actions from the Navigation drop-down for the applicable document, and then click List.
-
Click Add at the bottom of the Actions List page.
-
Enter a Label.
-
Enter a unique Variable Name.
-
Select GenAI Assist from the Action Type from the drop-down.
-
-
Click Add to save changes and open Admin Action editor.
-
Click the Generate Summary tab.
-
Enter the Prompt Name for the Oracle Sales quote summary action.
Note: The default Prompt Name (
cx.cpq.quote_summary) for the Oracle Fusion Cloud Sales quote summary action will only work with the Standard Process.For Blank (i.e non-Standard) Processes you need to modify the prompt in Oracle Fusion Cloud Sales to include your list of attributes. Refer to Administration Interface to Manage Prompts Used for Generative AI Features for more information.
-
Click Apply or Update.
-
Deploy the Commerce process.
Note: For JET Transaction UIs, the Generate Summary action must be added to layout. Refer to the Layout Editor for more information.
![]() Display Price Waterfall in Commerce
Display Price Waterfall in Commerce
Complete the following steps to display the price waterfall in Commerce.
-
Navigate to the Admin page.
-
Click Process Definition in the Commerce and Documents section.
-
For the applicable process, select Documents from the Navigation menu, and then click List.
-
For the main document, select JET Responsive Layout from the Navigation menu, and then click List.
-
Enable the Price Waterfall:
-
Click on the Line Item Grid element in the layout section.
-
Open the side panel Settings section.
-
Select the Enable Price Waterfall option.
-
-
Display additional attributes in the Charge Details View for price waterfall.
-
Click on the desired Line Item Grid attribute in the layout section.
-
Select the Display in Price Waterfall option.
-
Repeat this step for all desired attributes.
-
-
Designate the Net Price attribute.
Note: You must select an attribute as Is Net Price Attribute when Price Waterfall is enabled.
-
Click on the desired Line Item Grid attribute in the layout section.
-
Select the Is Net Price Attribute option.
-
Click Save.
-
-
Deploy the Commerce process.
![]() JET Responsive Layout Migration
JET Responsive Layout Migration
After enabling the JET Responsive Layout, administrators can migrate the layout as part of the migration for an entire Commerce process. The Migration Center reflects changes made to the JET Responsive Layout and allows administrators to migrate the changes between sites. Administrators can also enable or disable a JET Responsive Layout using the Migration Center.
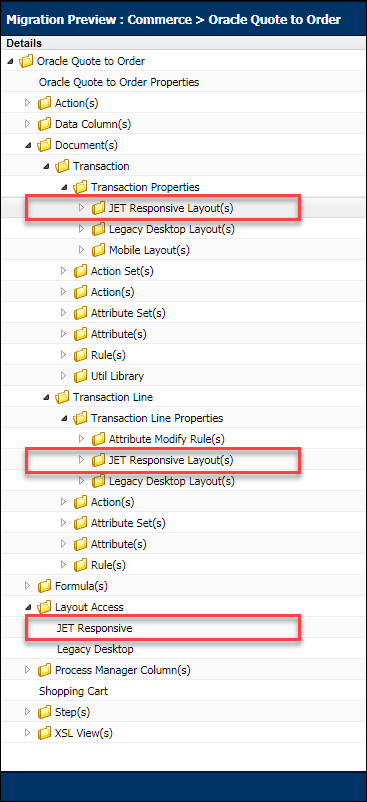
- The target site for the migration will preserve the access rights for user types but not access for user groups that differ between the two sites.
- Refer to the Migration Center topics for detailed migration information and procedures.
Notes
Notes:
- Custom JavaScript is compatible with the JET Transaction UI; however, admin users may need to resolve conflicts when first implementing the JET Transaction UI.
- The JET Transaction UI Line Item Grid includes native support for hierarchical display of models with System Configuration and BOM. As a result, the read-only BOM table (ROBOM) is not needed and should not be used in the implementation. If it is used, it may cause CSS conflicts with the JET Transaction UI.
- The default recommended page size for the Line Item Grid is 500 items per page. If you require more items per page, you must open a Service Request (SR) on My Oracle Support to have the maximum number increased.
GenAI Quote Summaries
-
The default Prompt Name (
cx.cpq.quote_summary) for the Oracle Fusion Cloud Sales quote summary action will only work with the Standard Process. -
For Blank (i.e non-Standard) Processes you need to modify the prompt in Oracle Fusion Cloud Sales to include your list of attributes. Refer to Administration Interface to Manage Prompts Used for Generative AI Features for more information.


