Overview
To edit a Document Designer template, click the template’s name in the Document Templates page. The Document Designer editor opens.
Administration
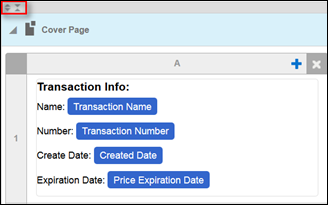
![]() Expand All / Collapse All Buttons
Expand All / Collapse All Buttons
Use the Expand All and Collapse All buttons in the header of the Document Designer Editor to expand or collapse all Document Designer layout objects (e.g. Section, Table of Contents, Header & Footer) in a template.
When expanding sections that contain more than approximately 500 components, the following warning message displays, “The maximum number of supported elements was exceeded in some sections, so not all elements are displayed. Please redistribute elements among continuous sections. Then, save and reload the template.”
To avoid performance issues when working with continuous sections, consider the following tips:
- Split large sections into small continuous sections.
- Save the template frequently as a general best practice.
- Do not have several sections expanded at the same time.
- After saving a section and before working in a new section, refresh the page to clear the browser’s cache.
- If parts of a document are static, consider creating separate files and embedding the files as components.
- As a good practice, Oracle recommends not creating extremely large sections.
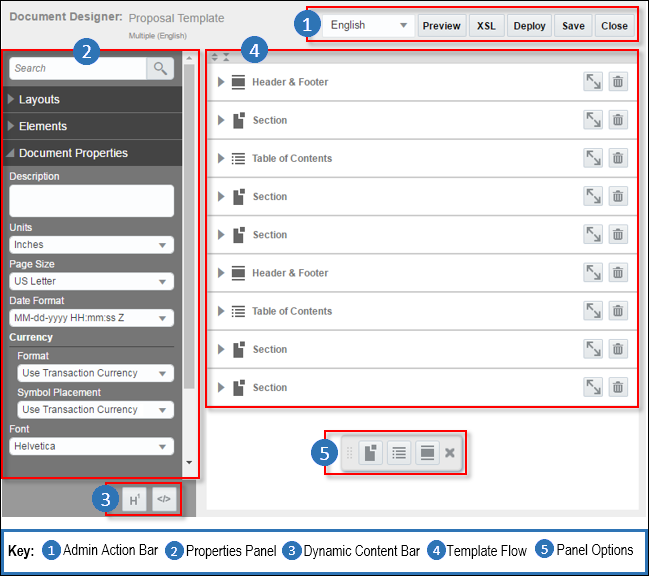
The Admin Action Bar will always contain (at minimum) the following four buttons:
- Preview
- Deploy
- Save
- Close
If the template is a multi-language template, a Language drop-down will also be present in the Admin Action Bar.
If there are inconsistencies between attribute values referenced in a template and attributes on the site, an Errors button will be present in the Admin Action Bar.
The Language drop-down determines the Language View of the Template Flow.
- If the default language is selected, all administration tasks can be done, and content can be added in the default language.
- If another language is selected, Text and Heading Elements can have translations added to them, but no other administration tasks can be done.
See the topic Document Designer: Languages and Translations for more information.
An icon over the Errors button will display how many attribute errors exist in the template. Clicking Errors opens the Errors window, which includes a description of each error and allows the admin to navigate to each error in the Template Flow.
When errors exist in the template, the Preview and XSL buttons cannot be invoked. See the topic Document Designer and Errors for more information.
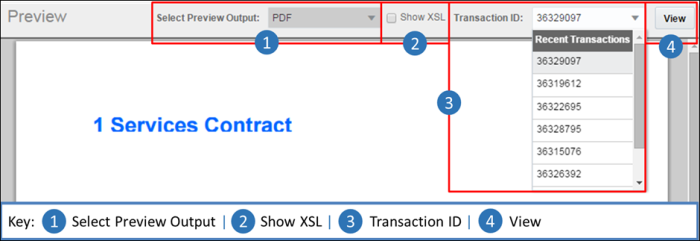
Clicking Preview opens the Preview page on a new tab in the browser, where the last-saved version of the template will be previewed as a PDF using data from the Transaction that was most recently opened by any user on the site. On the Preview page the admin can choose to preview the template in a different output type or using data from a different Transaction.
| Item | |
|---|---|
| 1 |
Select Preview Output: The output type selected determines what file type is previewed. The template can be previewed as a PDF, DOCX, or RTF file. |
| 2 |
Show XSL: If the site’s Application Administrator(s) accesses the Preview page, a Show XSL checkbox will be present in the Admin Action Bar. Regardless of what output type is selected, if Show XSL is selected, clicking View will reveal the XSL code that makes up the output instead of a PDF, DOCX, or RTF document. |
| 3 |
Transaction ID: The template will be previewed using Transaction data from the Transaction ID specified. The admin can enter a Transaction ID or choose from one of the ten Transactions that were most recently opened (by all users on the site) in the drop-down. For more information, see the topic Finding the Transaction ID. |
| 4 |
View: Clicking View will preview the template using the output format and Transaction ID selected. If PDF is selected for the preview output type, a PDF preview will be loaded in the browser window and can be saved through the browser. If DOCX or RTF is selected for the preview output type, the preview file will be downloaded to the browser. |
The XSL button reveals the XSL code that makes up the template in a new window. This button is only available to the site’s Application Administrator(s). The Application Administrator can only view the template’s XSL but not modify the code.
For more information on the relationship between the Document Designer and XSL, see the topic Document Designer and XSL.
The Deploy button deploys all saved changes in the template to Commerce so that they are available to all users on the user-side of the application.
The Save button saves all changes made to the template. This allows for unwanted changes to be undone, as an admin can close the template without saving in order to lose any unwanted changes that were made since the last save.
The Close button closes the Document Designer editor and returns the user to the Document Templates page. When the user clicks Close, a Confirmation pop-up appears to warn that unsaved changes will be lost.
The Properties panel is used to add Layouts and Elements to the template, as well as to edit the properties of individual Layouts and Elements or the properties of the template as a whole. The Properties panel contains three panes; the Layouts pane, the Elements pane, and the Properties pane. Each pane can be expanded by clicking the name of the pane. When a different pane is expanded, the previously expanded pane is collapsed.
The Layouts pane contains all Layouts that can be added to the Template Flow via drag and drop or double-clicking on the layout item. For more information, see the topic Document Designer Layouts.
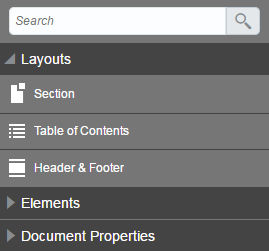
The Elements pane contains all Elements that can be added to the Template Flow via drag and drop or double-clicking on the element item. For more information, see the topic Document Designer Elements.
The Properties pane contains properties of the currently selected Layout or Element that can be modified. See each individual Layout or Element’s section for more information on what properties are shown in the Properties pane when each Layout/Element type is selected.
If more than one Layout or Element is selected, the Properties pane only shows the properties that all selected Layouts/Elements have in common. By selecting more than one item, you can edit the properties of each item at the same time. This ensures consistency in the property selections, and is more efficient than editing each item one at a time.
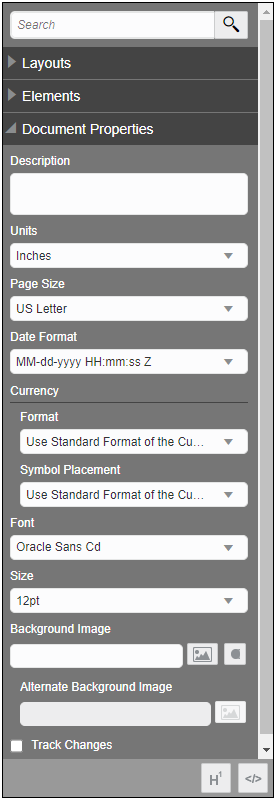
If no Layout or Element is selected, the Properties pane contains Document Properties that relate to the template as a whole. To reveal these Document Properties, click an empty space in the Admin Action Bar or in the Template Flow.
| Document Property | Description | ||||||||||||||||||||||||||||||||||||||||||||||||||||||||||||||||||||||||||||||||||||||||||||||||||||||||||||||||||||||||||||||||||||||||||||||||||||||||||||||||||||||||||||||||||||||||||||||||||||||||||||||||||||||||||||||||||||||||||||||||||||||||||||||||||||||||||||||||||||||||||||||||||||||||||||||||||||||||||||||||||||||||||||||||||||||||||
|---|---|---|---|---|---|---|---|---|---|---|---|---|---|---|---|---|---|---|---|---|---|---|---|---|---|---|---|---|---|---|---|---|---|---|---|---|---|---|---|---|---|---|---|---|---|---|---|---|---|---|---|---|---|---|---|---|---|---|---|---|---|---|---|---|---|---|---|---|---|---|---|---|---|---|---|---|---|---|---|---|---|---|---|---|---|---|---|---|---|---|---|---|---|---|---|---|---|---|---|---|---|---|---|---|---|---|---|---|---|---|---|---|---|---|---|---|---|---|---|---|---|---|---|---|---|---|---|---|---|---|---|---|---|---|---|---|---|---|---|---|---|---|---|---|---|---|---|---|---|---|---|---|---|---|---|---|---|---|---|---|---|---|---|---|---|---|---|---|---|---|---|---|---|---|---|---|---|---|---|---|---|---|---|---|---|---|---|---|---|---|---|---|---|---|---|---|---|---|---|---|---|---|---|---|---|---|---|---|---|---|---|---|---|---|---|---|---|---|---|---|---|---|---|---|---|---|---|---|---|---|---|---|---|---|---|---|---|---|---|---|---|---|---|---|---|---|---|---|---|---|---|---|---|---|---|---|---|---|---|---|---|---|---|---|---|---|---|---|---|---|---|---|---|---|---|---|---|---|---|---|---|---|---|---|---|---|---|---|---|---|---|---|---|---|---|---|---|---|---|---|---|---|---|---|---|---|---|---|---|---|---|---|---|---|---|---|---|---|---|---|---|---|---|---|---|---|---|---|---|---|---|---|---|---|---|---|---|---|---|---|---|---|---|---|---|---|---|
|
Description |
An optional description of the template for reference (this description is not visible anywhere else in the system). |
||||||||||||||||||||||||||||||||||||||||||||||||||||||||||||||||||||||||||||||||||||||||||||||||||||||||||||||||||||||||||||||||||||||||||||||||||||||||||||||||||||||||||||||||||||||||||||||||||||||||||||||||||||||||||||||||||||||||||||||||||||||||||||||||||||||||||||||||||||||||||||||||||||||||||||||||||||||||||||||||||||||||||||||||||||||||||
|
Units |
The units used to determine margins and padding within the template. Inches, millimeters, centimeters, or pixels can be selected. |
||||||||||||||||||||||||||||||||||||||||||||||||||||||||||||||||||||||||||||||||||||||||||||||||||||||||||||||||||||||||||||||||||||||||||||||||||||||||||||||||||||||||||||||||||||||||||||||||||||||||||||||||||||||||||||||||||||||||||||||||||||||||||||||||||||||||||||||||||||||||||||||||||||||||||||||||||||||||||||||||||||||||||||||||||||||||||
|
Page Size |
The size of each page in the output. |
||||||||||||||||||||||||||||||||||||||||||||||||||||||||||||||||||||||||||||||||||||||||||||||||||||||||||||||||||||||||||||||||||||||||||||||||||||||||||||||||||||||||||||||||||||||||||||||||||||||||||||||||||||||||||||||||||||||||||||||||||||||||||||||||||||||||||||||||||||||||||||||||||||||||||||||||||||||||||||||||||||||||||||||||||||||||||
|
Date Format
|
The format that determines how all date attributes appear in the output. The following Day | Date | Time values are used for the examples below: Friday | April 7, 2017 | 1:26:15 PM
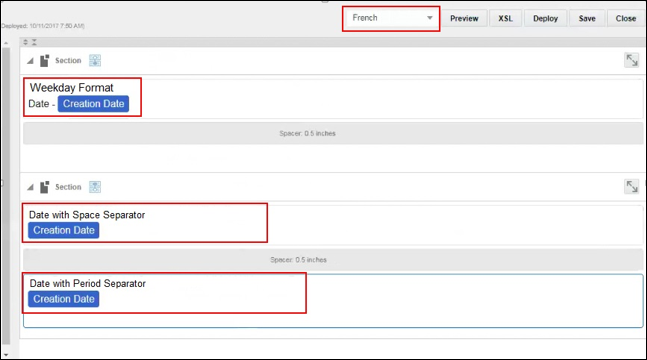
For multi-language templates, dates (i.e. month and day labels) are now translated to the output document language and visible when previewing the template in Document Designer or Email Designer. In the following example, an administrator selected French as the template's language. The date translations do not appear when viewing the template in Document Designer Editor.
As shown below, the dates translate to their French equivalent when previewing the template in Document Designer or Email Designer.
Note: The grammar for translated languages is set in the Java Library. French, Italian, and Spanish months and days are not capitalized. This is grammatically correct and the capitalization is not modifiable.
|
||||||||||||||||||||||||||||||||||||||||||||||||||||||||||||||||||||||||||||||||||||||||||||||||||||||||||||||||||||||||||||||||||||||||||||||||||||||||||||||||||||||||||||||||||||||||||||||||||||||||||||||||||||||||||||||||||||||||||||||||||||||||||||||||||||||||||||||||||||||||||||||||||||||||||||||||||||||||||||||||||||||||||||||||||||||||||
|
Currency Format |
The format that determines how all currency attributes appear in the output. Use Standard Format of the Currency #,###.## #.###,## #,###.### #,##,###.## #,### #.###,## #.### # ###.## # ###,## # ### #'###.## |
||||||||||||||||||||||||||||||||||||||||||||||||||||||||||||||||||||||||||||||||||||||||||||||||||||||||||||||||||||||||||||||||||||||||||||||||||||||||||||||||||||||||||||||||||||||||||||||||||||||||||||||||||||||||||||||||||||||||||||||||||||||||||||||||||||||||||||||||||||||||||||||||||||||||||||||||||||||||||||||||||||||||||||||||||||||||||
|
Currency Symbol |
The format that determines the placement of the currency symbol. The available options include Use Standard Format of the Currency, Left, Right, and None,
|
||||||||||||||||||||||||||||||||||||||||||||||||||||||||||||||||||||||||||||||||||||||||||||||||||||||||||||||||||||||||||||||||||||||||||||||||||||||||||||||||||||||||||||||||||||||||||||||||||||||||||||||||||||||||||||||||||||||||||||||||||||||||||||||||||||||||||||||||||||||||||||||||||||||||||||||||||||||||||||||||||||||||||||||||||||||||||
|
Font |
The default font that is selected in all Text and Heading Elements when they are created. |
||||||||||||||||||||||||||||||||||||||||||||||||||||||||||||||||||||||||||||||||||||||||||||||||||||||||||||||||||||||||||||||||||||||||||||||||||||||||||||||||||||||||||||||||||||||||||||||||||||||||||||||||||||||||||||||||||||||||||||||||||||||||||||||||||||||||||||||||||||||||||||||||||||||||||||||||||||||||||||||||||||||||||||||||||||||||||
|
Size |
The default font size that is selected in all Text and Heading Elements when they are created. |
||||||||||||||||||||||||||||||||||||||||||||||||||||||||||||||||||||||||||||||||||||||||||||||||||||||||||||||||||||||||||||||||||||||||||||||||||||||||||||||||||||||||||||||||||||||||||||||||||||||||||||||||||||||||||||||||||||||||||||||||||||||||||||||||||||||||||||||||||||||||||||||||||||||||||||||||||||||||||||||||||||||||||||||||||||||||||
|
Background Image |
A background image that will be applied to all pages within the template. For more information on Background Images, see the topic Document Designer and Background Images. |
||||||||||||||||||||||||||||||||||||||||||||||||||||||||||||||||||||||||||||||||||||||||||||||||||||||||||||||||||||||||||||||||||||||||||||||||||||||||||||||||||||||||||||||||||||||||||||||||||||||||||||||||||||||||||||||||||||||||||||||||||||||||||||||||||||||||||||||||||||||||||||||||||||||||||||||||||||||||||||||||||||||||||||||||||||||||||
|
Alternate Background Image |
An alternate background image that will be applied to all pages within the template when the Background Image Condition button is set to False. For more information on Background Images, see the topic Document Designer and Background Images. |
||||||||||||||||||||||||||||||||||||||||||||||||||||||||||||||||||||||||||||||||||||||||||||||||||||||||||||||||||||||||||||||||||||||||||||||||||||||||||||||||||||||||||||||||||||||||||||||||||||||||||||||||||||||||||||||||||||||||||||||||||||||||||||||||||||||||||||||||||||||||||||||||||||||||||||||||||||||||||||||||||||||||||||||||||||||||||
|
Track Changes |
Enables Microsoft Word’s track changes feature in .DOCX output files. |
||||||||||||||||||||||||||||||||||||||||||||||||||||||||||||||||||||||||||||||||||||||||||||||||||||||||||||||||||||||||||||||||||||||||||||||||||||||||||||||||||||||||||||||||||||||||||||||||||||||||||||||||||||||||||||||||||||||||||||||||||||||||||||||||||||||||||||||||||||||||||||||||||||||||||||||||||||||||||||||||||||||||||||||||||||||||||
|
Contract |
With the exception of the spacer element, the page element, and the column break element, the remaining Document Designer elements are identified in the .DOCX output file as clauses. |

The buttons available in the Dynamic Content Bar will vary based on what is selected. There are many potential buttons:
- Heading Styles
- Global XSL Snippet
- Inline XSL Snippet
- Loop
- Condition
- Copy
- Paste
- Merge Cells
- Split Cell
- Clear Cell
- Clear Row
- Clear Column
- Delete
Within a template, Layouts and Elements can be copied and pasted to different places within the Template Flow. All properties between the copied and pasted Layout/Element will be identical until otherwise modified. When a Layout that contains Elements is copied and pasted, all Elements within the Layout will be duplicated and will appear in the duplicated Layout.
Multiple Layouts or multiple Elements can be copied and pasted at once.
To copy and paste one or more Layout(s) or one or more Element(s):
- Select one or more Layout(s) or one or more Element(s) in the Template Flow.
- To select more than one item, click on the first item and press the Ctrl key while clicking the other item.
- Click the Copy button (
 ) in the Dynamic Content Bar.
 - If an Element was copied, select a Section or a Header & Footer in the Template flow to paste the Element to. If a Layout was copied, select a blank place in the Template Flow so that no Layouts or Elements are selected.
- Click the Paste button (
 ) in the Dynamic Content Bar.
A Layout and an Element that is within a different Layout cannot be copied and pasted at the same time.
The Template Flow is the main editing area of the Document Designer editor. All Layouts and Elements must be dragged into the Template Flow to be added to the template.
![]() Adding Layouts and Elements to the Template Flow
Adding Layouts and Elements to the Template Flow
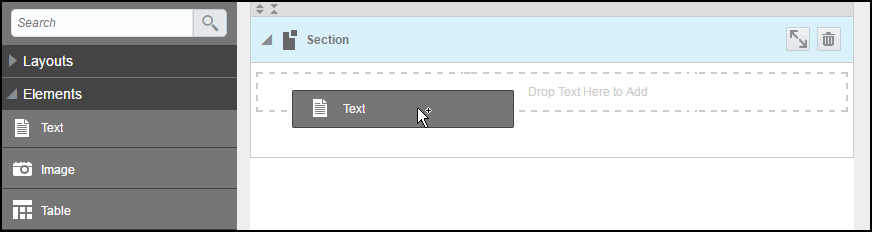
Layouts and Elements are added to the template via drag and drop.
To add a Layout to the Template Flow:
- Click Layouts in the Properties panel to expand the Layouts pane.
-
Click and drag, or double click, the Layout you wish to add to the template to the Template Flow.
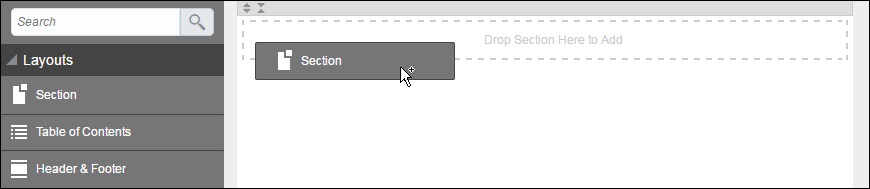
To add an Element to a Layout in the Template Flow:
- Click Elements in the Properties panel to expand the Elements pane.
-
Click and drag, or double click, the Element you wish to add to the template into a Layout in the Template Flow.
![]() Using Palettes to Add Layouts and Elements
Using Palettes to Add Layouts and Elements
Administrators can use a palette of options to add layouts and layout elements from the palette to the layout editor. The following figure shows the palette of options minimized in the layout editor.
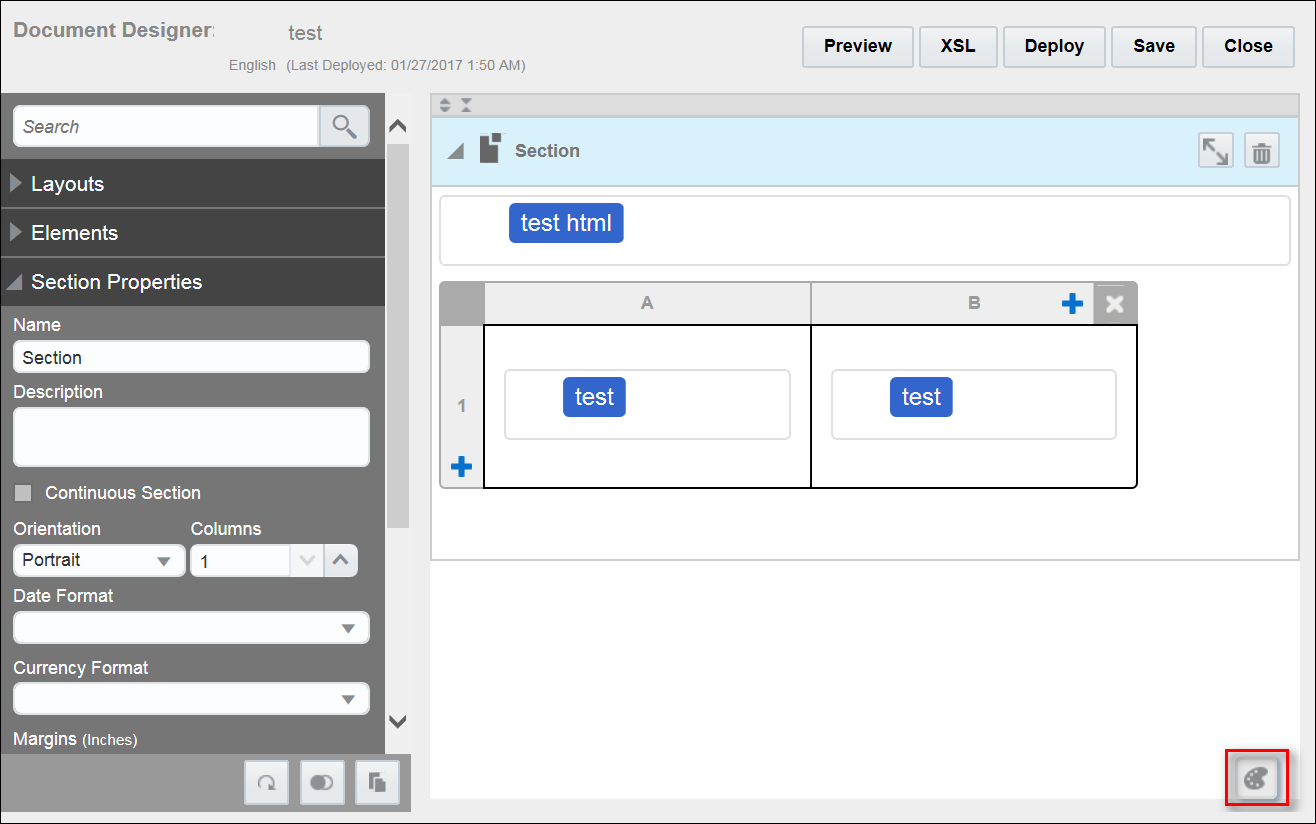
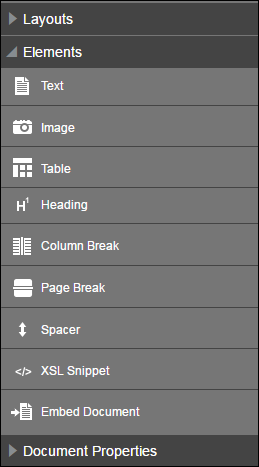
Click the palette to expand its contents, which will vary based on the layout or element selected in the layout editor. For example: When a Section is selected in the layout editor, the palette displays options for Section, Table of Contents, Header & Footer, Text, Image, Table, Heading, Column Break, Page Break, Spacer, XSL Snippet, Embed Document, and Hide Palette. Administrators can click a palette icon to add the associated element to the layout editor.

When administrators select a Header & Footer in the layout editor, the palette displays icons for Section, Table of Contents, Header & Footer, Text, Image, Table, Spacer, XSL Snippet, and Embed Document.

When administrators select a Table of Contents in the layout editor, the palette displays options for Section, Table of Contents, and Header & Footer.

When administrators select a Table Cell in the layout editor, the palette displays options for Section, Table of Contents, Header & Footer, Text, Image, Spacer, XSL Snippet, and Embed Document.

![]() Managing Layouts in the Template Flow
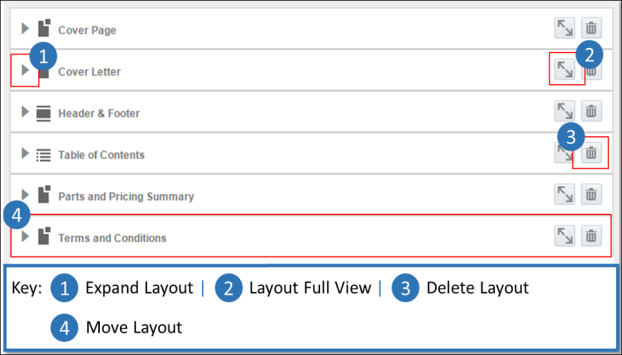
Managing Layouts in the Template Flow
| Item | Description |
|---|---|
| 1 |
Click the Expand icon ( |
| 2 |
Click the Full View icon ( |
| 3 |
Click the Delete icon to remove a Layout and all the Elements within the Layout from the Template Flow. A Confirmation pop-up will appear to confirm that the Layout should be deleted. |
| 4 |
Rearrange Layouts in the Template Flow by clicking and dragging Layouts to new locations in the Template Flow. |
![]() Managing Elements in the Template Flow
Managing Elements in the Template Flow

| Item | Description |
|---|---|
| 1 |
Hover over or select an Element to reveal the Delete ( |
| 2 |
Rearrange Elements in the Template Flow by clicking and dragging the Elements to new locations. Elements can be moved from one Layout to another Layout, or within a Layout. |
 ) icon


