Document Designer Languages and Translations
Overview
The Document Designer supports additional language translations in two ways:
- Separate Document Designer templates, with one for each language
- One Document Designer template, with translations for each language within the template
Administration
 Example
In the example below, there are three separate Proposal templates—one for each translation. However, the Contract template is multilingual and contains translations for all necessary languages within the single template.
- ProposalTemplate + English
- ProposalTemplate + German
- ProposalTemplate + Japanese
- ContractTemplate + Multilingual (English is the default language)
This one template contains a hybrid of translations.
Whether multiple templates should be used for translations or if a single template should be used for translations must be decided on a customer-by-customer, template-by-template basis.
| Advantages |
Each Translation template can be worked on simultaneously by multiple admins, and it is easier to make individual language templates different from each other if desired.
|
All layout, design, property, etc. changes only need to be done once.
|
| Considerations |
All layout, design, property, etc. changes must be done for each template file.
|
Only one language can be translated at a time, and much more administration work is required if outputs for each language need to be different in other ways besides their translations.
|
 Language Attribute
A Commerce attribute type, Language, can be created at the Quote/Transaction-level and placed on the Commerce layout. When linked to a Print or Email action, the value of the Language attribute specifies what language the Document Designer template that is linked to the action should be outputted in upon printing.
A Language Attribute menu exists on the XSL Views tab of Print and Email actions in order to associate a Language attribute with the action.

Attributes in general are discussed in the topic Commerce Document Attributes.
 Creating a Language attribute
- Click Admin to go to the Admin Home Page.
-
Click Process Definition under Commerce and Documents.
The Processes page opens.
- For the process for which you want to create the Language attribute, confirm that Documents is selected in the Navigation column and click List.
-
For the Main Document, such as Quote or Transaction, make sure Attributes is selected in the Navigation column and click List.
The Attribute List page opens.
- Click Add.
-
Enter a Label and Variable Name for the attribute.
The Variable Name field populates automatically. Variable names can only contain alpha-numeric characters and underscores. The entry can be changed before saving, but after saving the value is read-only.
-
Select Language from the Attribute Type drop-down.

- Click Add to add the attribute.
The Language attribute can be added to the Commerce Quote/Transaction-level layout, referenced in functions and Formulas, etc.
 Linking a Language attribute to a Print or Email action:
- Click Admin to go to the Admin Home Page.
-
Click Process Definition under Commerce and Documents.
The Processes page opens.
- For the process for which you want to link the Language attribute to a Print or Email action, confirm that Documents is selected in the Navigation column and click List.
-
For the Main Document, such as Quote or Transaction, make sure Actions is selected in the Navigation column and click List.
The Action List page opens.
- Click the Print or Email action you want to modify.
- Click the XSL Views tab.
-
Select the Language attribute from the Language Attribute drop-down.

- Click Apply or Update to save the action.
 Multiple Templates for Translations
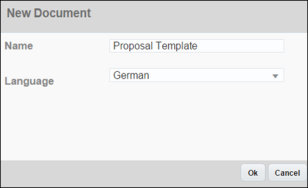
When creating multiple templates to handle translations, all templates should be given the same name, but a different language should be chosen for each template upon creation. When all templates are given the same name, only one name must be associated with the Printer Friendly XSL View, so only one XSL View and one Print/Email action must be created and maintained to support multiple templates.
When the Print/Email action is invoked, the system will output the template whose name is associated with the Printer Friendly XSL View and whose language setting matches the value of the Language attribute that is associated with the Print/Email action.
If Document Designer templates have the same name, they cannot have the same language setting.
If multiple templates are being used for Translations, and if there is no template that matches the value of the Language attribute, and there is not a multi-lingual template defined, an error will be shown when the user attempts to output the template.
- Click Admin to go to the Admin Home Page.
- Click Document Designer under Commerce and Documents.
- Click Create.
- Enter a Name for the template.
-
Select a Language for the template.

- Click OK.
- Click Save.
- In the top right corner of the Document Designer editor, click Deploy.
- Click Close to return to the Document Templates page.
- Repeat steps 3-9 for additional templates as necessary. For step 4, enter the same name for all additional templates. For step 5, select a different language for each additional template.
- Link the template name that is associated with all the different language templates to a Printer Friendly XSL View.
- Associate a Commerce Language attribute with the Print/Email action that is linked to the Printer Friendly XSL View.
- Optionally add the Print/Email action to the Commerce layout, or use the Language attribute in a function, Formula, etc.
 Multi-Language Template for Translations
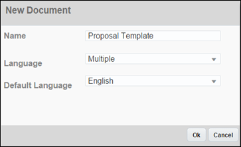
When creating multi-language template to handle translations, Multiple should be selected for Language and a default language must be chosen.
When the Print/Email action is invoked, the output of the template will show all translated Elements whose translation language matches the value of the Language attribute that is associated with the Print/Email action.
For example, if the value of the Language attribute is German, all Text and Heading Elements that have German translations associated with them will appear in German in the output. If a Text or Heading Element does not have a translation associated with it, it will appear in the default language in the output unless it is hidden with a Condition that uses the value of the Language attribute to determine in the Element should be shown or hidden.
If no Language attribute is associated with the Print/Email action, if the Language attribute has no value, if the value of the Language attribute does not match a language that exists in the template, or if the template has no translations associated with its Text or Heading Elements, the template will output in its default language.
- Click Admin to go to the Admin Home Page.
- Click Document Designer under Commerce and Documents.
- Click Create.
- Enter a Name for the template.
-
Select Multiple from the Language drop-down.
The Default Language drop-down appears.
-
Select a default language from the Default Language drop-down.

- Click OK.
- Optionally add translations for your content.
- Click Save.
- In the top right corner of the Document Designer editor, click Deploy.
- Click Close to return to the Document Templates page.
- Link the template name to a Printer Friendly XSL View.
- Associate a Commerce Language attribute with the Print/Email action that is linked to the Printer Friendly XSL View.
- Optionally add the Print/Email action to the Commerce layout, or use the Language attribute in a function, Formula, etc.
 Adding Translations
Text and Heading Elements within multi-language templates can have translations added to them so that the translated content appears in the output when the value of the Language attribute corresponds to the language of the translations.
The Translation window for a Text or Heading Element can be accessed in two ways.
-
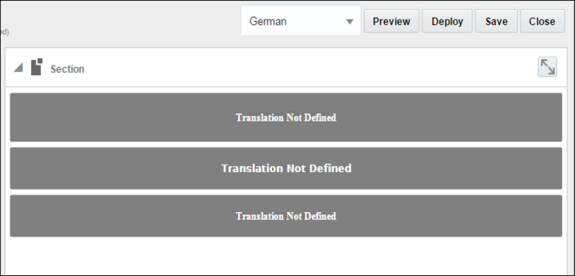
Select the language that translation content will be entered for in the Language drop-down in the Admin Action Bar.

The Translation view of the Template Flow appears.

-
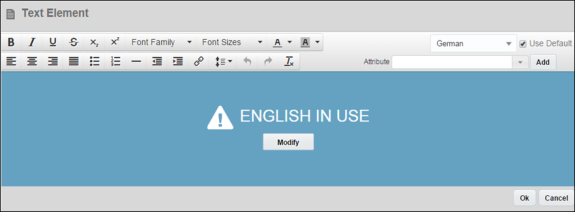
Double-click a Text or Heading Element to add translation content or to modify existing translation content.
The Text/Heading Element dialog box appears.

- Click Modify.
- Enter translated content as needed.
- Click OK to save the translation.
-
Double-click a Text or Heading Element to add translation content to or to modify existing translation content.
The Text/Heading Element editor window appears.
-
Select the language that translation content will be entered for in the Language drop-down.

- Click Modify.
- Enter translated content as needed.
- Click OK to save the translation.
Notes
- Customers may need have additional fonts installed to support PDF output for non-English languages.
- When a single-language template and a multi-language template have the same name, and the value of the Language attribute, associated with the Print action, matches the language of the single-language template, the single-language template will be used.
- When a single-language template and a multi-language template have the same name, but the Print/Email action does not have a Language attribute associated with it, and when the language preference of the user matches that language of the single-language template, the single-language template will be used.
- Use Default: Within the Translation window of Text and Heading Elements there is a Use Default option. Selecting this checkbox and then saving the Element will clear any translation content from the editor window. If the template is printed and the Translation editor window for the selected language has Use Default selected, the Element will appear in the output in the template’s default language.
- When you are in the Translation view of the Template Flow, you cannot add, move, or delete Layouts and Elements. Similarly, you cannot change Layout and Element properties. Only Translations can be added or deleted within the Translation view, but no other modifications can be made to the template until the Default Language view is restored.
Related Topics
 See Also
![]() Linking a Language attribute to a Print or Email action:
Linking a Language attribute to a Print or Email action:
![]() Multiple Templates for Translations
Multiple Templates for Translations
![]() Multi-Language Template for Translations
Multi-Language Template for Translations


