Commerce Process
Overview
Commerce Processes are used to create templates for the selling processes used by your company. With Commerce Processes, you set up your quoting, ordering, approval, and other workflow processes. By creating ordered sets of Commerce document templates, along with associated attributes and actions, you enable buyers and supplier agents to conduct transactions on your customized Oracle CPQ application. Each Commerce Process can be customized according to how you want to structure data flows for different users during the Transaction life cycle. You can create one Process for all Commerce Transactions or multiple Processes based on different purchase types.
- Process Definition: Define your Commerce documents, attributes, actions and proposal views.
- Process Invocation: Define rules that enable the user to invoke your Commerce Process from pages in the application, such as Configuration and Parts pages.
Commerce Process tasks are administrated in an inactive, pending state. For a new Process (or a change to an existing Process) to be visible on the production side of CPQ, the Process must be deployed.
Standard Process
Beginning in Oracle CPQ 23B, the Standard Process is delivered for new Oracle Sales integrated site installations and is the default process when creating a new Commerce process. The new Standard Process simplifies administrator setup for ABO implementation and Commerce integrations, standardizes the quote object with seeded and systemized functional logic, and provides a unified solution for Sales, Subscription, and Order Management. New and existing customers will have the ability to create a new Standard Process that is automatically populated with documents, attributes, actions, rules, library functions, layouts, data columns, Commerce integrations, and workflow steps.
There is no change to existing Commerce process definitions. Refer to Standard Process for more information.
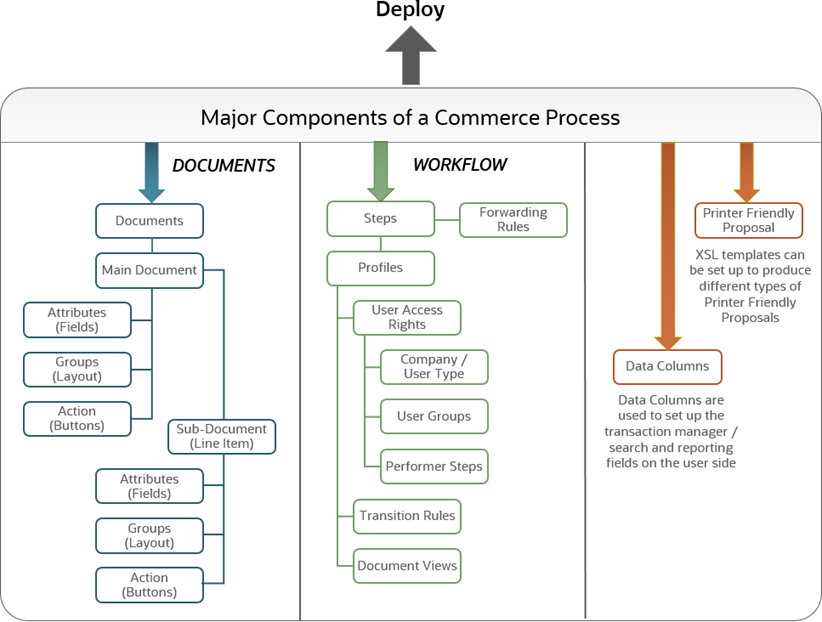
 Major Components of a Commerce Process
Commerce Processes Page
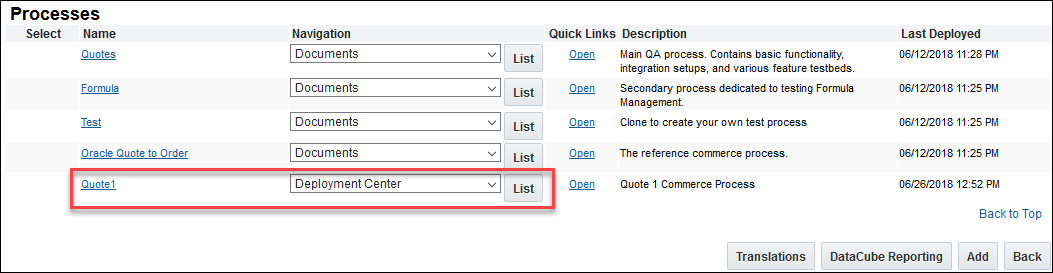
The Processes page displays a list of available Commerce Processes, along with various navigation options, Quick Links for the other available options, descriptions for the available Processes, and the date and time the Processes were last deployed.
To access Commerce processes, navigate to: Admin > Commerce and Documents > Process Definition
The following actions are available from the Processes page:
Commerce Process List Page Navigation Menu Options
- Documents: Provides access to manage documents within the selected process.
-
Steps: Provides access to manage steps and workflows.
At least one main document must be created before Steps can be created and accessed.
-
Process Actions: Provides access to customize process actions.
At least one main document must be created before Process Actions can be created and accessed.
-
Data Columns: Provides access to manage Data Columns.
At least one main document must be created before Data Columns can be created and accessed.
-
Process Manager: Provides access to map process columns for the Commerce Manager.
At least one main document must be created before Process Manager can be created and accessed.
- Printer Friendly/History XSL Views: Provides access to manage XSL templates for printer friendly proposal formats or transaction history outputs.
- Text Library Templates:Provides access to the RTE Editor to manage predefined templates that are used in Rich Text attributes.
- Composite Attribute XSL Views: Provides access to control the display of attributes from the transaction XML on the UI.
-
Integrations: Provides access to Commerce Integrations.
Integration is only available for companies that have this module turned on. If you want to learn more about Oracle CPQ integration module, please contact your system FullAccess User.
- Stylesheet:
- Shopping Cart: Provides access enable the Shopping Cart and manage Shopping Cart settings.
- Formulas: Provides access to Formula Management to write formulas that will set Commerce attribute values through a drag & drop interface and a visual editor.
- Analytics: Provides access to create and manage Deal Management analytics.
- Deployment Center: Provides access to deploy, mange, and delete the Commerce process.
Process Administration Page
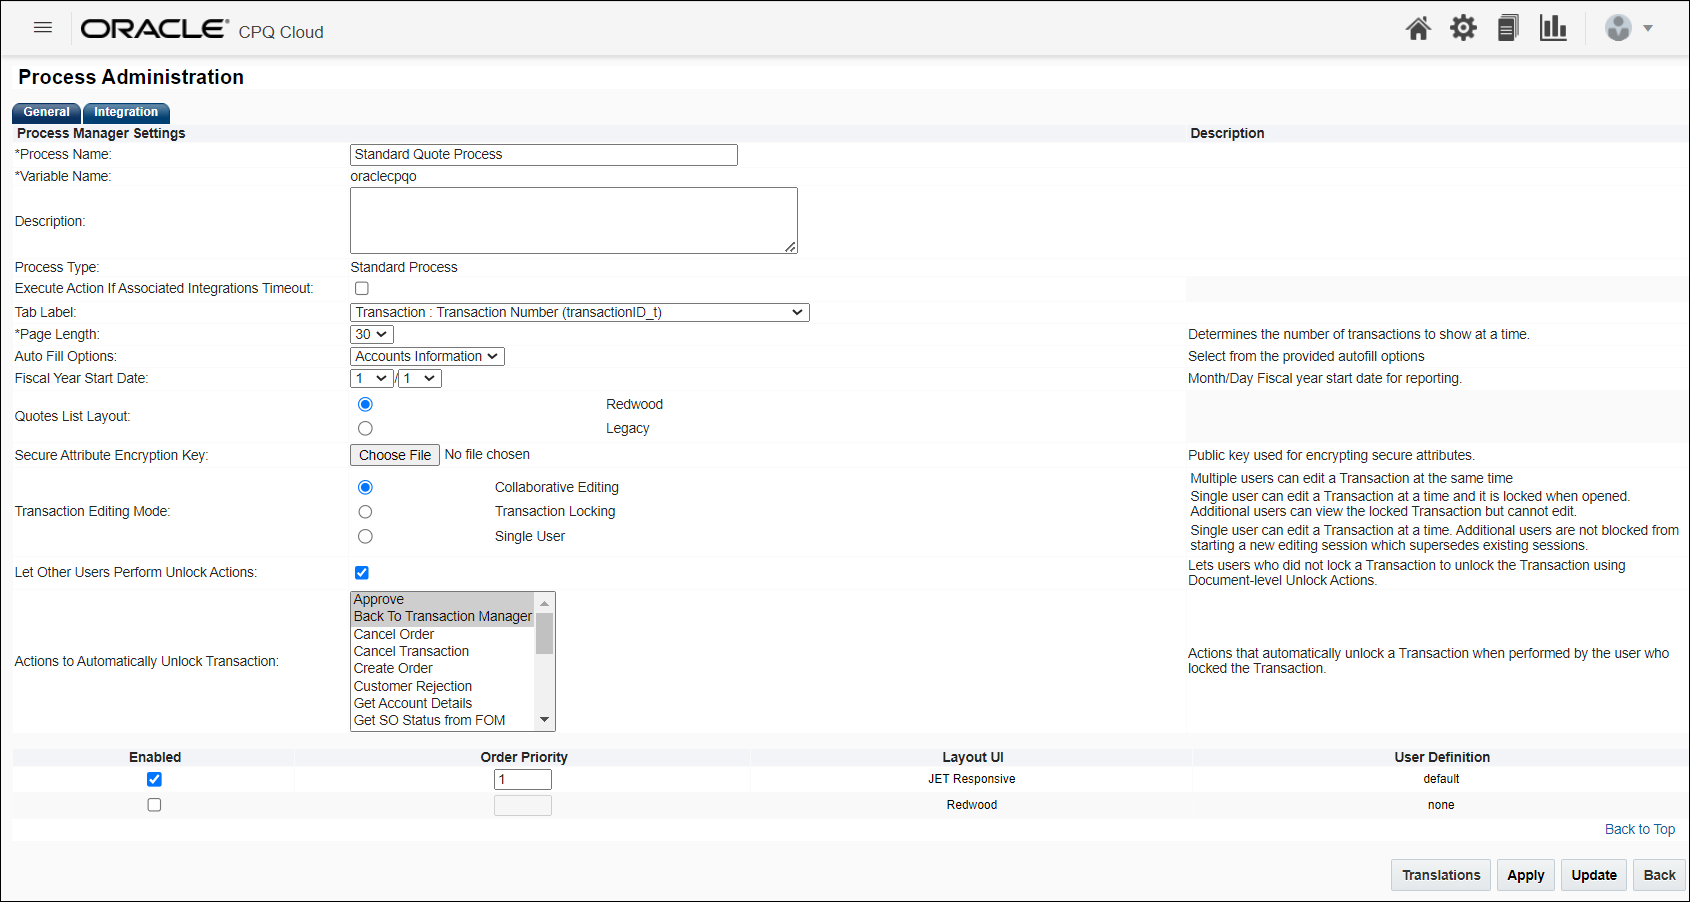
The Process Administration page provides information and settings for a Commerce Process.
To access a Commerce Process Administration page, navigate to: Admin > Commerce and Documents > Process Definition
Then click on the desired Commerce name link.
Process Type
The Process Type option was introduced in Oracle CPQ 23B to allow administrators to create a Blank or Standard Process. Typically, Standard Process is the only available option.
Notes:
- Customers can create a new pre-populated process using the Standard Process.
- It is very unusual to create a blank Commerce Process or documents from scratch; customers typically use the default Commerce Process and its documents.
- If another Commerce Process or Document is required, best practice is to clone the existing Commerce Process or Document and then delete everything that isn’t needed.
- For more information on cloning a Commerce Process, see Commerce Deployment Center.
Execute Action If Associated Integrations Timeout
Select this option to allow an action to execute when an integration XSL or a middleware integration times out. By default, this checkbox is unselected.
When selected, the action continues regardless of any associated integration timeout. A warning message displays to the end user, and Oracle CPQ logs information about the integration that timed out.
Page Length
Select the number of transactions you want to display on the Transaction Manager page.
Note: This setting does not control the number of transactions displayed on the Redwood Quotes List UI.
Auto Fill Options
Use this setting to select auto-fill options for new transactions.
- None: New transactions are NOT auto-populated with user or accounts information.
- User Information: New transactions are auto-populated with user information.
- Accounts Information: New transactions are auto-populated with Accounts information.
Fiscal Year Start Date
Use these fields to set when the fiscal year starts for this process. The first field represents the month and the second field represents the day of the month.
Quotes List Layout
This setting designates the layout for the quotes / transactions list page.
Secure Attribute Encryption Key
This setting allows you to select a public key for secure attributes.
Stage
This setting enables subsets of transactions within different phases of the transaction lifecycle.
- Quote - the default phase of the transaction lifecycle.
- Order - enables the ordering phase of the transaction lifecycle.
- Agreement - enables the agreement phase of the transaction lifecycle.
Notes:
- Upon upgrade to Oracle CPQ 24D all current transactions are set to the Quote stage.
- The Order stage is automatically enabled when a new Standard Process is created.
- Once the Order stage is enabled for a Standard Process it can't be disabled.
Transaction Editing Mode
This option specifies the editing mode for a transaction.
- Collaborative Editing - Multiple users can edit a Transaction at the same time.
- Transaction Locking - Single user can edit a Transaction at a time and it is locked when opened. Additional users can view the locked Transaction but cannot edit.
- Single User - Single user can edit a Transaction at a time. Additional users are not blocked from starting a new editing session which supersedes existing sessions.
Let Other Users Perform Unlock Actions
This setting is available for Collaborative Editing and Transaction Locking modes. When enabled, it allows users who did not lock a Transaction to unlock the Transaction using Document-level Unlock Actions.
Actions to Automatically Unlock Transaction
This setting is available for Collaborative Editing and Transaction Locking modes. It is used to define actions that automatically unlock a transaction when performed by the user who locked the transaction.
Transaction UI Layouts
- Select JET Responsive to enable the JET Responsive Transaction UI layout.
- Select Legacy Desktop to enable the legacy layout.
Large Attribute Size Limitations
Oracle CPQ 24D provides the ability to limit attribute size for potentially large attributes on a transaction. Size limits can be implemented for Rich Text, Text Area, History, and File Attachment attributes. Additional size limitations can be implemented to limit total allowed size of large attributes for a transaction and a transaction line
When large attribute size limitations are implemented for a CPQ site the individual attribute value size limits, transaction size limit, and transaction line limit are displayed on the Commerce Process Administration page. User errors are also displayed for the following user actions:
The following large attribute size limitations are automatically provisioned for new site implementations:
- Rich Text – 32 kb
- Text Area – 32 kb
- History - 32 kb
- Main Document - 100 MB
- Sub Document - 5 MB
Notes:
-
There is no impact for existing customer sites. Large attribute size limitations will not be applied upon upgrade to Oracle CPQ 24D.
-
Customers can submit a Service Request (SR) on tMy Oracle Support to implement large attribute size limitations for existing sites.
Administration
Setting up and Using a Commerce Process
- Create a Process and save it.
- Add main and sub-documents to the Commerce Process.
- For each document, create attributes, actions, and views.
- Develop XSL views for Print, Email, and Change History actions.
- Customize Process actions for the Transaction Manager.
- Create the Transaction Manager Column layout using Data Columns.
-
Design the Process workflow steps.
In each workflow step, create participant profiles to control user access. Participant profiles must be further defined using:
- User access rights
- Transition rules
- Document views
- Set up forwarding rules within workflow steps to automatically forward Transactions to groups upon creating or saving a Transaction.
- Create timers to automatically perform Commerce actions and auto-forwarding rules to support collaborative workflows.
- Deploy the Commerce Process.
Add a Commerce Process
Complete the following steps to create a new Commerce Process.
Note: Customers can create a new pre-populated process using the Standard Process. It is very unusual to create a blank Commerce Process or documents from scratch; customers typically use the default Commerce Process and its documents. If another Commerce Process or Document is required, best practice is to clone the existing Commerce Process or Document and then delete everything that isn’t needed. For more information on cloning a Commerce Process, see Commerce Deployment Center.
-
Navigate to the Admin Home Page.
-
Click Process Definition in the Commerce and Documents section.
-
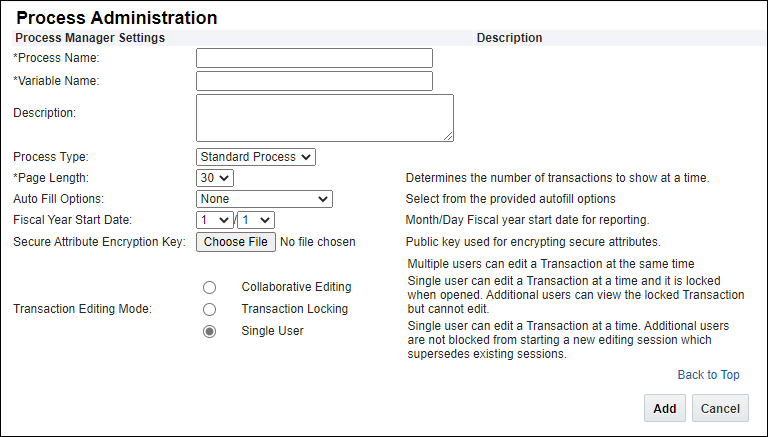
Click Add.
-
Enter a name in the Process Name field.
The Process name you choose is used as the navigation link to the Commerce Manager.
-
Enter a unique Variable Name.
The Variable Name field populates automatically. Variable names can only contain alpha-numeric characters and underscores. The entry can be changed before saving, but after saving the value is read-only.
-
Enter a Description for the Process being added.
-
Select a Process Type.
Notes:
- The Process Type is not available for releases prior to Oracle CPQ 23B.
- Standard Process is typically the only available option.
-
Use the Page Length drop-down to select the number of transactions you want to display on the Transaction Manager page.
Note: This setting does not control the number of transactions displayed on the Redwood Quotes List UI.
-
Select the Auto Fill Options for new transactions.
- None: New transactions are NOT auto-populated with user or accounts information.
- User Information: New transactions are auto-populated with user information.
- Accounts Information: New transactions are auto-populated with Accounts information.
-
Select dates in the Fiscal Year Start Date fields.
The first field represents the month and the second field represents the day of the month.
-
Select the Quotes List Layout setting.
- Select Redwood to enable the Redwood Quotes List UI.
- Select Legacy to enable the legacy Transaction Manager.
- Next to Secure Attribute Encryption Key, click Choose File to select a public key for secure attributes.
-
Select Stages to enable subsets of transactions within different phases of the transaction lifecycle.
- Quote - the default phase of the transaction lifecycle.
- Order - enables the ordering phase of the transaction lifecycle.
- Agreement - enables the agreement phase of the transaction lifecycle.
Notes:
- Upon upgrade to Oracle CPQ 24D all current transactions are set to the Quote stage.
- The Order stage is automatically enabled when a new Standard Process is created.
- Once the Order stage is enabled for a Standard Process it can't be disabled.
- Select the Transaction Editing Mode:
- Collaborative Editing - Multiple users can edit a Transaction at the same time.
- Transaction Locking - Single user can edit a Transaction at a time and it is locked when opened. Additional users can view the locked Transaction but cannot edit.
- Single User - Single user can edit a Transaction at a time. Additional users are not blocked from starting a new editing session which supersedes existing sessions.
-
Click Add to save the Process and return to the Processes page or click Cancel to return to the Processes page without saving your changes.
-
After the process is created, proceed to Edit a Commerce Process to set the following parameters:
- Execute Action If Associated Integrations Timeout
- Tab Label
- For Collaborative Editing or Transaction Locking modes:
- Let Other Users Perform Unlock Actions
- Actions to Automatically Unlock Transaction
- Transaction UI Layout
Edit a Commerce Process
Complete the following steps to modify a Commerce Process.
-
Navigate to the Admin Home Page.
-
Click Process Definition in the Commerce and Documents section.
-
Click the Process link in the Name column.
-
If desired, modify the Process Name.
The Process name you choose is used as the navigation link to the Commerce Manager.
-
If desired, modify the Description.
-
Select the Execute Action If Associated Integrations Timeout option to allow an action to execute when an integration XSL or a middleware integration times out. By default, this checkbox is unselected.
When selected, the action continues regardless of any associated integration timeout. A warning message displays to the end user, and Oracle CPQ logs information about the integration that timed out.
- Select an attribute from the Tab Label drop-down.
- Use the Page Length drop-down to select the number of Commerce Transactions you want to display on the Commerce Manager page.
-
Select the Auto Fill Options for new transactions.
- None: New transactions are NOT auto-populated with user or accounts information.
- User Information: New transactions are auto-populated with user information.
- Accounts Information: New transactions are auto-populated with Accounts information.
The first field represents the month and the second field represents the day of the month.
- Select dates in the Fiscal Year Start Date fields.
- Select the Quotes List Layout:
- Select Redwood to enable the Redwood Quotes List UI.
- Select Legacy to enable the legacy Transaction Manager.
- Next to Secure Attribute Encryption Key, click Choose File to select a public key for secure attributes.
-
Select Stages to enable subsets of transactions within different phases of the transaction lifecycle.
- Quote - the default phase of the transaction lifecycle.
- Order - enables the ordering phase of the transaction lifecycle.
- Agreement - enables the agreement phase of the transaction lifecycle.
Notes:
-
Upon upgrade to Oracle CPQ 24D all current transactions are set to the Quote stage.
-
The Order stage is automatically enabled when a new Standard Process is created.
-
Once the Order stage is enabled for a Standard Process it can't be disabled
- Select the Transaction Editing Mode:
- Collaborative Editing - Multiple users can edit a Transaction at the same time.
- Transaction Locking - Single user can edit a Transaction at a time and it is locked when opened Additional users can view the locked Transaction but cannot edit.
- Single User - Single user can edit a Transaction at a time. Additional users are not blocked from starting a new editing session which supersedes existing sessions.
-
If applicable, select Let Other Users Perform Unlock Actions to allow users who did not lock a Transaction to unlock the Transaction using Document-level Unlock Actions.
- If applicable, select actions from the Actions to Automatically Unlock Transaction drop-down to define actions that automatically unlock a Transaction when performed by the user who locked the Transaction.
- Enable Transaction UI Layouts:
- Select JET Responsive to enable the JET Responsive Transaction UI layout.
- Select Legacy Desktop to enable the legacy layout.
-
Click one of the following actions:
- Apply to save the Process and refresh the page
- Update to save changes and return to the Processes page
- Cancel to return to the Processes page without saving your changes.
Enable a Commerce Process Stage
Complete the following steps to enable the Order and/or Agreement stage(s) for a Commerce Process.
-
Navigate to the Admin page.
-
Click Process Definition in the Commerce and Documents section.
-
Click on the Name link for the applicable Commerce process.
-
Select the Order and/or Agreement option(s) for the Stage setting.
-
Click Apply or Update.
Note: The Commerce Process Stage parameter allows administrators to enable/disable relevant stages for the associated process transactions.
-
Quote is the default stage and cannot be disabled.
-
The Order stage is automatically enabled for new Standard Processes.
-
When the Order stage is enabled for an existing Standard Process, it cannot be disabled.
Deploy a Commerce Process
Complete the following steps to deploy a Commerce Process.
-
Navigate to the Admin Home Page.
-
Click Process Definition in the Commerce and Documents section.
-
Select Deployment Center from the applicable process Navigation drop-down, and then click List.
-
Select the Deploy Event Type.
-
Select the Send Confirmation Email To:
-
To schedule a deployment, enter the desired date and time (in mm/dd/yyyy hr:mm AM/PM format) in the Scheduled Time field.
-
Click Add Event.

-
If desired, you can cancel the scheduled deployment by selecting the new event and clicking Delete.
You cannot remove an event if the deployment has already started.
-
Click Refresh to display the updated information on the page.
Delete a Commerce Process
Complete the following steps to delete a Commerce Process.
-
Navigate to the Admin Home Page.
-
Click Process Definition in the Commerce and Documents section.
-
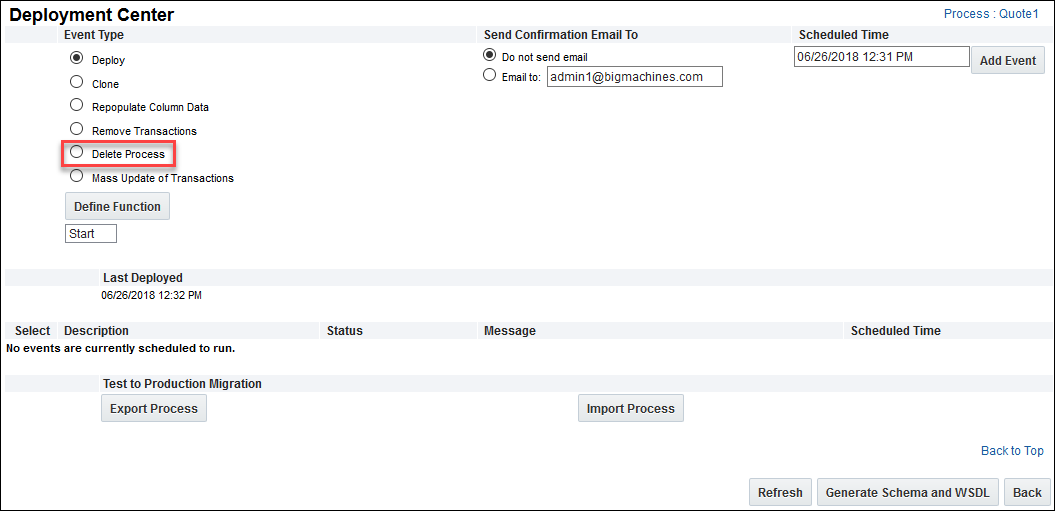
Select Deployment Center from the applicable process Navigation drop-down, and then click List.
-
Select Delete Process from the Deployment Center page for the Commerce process.
-
A confirmation of delete message displays indicating that the process and all related data and transactions will be deleted. Click OK to proceed with the deletion or Cancel to not perform the delete action.
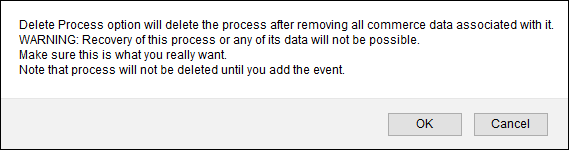
Recovery of the Commerce process and its associated data is not possible. Make sure you want to move forward with the delete option before you click OK.
-
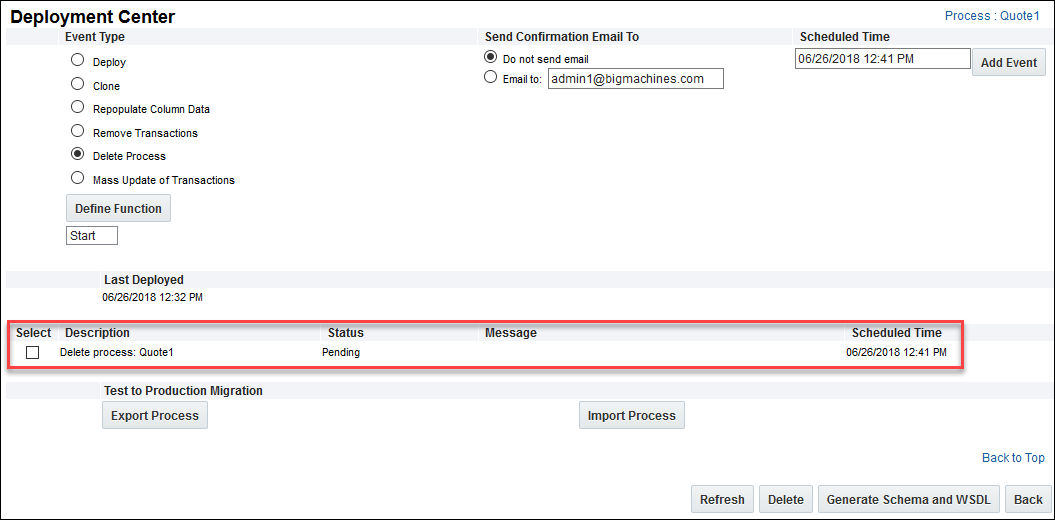
Enter the date and time to schedule the delete event and click Add Event. The Commerce Process delete action is scheduled to delete.
Notes
Warnings:
- Use caution when deleting a Commerce Process, because the deleted data cannot be recovered. Upon deletion, all documents, workflow and steps contained within the Process are also deleted.
- When a Commerce main document is removed, the associated Transaction Manager on the Commerce side will be removed from view.
Notes:
- Users are prevented from creating or adding quotes from Configuration to Commerce if mandatory items are missing.
- You cannot migrate Standard Process override properties from one to another Standard Process with the same variable name.
- Even though Legacy and Mobile Layouts are displayed when migrating granular differences for a Standard Process, Legacy and Mobile Layouts are not available in the Standard Process.
- Prior to Release 18C, deployed Commerce Processes cannot be deleted.
- When choosing to auto fill documents with Account data, make sure to set up mapping rules for the Auto Fill Commerce action.
- When performing a Mass Update, users can filter which steps the update applies to.
- Adding a Commerce Process:
- Processes are created in a pending state. After all components of a Commerce Process have been configured, deploy the Process.
Commerce Processes can be added one at a time.
The page length affects how fast the Process page loads in the Commerce Manager. Short page lengths load more quickly than long page lengths. Document sets can be viewed by iterating through list pages.
Advanced Reports can be created with MicroStrategy Enterprise Reporting (third-party Reporting Software). The Transaction data can be automatically mapped to the relevant fields in MicroStrategy through an Integrate action. Contact your Engagement Manager for more information.
Related Topics
See Also