Transaction Locking
Overview
Administrators can enable Transaction Locking in a Commerce process. This feature is beneficial to Oracle CPQ customers who have multiple users, such as sales representatives, working concurrently on Transactions by performing actions such as adding different products to the same Transaction or updating different fields in the same Transaction. Locking a Transaction provides users with full control of a Transaction and prevents conflicting changes to the same Transaction.
When the user who locks a Transaction for editing (e.g. the Transaction owner) performs an auto-unlock action, logs out of CPQ, or their Oracle CPQ session times out, the Transaction automatically unlocks. Administrators can open a Service Request (SR) on My Oracle Support to request a specific session timeout value. Administrators have the option of allowing users other than the Transaction owner to unlock a locked Transaction.
The following functionality is available in CPQ:
 Transaction Locking
When administrators enable Transaction locking for an existing Commerce process, the following actions are by default available and selected: Back, Version, Request Approval, Approve, and Reject. These actions are all main document action types that perform their implied action and unlock a Transaction when performed by the Transaction owner. Administrators can edit the list of auto-unlock actions by unselecting any of the default auto-unlock actions or adding one or more Modify main document action types to the list of auto-unlock actions.
Note: When administrators add a new action to a process that already has Transaction locking enabled, the action will automatically display in the list of Actions to Automatically Unlock Transaction.
Unlock is a main document action type. As is the case with actions that have auto-unlock enabled, Unlock type actions unlock a Transaction when performed. However, Unlock type actions do not perform any further action on the Transaction, such as modify. Administrators can configure the Commerce process to allow users other than the Transaction owner to unlock a Transaction using an Unlock type action.
Auto-Unlock - In addition to the default Commerce process actions that are selected when Transaction locking is enabled, administrators can also set auto-unlock for individual actions.
Lock a Transaction
When a user creates a new Transaction, the Transaction immediately locks for the user when created. Users lock Transactions for editing by opening Transaction Manager and clicking on a link to the Transaction.
The Transaction opens in edit mode for the Transaction owner, who then has the Transaction locked for editing. With the exception of Web Services Only users, no other users can edit a locked Transaction.
Note: Web Services Only users can update a Transaction via SOAP and REST APIs, even when a Transaction is locked for editing by another user.
Open a Locked Transaction
When a Transaction owner has a Transaction locked for editing, the locked Transaction displays in read-only mode when other users open the Transaction. For example: If another user opens a Transaction while the Transaction owner has the Transaction locked for editing, the attributes and line items in the main document (e.g. Transaction) display in read-only mode.
Note: Other users can still open sub-documents (e.g. Transaction lines) from the Line Item Grid; however, the sub-documents will display in read-only mode.
Unlock a Transaction
When a Transaction owner performs any of the main document actions selected by an administrator in the Actions to Automatically Unlock Transaction list, a locked Transaction will unlock.
For example: If an administrator selects Back and Version as the Actions to Automatically Unlock Transaction, the user who locks a Transaction for editing becomes the Transaction owner and can unlock the Transaction by clicking either Back or Version.
When an administrator selects the Let Other Users Perform Unlock Actions checkbox on the Process Administration page, users other than the Transaction owner can unlock a locked Transaction when the main document has an Unlock type action that is available to those users via their Participant Profiles.
Note: When the Transaction owner logs out of Oracle CPQ or their CPQ session times out, the locked Transaction automatically unlocks.
Process-Level Unlock Action
A Lock Status column displays in Transaction Manager whenever administrators enable Transaction locking for a Commerce process. Full Access users can use Transaction Manager to view a list of locked Transactions for a specific Commerce process. An icon displays in the Lock Status column next to each locked Transaction.
Authorized users can unlock locked Transaction by selecting the Transactions to unlock and the clicking Unlock. Unlock is a process-level action available in Transaction Manager when all of the following apply:
- At least one Transaction displays in Transaction Manager
- Transaction locking is enabled in the deployed process
- The user has access to the Unlock process action, refer to Grant Access to the Unlock Process Action for instructions

Show Lock State Attributes in Transaction Search Results
When users click Search from Transaction Manager, they can select the special attributes and main attributes to display as the columns in the search results. Lock Status, Locked By, and Date Locked are included as Special Attributes.

When users opt to mark the Lock Status, Locked By, and Date Locked checkboxes to include these special attributes as search result columns, they can specify the order in which to display the columns in the search results.
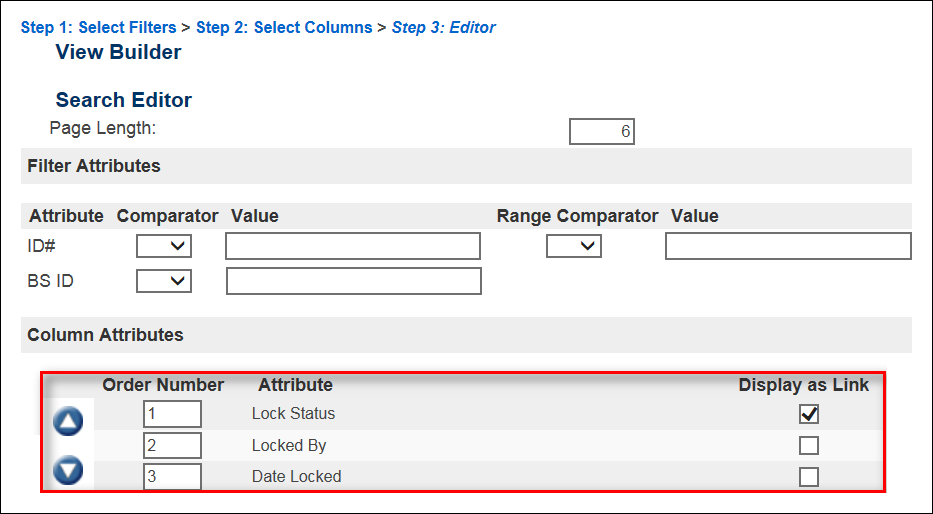
The following is an example of the Lock Status, Locked By, and Date Locked special attributes displayed as columns in the search results.

REST API State Response for Locked Transactions
When using a Transaction REST API to request the “_state” of a locked Transaction, the response shows the Transaction’s attributes as read-only and the actions as active or inactive.
Allow Web Service Only Users to Perform Transaction Actions
When SOAP or REST API requests for a Transaction come from a "Web Service Only" user, the action performs as usual even when performed against a locked Transaction. The owner of a lock on a Transaction remains the same after a “Web Service Only” user performs an action on a locked Transaction. A “Web Service Only” user can unlock a locked Transaction by performing an auto-unlock action or the Unlock action.
Use SOAP or REST APIs to Unlock Transactions
Creating a Transaction using a REST API locks the Transaction by the current user. When another user opens a locked Transaction, the current lock on the Transaction does not transfer. In REST, performing any Open Document type action API locks the Transaction. Using the GET Transaction API does not lock the Transaction.
When using a SOAP or REST API to unlock a Transaction, the Transaction owner can still perform any action on the Transaction or perform an auto-unlock action to unlock the Transaction. Any user can perform an auto-unlock action to unlock a Transaction, provided the action is active for the user on the step in which the Transaction is on.
Set Back Type Action Destinations for Locked Transactions
In CPQ, a Destination tab is available for all Commerce Back type actions. Since Modify actions are not available when opening a Transaction locked by a different user, administrators who need this functionality must create a Back type action and set the Destination tab appropriately. This functionality makes it easier for users to leave a locked Transaction.
For example: If Salesforce users access a locked Transaction, they are by default missing a Return to Opportunity button. As a result, they have no easy way to get back to the opportunity when Oracle CPQ is not running in an iFrame. The Destination tab for Back type actions resolves this issue. Administrators can use the Destination tab to set a Salesforce destination for a Back type action. When Salesforce users access a locked Transaction, they can return to Salesforce upon performing the Back type action.
Described below are the destination types available in the Destination tab for Back type actions and the functionality that occurs upon clicking a Back type action from a locked Transaction:
- Parent Page: The user returns to the page they were on prior to accessing the locked Transaction, such as Transaction Manager or Salesforce. Parent page is the default destination type.
- Same Page: The user remains on the locked Transaction.
- Custom Destination: The user is taken to the URL specified in this field.
- Partner Object ID Attribute: The user is taken to the appropriate object on the partner site. A valid value for this field is the variable name of the attribute that stores the partner object ID information.
- Define Destination Rule: The user is taken to the URL returned by running a BML function. The valid return value for this function is a string. Any URL whose relative path is a page on the Oracle CPQ application is a valid return value.
Administration
Enable Transaction Locking
- Navigate to the Process Administration Page.
Click Admin to go to the Admin Home Page.
Click Process Definition in the Commerce and Documents section.
The Processes page opens.
- Select the name of an existing Commerce process to open the Process Administration page.
- Select the name of an existing Commerce process to open the Process Administration page or click Add to create a new Commerce process.
-
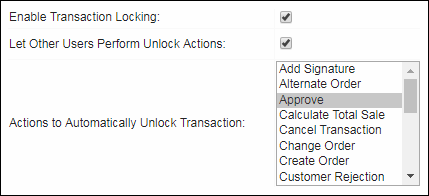
Select the Enable Transaction Locking checkbox. The following two additional options will display on the Process Administration page:
- Let Other Users Perform Unlock Actions - Lets users other than the Transaction owner unlock a Transaction when their Participant Profile grants access to a main document action of the new Unlock action type.
- Actions to Automatically Unlock Transaction – Displays a list of auto-unlock actions: Back, Version, Request Approval, Approve, and Reject. Administrators can also add a Modify main document action to the list of auto-unlock actions. Press the CTRL key and select the actions to include as auto-unlock actions. When the Transaction owner performs any of the auto-unlock actions, the Transaction will unlock.
Note: In the below list of Actions to Automatically Unlock Transaction, Save and Modify and Unlock are Modify main document action type that the administrator added to the list of auto-unlock actions. The other options are main document actions that, by default, are included in the list of auto-unlock actions.
- Click Apply to save your changes.
-
Deploy the Commerce process in the Deployment Center.
Whenever administrators make changes on the Process Administration page, they must deploy the changes for the changes to take effect.
Disable Transaction Locking
- Navigate to the Process Administration Page.
Click Admin to go to the Admin Home Page.
Click Process Definition in the Commerce and Documents section.
The Processes page opens.
- Select the name of an existing Commerce process to open the Process Administration page.
- Unselect the Enable Transaction Locking checkbox.
- Click Apply to save your changes.
-
Deploy the Commerce process in the Deployment Center.
Whenever administrators make changes on the Process Administration page, they must deploy the changes for the changes to take effect.
After disabling Transaction locking for a Commerce process, all of the previous locked Transactions in the Commerce process are effectively unlocked until a periodic background task removes the lock completely.
Set Action Auto-Unlock
-
Navigate to the Action List Page.
- Click Admin to go to the Admin Home Page.
-
Click Process Definition in the Commerce and Documents section.
The Processes page opens.
-
For the applicable Process, select Documents from the Navigation drop-down,
then click List.
The Document List page opens.
-
For the main document, select Actions from the Navigation drop-down menu,
then click List.
The Action List page opens.
-
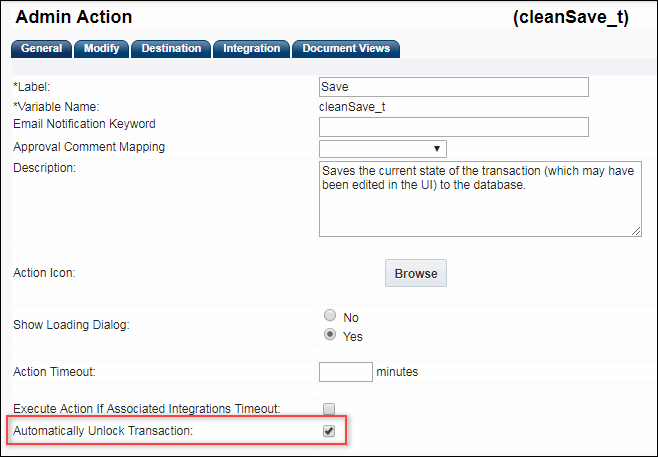
Click on the appropriate Action Name link to open the Admin Action page.
- Select the Automatically Unlock Transaction checkbox.
The checkbox is similar to the Actions to Automatically Unlock Transaction checkbox on the Process Administration page, but sets a single action as an auto-unlock action.
Grant Access to the Unlock Process Action
-
Navigate to the Action List Page.
- Click Admin to go to the Admin Home Page.
-
Click Process Definition in the Commerce and Documents section.
The Processes page opens.
-
For the applicable Process, select Documents from the Navigation drop-down,
then click List.
The Document List page opens.
-
For the main document, select Actions from the Navigation drop-down menu,
then click List.
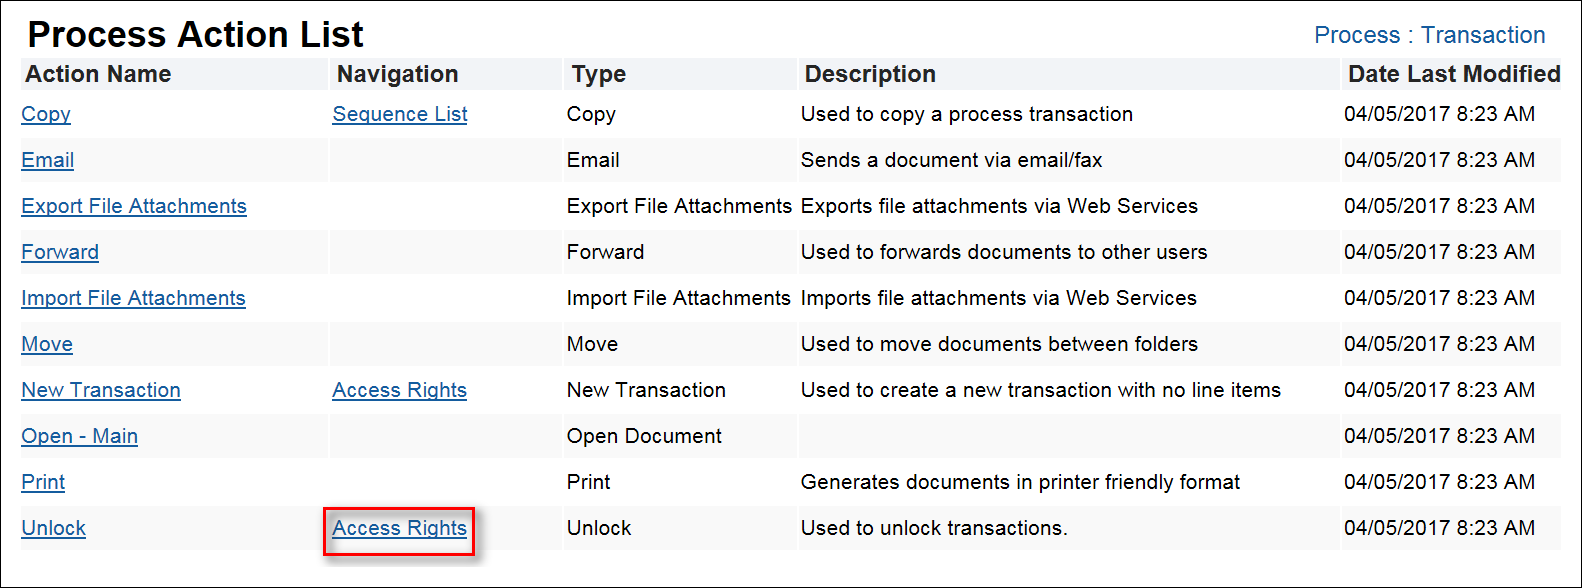
The Action List page opens.
-
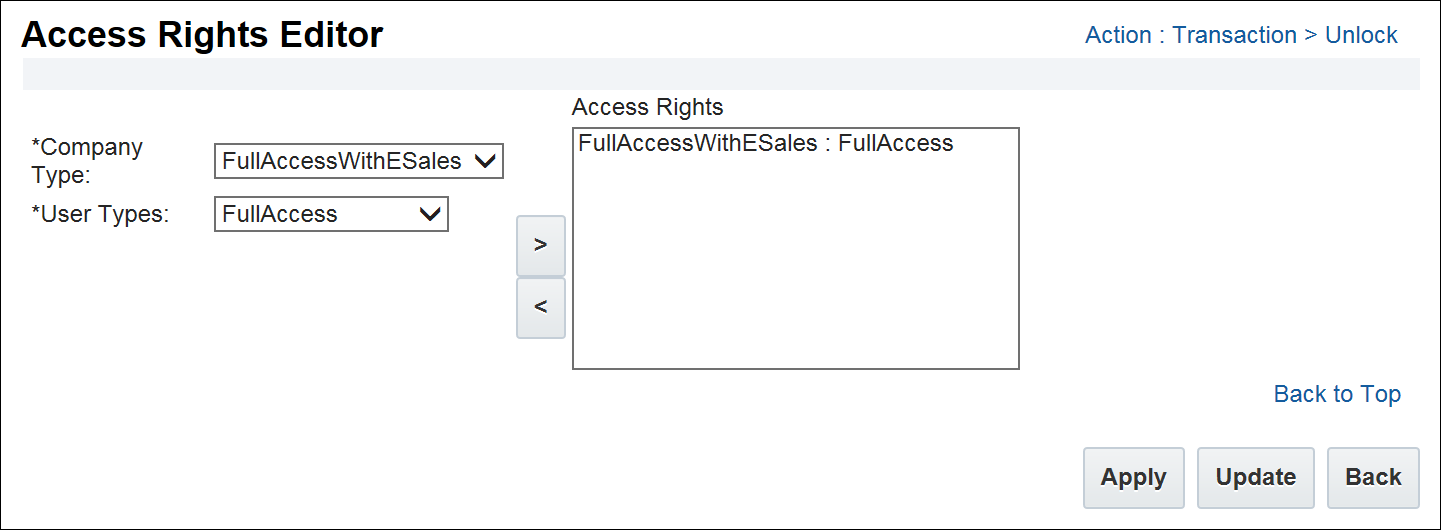
Select the Access Rights link next to the Unlock action.
-
Use the Access Rights Editor to grant Full Access users with access to the Unlock process action.
Notes
Consider the following tips when usingTransaction Locking:
- When the Enable Transaction Locking checkbox is not marked, administrators can still view, update, or delete Unlock type actions. End-users cannot execute the actions unless an administrator enables the Transaction locking feature.
- When users other than the Transaction owner open a locked Transaction, the attributes and line items on the main document display in read-only mode.
- Approvers cannot approve or reject a locked Transaction.
- When administrators use the Deployment Center to perform a mass update of Transactions, locked Transactions are included in the deployment.
- When creating a new Commerce process, no options display by default in the Actions to Automatically Unlock Transaction list. Administrators must add one or more main documents to the process and add one or more actions to the main document. If the actions are eligible for auto-lock, they will display in the Actions to Automatically Unlock Transaction list.
Related Topics
See Also


