Commerce Deployment Center
Overview
Navigation: Admin Home Page > Commerce and Documents > Process Definition > Deployment Center
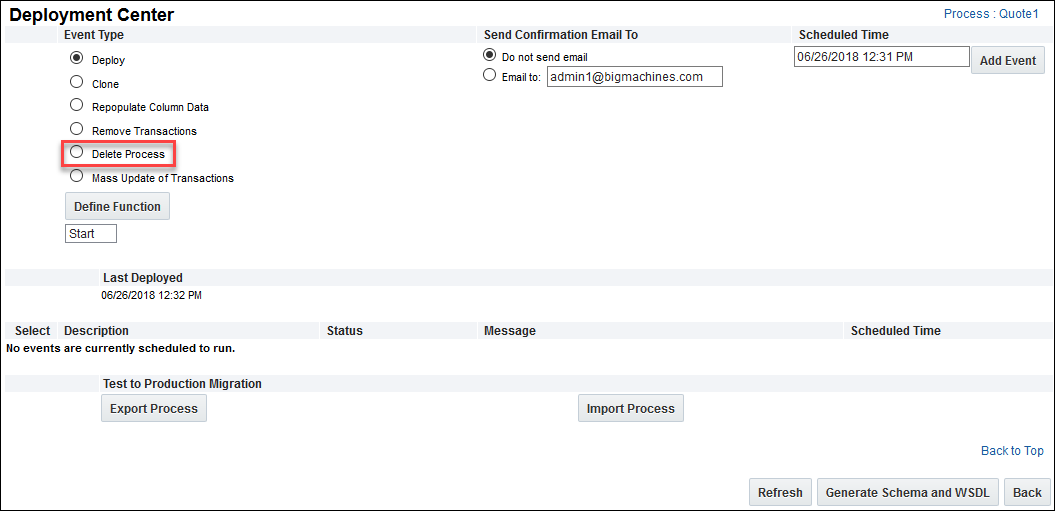
For undeployed processes, "Deploy" is only event available. After deployment, other events displayed. You can verify a successful deploy when you Review the confirmation email. A confirmation email is sent to the email address specified for a deploy; it indicates whether a deploy happened successfully or not. It also contains the details of what was deployed.
 Event Types available for Scheduled Deployments
| Deploy |
This event ensures that a Commerce Process is ready for use on the commerce side. |
| Clone |
This event creates a copy of the selected process on the admin side. The cloned process must be deployed for it to become active on the commerce-side.
Visible based on the setting Allow Commerce Processes to be Cloned and Migrated on the Commerce Options page. Choose Admin Home Page > Commerce and Documents > Commerce Settings. |
| Repopulate Column Data |
This event makes it possible for changes done in the Data Columns on a deployed process, to be available on the commerce side. This event is applicable for the transaction manager data. |
| Remove Transactions |
This event deletes all transactions from the Commerce side.
|
| Mass Update of Transactions |
Set-up a BML script which can be used to update all existing commerce transactions.
For example, if a sales rep quits their job and all of their existing quotes have to be reassigned to another sales rep, then the admin user could write a mass update BML script to replace the old sales rep's name with the new one.
- Users can select the steps to which the Mass Update will be applied.
- All transactions will be updated when the mass update script is run.
- The process must be deployed before the mass update function is run.
- This will be recorded in the document history as a System Mass Update action.
You should find what you’re looking for in the History XML.
-
The return type for this function is : document_number~variable_name~value[ |document_number~variable_name~value]*
- The admin side also provides a log that updates when the mass update function runs.
Be careful when running mass update functions so that historical data in transactions is not improperly updated.
Mass Update of Transactions is not available when Collaborative Editing is enabled. To perform a Mass Update you can temporarily disable Collaborative Editing and re-enable it once you have finished.
|
 Deployment Status Messages
| In Progress |
The component is deploying. Deployment cannot be stopped once it has begun. |
| Pending |
The component has been scheduled for deployment and is waiting in the queue. Until it moves to In Progress, the task can be deleted. |
| Loaded |
The task has been requested but it has not yet been moved to the queue. You will move from Loaded to Pending and can delete the task if necessary. |
Administration
 Deploy a Commerce Process
Complete the following steps to deploy a Commerce Process.
-
Navigate to the Admin Home Page.
-
Click Process Definition in the Commerce and Documents section.
-
Select Deployment Center from the applicable process Navigation drop-down, and then click List.
-
Select the Deploy Event Type.
-
Select the Send Confirmation Email To:
-
To schedule a deployment, enter the desired date and time (in mm/dd/yyyy hr:mm AM/PM format) in the Scheduled Time field.
-
Click Add Event.

-
If desired, you can cancel the scheduled deployment by selecting the new event and clicking Delete.
You cannot remove an event if the deployment has already started.
-
Click Refresh to display the updated information on the page.
 Delete a Commerce Process
Complete the following steps to delete a Commerce Process.
-
Navigate to the Admin Home Page.
-
Click Process Definition in the Commerce and Documents section.
-
Select Deployment Center from the applicable process Navigation drop-down, and then click List.

-
Select Delete Process from the Deployment Center page for the Commerce process.

-
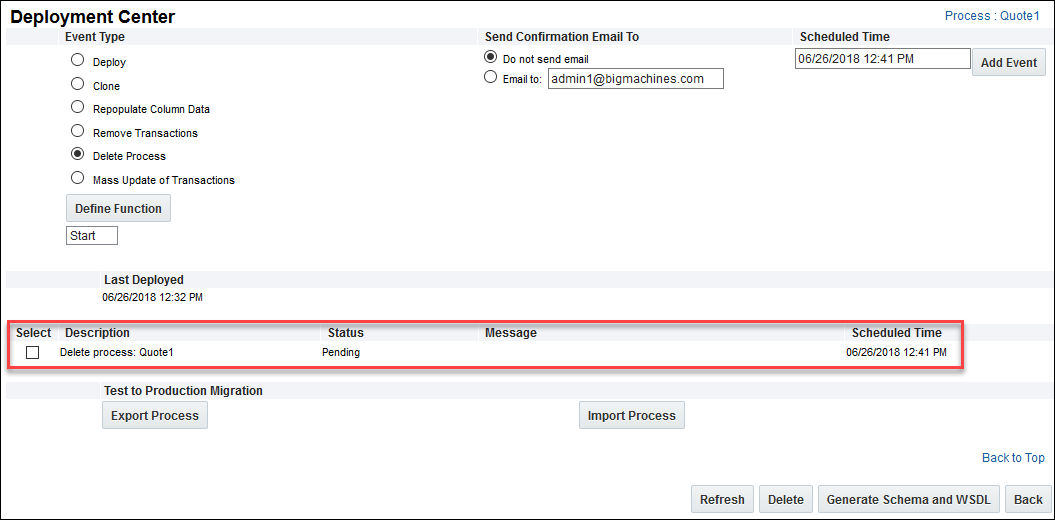
A confirmation of delete message displays indicating that the process and all related data and transactions will be deleted. Click OK to proceed with the deletion or Cancel to not perform the delete action.

Recovery of the Commerce process and its associated data is not possible. Make sure you want to move forward with the delete option before you click OK.
-
Enter the date and time to schedule the delete event and click Add Event. The Commerce Process delete action is scheduled to delete.

Notes
Use caution when deleting a Commerce Process, because the deleted data cannot be recovered. Upon deletion, all documents, workflow and steps contained within the Process are also deleted.
Notes:
- When performing a Mass Update, users can filter which steps the update applies to.
- Deploy dates and times are recorded in the Last Deployed column on the Process List page. Processes that have not been deployed have a blank timestamp in the Last Deployed column.
- Deploys should take place when there is little activity on your site, like weekends or after-business hours.
- For more information on closing a Commerce Process, see the topic Commerce Process.
- After a Commerce Process is deployed, some administrative functionality becomes hidden from view.
Related Topics
 See Also
![]() Event Types available for Scheduled Deployments
Event Types available for Scheduled Deployments


