Migration Activities
Overview
The following information provides information for Migration Activities using Redwood Admin UI.
Migration Activities provides easy access to the site's migration status, migration details, and migration logs. In addition you are able to import a package, connect to a source site, create a snapshot, revert to a snapshot, import a migration package ZIP file, roll back to a migration activity, and delete migration activities. The Migration Activities page always refers to the target migration site activities (the CPQ site you are logged into). When you perform a migration from the Migration Activities page you are either performing a migration from a migration package or from a source site into the target (currently logged into) site.
To access the Migration Center Activities, navigate to: Admin Home > Developer Tools & Utilities > Migration and click on Activities.
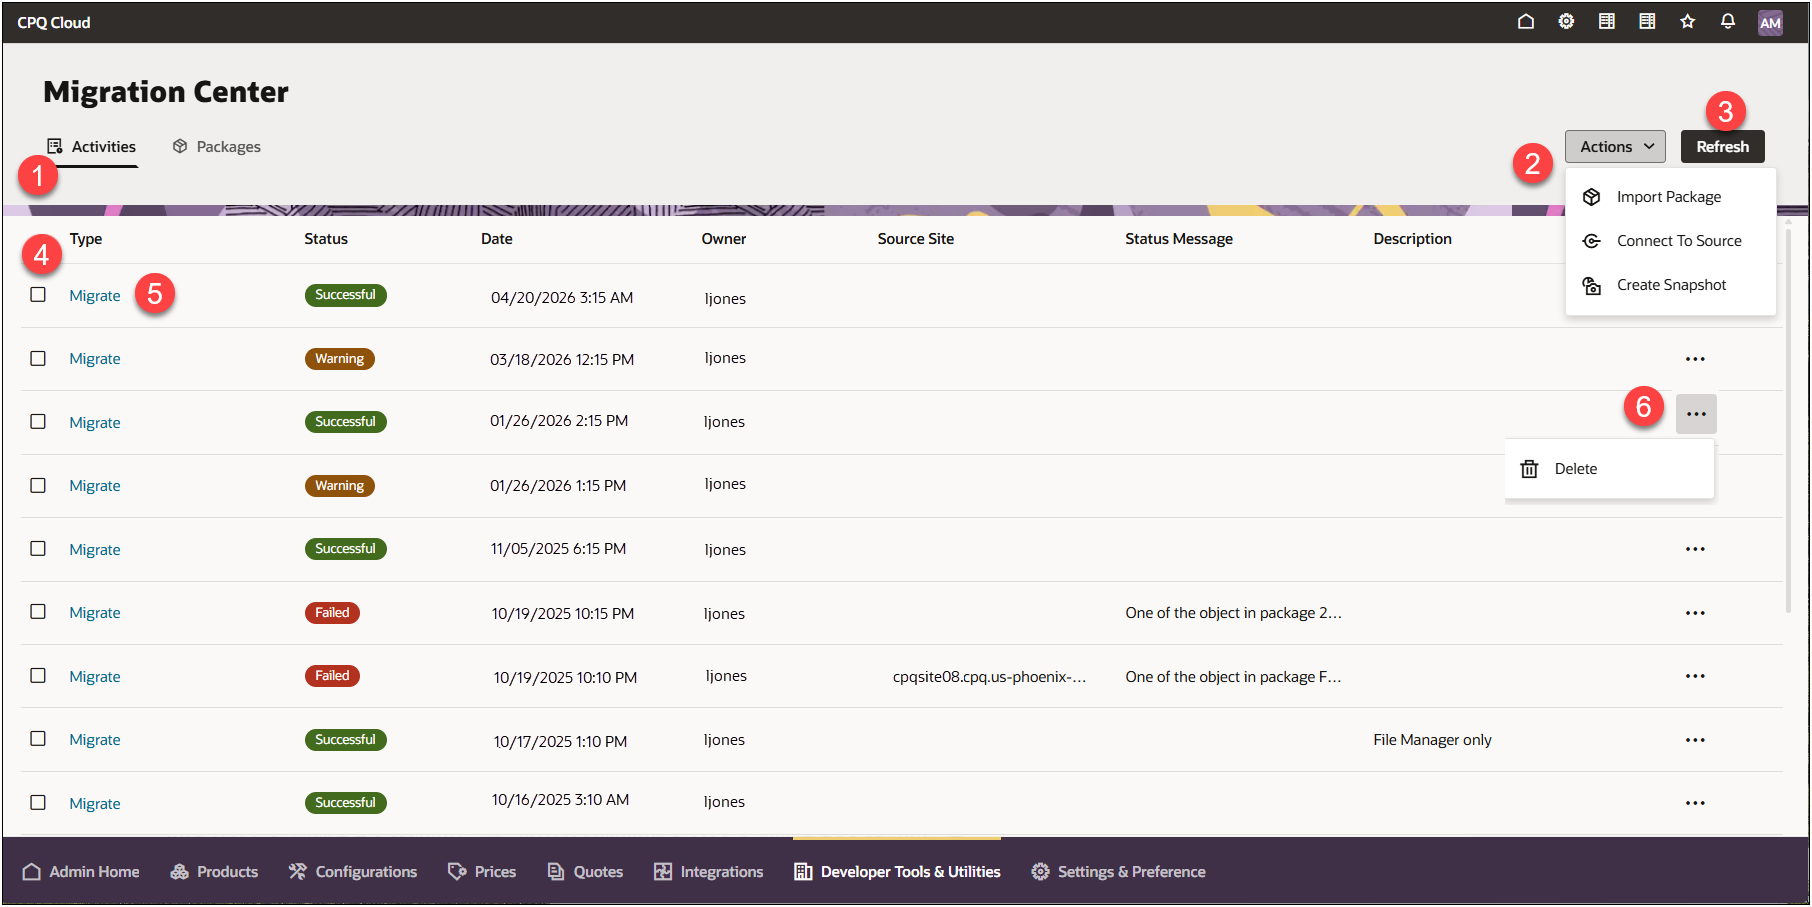
Activities View
|
1
|
Click Activities to view recent migrations, migration status and details, and delete a migration activity. |
|
2
|
Click the Actions drop-down to:
|
|
3
|
Click Refresh to refresh the current page.
|
|
4
|
Select the desired activity check boxes and click Delete to delete all the selected activities at one time. |
|
5
|
Click the link under Type to view the Migration Log details associated with that activity. Refer to Migration Logs. |
|
6
|
Click the activity line actions ellipsis to:
-
Delete the migration activity
-
Roll back the site to the state of the selected activity (if available)
-
Download the package zip file for that activity (if available)
|
Administration
 Import Migration Package via Package Upload
To import a package, perform the following steps:
-
Navigate to: Admin Home > Developer Tools & Utilities > Migration
-
Click Activities or Packages.
-
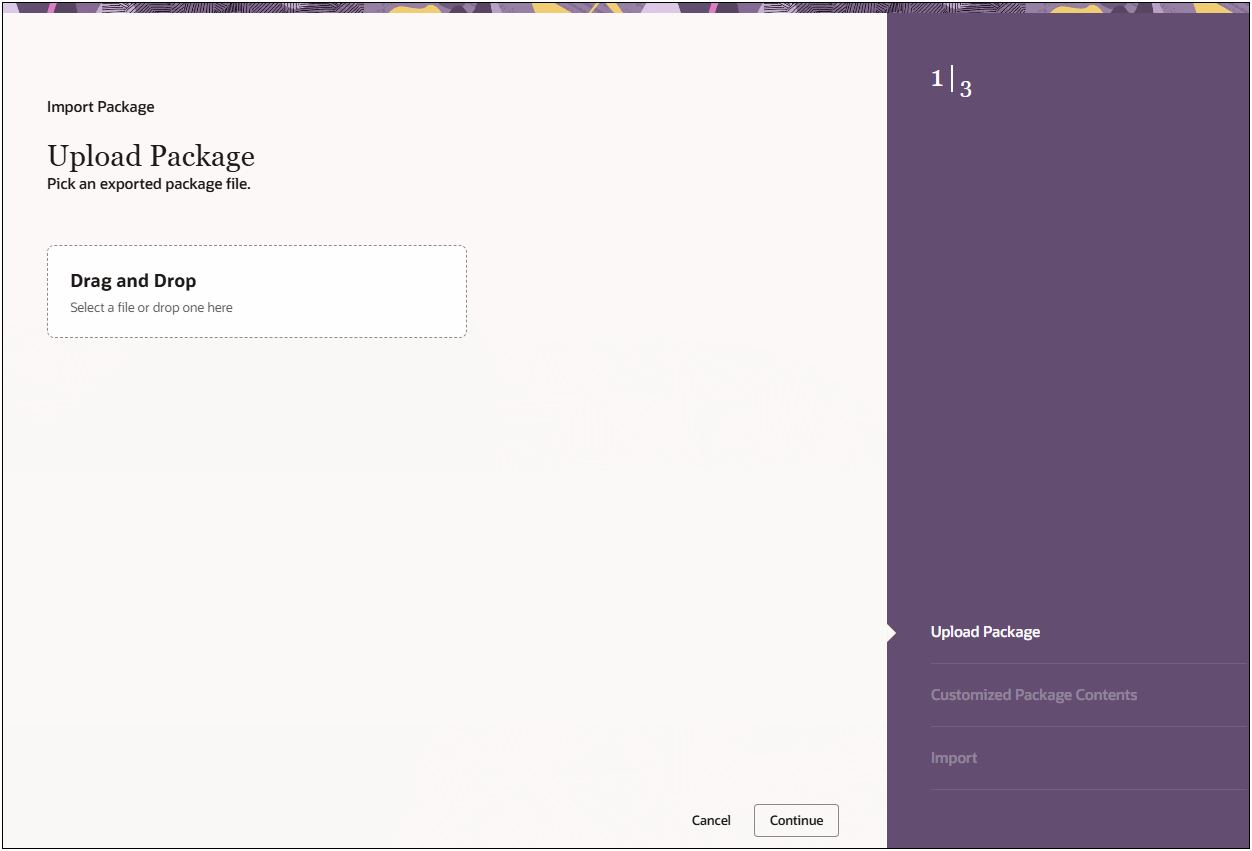
Select Import Package from the Actions drop-down. The Upload Package displays.
-
Click into the Drag and Drop box to browse to the exported ZIP package file or select the package ZIP file and Drag and Drop the file for import.
-
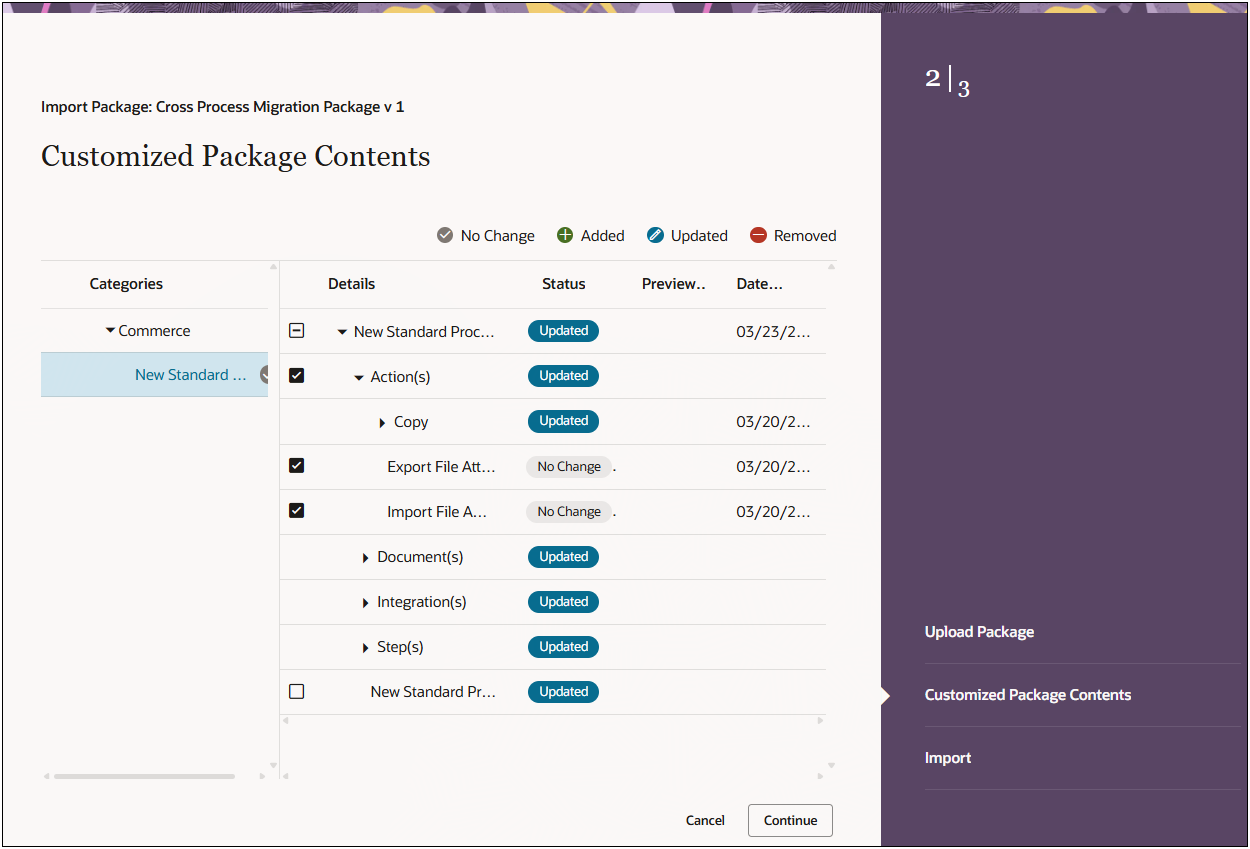
Click Continue. The Customized Package Contents displays. Refer to Customized Package Contents.
-
Initiate any customized package content modifications as desired.
Components in a package will be compared to components on the target site and the results of the comparison will be reflected by the Migration Center icons, as follows:  No Change,
  Added,
  Updated, and
  Removed. By default, all objects in the package are selected.
You can choose to import the entire package, or you can deselect certain objects within the package before importing.
-
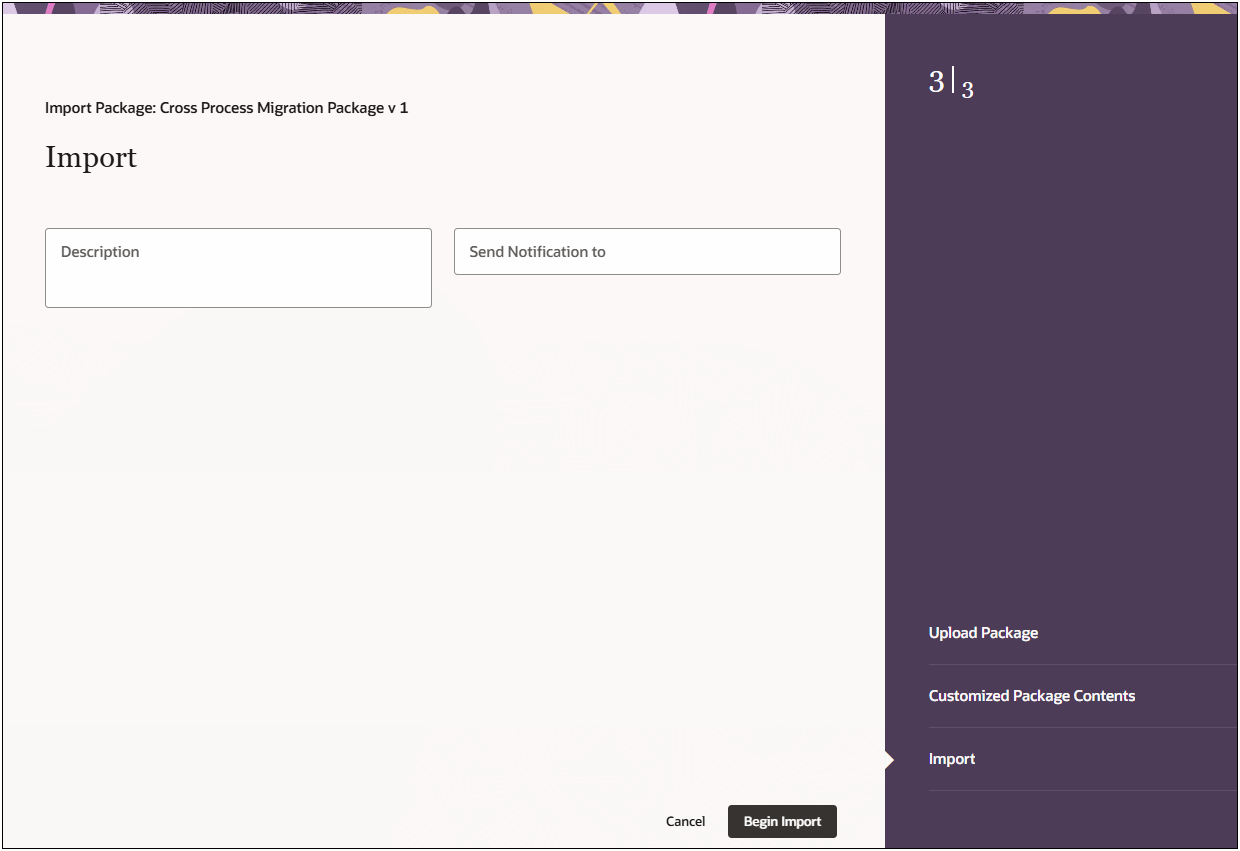
Click Continue. The Import page displays.
-
Enter a description for the package import.
- Enter the email addresses of any additional individuals who are to receive the status notification in the Send Notificaton to field. Separate each email address with a semi-colon.
By default, the administrator who initiated the migration receives email notifications for the migration.
When the migration completes, a status notification is sent to each email address specified.
The email indicates the success or failure of the migration.
-
Click Begin Import to start the import of the migration package.
A status message will appear in at the top of the page to show the status of the import. When the import is complete, you can view the import status in the Migration Activities to see the import migration activity log details.
If the migration is successful, the package has been imported and will appear in the list of packages and in the activities list for the target site.
If the migration is not successful, the package import is not complete and none of the objects in the package will be added or modified on the current site. Refer to Migration Activities for import status and migration log details.
Notes:
- If a package with the same Name and Version combination already exists on the site, the packages will be recognized as being the same, even if they don’t contain the same objects.
- In this case, a dialog box appears to ask if the existing package should be overwritten. If the admin then selects Yes, and the import is successful, the uploaded package will replace the existing package, and the objects within the uploaded package will be modified on the site according to their state in the uploaded package.
Import a Migration Package using FTP Automation
Migration packages are administrator-defined packages of components that can easily be moved from site to site without the administrator having to reselect components before each migration. Migration packages and individual components of a migration package can be imported into Oracle CPQ using the Migration Center or using FTP Automation data transfer.
To import a migration package using FTP, perform the following steps:
- If you haven't done so already, contact My Oracle Support for the creation an FTP profile and its corresponding "automated" folder on the FTP server.
-
Prepare an XML controller file for the migration package ZIP file. The controller filename must include the prefix upload_list.
The upload_list.xml file lists the migration ZIP file. The following shows the XML format for the migration package upload_list.xml file.
<?xml version="1.0" encoding="UTF-8
<files>
  <file>
    <name>migrationpackagefilename.zip</name>
    <type>REGULAR</type>
  </file>
</files>
- Upload the migration package ZIP file referenced in the migration package
upload_list.xml controller file.
- Upload the migration package
upload_list.xml controller file.
- Navigate to the Bulk Data Upload Status page to view the migration package status.
Admin Home > Developer Tools & Utilities > Bulk Data Services > Upload
When uploading a migration package via FTP Automation, the following default values are set (and not able to be changed by an administator) for the migration:
- The migration package Description is set to Automatic Bulk Upload of migration package
- The Send Notification is not set to send email notifications
- The Include Snapshot is not set to take a snapshot of the target site immediately before performing the migration
- The Target Process is set to Default Migration where a standard package migration is performed
Connect To Source
-
The site you are currently logged into is referenced as the "target site". If you are connected to a site, that site is referenced as the "source site."
-
Connect To Source is available to sites currently using basic authentication. Note that we recommend transitioning away from basic authentication and to OAuth as part of your overall plan for secure communication connection.
-
Connect To Source is available for migrations that are not between two CPQ sites running in Fusion. Refer to Manage Connections for CPQ Sites Runnning in Fusion for source site connections between two CPQ sites running in Fusion.
Connect to source allows you to connect to a source site and perform a migration from the source site to the target site.
Once connected, you can import a package from a source site or connect to a (destination) source site to compare with the target site.
To connect to a source site, perform the following steps:
-
Navigate to: Admin Home > Developer Tools & Utilities > Migration
Manage Connections is available from both the Activities and Packages Actions drop-down.
-
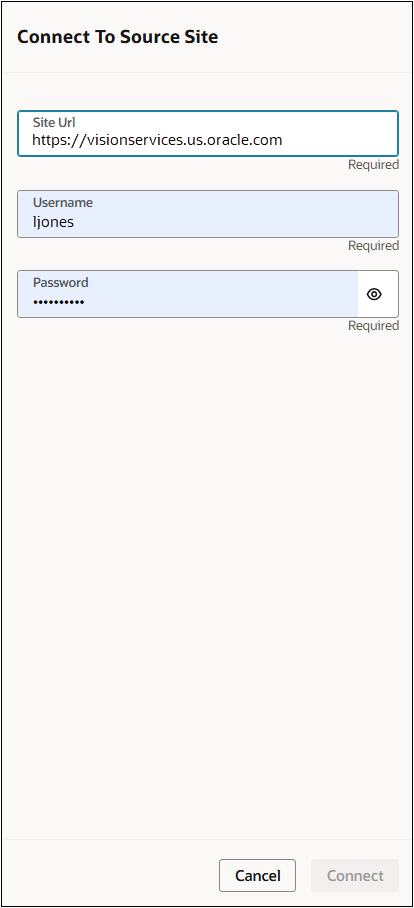
Select Connect To Source from the Actions drop-down. Connect to Source Site displays.
-
Enter the base Site URL for the desired source site. Do not include anything after the “.com” of the URL.
-
Enter the username and password of the source site’s Application Administrator or a FullAccess user with permission to create/modify users on the source site into the Username and Password fields, respectively.
-
Click Connect.
Manage Connections for CPQ Sites Running in Fusion
In order to connect to a CPQ source site, the two sites must be connected with an OAuth client via Oracle Identity Management. The IAM connections details are required to set up the migration connection. Contact your Oracle IAM administrator for this information. Go to Register an External Application Client in IAM for Oracle CPQ Running in Fusion for instructions.
You only need to register the CPQ running in Fusion source site as an external application client in IAM and create the migration connection for the CPQ source site one time. After the initial connection setup, you can maintain the connection if there are updates to the connection information such as the Client ID or Client Secret by selecting Manage Connections and selecting the source site from the Actions drop-down.
-
Navigate to: Admin Home > Developer Tools & Utilities > Migration
Manage Connections is available from both the Activities and Packages Migration Center Actions drop-down.
-
Select one of the following:
-
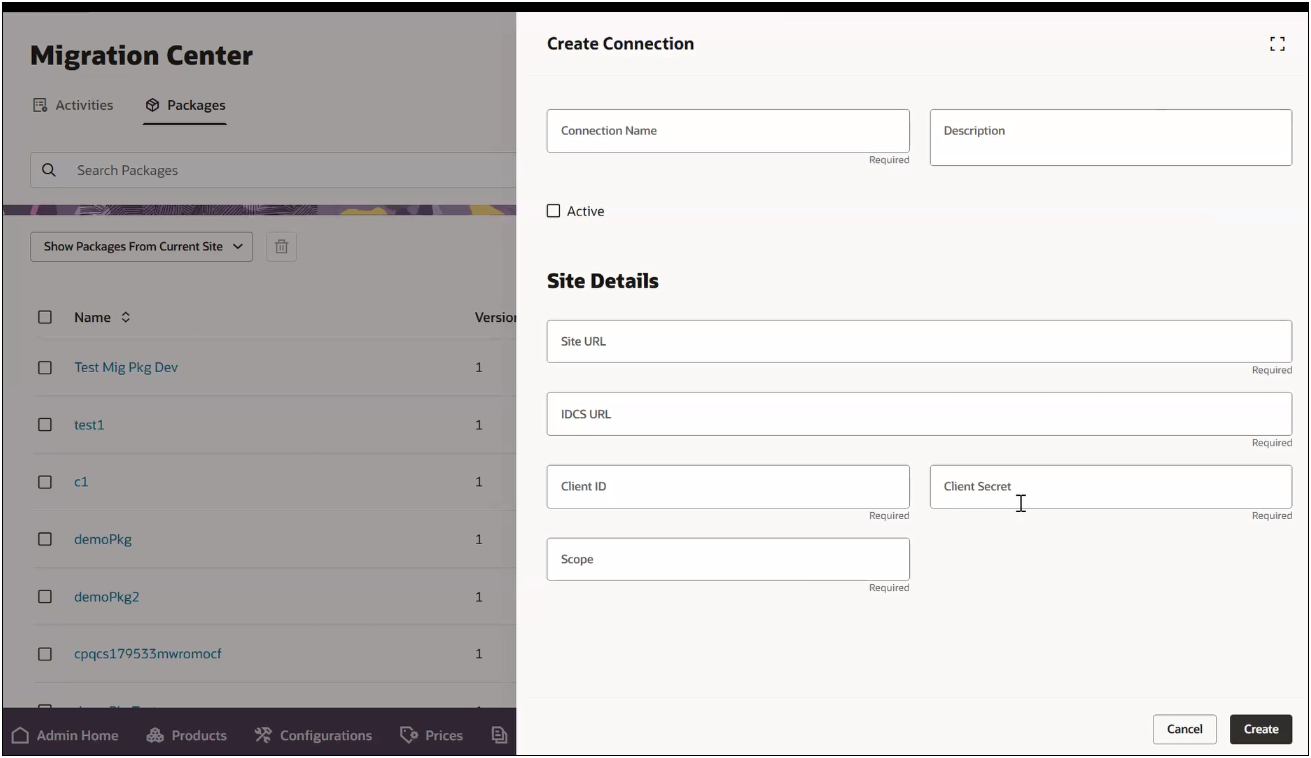
Manage Connections > Create Connections from the Actions drop-down to create a new migration source connection.
-
Manage Connections > select connection from the Actions drop-down to modify the credentials of an existing migration source connection. This lists only available and existing source site connections for the target site.
- (Required) Enter the Connection Name.
- Enter a description for the connection.
- Select the Active check box to activate the connection. The connection is inactive when the Active check box is empty.
- Enter the Site URL. This is the URL for the source site.
- Enter the IDCS URL. This is the IDCS instance URL for the source site.
- Enter the Client ID, Client Secret, and Scope. This information is generated when your Oracle IAM administrator establishes the OAuth Client connection.
- If your company requires OAuth credentials be updated for security reasons, you may periodically have to update the Client ID and Client Secret to maintain the source site connection.
- The Client ID and Client secret are extremely sensitive information. They MUST be stored securely. Contact your Oracle IAM administrator for the source site credentials and proper handling of this information.
- To connect CPQ sites running in Fusion using IAM OAuth credentials, refer to Register an External Application Client in IAM for Oracle CPQ Running in Fusion.
- Click Create to create the source site migration connection for the Migration Center. A success message is shown if the connector creation was stressful.
Troubleshooting Common Migration Connection Errors
| Failed to get access token for the given Client Id. Client authentication failed. |
Enter correct Client ID and Client Secret as provided by IAM/IDCS. |
| Failed to get access token for the given Client Id. Invalid scope. |
Please use the correct scope as provided by IAM/IDCS. |
| Failed to get access token for the given Client Id. The OAuth Client app is inactive or the OAuth Client facet is not enabled for app. |
Log in to remote site IAM/IDCS instance and activate the client that was created for migration purpose. |
| Failed to validate connection with the source site. Access Denied. |
-
CPQ remote site IAM/IDCS instance URL is incorrect. Verify you are using correct IAM/IDCS instance URL. This must be the CPQ source site's IAM/IDCS URL.
-
Integration user is not created on remote CPQ site. Refer to Integration Users instructions.
|
| Failed to validate connection with the source site. You do not have access to perform this action. Contact your Access Administrator to request access. |
The Migration Center permission is not given to the integration user that was created for site to site migration. Verify Migration Segment Access for the integration user. |
Delete Migration Package
To delete a migration package, perform the following:
-
Navigate to: Admin Home > Developer Tools & Utilities > Migration
-
Click Activities.
-
Select Delete from the specific migration paciage Actions drop-down. The Delete Package confirmation pop-up displays.
- Click Delete to delete the package or Cancel to return to Migration Packages.
To delete multiple migration package at the same time, perform the following:
-
Navigate to: Admin Home > Developer Tools & Utilities > Migration
-
Click Activities.
-
Click the select all checkbox or the checkbox for each of the migration packages to delete. The Delete Package confirmation pop-up displays.
- Click Delete to delete all the selected migration packages or Cancel to return to Migration Packages.
Create a Snapshot
You can have the system take a snapshot of the target site at anytime. You may want to take a snapshot of the site before performing a migration or rollback. Refer to Snapshots for more information.
To create a snapshot, perform the following steps:
-
Navigate to: Admin Home > Developer Tools & Utilities > Migration
-
Click Activities.
-
Select Create a Snapshot from the Actions drop-down. The Create Snapshot Confirmation pop-up displays.

- Click Yes to create a snapshot of the entire site or Cancel to cancel and return to Migration Activities.
The creation of a snapshot will add its own line to the Migration Activities page. All Snapshot activity lines include a Revert Snapshot option in the Actions drop-down which is used to apply a snapshot.
Applying (Reverting to) a Snapshot
The creation of a Snapshot will add its own line to the Migration Activities page. If the Snapshot was taken during a migration, the line will appear below and separate from the migration entry. All Snapshot lines will include a Revert Snapshot option from the Actions drop-down which is used to revert to a snapshot. Reverting to a snapshot will result in all changes to the site that occurred after the snapshot was created will be undone. Refer to Snapshots for more information.
Use care when performing a Revert to Snapshot as some data may be lost.
To apply a snapshot, perform the following:
-
Navigate to: Admin Home > Developer Tools & Utilities > Migration
-
Click Activities.
-
Select Revert to Snapshot from the specific migration snapshot activity's Actions drop-down. The Create Snapshot Confirmation pop-up displays.
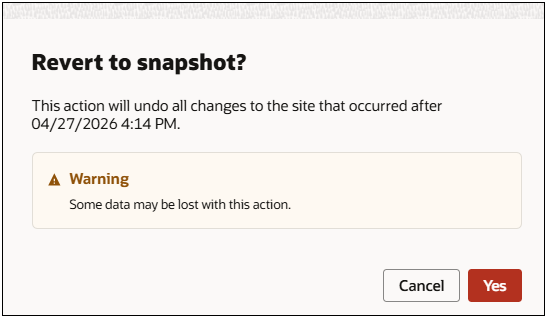
-
Click Yes to revert to the snapshot or Cancel to cancel and return to Migration Activities.
Perform a Migration Rollback
Rollbacks can only be performed on one of the 20 most recent successful migrations. Each successful migration adds a new line to the Migration Activities page with a Rollback option available under the migration activity Actions drop-down. Refer to Migration Rollbacks for more information.
Use care when performing a Rollback as some data may be lost.
You may want to consider creating a snapshot of the site before performing a rollback.
To initiate a Rollback, perform the following:
-
Navigate to: Admin Home > Developer Tools & Utilities > Migration
-
Click Activities.
-
Select Rollback from the specific migration activity's Actions drop-down. The Rollback Confirmation pop-up displays.

- Click Yes to rollback to the specified migration or Cancel to cancel and return to Migration Activities.
The Migration Rollback is added to the list of Migration Activities. Once a Rollback is complete, the Rollback option for that migration and all migrations that took place after that date no longer appear for those activities in Migration Activities. However, the migration records remain.
- Avoid making changes to a production (target) site directly, especially if you plan to use Rollbacks. Changes made to migratable objects outside of the Migration Center may cause a Rollback to fail if the objects to be reverted are missing or have been modified.
- Rollback is a permanent action. Rollbacks cannot be undone.
- While a Rollback is in progress, users cannot trigger: Migration, Deployment, or additional Rollbacks.
- All stored data for potential Rollbacks is permanently deleted upon upgrade of a major Update release (such as 26B). Stored data for potential Rollbacks are not deleted upon an maintenance Update (such as 26B Patch Weekly Bundle 0503), and thus can still be rolled-back.
- A status email is sent to the Application Administrators when Rollback is complete.
- Migration records cannot be deleted from the Migration Activities page if the Rollback option is still available.
- Only users with access to perform migrations (Application Administrators and FullAccess users with permission to create and modify users) can perform Rollbacks.
Delete a Migration Activity
-
To delete a migration activity, perform the following:
-
Navigate to: Admin Home > Developer Tools & Utilities > Migration
-
Click Activities.
-
Select Delete from the specific migration activity Actions drop-down. The Delete Activity confirmation pop-up displays.
- Click Delete to delete the package or Cancel to return to Migration Activities.
To delete multiple migration activities at the same time, perform the following:
-
Navigate to: Admin Home > Developer Tools & Utilities > Migration
-
Click Activities.
-
Click the select all checkbox or the checkbox for each of the migration activities to delete. The Delete Activity confirmation pop-up displays.
- Click Delete to delete all the selected migration activities or Cancel to return to Migration Activities.
View Migration Logs
Migration logs contains a record of every migration, package import, package download, and rollback that has taken place on the target site. Admins can review migration status details, summary logs, and view specific package/component contents for a migration activity.
To view a migration log, perform the following:
-
Navigate to: Admin Home > Developer Tools & Utilities > Migration
-
Click Activities.
-
Click on the migration activity link under Type. The Migration Log Details displays with the Summary information followed the Details.

Notes
-
Commerce components cannot be deleted from a target site when migrated individually, apart from the entire Commerce Process—objects can only be deleted in a full migration of a Commerce Process.
For example, if a Commerce Main Document attribute exists on the target site but does not exist on a source site, that attribute will not be deleted from the target site if a Main Document's attributes are selected and then migrated.
-
After migrating individual components within a Commerce Process, differences calculated between the source and target site within the Category pane may show the sites to be different, even if all the differences within the Details pane show the sites to be the same.
In order to completely sync a Commerce Process between two sites, perform a full migration of the Commerce Process using the Category pane.
- Administrators should use caution when using migration packages that contain Configuration layouts and rules. All Product Family attributes are deleted from the target Configuration if a source migration package that contains Configuration layouts or rules without All Product Family references is migrated to a Configuration with All Product Family references. This will cause deployment and Configuration Flow errors for Configurations that reference the deleted All Product Family attribute.
- If necessary dependencies are not included in the migration, the migration may fail.
-
Dependent Packages need to be installed first in the target system before installing the migration package in order to ensure all the data is migrated as desired. The Dependencies field in the Create Package UI does note that the packages in the Include list be available in the target system prior to installing the package; however, this validation is not enforced. If you don't have the dependent packages in the target system, it will not stop you from installing the package.
Notes:
- Oracle CPQ does not recommend migrating between blank and Standard Processes due to dependencies and validation issues. The following methods are recommended:
- The preferred method is to perform granular migration of only attributes and actions that don't exist in the Standard Process.
- The source attributes and actions should not have any customizations or dependencies with other attributes, actions, or rules.
- All customizations need to be manually added to the target Standard Process.
- The second and more secure option is to manually create everything from scratch in the Standard Process.
- Packages cannot contain other packages.
- A package cannot be imported or downloaded while a migration is in progress, a Rollback is progress, or a Snapshot is being applied.
- Note than the site you are currently logged into is referenced as the "target site". If you are connected to a site, that site is referenced as the "source site."
Related Topics
See Also


