Partner Organizations
Overview
Partner Organizations are typically used when an Oracle CPQ customer has independent third parties that quote and/or sell products. These are typically resellers, distributors, or VARS.
One Oracle CPQ instance can be enabled for both standard and partner sales users.
All Partner Organization accounts are created as BuyAccess company types.
Your company, the Host Company, is a FullAccessWithESales company type.
The SuperUser of each Partner Organization account can manage its own users, groups, and company information by logging in to your system with the appropriate account information. Starting in Oracle CPQ 25B, we have expanded the Partner Organization FullAccess users with User Administration permission to provide the ability to perform all the tasks the previously only the designated Partner Organization SuperUser could perform. The Partner Organization User Admin will have the ability to add and modify users and user groups. This feature allows customers to share Partner Organization user administration responsibilities between two or more users per Partner Organization without sharing the SuperUser account and its credentials.
In a future release the Partner Organization SuperUser account will be deactivated so it's imperative that customers transition away from using the SuperUser account and assign a FullAccess user with User Administration permission.
After creating Partner Organization accounts, distribute the account information to the appropriate FullAccess users for each company.
Administration
 Setting up a Partner Organization
- Navigate to the Admin Home page.
- Click on Partner Organizations in the Users Section. The Partner Companies page opens.
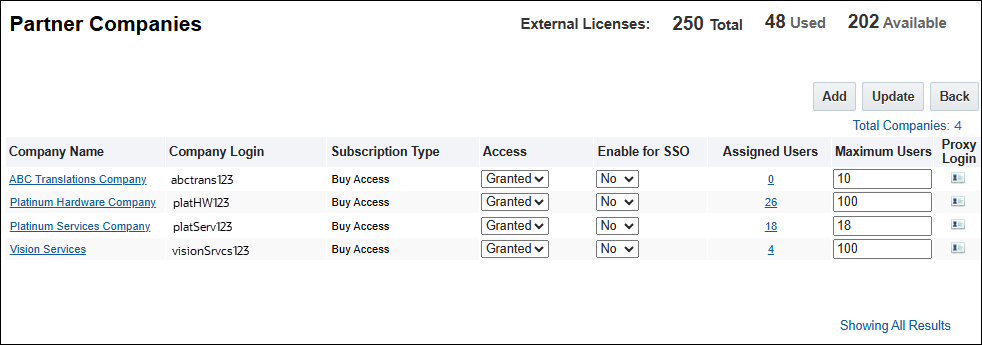
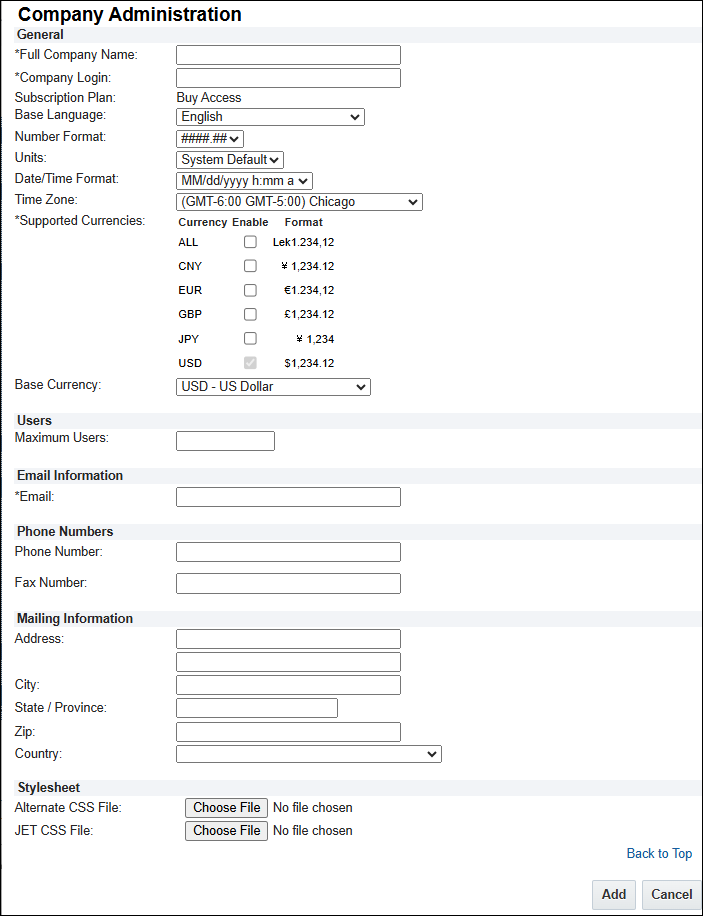
- Click Add. The Company Administration page opens.
-
(Required) Enter a Full Company Name and a Company Login.
The Company Login field is where you give your company a login name. This name will append to the login for all users, so the best practice is to keep the name simple. A sample login is "JoeSmith@JoesCompanyName"
-
Choose a Base Language from the drop-down.
- Select the Number Format from the drop-down.
- Select the Units from the drop-down.
- Select the Date/Time Format from the drop-down.
- Select the Time Zone from the drop-down.
-
Select Supported Currencies (required field) and a Base Currency.
The Partner Organization's admin cannot set its own supported currencies. Before creating a new Partner Organization account, determine the currencies the company needs to support so that they can be accurately set up.
For more information, see the topic
Multi-Currency Support.
-
Enter the number of Maximum Users.
To allow “Granted” Partner Organization admins to view their Remaining license information, the Host Company admin must enter a zero in the Maximum Users column for any “Denied” Partner Organization. For more information, see the topic User License Count.
- (Required) Enter the company's Email address. The email for the company should be for the person who will be designated as the SuperUser or FullAccess user with User Administration permission.
- Enter the company's Phone Number and Fax Number.
- Enter the company's mailing address.
- Select a Partner-specific Stylesheet for the Alternate CSS File and or JET CSS File. For more information, see the topic Partner Organization Stylesheets And Branding .
-
Click Add.
After you create a company account, you will receive login information.
- The FullAccess login account is always superuser@companylogin, and the password is always initialized as "superuser".
- Upon initial login, change your password.
Customizing Commerce Views for Partner Organizations
A typical requirement is to customize the document view for partner users, for example, by hiding certain fields. This can be achieved by using access rules or, if complex customizations are required, by using separate Participant Profiles for partners.
- Identifying quotes created by a partner user: create a quote-level
creatorCompany_quote attribute, and default this value to the Current User's Company name system attribute (_system_company_name).
- Identifying partner quotes: compare the
creatorCompany_quote to the Supplier's Company name system attribute(_system_supplier_company_name).
- Identifying partner users: compare the Current User's Company name system attribute (
_system_company_name) to the Supplier's Company name system attribute(_system_supplier_company_name).
Creating separate Participant Profiles for partner users requires a combination of additional Steps and Participant Profiles. Solution: create 2 Pending steps:
- 1 partner quote
- 1 regular quote
In other steps, a single step with separate profiles can be used.
You cannot create a new Participant Profile in the Pending Step and use the “User Access Rights” feature to assign it to a particular group representing partner users, because assigning a Participant Profile to a group gives access to all users in that group, not just the quote creator.
Similarly, it is not suitable to assign partner participant profiles based on User Type Access Rights (FullAccess, Buy Access, and so on). This would make quotes visible to all users with that access type, meaning that FullAccess users in one Partner Organization could see quotes from a separate Partner Organization.
| Start |
- Partner Profile: Company type- Buy Access
- Internal Profile: Otherwise
|
- If Quote created by Partner, transition to Pending – Partner.
- If Quote created by internal user, transition to Pending – Internal.
|
| Pending |
- Partner Profile: Performer Step (Start)
- Internal Profile: Performer Step (Start)
|
Standard Transition Rules to Submitted for Approval or Approved
|
| Submitted for Approval |
- Partner Profile: Performer Step (Pending- Partner)
- Internal Profile: Performer Step (Pending- Internal)
|
- Standard Transition Rules to Approved.
- Revise or Reject must transition to Pending – Partner if Quote created by partner user.
|
| Approved |
- Partner Profile: Performer Step (Pending- Partner)
- Internal Profile: Performer Step (Pending- Internal)
|
Revise must transition to Pending – Partner if Quote created by partner user.
|
Customizing Workflow
A common requirement for Partner Organizations is to introduce a new, first level of approval for partner quotes.
For example, each partner sales rep may be assigned to an internal sales rep, and that internal rep may need to approve the partner's quote before it continues through the usual approval process.
For more information on the Commerce Workflow, see the topic Workflow Steps.
Customizing Configurators, Parts, and Price Books
Create a Data Table to store Partner Organization variable names and the rules defining what Price Books, Parts (based on an appropriate custom field, like Product Line), and Configurators the partner can see. For example:
| ACME |
Canada, US |
Doors, Windows |
DoorsAndWindows |
- Click Admin to go to the Admin Home Page.
- Locate the appropriate Punch-in.
- Click Restrict Access.
- Create a rule that returns True if the Configurator should be hidden.
- Navigate to the Part Defined Fields page.
- Click Admin to go to the Admin Home Page.
-
Click Parts in the Products section.
The Parts Search for Admin page opens.
-
Click Customize Part Fields.
The Part Defined Fields page opens.
- In the Filter / Normal column, set the value to Filter for the appropriate field.
-
Create an Advanced Script that returns a comma-delimited list of the custom field values for parts the user should be able to see.
For example, if the user should be able to see parts with the product lines Doors and Windows, return “Doors,Windows”.
Ensure that parts that are filtered from view are not used in Recommended Item rules.
-
Navigate to the Price Book Available Fields page.
- Click Admin to go to the Admin Home Page.
-
Click Parts in the Products section.
The Parts Search for Admin page opens.
-
Click Customize Price Book Fields.
The Price Book Available Fields page opens.
- Create a custom field and set Filter / Normal to Filter.
-
Store a unique identifier, such as the Price Book variable name, in the Custom field for each Price Book.
This is required because you cannot filter the Price Book by variable name directly.
-
Create an Advanced Script that returns a comma-delimited list of the custom field values for Price Books the user should be able to see.
For example, if the user should be able to use the Canada and US Price Books, return “canada,us”.
Ensure that Price Books that are filtered from view are not used in Recommended Item rules.
- Once created, a Partner Organization can't be deleted.
- A user can't be moved from one Partner Organization to another.
- Partner users can't use the native “Forward” feature to forward a quote to a user in a different organization, such as another Partner Organization or the Host Company.
Troubleshooting
Salesforce Integration Troubleshooting
The Salesforce partner management portals are called PRM and Communities. They should be used in cases where Salesforce integration is required for partner users.
If partner users do not require Salesforce access, they can log in to Oracle CPQ directly. However, access to accounts and opportunities will not be available, and partner-created quotes will not appear in Salesforce.
Users Seeing Quotes They Shouldn't
| Users can see quotes created by other users in the same partner organization. |
Participant Profiles were assigned to groups on the User Access Rights tab. |
| Users can see quotes created by users in other partner organizations. |
Participant Profiles were assigned to User Types on the User Access Rights tab. |
Notes
Currency preference changes take effect after the user has logged out and then logged back in.
- By default, a company account called yourcompany_buy exists in the Partner Organization administration area.
- This company enables you to support quick registration. All users who submit a quick registration form get a login account ending with the extension yourcompany_buy.
- If you do not want to support quick registration, the QuickRegistrationBuy company account should be denied access.
- To support quick registration, grant access to the company named YourCompany_buy.
- Oracle 24C and later provides administrators with a drop-down setting to enable or disable Single Sign-On for a Quick Registration company from the Company Administration List page.
- It is not possible to delete a Partner Organization.
- Users cannot be deleted, but they can be inactivated. When a user is inactive, its owner will not be able to log in to Oracle CPQ and the user will not count in the User License count. To prevent a user from logging in, change their login information, for example, username and password.
If a site exceeds the license limitations on any of the license types (Internal User & Partner Organization User), the administrator will not be allowed to create any new users until the license count is decreased and no longer exceeds the license limit. When the license limit is reached, an error message appears instructing the administrator to contact Customer Support and purchase additional licenses.
User license count excludes Web Services Only users in the count. In addition, once the maximum number of licenses is allocated, Web Services Only users can still be added to the site.
Related Topics
See Also


