Oracle Subscription Management Integration
Overview
Businesses across the industries are looking to adapt the change in buyer behavior and embrace subscription business models. In order to address these needs, Oracle recently launched the Oracle Subscription Management cloud application. By integrating front and back office business processes on one platform, Oracle Subscription Management allows organizations to build predictable, recurring revenue models by providing an end-to-end subscription solution that manages billing and revenue recognition and also informs customer-facing personnel with a complete view of purchasing behavior.
As part of the end-to-end subscription solution Oracle CPQ provides integration with Oracle Subscription Management application. This allows customers to create and manage products and services they can sell using a subscription model. The subscription model supports the ability to manage a given product or service as a recurring or usage-based price item.
Leveraging this integration customers can enable their sales teams to capture subscription orders and perform subscription management activities throughout the lifecycle of these customer relationships. The integration, enabled by Oracle’s next generation middleware Oracle Integration Cloud (OIC), sometimes called Oracle Autonomous Integration Cloud (OAIC) or (ICS), comes with a Subscription Management package that includes installable artifacts for both Oracle CPQ and OIC.
 Support Granular Pricing for Subscription Products (21D and later)
Oracle CPQ 21D introduces a new subscription pricing structure that provides a consistent pricing structure for subscription and non-subscription products by allowing single price type for each line item. With the new pricing structure, a price change can be made at a more granular level since every charge is represented with a distinct part. Every line item/part charge is able to roll-up to the Model price.
The following graphic shows the new subscription product pricing structure.
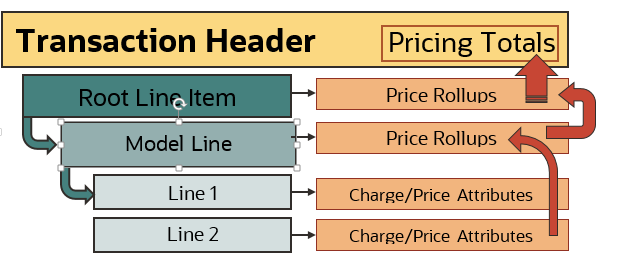
The introduction of the common pricing structure provides flexibility to customers who sell both tangible and subscription-based product types, keeping the end user experience the same for both Commerce and Configuration products. In addition the new subscription pricing model continues to support the various types of product pricing (i.e., tiered pricing, adjustments/discounts, usage rating, etc.) in a single transaction.
The Granular Pricing for Subscription Products is available only to new site installations. The site must be set up using the latest (21D or later) Subscription Management (SM) package. Go to the Integrating Oracle Subscription Management and Oracle CPQ (Doc ID 2508999) on My Oracle Support to access the latest Subscription Management package. Refer to Oracle CPQ with Subscription Management Integration Guide for more information.
Related Documentation:
Oracle Subscription Management (OSS) is a separately licensed product. Refer to Oracle Subscription Management documentation in the Oracle Help Center for additional information, including topics related to Partial Period Billing and Bill Total Charge Amount.
Administration
The examples provided in the following procedures are part of the Subscription Management Integration Package. The referenced Oracle CPQ attributes, actions, and other artifacts are from Oracle CPQ Reference Application for customers provisioned after 2016. Other customers can also configure this integration as per their current implementation's requirements.
 Create a Subscription in OSS from CPQ
OIC is the middleware used to establish an integration between Oracle CPQ and OSS. Once this integration is established, sales users can use Oracle CPQ to create a Transaction and invoke OIC to create a subscription in OSS. To access Oracle CPQ to create a Transaction, sales users directly log in Oracle CPQ or gain access through a Customer Relationship Management (CRM) opportunity.
To create a subscription in OSS by creating and submitting a Transaction in CPQ, perform the following steps in CPQ:
- Open CPQ.
- Navigate to Transaction Manager.
-
Click New Transaction.
The Transaction page opens.
-
Select the date the subscription is to take effect from the Default Request Date field, which is used to specify the date when the subscription order should be activated. After approval of the Transaction, the Submit Order button is available on the Transaction page.
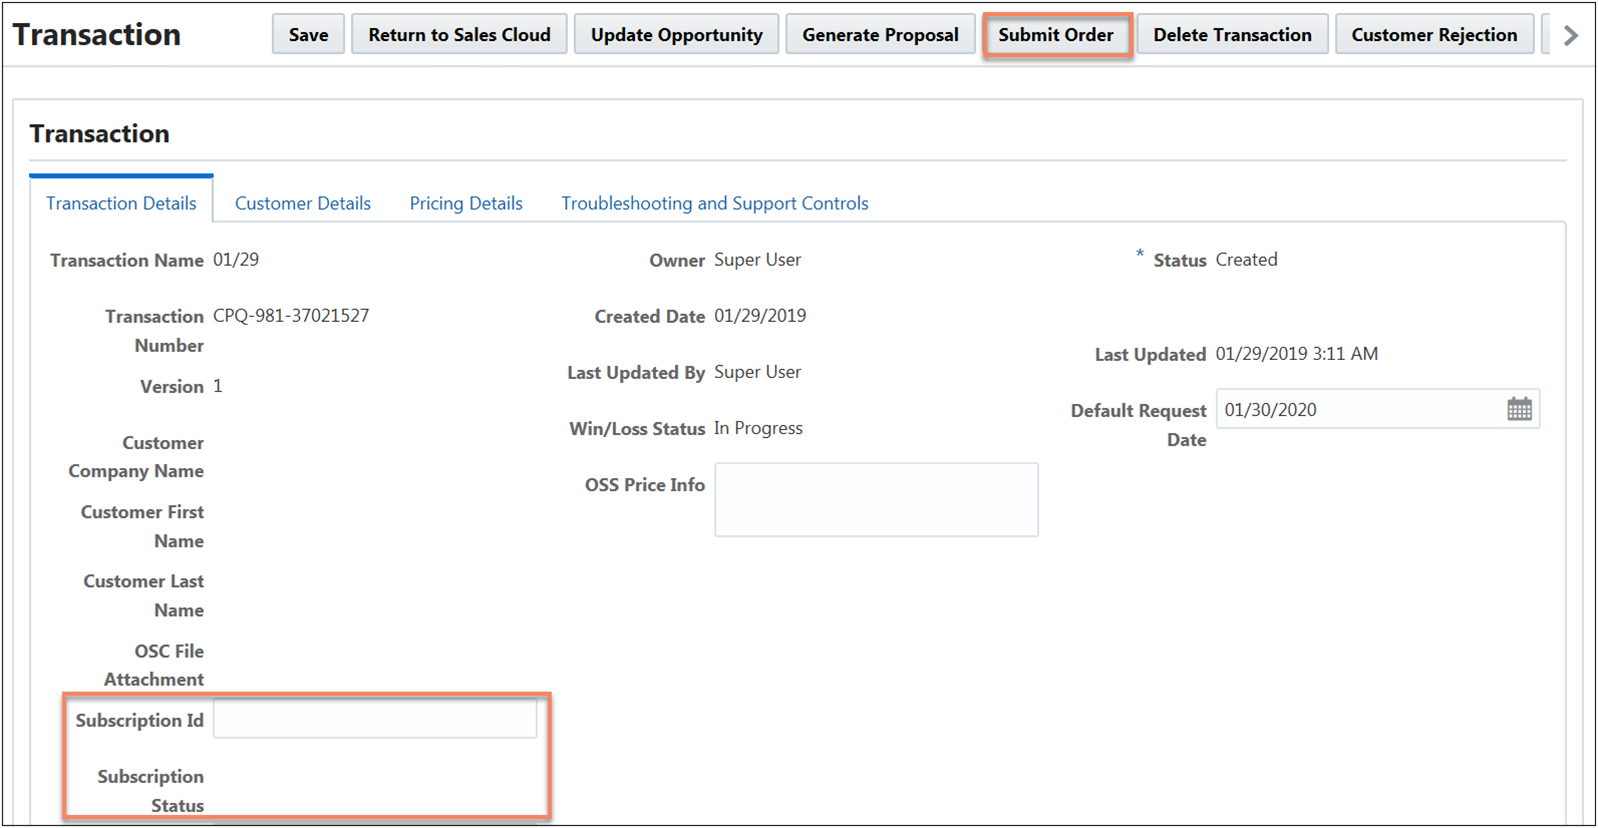
Notes:
- When the Subscription Management package is installed, a Subscription Status field and a Subscription Id field are added. Administrators can add these fields to the layout.
- OSS requires the generation of a billing schedule as part of subscription creation. If billing or charge related fields are missing or incorrect in the Create subscription payload, the billing schedule is typically not generated. Administrators can resolve this discrepancy by attempting to activate the subscription in OSS.
-
Click Submit Order.
Once the subscription is created, the Subscription Id is updated.
- If subscription activation is successful, the Subscription Status field updates to "Success".
- If the billing schedule is not generated, a new Subscription id is created, but the Subscription Status field updates to "Failure".
-
When the subscription reaches the Subscription Created state, the Update Asset Timer is triggered. Refreshing the Transaction changes the Fulfillment Status from Created to Fulfilled.
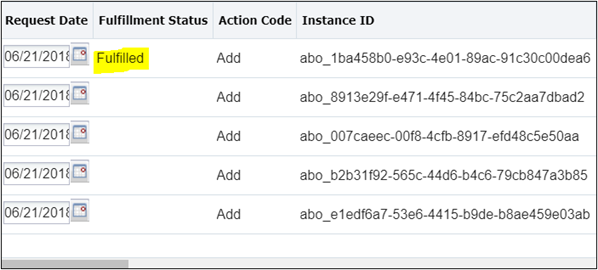
The Update Asset Timer is configured in the Subscription Created step and monitors the Max Request Date field. The Max Request Date field, which is part of the Subscription Management installation package, defaults to the Default Request Date during the creation of a Transaction.
The Update Asset Timer creates assets only when the Contract Start Date is less than or equal to the Max Request Date. After the Update Asset Timer is executed, the Max Request Date field is updated to the next Contract Start Date. The Update Asset Timer will then execute on this date. Oracle CPQ Commerce Timer functionality is leveraged to activate the asset as specified on the request date. For details about Timer functionality, refer to the Commerce Timers topic.
 Amend a Subscription
The Subscription Management solution uses Asset-Based Ordering functionality to support the modification of an existing asset-based subscription. After a subscription is created and fulfilled, sales users can use the ABO Modify flow to change the subscription product, quantity, or duration. During the amend flow, OIC obtains charge information from OSS and adds the charge information to the amended Transaction. Charges, sometimes referred to as Pricing Charges, are a way to model multiple prices for a given subscription product or service. For instance, an internet subscription may include charges like one-time installation fee, monthly recurring fee, overage fee, etc.
To amend a subscription by changing the subscription product, quantity, or duration; perform the following steps:
- Open CPQ.
- Navigate to Transaction Manager.
-
Click the Transaction Number associated with the asset to amend.
The Transaction page opens.
-
Click the Customer Assets button.
The Customer Assets page opens.
-
Select the asset to modify.
Sales users must know the asset key associated with the asset-based subscription to modify.

-
Click Modify.
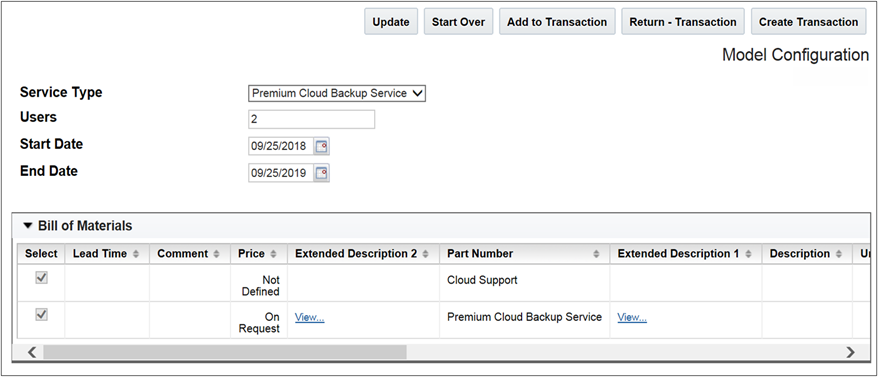
The Model Configuration page opens.
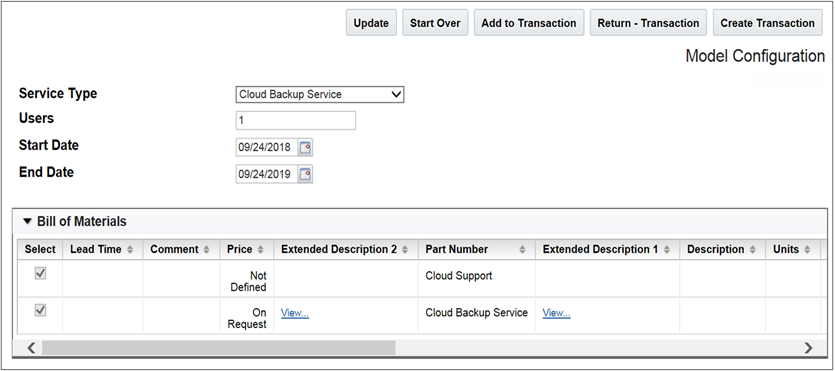
- Modify the subscription service, quantity, or duration.
-
Click Update.
-
Click Create Transaction. The Transaction page opens.
-
(Optional) Click Add Line Item to add one or more additional products.
- Select the date the amended subscription is to take effect from the Default Request Date field.
-
Select a Change Reason.
- If the product was modified, select Upgrade or Downgrade as the Change Reason.
- The Amend Replacement field must be the instance Id of the deleted product.

Note: The amendment process requires Oracle CPQ to send fields like Change Reason, Change Code, Amendment Replacement, Instance ID, etc. to OSS. Administrators can write Commerce rules to set the values for these fields as part of the amendment flow call to OSS.
-
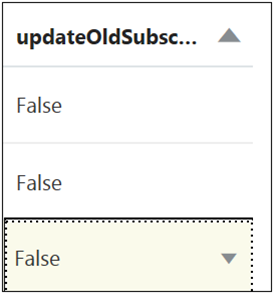
Use the UpdateOldSubscription menu to determine whether to apply the subscription amendments to a new subscription or to the existing subscription. In the following example, the amendments to the subscriptions are applied to a new subscription.
- When the UpdateOldSubscription menu is set to False, the amended product lines are added to a new subscription in OSS.
- When the UpdateOldSubscription menu is set to True, the amended product lines are added the existing subscription in OSS.
- Submit the transaction to get the required approvals and create the amendment order.
Notes:
- When a subscription is amended, the status of both the original subscription and the amended subscription is "Active" in OSS.
- Quantity changes are supported at the subscription line level and not at the root model level.
- Sales users cannot amend a subscription with a future-dated termination date. The termination of a subscription is handled by OSS.
- Sales users can use the Update flag with all types of Amend flows to determine whether to apply subscription changes to a new subscription or the existing subscription.
 Add Amended Lines to Existing Subscription
Once a subscription is created, sales users can change the subscription and have the amended lines included in the existing subscription. As an example, a sales user subscribes to "Cloud Backup Services" in Oracle CPQ and later decides to upgrade to "Premium Cloud Backup Service". The sales user wants to include the amended lines in the existing subscription instead of creating a new subscription.
To add amended lines to an existing subscription, perform the following steps:
- Open CPQ.
- Navigate to Transaction Manager.
-
Click the Transaction Number associated with the subscription to amend.
The Transaction page opens.
- Amend the subscription by adding, updating, or deleting products.
-
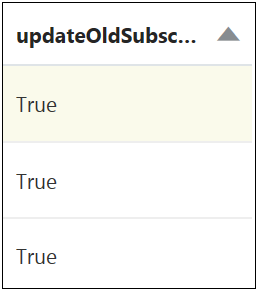
Set the UpdateOldSubscription checkbox next to the amended products to True.
The amended product lines are added to the existing subscription in OSS.
Notes:
- Administrators can also automate the process by setting the “Update” flag through the BOM configuration approach.
- The Populate OSS Charge action allows users to call OSS to get and update the charges for the pre-existing subscription lines from the original subscription contract that are getting amended in the current Transaction.
 Renew Existing Subscription
Sales users can renew a subscription from OSS. This creates a new Transaction in Oracle CPQ and a new subscription in OSS. When the OSS Renew event is triggered, a new Transaction is created in Oracle CPQ with a Renew state for the Transaction Lines of all products. A new, renewed subscription is created in OSS.
Note: If administrators define email notifications for renewals, the subscription owner will receive an email notification informing of the subscription renewal.
 Terminate an Active Subscription
Sales users can use the Customer Assets page to terminate subscriptions that are in an active state in OSS. Terminating an active subscription creates a Transaction Line in a new Transaction, where the root line item has an action code of Terminate and all products have an action code of Delete.
To terminate an active subscription, perform the following steps:
- Open CPQ.
- Navigate to the Customer Assets page.
-
Select the asset that corresponds to the subscription to terminate.

-
Click Terminate.
The Transaction page opens.
- Click Save.
-
Click Submit Order.
- Use OSS to verify the termination of the subscription.
- The product status of the subscription displays as "closed" in OSS.
 Display Subscription Charges in the Pricing Engine
The Subscription Management integration supports the ability to model subscription products to hold different prices at any given point. Customers can model the prices of their subscription products, known as charge lines, through child line items and add them to a Transaction through Configuration. The Pricing Engine was enhanced in 19A to support Transaction arrays. The Subscription Management solution displays subscription charges as line attributes using Transaction arrays.
 Subscription Workbench
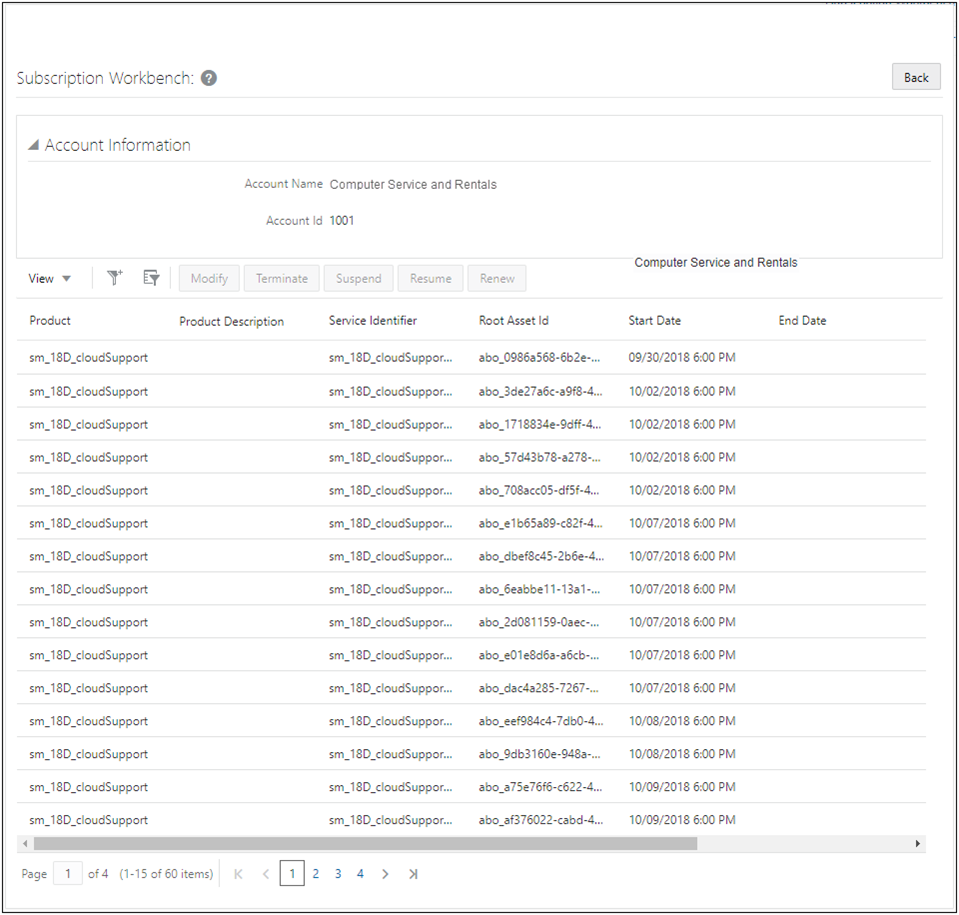
Oracle CPQ 19B enhances the Customer Assets List page, now known as the Subscription Workbench, to provide sales users with a centralized location to easily access subscription information by account ID or account name. In Oracle CPQ 19A or earlier, customer’s leveraging Oracle CPQ ABO functionality are restricted to a predefined flow for users. To see the list of assets owned by a given account, a sales user was required to access a Transaction first. This enhancement decouples the Subscription Workbench page from the Transaction UI and allows users to view the assets/subscriptions belonging to a given account directly through a navigation link.
To view the Subscription Workbench, a user-defined link must be set up. If the user-defined link is not set up, the Subscription Workbench is only viewable from the Transaction.
 Set up User-Defined Link
To setup a user-defined Link for accessing the Subscription Workbench, complete the following steps:
- Navigate to Admin Home page.
- Click Navigation Menus under Styles and Templates. The Navigation Menus page displays.
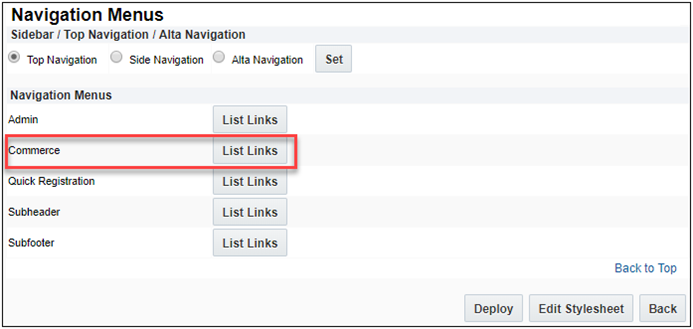
- Click List Links for Commerce. The Navigation Items List – Commerce page displays.
- Select the User Defined tab.
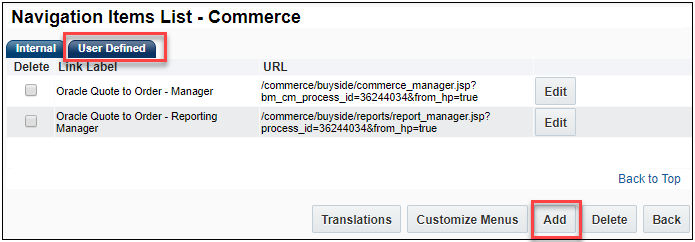
- Click on Add. The Link Editor page displays.

- Enter Subscription Workbench for the Label.
- Enter a valid URL. For example,
/commerce/subscription?process_varname={PROCESS_VARNAME}where process_varname is the valid Commerce process.
- Select Link for Show As.
- Select Label for Display.
- Click Add. The Navigation Items List - Commerce page displays.
- Click Customize Menus within the User Defined tab. The Customize Links for Commerce page displays.

- Select Subscription Workbench from the Add Links list and click Add. The Customize Links for Commerce page displays with the Subscription Workbench showing in the Hidden Links list.

-
Select Subscription Workbench from the Hidden Links list and then click Add next to the Hidden Links list. The Subscription Workbench link is moved to under the Top Navigation Tab.
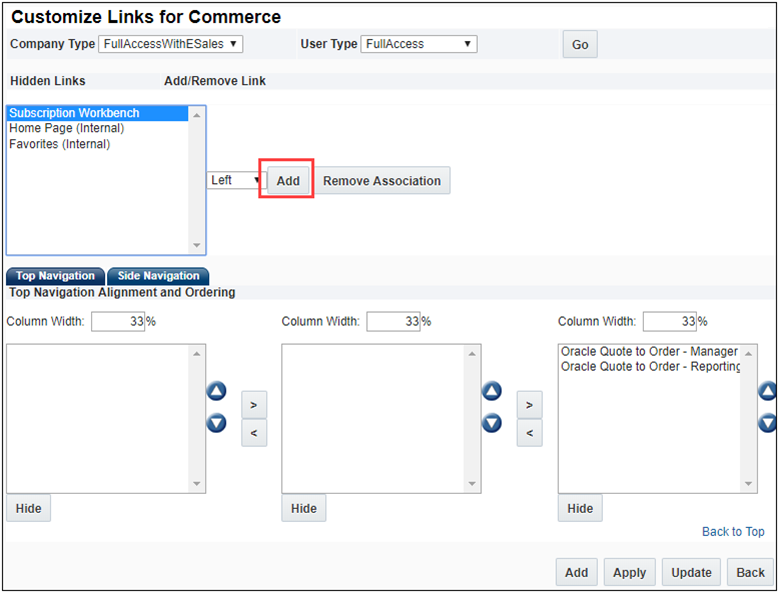
- (Optional) Click the arrows to move the Subscription Workbench link to the desired location to display on the UI.
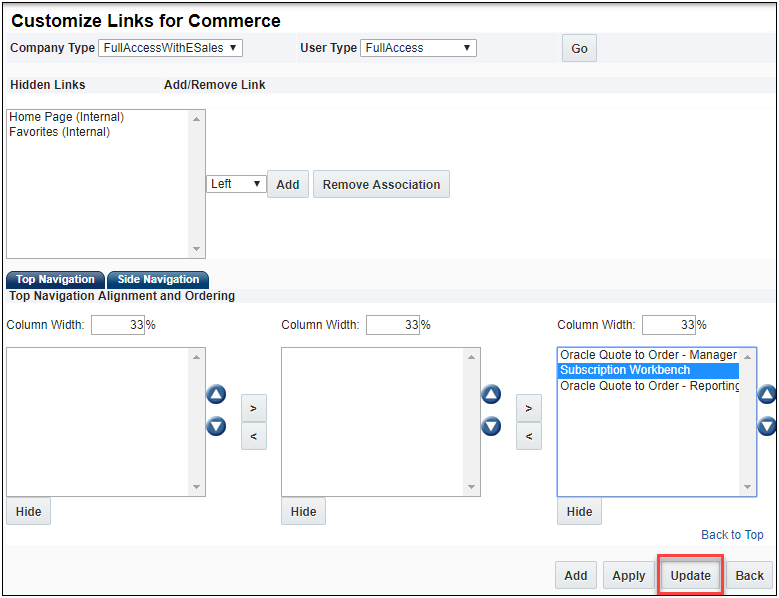
- Click Update to get back to the Navigation Items List – Commerce page.
- Click Back to get to the Navigation Menus page.
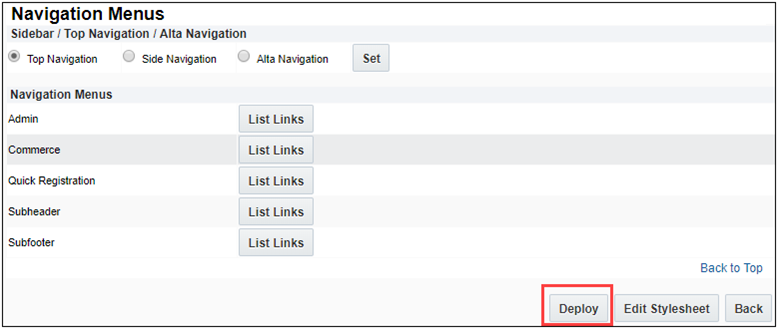
- Click Deploy to deploy the Subscription Workbench to the User-Defined Navigation Menu UI.
 Enable Accounts Lookup Library Function
To enable the Accounts Lookup Library function for Integrations with CRMs, complete the following steps:
- Navigate to the Admin Home page.
- Select Commerce Settings under Commerce and Documents. The Commerce Options page displays.
- Select an Account Lookup BML script from the Accounts Lookup Library Function drop-down.
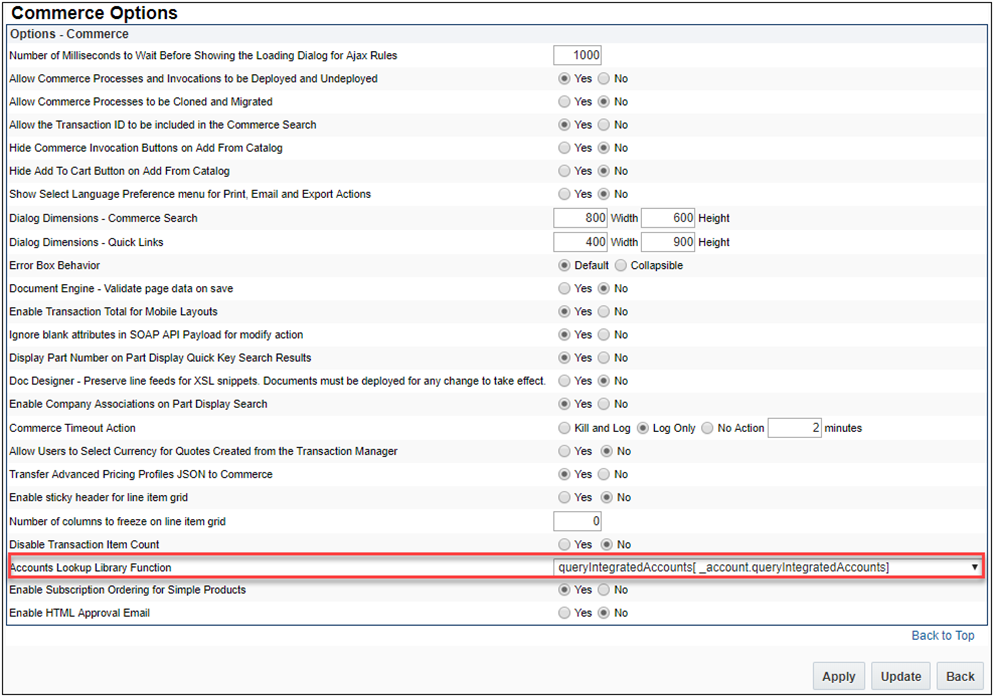
- Click Apply.
The Accounts Lookup Library Function drop-down is only available for sites that are integrated with a CRM. Refer to the Oracle CPQ Online Help for information about the Integration Center.
Administrators need to develop an Account Lookup BML script in order for the lookup feature to know what data to search. A sample BML script is included within the 19B Subscription Management Installation package. The following examples provide the input and output BML format for the accounts lookup script.
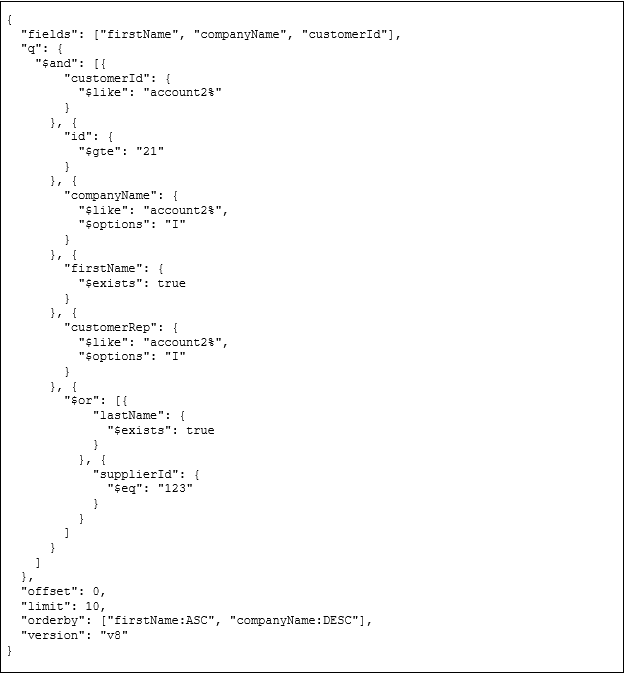
Sample Input BML
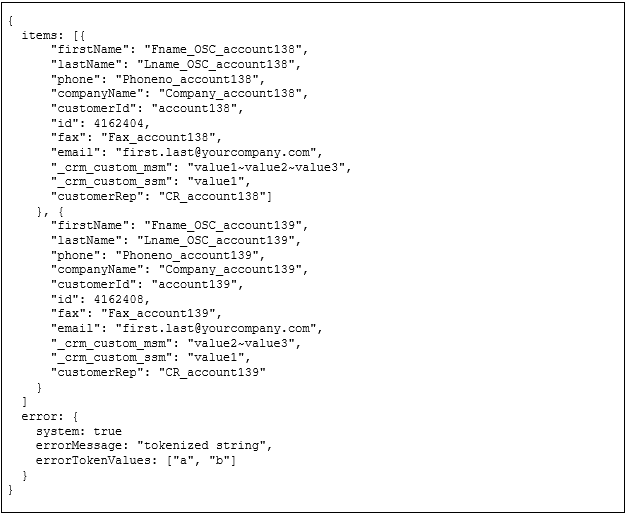
Sample Output BML
 View Subscription Workbench
To view the Subscription Workbench, complete the following steps:
- Log in to CPQ, click Subscription Workbench. The Subscription Workbench page displays.

- Perform one of the following steps:
- Enter the account name in the Account Name field.
- Enter the account ID in the Account Id field.
- Click on the
 Look up Key to select an account.

- Click Next. The Subscription Workbench showing the list of assets/subscriptions for that account displays.
 Subscription Workbench Layout Editor
Beginning in Oracle CPQ 19B, administrators have the ability to edit the Subscription Workbench, formerly Customer Assets List page, and add additional account and asset attributes through the UI Designer Layout Editor.
UI Designer contains a drag and drop interface that allows administrators to easily customize layouts. In 19B, the UI Designer default layout for Customer Assets is modified for the new Subscription Workbench title and new Account Information panel.
To access the new Customer Assets layout, complete the following steps:
- Navigate to the UI Designer page.
Admin Home > General > UI Designer

- Click Customer Assets List under Name. The UI Designer: Customer Assets List page displays.
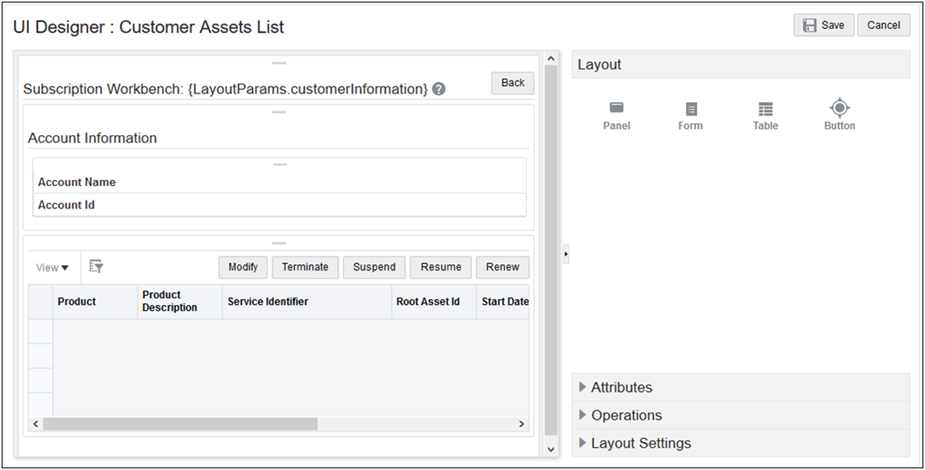
The Customer Assets List layout shows the new Subscription Workbench title and Account Information panel. If you select the Account Information panel, the list of supported asset and account attributes are available. Also, administrators can modify the page and layout labels within the Layout Settings panel. Refer to UI Designer Editor.
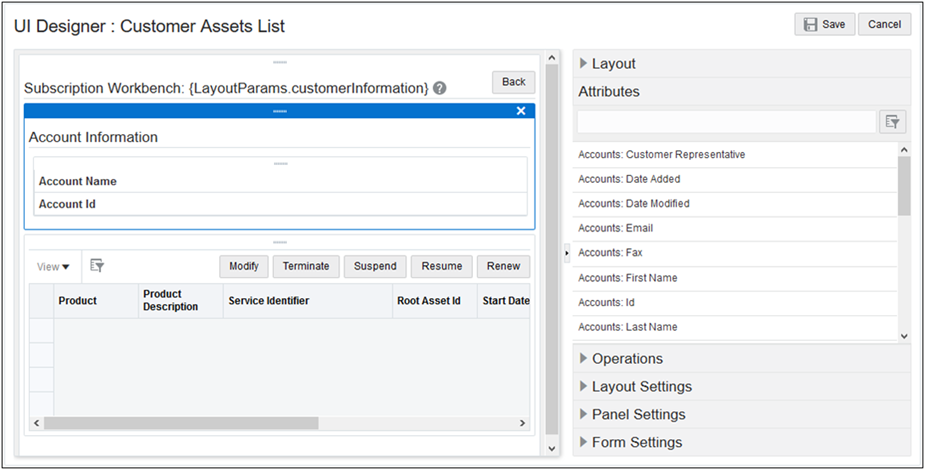
UI Designer: Customer Assets List showing Account Panel Attributes
 Set up the Subscription Management Integration
The Oracle CPQ Subscription Management Installation Guide contains integration details for Subscription Management and is published as a separate document for 19A.
The Oracle CPQ Subscription Management Integration Package contains the following artifacts:
- Oracle CPQ Subscription Management Installation Guide: A document containing detailed instructions on setting up the integration.
- Oracle CPQ Subscription Management Package: A granular migration package containing new Commerce attributes, actions, and rules supporting Subscription Management.
- OIC Integration for End-to-End Flow: An OIC flow package for creating, amending, terminating, and renewing subscriptions.
- OIC Flow for the OSS Renew Event: An OIC flow package that listens to the OSS Renew Event and creates a Transaction in Oracle CPQ for the OSS Renew Event.
- OIC Usage Rating Flow: The OIC flow for rating usage charges for OSS by invoking the Oracle CPQ Pricing API.
- Populate Amend Charge Flow: This flow populates charge information from the original subscription into the amended Transaction.
Notes
The required prerequisites for the Subscription Management integration to work include:
- Oracle CPQ Subscription Management Integration Guide
- Oracle Customer Data Management for customer account information
- Oracle Product Information Management (PIM) with parts synced between Oracle CPQ and OSS
- Oracle Asset-Based Ordering (ABO) flow with BOM Mapping and ABO setup
Related Topics
 See Also
![]() Support Granular Pricing for Subscription Products (21D and later)
Support Granular Pricing for Subscription Products (21D and later)
![]() Create a Subscription in OSS from CPQ
Create a Subscription in OSS from CPQ
![]() Add Amended Lines to Existing Subscription
Add Amended Lines to Existing Subscription
![]() Terminate an Active Subscription
Terminate an Active Subscription
![]() Display Subscription Charges in the Pricing Engine
Display Subscription Charges in the Pricing Engine
![]() Subscription Workbench Layout Editor
Subscription Workbench Layout Editor
![]() Set up the Subscription Management Integration
Set up the Subscription Management Integration


 Look up Key to select an account.


