Commerce Timers
Overview
You can schedule the system to automatically perform a Commerce action by using Timers. Based on a defined duration of time, a Timer triggers when the elapsed time exceeds the specified duration. Oracle CPQ uses date type attributes to calculate elapsed time and Timers are set up on modify type commerce actions.
How They Work
Timers are managed within individual workflow steps and you can define one each. Each Timer is associated with a participant profile and a user account.
- The user account acts as the performer of the timed action and is automatically granted permission to view the document.
- The participant profile defines whether the timer has permission to perform the action. In other words, the action you want a timer to trigger must be active in the profile associated with the timer.
Using transition rules in a timer's associated profile, you can configure the system to send email notifications when a timed system triggers. You can also use transition rules to transition a workflow step from the current step to any downstream step when a timed action is performed.
Administration
 Add a Timer
- Navigate from: Admin Home Page > Commerce and Documents > Process Definition > Select a Commerce Process > Steps
- Double-click a step name in the left panel. If you need to create or edit workflow steps, click here.
-
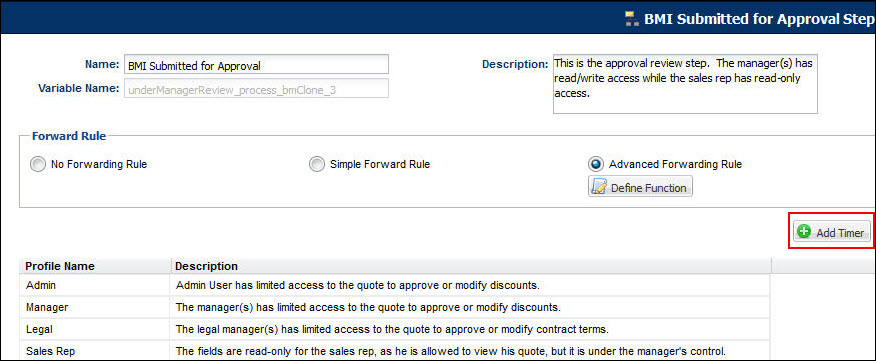
Click Add Timer.

-
Enter a Name and Variable name for the timer.
The Variable Name field populates automatically. Variable names can only contain alpha-numeric characters and underscores. The entry can be changed before saving, but after saving the value is read-only.
-
Choose a Participant Profile to map the timer to from the Map to Profile drop-down.
This is the profile with which the application executes the Timer action. Since timers are used in transition steps, and transition rules are tied to the junction of actions and profiles, by mapping the Timer action to a particular profile, the admin can specify which transition rules will operate.
-
Choose a user to map the timer to from the Map to User drop-down.
This is the user that the application 'proxies' to accomplish the named action when the timer executes. This mapping allows the FullAccess user to specify 'who' initiated the action.
-
Define the duration of time for the timer by specifying the time to elapse in the Elapsed Time field. Choose the Days, Hours and Minutes in the drop-down.
-
Choose a date attribute you want to relate to the timer from the Relative to Date Attribute drop-down.
The Relative to Date Attribute drop-down contains commerce Date Type attributes that have been added to the data columns. To view a commerce date attribute in this list, add the date attribute to the data columns.
- Choose a document from the Document drop-down.
-
Choose an action from the Action drop-down.

- Click Save. This displays the section where you can define action rules for the step.
- Select an action rule as Simple or Advanced.
- Select Advanced if you want to add an advanced action rule and click Define Function.
- Click Save.
 Timer Queue
Beginning in Release 18C, the Timer queue is enhanced to support task multi-threading. To kill a Timer thread from the queue, open a Service Request (SR) on My Oracle Support.
Use Cases
 Use Case: Recurring Timers
-
Create a date attribute. It can be set to system time, system timer plus some interval (for example, 30 days from now), or a given time (for example, end of calendar year).
The date attribute must be included in the data columns or else it cannot be used to trigger a timer.
- The timer should trigger an action that modifies your new date attribute. It could set to the current time, or another interval, or a new given time. Example: if you want to use a timer to send a reminder about open quotes every two weeks, the action should set the date attribute to system time plus two weeks.
Troubleshooting
 Recurring Timer still fires after quote exits "timer-ed" step
-
Make the "lastEmailed_quote" Attribute (or whatever is controlling the Recurring Timer) a writable Attribute for admins.
If the problem is associated with only one quote, set the date to sometime in the far future.
- If more than one quote is the issue, double-check your Timers. The above fix does not work for a systematic problem.
Notes
A Timer action is always performed after the date specified by the Relative to Date Attribute. A timer cannot be set up to occur before a date.
The user account specified for a timer is recorded by the system as the performer of the Timer action. This performer appears in change history logs for documents. You can select an existing user account as the performer of a Timer action, or you can create a user account specifically for the purpose of performing timer actions.
Timers can perform actions up to 99 days after the date defined by the date field.
Timers are created in an inactive, pending state. To activate a timer for all documents, including legacy documents, deploy the Commerce Process.
The system records who performs Commerce actions, including timer actions, in the change history log. You can create a virtual user solely for the purpose of performing timer actions, see Setting up a timer user.
To add email notification or a step transition rule functionality to a timer, you can add transition rules to the profile associated with the timer. For more information, see Transition Rules, Transition Notifications and Approval Notifications.
Related Topics
 See Also
![]() Recurring Timer still fires after quote exits "timer-ed" step
Recurring Timer still fires after quote exits "timer-ed" step


