Overview
Accounts are often a necessary part of the selling process. They typically store important customer details like the account name and ID, the buyer’s contact information and the shipping and/or billing address for the Transaction. This information can be keyed in directly on each quote or order, but in most cases it’s more efficient and reliable to record this information once in your customer database and then automatically populate it when you are creating transactions for those accounts.
Oracle CPQ offers two primary methods for managing your Account information for use with quotes and orders.
Oracle CPQ Accounts
Oracle CPQ Accounts, sometimes referred to as Native Accounts, are customer account records stored inside your Oracle CPQ site. When Oracle CPQ Accounts are used you are typically treating Oracle CPQ as the system of record for your customer account data, i.e. your customer data master.
External Accounts
External Accounts are customer account records stored in another system. Most commonly this external system is a dedicated Customer Data Management (CDM) system, a Customer Relationship Management (CRM) system, or an Enterprise Resource Planning (ERP) system. When External Accounts are used you are treating that system as the system of record for your account data.
Regardless of where you are mastering your customer data, Oracle CPQ makes it easy to find and retrieve account data during your quoting process by using a collection of Main Document Actions such as Autofill, Browse, View, and Select Alternate Address.
Administration
Choosing an account master is an important decision that must be made early in your implementation of CPQ. Oracle CPQ Accounts and External Accounts cannot be implemented together using standard features; you should choose one approach.
For most customers, we recommend that you use External Accounts. If you are integrating to a CRM system, Oracle CPQ can import the account and contact information from that system as part of the standard CRM integration setup. If you have defined another system as your account master, you can choose to pull that account information into Oracle CPQ directly or you can push that information to your CRM and allow Oracle CPQ to pull the account details from there. See Integrations for more details on supported CRM systems.
If your Oracle CPQ system is not connected to a CRM system or if some of your users do not Single Sign-On (SSO) into Oracle CPQ from a CRM system, you may want to consider using Oracle CPQ Accounts. When using Oracle CPQ Accounts, you should decide if you want to allow users to create and edit Accounts directly or if you want to manage Accounts through Bulk Data Services or Web Services.
Consult with your system integrator and/or your IT department for additional guidance on each of these approaches. Once you have chosen the Account Master, log a Service Request on My Oracle Support
![]() Using the Standard Account Attributes
Using the Standard Account Attributes
Accounts in Oracle CPQ are provided with a standard set of system-generated attributes which store the details of the customer account. These attributes are used with both Oracle CPQ Accounts and External Accounts and can be mapped to main document attributes using the Main Document Actions View, Autofill, and Select Alternate Address.
The table below describes the standard Account attributes:
| Attribute Name | Variable Name | Type (Character limit) |
|---|---|---|
| Company Name |
company_Name |
Text String (512 characters) |
| Customer ID |
customer_Id |
Text String (256 characters) |
| Customer Rep |
customer_Rep |
Text String (512 characters) |
|
|
Text String (256 characters) | |
| Fax |
fax |
Text String (100 characters) |
| First Name |
first_Name |
Text String (512 characters) |
| Last Name |
last_Name |
Text String (512 characters) |
| Phone |
phone |
Text String (100 characters) |
| Supplier ID |
supplier_Id |
Integer (18 characters) |
| Custom Attributes 1 - 50 | Text String (256 characters) |
The table below describes the standard Address attributes:
| Attribute Name | Variable Name | Type (Character limit) |
|---|---|---|
| Billing Address |
billing_Address |
Text String (255 characters) |
| Billing Address 2 |
billing_Address2 |
Text String (128 characters) |
| Billing Company |
billing_Company |
Text String (128 characters) |
| Billing Company 2 |
billing_Company2 |
Text String (128 characters) |
| Billing City |
billing_City |
Text String (128 characters) |
| Billing Country |
billing_Country |
Text String (128 characters) |
| Billing Email |
billing_Email |
Text String (128 characters) |
| Billing Fax |
billing_Fax |
Text String (50 characters) |
| Billing First Name |
billing_First_Name |
Text String (128 characters) |
| Billing ID |
billing_Id |
Text String (255 characters) |
| Billing Last Name |
billing_Last_Name |
Text String (128 characters) |
| Billing Phone |
billing_Phone |
Text String (50 characters) |
| Billing State |
billing_State |
Text String (128 characters) |
| Billing Zip |
billing_Zip |
Text String (30 characters) |
| Company ID |
company_Id |
Integer (18 characters) |
| CRM ID |
crm_Id |
Integer (18 characters) |
| Shipping Address |
shipping_Address |
Text String (255 characters) |
| Shipping Address 2 |
shipping_Address2 |
Text String (128 characters) |
| Shipping City |
shipping_City |
Text String (128 characters) |
| Shipping Company |
shipping_Company |
Text String (128 characters) |
| Shipping Company 2 |
shipping_Company2 |
Text String (128 characters) |
| Shipping Country |
shipping_Country |
Text String (128 characters) |
| Shipping Email |
shipping_Email |
Text String (128 characters) |
| Shipping Fax |
shipping_Fax |
Text String (50 characters) |
| Shipping First Name |
shipping_First_Name |
Text String (128 characters) |
| Shipping ID |
shipping_Id |
Text String (255 characters) |
| Shipping Last Name |
shipping_Last_Name |
Text String (128 characters) |
| Shipping Phone |
shipping_Phone |
Text String (50 characters) |
| Shipping State |
shipping_State |
Text String (128 characters) |
| Shipping Zip |
shipping_Zip |
Text String (30 characters) |
| Tab Label |
tab_Label |
Text String (128 characters) |
| Custom Attributes 1 - 50 | Text String (256 characters) |
![]() Using Custom Account Attributes
Using Custom Account Attributes
In addition to standard account attributes, you can create up to 50 custom attributes which can store additional customer details that are important to your business. Custom attributes can be used with both Oracle CPQ Accounts and External Accounts and can be mapped to main document attributes using the Main Document Actions Autofill and Select Alternate Address.
![]() Creating a Custom Account Attribute
Creating a Custom Account Attribute
-
 Navigate to the Accounts page.
-
Click Admin to go to the Admin Home Page.
-
Click Accounts in the Integration Platform section.
The Accounts page opens.
-
-
Click Customize Attributes.
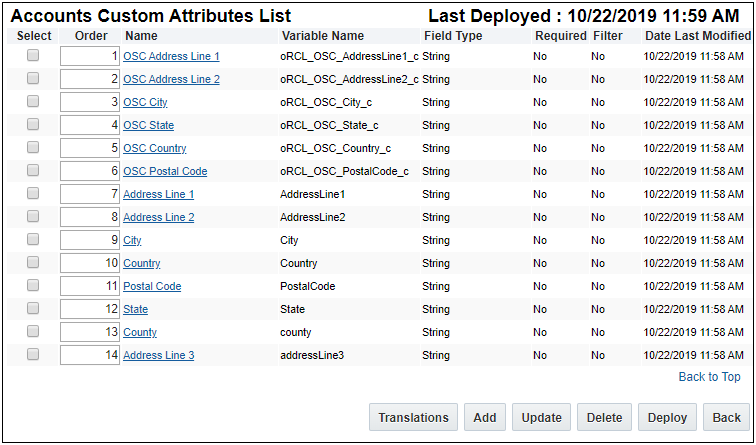
The Accounts Custom Attributes List page opens.
-
Click Add.
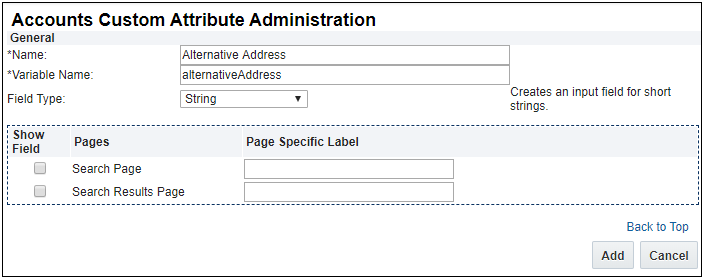
The Accounts Custom Attribute Administration page opens.

-
Enter a Name and Variable Name for the attribute.
The Variable Name field populates automatically. Variable names can only contain alpha-numeric characters and underscores. The entry can be changed before saving, but after saving the value is read-only.
- Choose the Field Type from the drop-down: String, Single Select Menu, or Multi Select Menu.
- For String, the Detail section appears.
- For Single Select Menu and Multi Select Menu field types, the Menu Detail section appears.
- Click Add.
-
Enter the values for the available fields based on data and field type:
Element Field Type Description Description All Available Enter details for the attribute. Default Value All Available Enter a default value that will pre-populate the custom attribute. Required All available Select if the field must be populated when creating and/or managing an Account. Show Field All available Select Search Page to use the attribute in an Account Search.
Select Search Results Page to use the attribute as a field in Account Search Results.
Menu Detail Single Select Menu and Multi Select Menu Populate menu values. Click here for more information. Filter Option Single Select Menu Use the Filter Option section to specify whether or not you want to add a filter script.
If you select Define Filter Script, you need to click Define Function. This will display the dialog box for creating that script.
-
Click Add.
The Accounts Custom Attributes List page reappears.
- Repeat Steps 3 - 8 for all custom attributes.
- Select one or more custom attributes and click Deploy.
-
Click Back to return to the Accounts page.
Notice that the attributes for which Search Page was selected are now displayed.
![]() Deleting a Custom Account Attribute
Deleting a Custom Account Attribute
-
 Navigate to the Accounts page.
-
Click Admin to go to the Admin Home Page.
-
Click Accounts in the Integration Platform section.
The Accounts page opens.
-
-
Click Customize Attributes.
The Accounts Custom Attributes List page opens.

- Select the custom attribute or attributes that are to be deleted and click Delete. The refreshed view of the page shows the deletion.
-
 Navigate to the Accounts Custom Attributes List page.
-
Click Admin to go to the Admin Home Page.
-
Click Accounts in the Integration Platform section.
The Accounts page opens.
-
- Click Customize Attributes.
The Accounts Custom Attributes List page opens.

- Enter a new numerical sequence under the Order column. The ordering system uses 1 as the highest order number.
- Click Update to save your changes or click Back to return to the Accounts page without saving your changes.


