External Accounts
Overview
External Accounts are customer account records stored in another system. Most commonly this external system is a dedicated Customer Data Management (CDM) system, a Customer Relationship Management (CRM) system, or an Enterprise Resource Planning (ERP) system. When External Accounts are used you are treating that system as the system of record for your account data.
External Accounts are reliant on Account Integrations which are used to retrieve customer information in real-time from a connected system. When using External Accounts the account data is not duplicated in CPQ, it remains in the designated system of record ensuring that sales users and administrators have a single source of truth for account details.
External Accounts are exposed in Oracle CPQ as a “virtual” object, meaning that the metadata for the Account is still defined in Oracle CPQ using standard and custom Account attributes. The Main Document Actions for Accounts, such as View, Browse, Autofill, and Select Alternate Address, function just the same as for Oracle CPQ Accounts. Any time you use these Account attributes in CPQ, the system calls out to the connected system to retrieve the latest values from the system of record and passes them as inputs to actions. From a user’s perspective External Accounts and native Oracle CPQ Accounts behave the same way.
Once the external system is connected and the Account Integrations are active, the user can use the Browse action to choose an account. After selection, the Autofill action populates the Account attribute and address values to the mapped main document attributes. If the account has related contacts or addresses, the Select Alternate Address action can be used to choose alternate address information to replace the default address set or to populate an alternate address set on the main document.
When a CRM system is integrated and acting as the Account Master, users gain an additional benefit: when creating a new quote, the Account ID is automatically passed in and the Autofill action runs automatically. This eliminates the need for any manual account selection from inside Oracle CPQ and saves your users time. See Integrations for more information on supported CRM systems.
Administration
 Creating an Accounts Integration
-
 Navigate to the Accounts page.
-
Click Admin to go to the Admin Home Page.
-
Click Accounts in the Integration Platform section.
The Accounts page opens.
-
Click Integration.
The Integration for CRM page opens.
-
Click Add.
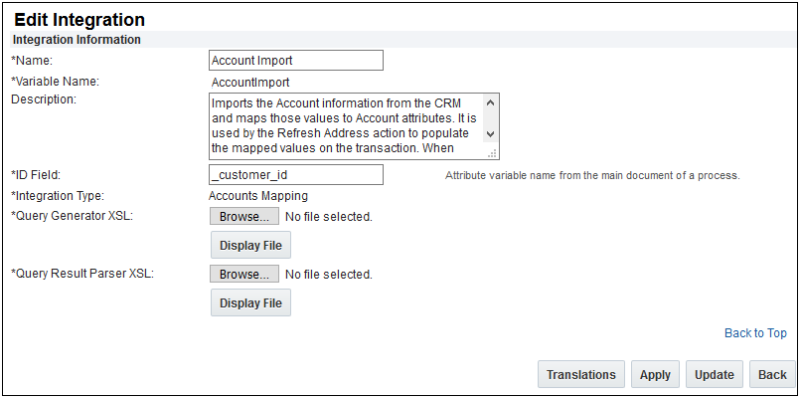
The Edit Integration page opens.

-
Enter a Name, Variable Name and Description for the new integration.
The Variable Name field populates automatically. Variable names can only contain alpha-numeric characters and underscores. The entry can be changed before saving, but after saving the value is read-only.
- In the ID Field field, enter the attribute variable name from the main document of a process that will store the external ID for the CRM Account record.
- Click Browse to locate and add a file to the Query Generator XSL field.
- Click Browse to locate and add a file to the Query Result Parser XSL field.
If you are using a reference application, your XSL files will be pre-loaded. If you are not using a reference application or have customized your XSL file, you will need to create a new file or retrieve your customized XSL from your repository.
-
Click Add to add the new integration or click Cancel to go back to the Integration for CRM page for managing integrations.
The Integration for CRM page reappears.

-
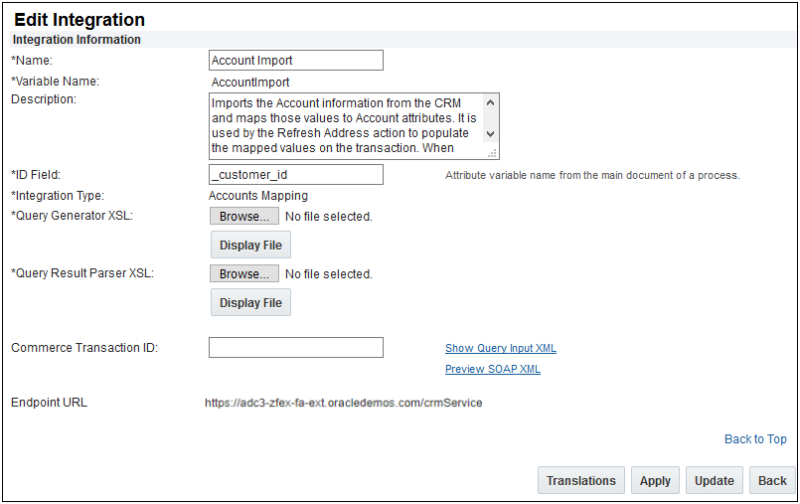
(Optional) To verify the integration, click the name of your new integration.
The Edit Integration page reappears.

A Commerce Transaction ID field appears in the Edit Integration page after you've saved an integration.
-
(Optional) Enter a value in the Commerce Transaction ID and click Show Query Input XML or Preview SOAP XML for additional integration details.
For more information, see the topic Finding the Transaction ID.
 Creating a BML Account Integration
Create a BML type Account integration from the Edit Integration page by selecting the system variable and library functions supporting the integration and defining the BML.
-
 Navigate to the Accounts page.
-
Click Admin to go to the Admin Home Page.
-
Click Accounts in the Integration Platform section.
The Accounts page opens.
-
Click Integration.The Integration for CRM page opens.
-
Click Add. The Edit Integration .
-
Enter a Name, Variable Name and Description for the new integration.
The Variable Name field populates automatically. Variable names can only contain alpha-numeric characters and underscores. The entry can be changed before saving, but after saving the value is read-only.

- Click Add. The Edit Integration page refreshes and includes a Define button.
- Click Define. The Select Attributes page opens.
-
From the System Variable Name tab, select “_system_account_id_field” to import the system attribute which contains the Account ID.
- Select any additional attributes or library functions which will be used in the BML function.
- Click Next. The BML Editor opens.
- Define a BML function which calls out to the external Accounts system and retrieves the Account information using the specified Account ID. If using a "out of the box" provided by Oracle or a third-party, follow the steps in the appropriate integration guide when defining the BML function.
If using a "out of the box" provided by Oracle or a third-party, follow the steps in the appropriate integration guide when defining the BML function.
- Click Save and Close to return to the Edit Integration page.
- Click Save. The new BML integration displays on the Integrations page along with all the other BML integrations.
To update a BML integration, select the integration name from the from the Integrations page to open the Edit Integration page.
Related Topics
 See Also
![]() Creating an Accounts Integration
Creating an Accounts Integration
![]() Creating a BML Account Integration
Creating a BML Account Integration


