Oracle CPQ Accounts
Overview
Oracle CPQ Accounts, sometimes referred to as Native Accounts, are customer account records stored inside your Oracle CPQ site. When Oracle CPQ Accounts are being used, you are typically treating Oracle CPQ as the system of record for your customer account data, i.e. your customer data master.
Sales users with the proper access rights can create and edit Accounts in Oracle CPQ from the Accounts page. In addition, sales users can add address information to Accounts. Accounts come with a default Bill To and Ship To address set. Users can add additional alternate addresses for accounts with multiple contacts or locations.
Once created, an Account can be selected during the quoting process using the Browse action. After selection, the Autofill action populates the Account attribute and address values to the mapped Main Document attributes. When alternate addresses are used, the Select Alternate Address action can be used to choose one of the additional addresses to replace the default address set or to populate an alternate address set on the Main Document.
See Main Document Actions for more information about these specialized actions for Accounts.
Administrators can use Bulk Data Services to import or export customer data to and from Oracle CPQ Accounts on a periodic basis. This can be useful when initially deploying Oracle CPQ and moving from a legacy quoting system, or as a method to synchronize accounts with another system. For more information, see Bulk Uploads and Bulk Downloads topics.
Administration
 Creating an Account
-
 Navigate to the Accounts page.
-
Click Admin to go to the Admin Home Page.
-
Click Accounts in the Integration Platform section.
The Accounts page opens.
-
Click Add.
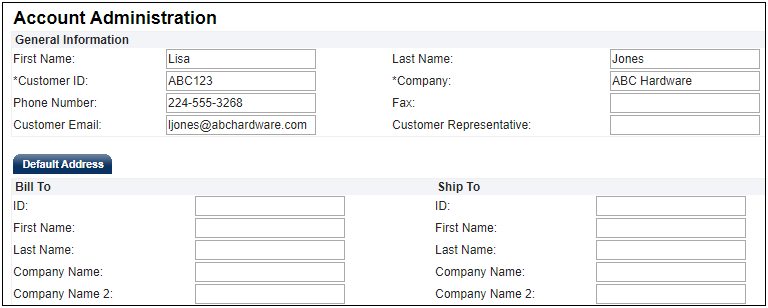
The Account Administration page opens.
-
Enter data in the General Information section and provide Bill To and Ship To information in the Default Address section.
The Customer ID and Company Name fields are required to create an Account.
-
If you have any custom attributes, enter the information in the Additional Information section.
For more information, see the topic Custom Attribute Fields.
-
Click Add.
The Administration page reappears.
 Editing an Account
-
 Navigate to the Accounts page.
-
Click Admin to go to the Admin Home Page.
-
Click Accounts in the Integration Platform section.
The Accounts page opens.
-
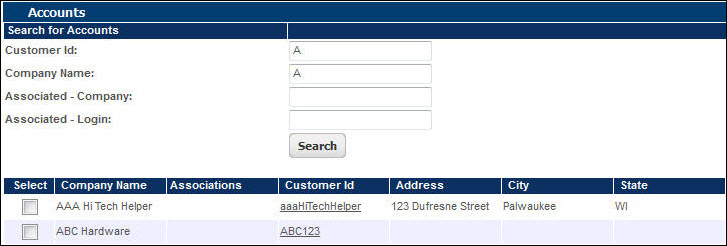
Enter data in the Search for Accounts section and click Search.
The Accounts page expands at the bottom to show the search results.
-
Click the Customer ID of the Account you want to edit.
The Account Administration page opens.
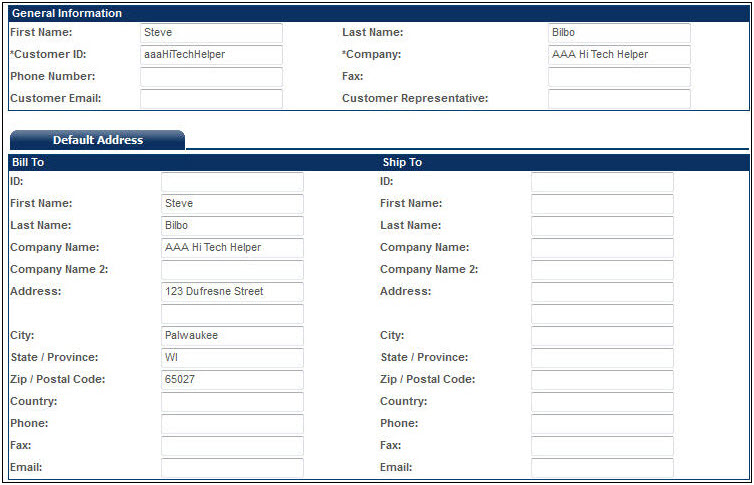
- Edit or enter Account information in the fields provided.
- Click Update to save changes or click Back to return to the Accounts page without saving your changes.
 Adding an Alternate Address to an Account
-
 Navigate to the Accounts page.
-
Click Admin to go to the Admin Home Page.
-
Click Accounts in the Integration Platform section.
The Accounts page opens.
-
Enter data in the Search for Accounts section and click Search.
The Accounts page expands at the bottom to show the search results.

-
Click the Customer ID of the Account you want to edit.
The Account Administration page opens.
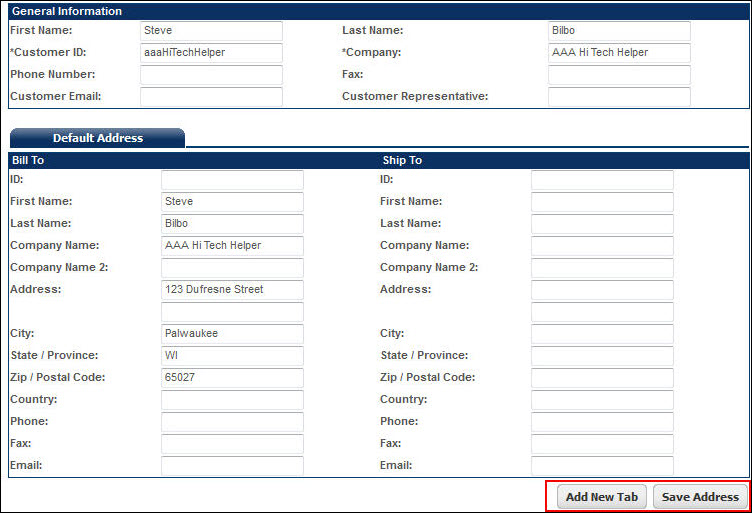
- Click Add New Tab to add an alternate address to new and existing Accounts records.
- Enter a label for the new tab, enter alternate address data, and click Save Address.
- Click Delete Address when the tab is no longer required or valid.
Alternate addresses appear as separate address tabs and can be viewed or modified by clicking the tab name.
- Click Update to save changes or click Back to return to the Accounts page without saving your changes.
 Searching for Accounts
Oracle CPQ supports an option in Accounts that allows you to select fields to use when searching for an Account. This search option only includes standard account attributes. You cannot add custom attributes to this.
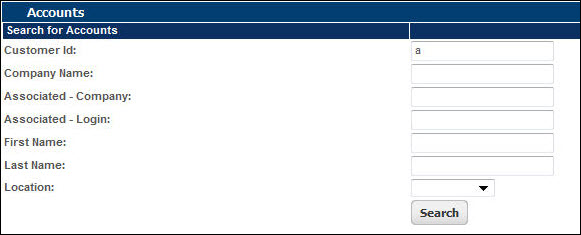
You can also customize the way you want to view the search results that are displayed on the Accounts page.

To set up account search criteria, perform the following steps:
-
 Navigate to the Accounts page.
-
Click Admin to go to the Admin Home Page.
-
Click Accounts in the Integration Platform section.
The Accounts page opens.
-
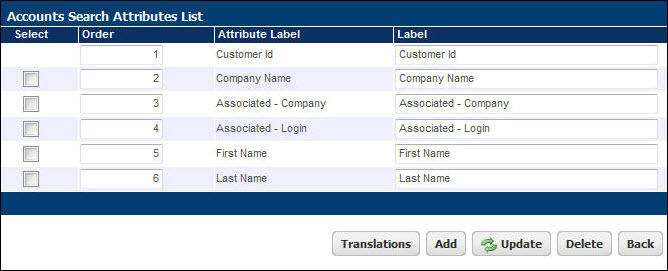
Click Customize Search.
The Accounts Search Attributes List page opens.
-
Click Add.
The Available Accounts Search Attributes page opens.
-
Select the account attribute(s) you want to add and click Add.
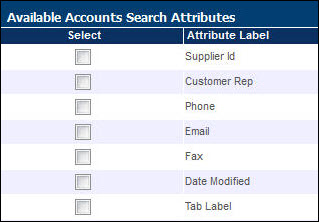
The Accounts Search Attributes List page reappears.
- Specify an order number for the attributes in the Order column.
- If you want, change the entry in the Label field.
- If your site has more than one language enabled, click Translations to include translations for each label in all the languages your application supports.
- Click Update to save your changes or click Back to return to the Accounts Search Attributes List page.
 Customizing Search Results
To customize account search results, perform the following:
-
 Navigate to the Accounts page.
-
Click Admin to go to the Admin Home Page.
-
Click Accounts in the Integration Platform section.
The Accounts page opens.
-
Click Customize Search Results.
The Accounts Search Result Attributes List page opens.
-
Click Add to add attributes to the Account Search Results Attributes List page.
The Available Accounts Search Result Attributes page opens.
-
Select the account attribute(s) you want to add click Add.
The Accounts Search Result Attributes List page reappears.
- In the Order column, specify an order for the attributes.
-
If you want, change the entry in the Label column.
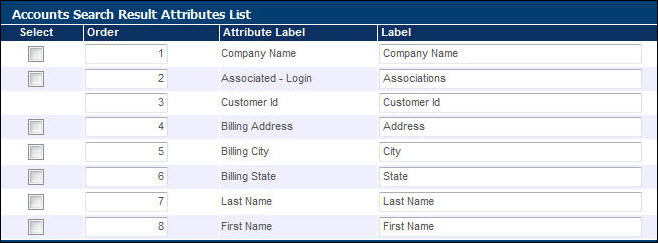
- If your site has more than one language enabled, click Translations to include translations for each label in all the languages your application supports.
- Click Update to save your changes or click Back to return to the Accounts page.
 Creating Account Associations
A single Accounts record can be associated with one or more user accounts. The purpose of associations is that they enable you to support Accounts-based selling rules. Whenever the system recognizes an association between a user and an Account record, it can trigger Accounts-based rules. For example, this would allow configuration rules to fire when the associated Account satisfies a rule's condition.
There are two types of association:
- Individual: Associate an individual user account to a single Accounts customer record.
- Company: Define associations for buying companies using an alias called "_everyone@buyercompany".
When a user logs in, the system looks for an individual association. If one exists, then that informs the system which record to associate with the user. If an individual association does not exist, the system looks for a company association for the user's company. If a company association exists, then that informs the system which record to associate with the user. If neither an individual nor a company association exists for a user, then the user is not associated with any Account record and Accounts-based rules will not trigger.
 Adding Account Associations
-
 Navigate to the Accounts page.
-
Click Admin to go to the Admin Home Page.
-
Click Accounts in the Integration Platform section.
The Accounts page opens.
- Search for an Account and click its Customer ID, or create a new account.
-
Click Associations.
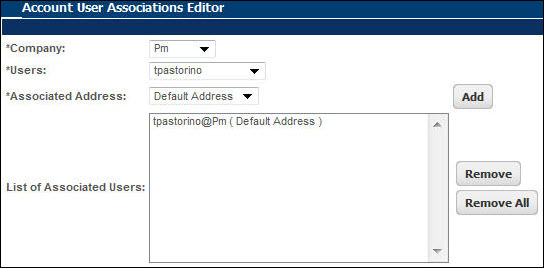
The Account User Associations Editor page opens.
-
Choose the company to associate your Account to from the Company drop-down.
The companies in the drop-down are the Host Company and any Buy Access Partner Organizations.
- Choose an individual user you would like to associate from the Users drop-down.
-
Choose an address from the Associated Address drop-down.
- Click Add.
- Repeat these steps for all individual users.
-
Click Update to save changes and return to the Account Administration page.
-
Click Back to return to the Accounts page.
The user(s) associated with the Account now appear in the Associations column.
Individual users accounts can only be associated with a single Account record. Similarly, company wide associations can only be defined for a single Account.
New associations take effect immediately after clicking Update.
 Removing Account Associations
In order to associate a user account with an Account record, the user account cannot be associated with any other record. Therefore, in order to change an association, any existing association must be removed before administrating a new one.
-
 Navigate to the Accounts page.
-
Click Admin to go to the Admin Home Page.
-
Click Accounts in the Integration Platform section.
The Accounts page opens.
-
Search for an Account and click its Customer ID.
The Account Administration page opens.
-
Click Associations.
The Account User Associations Editor page opens.
-
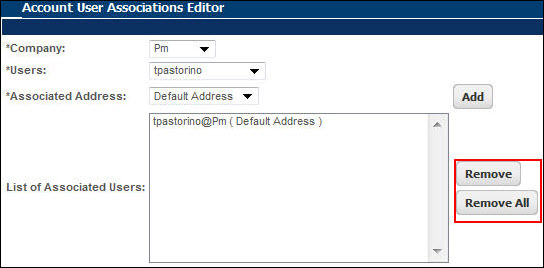
Select a user in the List of Associated Users field and click Remove.
To remove all associations, click Remove All.
- Click Update to save association changes.
Notes
We recommend using Bulk Data Services for importing and exporting Accounts. The Import and Export features on the Accounts page should not be used and will be deprecated in a later release. For more information, see
Bulk Uploads and
Bulk Downloads topics.
For Company Name and Customer ID search types, if you know only a partial company name or customer ID, you can search by the first few characters. The search engine locates all company names or customer IDs starting with the characters entered.
Wild card searches are permitted for Company Name and Customer ID search types. However, they can be time-consuming to complete.
- Customer ID - The Customer ID search option locates records based on the customer ID field required for each Accounts record. This type of search supports partial customer IDs with a trailing wildcard, meaning the search engine returns results based on a exact match between the search criteria entered and the beginning characters of the customer ID.
For example, a search using "123A" would return records with the following IDs: "123A23", "123ABG5" and "123A-345". - Company Name - The Company Name search type locates records based on the Company Name field used to create an Accounts record. For flexibility, this search type returns results based on partial matches. If any part of a company name matches the criteria entered, the corresponding record is included in the search results set.
For example, a search for "Acme" would result in records that have any of these names: "Acme Corp", "Big Acme Inc" and "Acme Corporation".
Associations can be managed by FullAccess users only. After associations are created, channel agents, sales agents and full access users can conduct Account searches using them.
Related Topics
 See Also
![]() Adding an Alternate Address to an Account
Adding an Alternate Address to an Account


