Email Designer Overview
Overview
You can customize the content and design of approval notification and transition rule notification emails by using Email Designer. Using an Email Designer template, you have complete control over the subject and body of all emails that are sent using the template. Transaction and user attribute values can be added to the subject of the email, and images, tables, Loops, Conditions, and additional types of attribute values can be added to the email's body.
You can create multiple, customized templates that can:
- Improve the look and feel of Approval and Transition Rule emails
- Automatically attach documents to emails
- Include Transaction information in an email
Customize your emails with the easy and intuitive Email Designer editor, using its drag and drop behavior. You can:
- Customize both the subject line and the body of the email
- Add images, text, and tables to the email body
- Include Transaction-level Commerce attributes to both the subject line and the body of the email
The look and feel of the Email Templates page and the Email Designer editor mirrors the administration experience of the Document Designer.
Administration
 Navigating to the Email Templates Page
To navigate to the Email Templates page:
- Click Admin to go to the Admin Home Page.
-
Click Email Designer in the Commerce and Documents section
The Email Templates page opens.
- If necessary, select a different Commerce Process from the Process drop-down.
Understanding the Email Templates Page
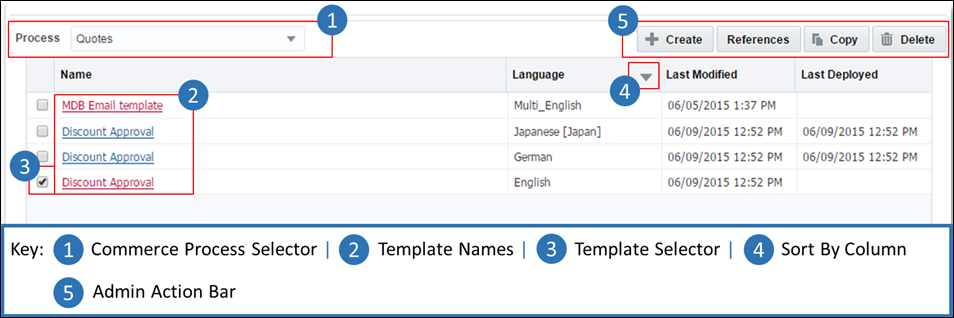
Use the Email Templates page to administer Email Designer templates at the list level.
|
1
|
Only Email Designer templates within the Commerce Process that is selected in the Process drop-down appear in the list. The names of deployed templates appear blue, while the names of undeployed (either never deployed or modified since the last deployment) templates appear red.
|
|
2
|
Click the name of a template to open that template in the Email Designer editor.
|
|
3
|
Select the Template Selector checkbox for a template to be able to copy the template, delete the template, or check its references.
|
|
4
|
Hovering over a column name will reveal a Sort By icon. Click the icon to sort the templates by the column data. Click the icon again to flip the direction of the sort.
|
|
5
|
The Admin Action Bar contains four buttons:
-
Create: Click to create a new template.
-
References: Select a template’s checkbox to activate the References button; the button is disabled until a template is selected.
Click to view the template’s associated Approvers and Steps. The References button will be disabled if multiple templates are selected. For more information, see the section Using References below.
-
Copy: Select a template’s checkbox to activate the Copy button.
The button will be disabled if no template is selected. Click to create a duplicate of the last-saved version of the selected template; undeployed changes will still be copied. The admin will have the option of changing the template’s name or language; at least one of these options must be changed, since no two templates can have the same name and language setting. The Copy button will be disabled if multiple templates are selected.
-
Delete: Select one or more templates’ checkbox(es) to activate the Delete button.
The button is disabled until a template is selected. Click to delete the selected template(s).
|
Creating an Email Designer Template
To create an Email Designer Template:
- Click Admin to go to the Admin Home Page.
-
Click Email Designer in the Commerce and Documents section.
The Email Templates page opens.
- If necessary, select a different Commerce Process from the Process drop-down.
- Click Create.
- Enter a Name for the template.
-
Select a Language for the template or select Multiple if the template will contain translations.
If you select Multiple, also select a Default Language.
For more information on handling multiple languages with the Email Designer Editor, see the topic Email Designer: Languages and Translation.
-
Click OK.
The Email Designer editor appears.
-
Optional: Begin adding content to the template. (This can be done later as well).
The Email Designer editor appears. See the topic Email Designer Editor for more information on creating your template.
Using References
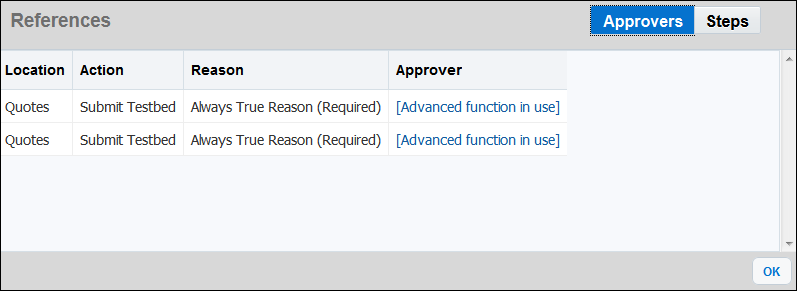
The References window on the Email Templates page has two buttons:
-
Approvers
Click Approvers to show the following columns: Location, Action, Reason, and Approver. Click the entry in the Approver column to move to the Approval Sequence page for that Email Designer template. For more information on approvals, see the topic Approval Sequences Overview.
-
Steps
Click Steps to show the following columns: Location, Step, Participant Profile, Action, and Transition Rule. Click the entry in the Transition Rule column to go to the Add Notification Rule page for that step. For more information on notifications, see the topic Approval Notifications.
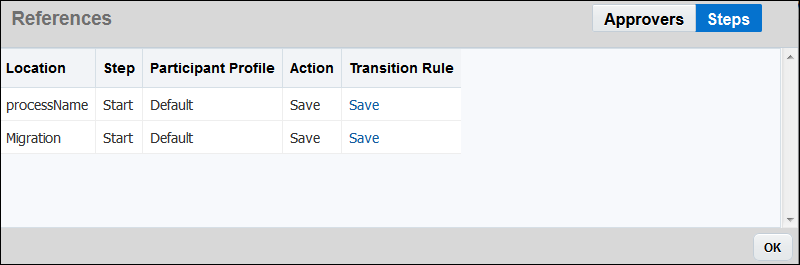
Click OK to exit the References window and return to the Email Templates page.
Notes
-
Options available in the Language drop-down are populated from the list of supported languages on the Host Company Admin page; this list is in turn taken from the list of the site’s supported languages, set by Oracle CPQ Ops. If a language is added or removed from the site’s supported languages, admins must update the Host Company Admin page for the Language drop-down to reflect the change. To add or remove a language from a site’s internal list of supported languages, open a ticket on My Oracle Support.
-
If support for a language is removed from the Host Company Admin page, Email Designer templates using that language as their default language will lose any content in that language and may behave unexpectedly. Additionally, removing support for the default language of a multi-language template may cause errors when the template is printed on the user side. Before removing support for a language, it is recommended to remove translations and templates that use the language.
-
Text with the font type Arial Unicode MS cannot be formatted in bold or italic in any output type. If bolding or italics is applied to Arial Unicode MS text, the text will appear bold/italic in the Email Designer editor, but the text will not be bold/italic in the output.
- Only new Elements and templates adopt a new version's updates. Existing Elements on existing templates are not affected or altered in any way, until they are edited; then that Element will acquire the new behavior on an individual basis.
-
Oracle CPQ implements XML Translation Line Limits to prevent performance issues that could occur when generating XML for quotes with an extremely large number of transaction lines.
Related Topics
See Also


