Email Designer Languages and Translations
Overview
The Email Designer editor supports additional language translations in two ways:
- Separate Email Designer editor templates, with one for each language
- One Email Designer editor template, with translations for each language within the template
In the example below, there are three separate Discount Approval templates—one for each translation. However, the OvernightDelivery template is multilingual and contains translations for all necessary languages within the single template.
- DiscountApprovalTemplate + English
- DiscountApprovalTemplate + German
- DiscountApprovalTemplate + Japanese
- OvernightDeliveryTemplate + Multilingual (English is the default language)
Whether multiple templates should be used for translations or if a single template should be used for translations must be decided on a customer-by-customer, template-by-template basis.
| Advantages |
Each Translation template can be worked on simultaneously by multiple admins, and it is easier to make individual language templates different from each other if desired. |
All layout, design, property, etc. changes only need to be done once.
|
| Considerations |
All layout, design, property, etc. changes must be done for each template file.
|
Only one language can be translated at a time, and much more administration work is required if outputs for each language need to be different in other ways besides their translations. |
Administration
 Creating Multiple Templates for Translations
When creating multiple templates to handle translations, all templates should be given the same name, but a different language should be chosen for each template upon creation. When all templates are given the same name, and that name is associated with an Approval Reason or Transition Rule Notification, the system will choose which template to use when creating the email based on the user who is getting the email’s language preference, as expected.
To create multiple Email Designer templates to support translations:
- Click Admin to go to the Admin Home Page.
- Click Email Templates under Commerce and Documents.
- Click Create.
- Enter a Name for the template.
-
Select a Language for the template.

- Click Save.
- In the top right corner of the Email Designer editor, click Deploy.
- Click Close to return to the Email Templates page.
- Repeat steps 3-8 for additional templates as necessary. For step 4, enter the same name for all additional templates. For step 5, select a different language for each additional template.
- Link the template name that is associated with all the different language templates to a Printer Friendly XSL View.
- Associate a Commerce Language attribute with the Print/Email action that is linked to the Printer Friendly XSL View.
- Optionally add the Print/Email action to the Commerce layout, or use the Language attribute in a function, Formula, etc.
If Email Designer templates have the same name, they cannot have the same language setting.
If multiple templates are being used for Translations, and if there is no template that matches the approver’s language preference, an error will be shown when the user attempts to submit the Transaction for approval.
Creating a Multi-Language Template
To create a multi-language Email Designer editor template to handle translations:
- Click Admin to go to the Admin Home Page.
- Click Email Templates in the Commerce and Documents section.
- Click Create.
- Enter a Name for the template.
-
Select Multiple from the Language drop-down.
The Default Language drop-down appears.
-
Select a default language from the Default Language drop-down.
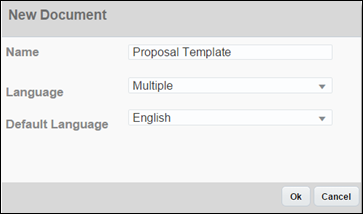
- Click Save.
- In the top right corner of the Email Designer editor, click Deploy.
- Click Close to return to the Document Templates page.
- Link the template name to a Printer Friendly XSL View.
- Associate a Commerce Language attribute with the Print/Email action that is linked to the Printer Friendly XSL View.
- Optionally add the Print/Email action to the Commerce layout, or use the Language attribute in a function, Formula, etc.
Adding Translations
Text Elements within multi-language templates can have translations added to them so that the translated content appears in the output when the approver’s language preference corresponds to the language of the translations.
Text Element Translation
The Translation dialog box for a Text Element can be accessed in two ways.
Changing to the Translation view of the Template Flow and then opening the Element:
-
Select the language that translation content will be entered for in the Language drop-down in the Admin Action Bar.

The Translation view of the Template Flow appears.

-
Double-click a Text Element to add translation content to or to modify existing translation content.
The Text Element dialog box appears.

- Click Modify.
- Enter translated content as needed.
- Click OK to save the translation.
Opening the Element and then changing to the Translation view:
-
Double-click a Text or Heading Element to add translation content to or to modify existing translation content.
The Text Element dialog box appears.
-
Select the language that translation content will be entered for in the Language drop-down.
- Click Modify.
- Enter translated content as needed.
- Click OK to save the translation.
Using Use Default
In the Translation view of the Text Element dialog box, there is a Use Default option.
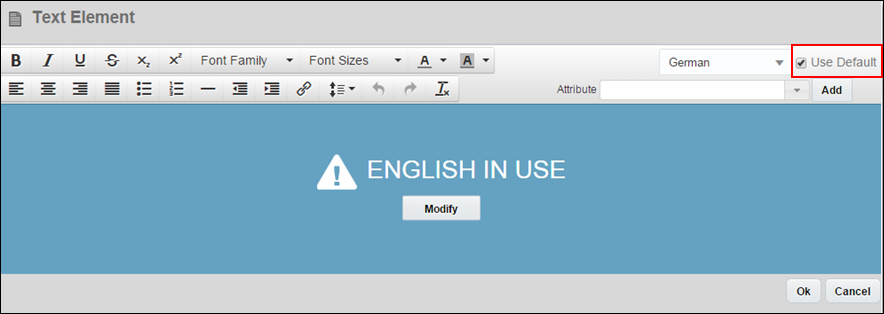
Selecting this checkbox and then saving the Element will clear any translation content from the window. If the template is printed and the Translation window for the selected language has Use Default selected, the Element will appear in the output in the template’s default language.
Notes
-
Options available in the Language drop-down are populated from the list of supported languages on the Host Company Admin page; this list is in turn taken from the list of the site’s supported languages, set by Oracle CPQ Ops. If a language is added or removed from the site’s supported languages, admins must update the Host Company Admin page for the Language drop-down to reflect the change. To add or remove a language from a site’s internal list of supported languages, open a ticket on My Oracle Support.
-
If support for a language is removed from the Host Company Admin page, templates using that language as their default language will lose any content in that language and may behave unexpectedly. Additionally, removing support for the default language of a multi-language template may cause errors when the template is printed on the user side. Before removing support for a language, it is recommended to remove translations and templates that use the language.
Elements cannot be added, moved, or removed from the Template Flow, or have their properties modified in any way within the Translation view of the Template Flow. Translations can be added or removed within the Translation view, but no other modifications can be made to the template until the Default Language view is restored.
When a single-language template and a multi-language template have the same name, and the language preference of the approver matches the default language of the single-language template, the single-language template will be used.
Related Topics
See Also


