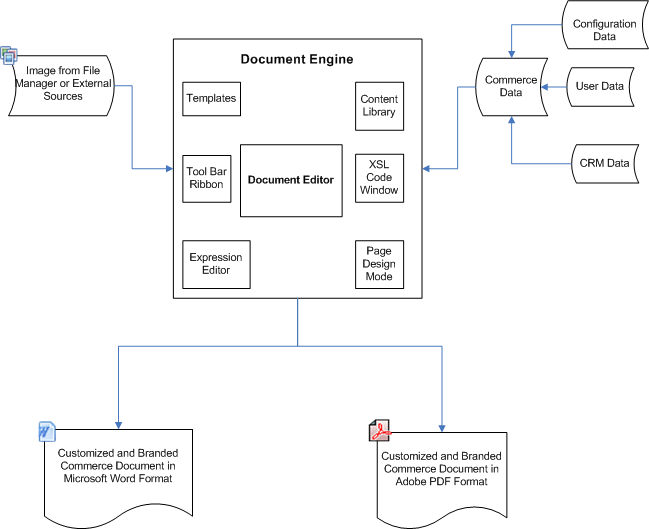
Document Engine Overview
Overview
The Document Engine is deprecated. Customers need to recreate their existing DocEngine Templates with the Document Designer. Upon upgrade to Oracle CPQ 21D, customers will no longer have access to Document Engine administration for the editing of templates. They will, however, retain edit access to the raw XSL templates that Document Engine produced. Print actions using templates created with the Document Engine will continue to function for end users. To learn more about Document Designer, refer to the
Document Designer Overview.
The Document Engine powers the Oracle CPQ Proposal Generator and the Oracle CPQ Contract Generator. Users can create professional and customer-friendly proposals and submissions as well as customize and brand proposals for specific products, channel partners or customers. The Document Engine also automates the generation of customized contracts driven from approved and submitted quotes and orders.
Document customization capabilities:
- Populate proposals with relevant customer data
- Include detailed quotes as sub-documents or appended-documents
- Add customized terms and conditions based on configuration options
- Add customized and branded cover letters from user-defined and/or company-defined templates
- Add technical data sheets, pictures, and drawings
- Add quality documentation or industry specifications
- Browse and append any external documents from the user’s desktop, company intranet, or internal shared drives
- Generate proposals, quotes or contracts in Microsoft Word or Adobe PDF
-
The same template, pdf and docx/rtf does not guarantee to be exactly the same. The best approach is to have two templates, one for pdf and one for docx, in order to tailor to the needs of each output type.
Next Steps:
After you have created and deployed a document in the Document Engine, you must set it up so that it can be used and printed.
- Associate the document with a Printer-friendly XSL view.
- Create a Commerce Print (or Email) action that refers to the Printer-friendly XSL view.
- Add the action to an end-user layout.
- Deploy the Commerce action.
Now, the user can click the action and the document from the Document Engine emerges with Oracle CPQ data inserted. For detailed steps, see the topic Document Engine Steps.
Administration
 Document Engine Structure & Relationships
Accessing the Document Editor
-
Click Admin to go to the Admin Home Page.
-
Click Documents under Commerce and Documents.
The Document Engine Management Center appears.
-
Click the name of an existing document, or click the pencil icon for a document and then click Open Document Engine.
The Document Engine appears.
-
Double-click an item in the Flow tab to edit it.
The item opens in editing mode.
Understanding the Document Editor
The Document Editor is a visual XSL editor designed for authoring and editing XSL templates. You can produce dynamic and customized commerce documents in either PDF or RTF formats, using the components and features of the Document Editor.

Key Components of Document Editor
- Enhanced Grid View section to view and edit the page properties
- User interface for Page Editing
- Access the File Manager directly from the Document Editor
- Add and manage files
- Insert images and links from the File Manager, using drag and drop
- Formatting features such as
Nested lists
- Custom bullets
- Table formatting
- Copying and pasting from Microsoft Word retains formatting
-
Preview and debug documents.
-
During the XSL template editing process, click once to preview the generated output as either PDF, Advanced PDF or RTF
-
Edit Global XSL snippets and maintain global variables, templates, and so on.
-
Customize the existing editor XSL data (such as <fo:simple-page-master>) in an Advanced XSL Code panel
-
Create Bookmarks and Table of Contents
Pages
In the Document Engine, a Page does not represent a literal page. The body content may end up flowing over to a new page when it's printed, depending on the data on the user-side. Think of a Document Engine Page as a place where you can define a constant header and/or footer with fixed dimensions. If your body content overflows to more pages, those pages will share the header/footer that you defined on the Document Engine Page. Additionally, you can insert hard page breaks into your page body content. In technical terms, a Page will output a complete xsl<fo:page-sequence> node.
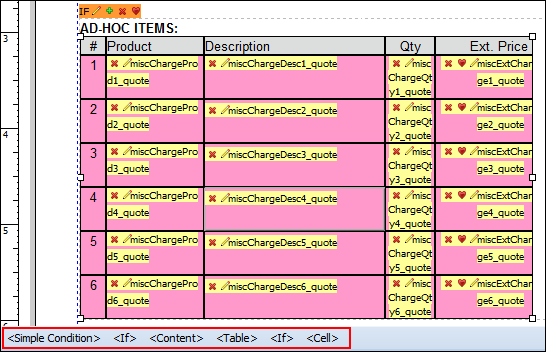
Loops
Loops in the Document Flow Tree repeat over all line items and can display individual Product Information pages for each line item in the loop. You can edit the loop to control how the pages within a loop are generated. In technical terms, a loop in an <xsl:for-each> which will ultimately be inserted outside of the <fo:page-sequence> tags that are generated for each Document Flow Page. Therefore, Document Flow Loops are useful for creating repeating pages.
XSL Snippets
The code that you write in a Document Flow XSL Snippet will be inserted between the <fo:page-sequence> nodes that are generated by Page objects. Therefore, to avoid XSL errors, you should only write XSL that will either be <fo:page-sequence> nodes or generate <fo:page-sequence> nodes.
Tool Bar Ribbon
The Tool Bar contains actions that the user can perform on the elements of a Document Page in the Page Design Mode. The actions on the Ribbon are grouped in tabs.
Clicking a tab, or placing your cursor in a different area of the document, shows a different set of actions. For more information, see the topic
Toolbar.
Page Design Mode
The Page Design Mode is where the user builds and edits Pages. This mode includes a collection of components for authoring and formatting text. The user can also insert dynamic data in the text, which is data that easily and automatically changes to allow for easy customization. Navigation: Document Application Panel > Document Flow Tree > double-click the desired page

Components of Page Design Mode
- Page Properties Grid: The grid displayed on the left panel stores formatting properties of the page, such as color, font family, font size, font style and so on.
- Page Design Tool Bar Ribbon: The Tool Bar Ribbon comprises a menu of actions that can be used to edit and format the document pages. The tool bar consists of a set of tabs with groups of actions. Selecting a specific tab switches the tool bar to display the chosen tab with its menu items.
- Rich Text Editor Region: View and edit the text within a page. Enter dynamic data using the Dynamic Content dialog box. Actions on the Tool Bar Ribbon manipulate the content in this region.
- Page Vertical & Horizontal Rulers: The vertical and horizontal rulers show the document's dimensions. The unit of measure defaults to the Meas. Units option, set in the View/Options tab of the Document Application panel.
- Draggable Page Layout/Margins: Change the page dimensions by dragging the margins.
- Direct Selection Path: The structural building blocks of a document are known as nodes. Click a Node button (highlighted with the red rectangle in the image below) to select an entire node. Use Node buttons to select the exact node to edit or format.
Validations & Optional Feedback
You can optionally run a validation on page data when saving a page in the Document Engine. When an error is found during validation, you will get an error message. You have the following options after receiving the error message:
- Save the corruption.
- Revert to the last saved copy
- Cancel the save
You can send feedback to the Oracle CPQ development team directly when you get the corruption. Make sure to define the steps to reproduce.
-
Click Admin to go to the Admin Home Page.
-
Click Commerce Settings under Commerce and Documents.
The Commerce Options page opens.
-
Select Yes for the option Document Engine – Validate Page Data on Save. This is set to NO by default.
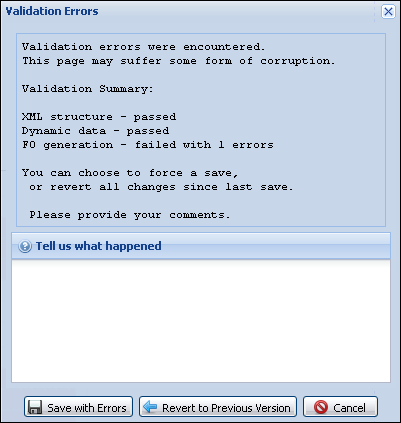
- Save with Errors: Save despite any errors. From this point on, you will encounter this error on this content until it is fixed.
- Revert to Previous Version: Revert to the last saved state. This will not rollback changes made to content of dynamic items like XSL snippets, simple conditions, loops, clause conditions, row conditions/loops, formatted expressions and others.
-
Cancel: Cancel the operation which caused this validation to fire. You will not lose changes you made.
The validation is run on complex conditionals.
The error message is sent to development, even if you don't provide feedback details. Feedback is stored in a database that is periodically analyzed by development.
This feedback is not a replacement for immediate bug reporting, so turn around time for this would be much longer.
Revert to last save is not available for new complex conditionals, but becomes available once the complex conditional has been saved for the first time.
Supported Node Types
Content in the Rich Text Editor is organized in a way similar to the way HTML is structured. This not only helps in providing structure to pages in a document, but also allows for enhanced functionality.
Example: Depending on where the cursor is in the Editor, different options are available to use. Similarly, depending on the Node Type that is selected, specific ribbon tabs are shown/hidden. This reveals what actions can be performed on a given node type.
| P |
paragraph |
| Table |
table |
| TR |
row in a table |
| TD |
cell in a table row |
| SPAN |
inline style |
| IMG |
image |
| A |
anchor link |
| UL |
list |
| Li |
list item |
| LOOP |
repeating block |
| CONDBLOCK |
condition block (if...then) |
| IFELSE |
if else |
| DATA |
dynamic data |
| BMK |
bookmark |
| PGNUM |
page number |
Some Node Types share names with corresponding HTML tags with similar functionality. However, these are custom nodes are not to be confused with HTML tags. Node are strings, and each can be translated.
Best Practices
- While working in the Document Engine Editor, click the
 button to save your work.
If you close the Document Editor without saving your changes, they will be lost.
- When possible, use standard functionality instead of XSL.
- Make backups; right-click a page in the Document Flow Tree panel and select Copy. Optional: Right-click the copy and click Rename.
- After modifying a document page through a Web Developer tool and saving the changes, reload/reopen the page before making any further changes. This ensures that the HTML changes made using the Web Developer tool are properly reflected in the document XSL.
Troubleshooting
Fixing corrupt documents
Corrupted file error messages are sometimes caused by deleting/altering tables, rows, or conditionals.
To fix a corrupt document:
- Open the corrupted file in Document Engine.
- Navigate to the area where an item was recently deleted/edited prior to the file corruption.
- Open a Web Developer tool within Document Engine.
- Click the row (or table, or paragraph) with a conditional that was recently altered and may have caused the corruption.
- Examine the element's HTML to determine if it is causing the problem.
- Once the corrupted element has been located, right-click the element and select Delete Element.
You will need to rebuild the table (or row) that had been there.
When deleting items in Document Engine, begin with the innermost element (for example, dynamic data, XSL snippets, complex conditionals) and then work outwards (for example, row, table).
To avoid this problem in the future, delete elements properly by using the buttons provided within Document Engine.
Mobile Documents
When printing or previewing a document on a mobile device:
- iOS 8: Formatting in DOCX files is stripped from a preview. To see the complete formatting, use iOS functionality to open the document in an installed app, such as Word or Pages, instead.
- Android: Oracle CPQ recommends using Google Docs to open DOCX files on Android devices. While other applications may produce acceptable results, this functionality was tested using Google Docs.
Use Cases
Use Case: Displaying a Conditional Watermark
Let's say you need to display a background "DRAFT" image for quotes that are in a pending state. We recommended that you define a global main_doc variable to point to your header attributes. You can only define it once in the document, so if main_doc is already defined, don't define it again.
- Before starting the Document Engine, upload an image to the Oracle CPQ File Manager to use as the watermark.
Make sure that the image that you use is a valid image that the FO processor can read.
-
Click Admin to go to the Admin Home Page.
-
Click Documents under Commerce and Documents.
The Document Editor List page opens.
- Click the name of the quote document you want to edit.
- In the Document Flow Tree panel, click Add and choose Add XSL.
The Flow XSL Snippet dialog box opens.
- Copy and paste the code below into the dialog box.
<xsl:variable name="main_doc" select="/transaction/data_xml/document[@data_type=0]"/>
<xsl:variable name="watermark">
<xsl:choose>
<xsl:when test="$main_doc/quoteStatus_q = 'Pending">/bmfsweb/pm/image/Proposal/watermark.jpg</xsl:when>
<xsl:otherwise></xsl:otherwise>
</xsl:choose>
</xsl:variable>
An <xsl:choose> statement is basically an IF/ELSE IF/ELSE block.
The processor will retrieve the value of the first <xsl:when> conditional statement that is true. In this case, we are returning the URL of the watermark if the watermark should be displayed.
- Replace the image URL to point to your watermark image.
- Change the logic of the text to one that you need for your application. In the example, we are checking for the main document commerce attribute with variable name
quoteStatus_q and seeing if it equals the text "Pending".
Your implementation may be different. You can add more <xsl:when> statements if you need to.
- Name and save the Snippet.
- Double-click the page where you want to place the watermark.
- Select Edit Layout from the Home tool bar to open the Layout Editor.
- Click the Body tab.
-
In the Value column of the Image property, enter {$watermark}. It is important to enter the {$} brackets as well, since this tells the processor that the image URL is contained in an XSL variable called {$watermark}. Now the page layout will read the global watermark variable.
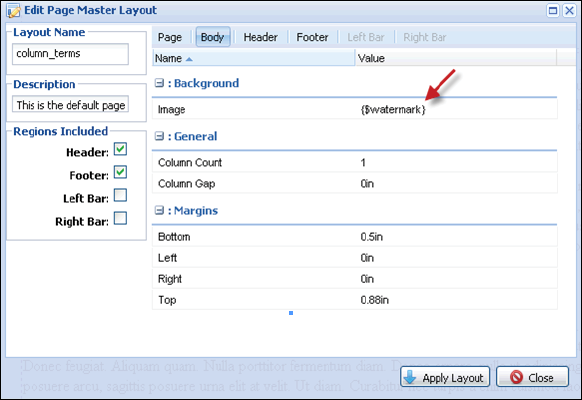
- Click Apply Layout.
- Save the document.
-
Test your new watermark.
The watermark image will only appear in the document output when printed and will not be displayed inside of the page editor.
Notes
Documents are deployed separately from Commerce. To view the latest changes in a document on a Print/Email/Preview action, you must first deploy the document. New documents must be deployed before they can be linked or accessed in the Printer-Friendly XSL views.
If content that is stored in a secure File Manager folder is referenced, the path must be updated.
Document Engine now includes the capability to format all CPQ-supported currencies (as long as the symbol is supported by the font).
Only the deployed version of a document is available for download or migration.
Global elements, like Content Library and Complex Conditionals, will be migrated every time a document is migrated.
Bulk upload of an existing document using the Add action is not supported.
Related Topics
See Also


