Using the Document Engine
Administration
Setting up a new Document Engine document template involves a series of steps:
![]() Create a New Document Template Using Document Engine
Create a New Document Template Using Document Engine
- Click Admin to go to the Admin Home Page.
- Click Documents under Commerce and Documents.
The Document Editor List page opens.
- Select the Process, from the Processes list on the left, to which you want to add a document template.
The content of the Document Editor list changes based on which Process is selected.
- Click Add Document.
The Add Document page opens.
-
Enter a Name and Variable Name, select a Document Template if you want, and click Add.
The Variable Name field populates automatically. Variable names can only contain alpha-numeric characters and underscores. The entry can be changed before saving, but after saving the value is read-only.
The document templates are available by default, and cannot be changed.
The name you enter here is shown in the Document Engine and other administration pages, but is not shown to the end user.
After the document template is saved, the buttons on the bottom right-hand corner of the screen change.
- Click Open Document Engine.
A new browser window opens.
- In the Flow tab, click Add and select Add Page.
-
Enter a Name for the page, select a Template, and click Select.
The templates are available by default, and cannot be changedThe page name only appears in the Document Engine. Make the page name descriptive so editing the document is easier.
The page name appears in the Document pane.
-
Double-click the page name to open the page in the Editor.
-
Make any changes to the document. For details, see the topic Document Engine Overview.
-
Click the Save icon,
 , on the upper left side of the Editor, to save changes to both the entire document and the page.Save the document frequently. If you click the Save Page icon, but do not also save the document, the page will not be saved.When you switch between pages, the following warning appears:
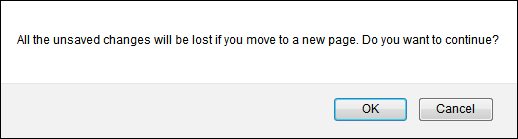
This warning appears whether or not you have saved the document. If you have saved your changes, ignore the warning and click OK.
![]() Deploy the Document Template to Commerce
Deploy the Document Template to Commerce
If you are continuing from the previous section, follow ![]() these steps to navigate to the Document Editor List view:
these steps to navigate to the Document Editor List view:
- Return to the browser window with the Add Document page open.
- Click Back.
You are returned to the Document Editor List page.
Otherwise, follow these steps to navigate to the Action Admin view from another location in CPQ:
- Click Admin to go to the Admin Home Page.
- Click Documents under Commerce and Documents.
- In the Document Editor List page, click the green check mark in the Deploy column for the document you just created.
- The Last Deployed column entry is no longer blank. It shows a date and time.
- The document link is gray, not red.
If a document link is red and shows a date and time in the Last Deployed column, then the document has changed since it was last deployed, and it must be deployed again before users will see the changes.
Only the deployed version of a document is available for download or migration.
The Document Editor List page opens.
![]() Link the Document Template to a Printer-friendly XSL Converter
Link the Document Template to a Printer-friendly XSL Converter
To specify the output type of the document template, create a Printer-Friendly XSL View to convert the template into that output.
-
Click Admin to go to the Admin Home Page.
-
Click Process Definition under Commerce and Documents.
The Processes page opens.
-
For the Commerce process to which you want to add the Printer-Friendly XSL converter, select Printer Friendly/XSL Views in the Navigation column for the Quote/Transaction and click List.
The Printer Friendly / History XSL Views page opens.
-
Click Add.
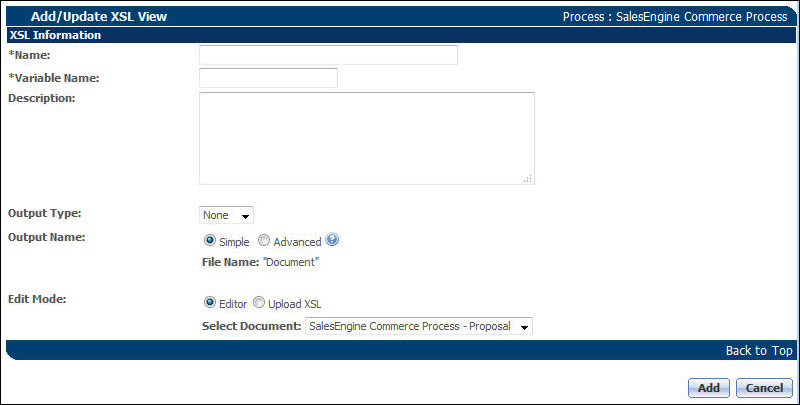
The Add/Update XSL View page opens.
-
Enter a Name.
When you leave the Name field, the Variable Name field automatically populates. You can change the Variable Name if you want to.
The name you enter here is shown in this page and other administration pages, but is not shown to the end user.
- Select an Output Type:. The options are:
- XML
- RTF
- DOCX
- XSL
- HTML
For a Document Engine document template, .RTF, .DOCX, and .PDF are the recommended outputs. - If you select PDF, the Is PDF Read-Only: option appears. Check the box to make the generated PDF read-only.
- Select an Output Name:.
- Select Simple if you want the output document to always have the name Document.
- Select Advanced and then select an attribute whose value will dynamically name the output.
This option is available on any user-created document that is generated through XSL Views. Administrators can only apply this feature on Quote-level Text Attributes.
Example Use Case: Sales users can distinguish documents by their file name, if each file name has the Quote Number in it.
- Select an Edit Mode:
- Editor: Select this option if you are using the Document Engine. From the list of deployed documents, choose the one that you want to link to the XSL view.
Upload XSL: Select this option to upload a custom XSL file.
Click Browse to select a file from your local system, using the File Upload dialog box.
If you upload a custom XSL file, it must be written in the same XML version as the other XML files in Commerce.
-
Click Add or Update to save the XSL view.
![]() Link the Printer-friendly XSL to a Print Action
Link the Printer-friendly XSL to a Print Action
-
Click Admin to go to the Admin Home Page.
-
Click Process Definition under Commerce and Documents.
The Processes view appears.
- For the Commerce Process to which you want to add a Print action, make sure Documents is selected in the Navigation column and click List.
- The Document List view appears.
-
For the Commerce document (Quote/Transaction or Line) to which you want to add the Print action, select Actions in the Navigation column and click List.
The Action List view appears.
-
Click Add.
The Admin Action view appears.
-
Enter a Label.
The Variable Name field populates automatically. Variable names can only contain alpha-numeric characters and underscores. The entry can be changed before saving, but after saving the value is read-only.
The name you enter here is shown to the end user in the layout, on the Print action button, so be descriptive. For example, you might name the action Print Summary PDF.
-
Select an Action Type of Print.
-
Click Add.
The Admin Action view appears.
- Click the XSL Views tab.
- For XSL Views, select the XSL view you created in the previous section.
- Click Apply.
For more information, see the section "Saving Proposal Output to a File Attachment Attribute" in the topic Oracle Sales Integration.
![]() Add the Print Action to a Commerce Layout
Add the Print Action to a Commerce Layout
If you are not continuing from the previous section, ![]() follow these steps to navigate to the Action Admin view:
follow these steps to navigate to the Action Admin view:
-
Click Admin to go to the Admin Home Page.
-
Click Process Definition under Commerce and Documents.
The Processes view appears.
-
Find the Commerce Process with the document to which you added a Print action, make sure Documents is selected in the Navigation column and click List.;
The Document List view appears.
-
For the Commerce document to which you added a Print action, such as Quote, select Actions in the Navigation column and click List.
The Action List view appears.
-
Click the name of the Print action you created.
The Action Admin view appears.
Otherwise, continue with the steps below.
-
Click the General tab.
Since you haven't assigned this action to a layout yet, the layout paths are shown as Unassigned.

-
Click Save and Edit Desktop Layout.
The Layout Editor appears.
-
Click +Add and select Actions from the drop-down.
A floating Actions panel appears.
-
Find the action you created in the steps above, and click and drag it to either the green Action Bar in the upper right-hand corner of the layout, or another action strip on the layout. For more information on action strips, see the topic Layout Editor Overview.
To see how the button looks on the layout, click Preview.
- Click Save.
To confirm that the Print action has been added to the layout:
- Click Back to return to the Document List view.
-
For the same Commerce document to which you added a Print action, select Actions in the Navigation column and click List.
The Action List view appears.
-
In the Action Name column, click the name of the Print action you created.
The Admin Action view appears, and the Desktop Layout Path is no longer Unassigned.

- Optional: make a similar change to the Mobile Layout.
You have now performed all the steps necessary to deploy your new Document Engine document template to end users.
-
Click Admin to go to the Admin Home Page.
-
Click Process Definition under Commerce and Documents.
The Processes view appears.
- For the Commerce Process to which you added the Document Engine document, select Deployment Center in the Navigation column and click List.
- Click Add Event.
-
Click Refresh.
When the Last Deployed column shows the current time, users will be able to see and use the new document, by clicking the button on the layout.
That button triggers the Print action, which links to the Printer Friendly XSL Converter, which converts the (deployed) document to the output you selected for the XSL Converter when you created it.


