Document Designer Overview
Overview
The Document Designer is a new tool for creating document templates. The Document Designer makes it easy to populate documents with current transaction data, and show or hide content based on product, transaction or user information. The Document Designer is a simple, powerful tool for creating proposals, contracts, statements of work, and other business documents.
The Document Designer editor’s intuitive user interface and drag and drop functionality makes document design and maintenance fluid and efficient. Editing and formatting individual elements is straightforward. Support for multiple languages can be tailored to allow many admins to work simultaneously.
 Features
Features include:
- Visual drag and drop editor
- Section headers
- Dynamic section numbering based on Headers
- Dynamic auto-populated Table of Contents
- Standard background image/watermark support
- Conditional image embedding
- Standard support for multi-language templates
- PDF document merging (Antenna House/‟Multi-Source Document Creation”) without XSL snippets
Usability
The Document Designer editor offers usability at two levels:
- Broad strokes: Drag and drop editor
- Easy to lay out pages quickly
- Easy to move large elements around
- Easily discoverable (for when new admins need to come up to speed)
- Out-of-box functionality with less XSL needed
- Fine detail
- Shows context-specific fine detail
- Multi-select properties editing
Administration
Like the Document Engine, the Document Designer uses Printer Friendly XSL Views and Commerce Print or Email actions to complete the template-to-output process.
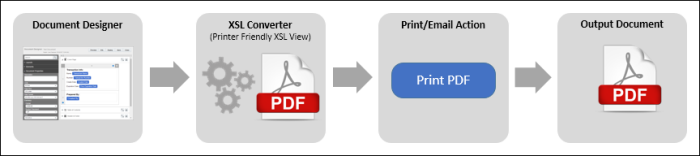
In a complete Document Designer workflow, when a Print or Email action is invoked on the user side, the Printer Friendly XSL View will convert the XSL that makes up the Document Designer template into the appropriate output type. Printer Friendly XSL Views can convert Document Designer templates into PDF, DOCX, and RTF files.
The Document Designer Setup Process
The process of creating a Document Designer template and linking it to a Commerce Print or Email action requires three steps:
-
Create a Document Designer Template and Deploy the Template
- Click Admin to go to the Admin Home Page.
-
Click Document Designer under Commerce and Documents.
The Document Templates page opens.
- Click Create.
- Enter a Name for the template.
-
Select a Language for the template or select Multiple if the template will contain translations.
If you select Multiple, also select a Default Language.
For more information on handling multiple languages with Document Designer, see the topic Document Designer: Languages and Translations.
-
Click OK.
The Document Designer editor appears.
- Optional: Begin adding content to the template. (This can be done later as well).
- Click Save.
- Click Deploy.
-
Create a Printer Friendly XSL View and Link it to the Document Designer Template
- Click Admin to go to the Admin Home Page.
- Click Process Definition under Commerce and Documents.
- From the Navigation drop-down, select Printer Friendly/History XSL Views and click List.
- Click Add to add a Printer Friendly XSL View.
-
Enter a Name and Variable Name.
The Variable Name field populates automatically. Variable names can only contain alpha-numeric characters and underscores. The entry can be changed before saving, but after saving the value is read-only.
- Select an Output Type.
- From the Select Document drop-down, select the Document Designer template you created (only deployed Document Designer templates appear in this list).
- Click Add.
-
Create a Print or Email Action and Link It to the Printer Friendly XSL View.
Add the action to a Commerce layout and deploy the Commerce Process.
- Navigate to the Quote-level Action List page.
- Click Admin to go to the Admin Home Page.
- Click Process Definition under Commerce and Document.
- With Documents selected in the Navigation drop-down, click List for the Commerce Process where the Print or Email action will be created.
- Select Actions from the Navigation drop-down for Quote/Transaction.
- Click List.
- Click Add to create a new Quote/Transaction-level action.
- Enter a Label for the action.
- Select Print or Email as the Action Type.
- Click Add to add the action.
- Click the XSL Views tab of the action.
- Select the Printer Friendly XSL View you created from the XSL Views drop-down.
-
Select a Language attribute if the template is or will be translated (via multiple templates or one multi-language template).
For more information on handling multiple languages with Document Designer, see the topic Document Designer: Languages and Translations.
- Click Apply to save the action.
- Add the action to the Quote/Transaction-level layout. See the topic Layout Editor Overview for step-by step instructions on adding actions to the Commerce layout.
- Deploy the Commerce Process.
Transitioning from the Document Engine
It is not possible to migrate document templates created in the Document Engine to the new Document Designer. When transitioning to the Document Designer, existing document templates must be manually recreated.
You can continue to edit Document Engine templates. Additionally, you can use both Document Engine and Document Designer templates in the same Commerce Process.
When to Transition
You should consider transitioning to the Document Designer when:
- You are creating new templates
- You need enhanced multi-language functionality
- A Document Engine template requires a significant change
- You have custom XSL to handle array set loops or PDF merging
By switching to the Document Designer, admins will enjoy reduced template maintenance, and will not have to use HTML debugging tools.
NOTES
Oracle CPQ does not support multi-layer PDF documents.
Related Topics
See Also


