Document Engine Toolbar
Overview
When creating or editing a document in Document Engine, use the toolbars to add dynamic data, format text, and create and edit tables. In the toolbar, the actions are grouped in tabs:
- Home
- Dynamic
- Format
- Table
 Home Tab
The Home Tab is the default tab, and contains many commonly used actions. Related actions are grouped together.
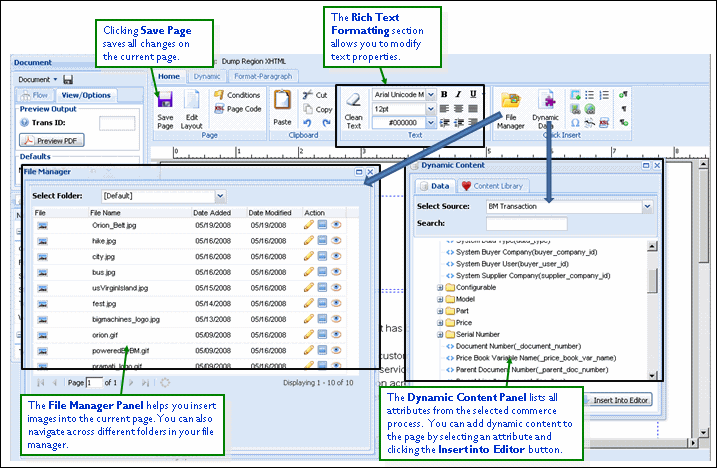

- Save Page: Save the current page along with the associated layout.
- Edit Layout: Open the Page Master Layout Editor window. Use this window to specify/edit the layout dimensions of the active page.
- Conditions: Open the Conditional Expression Editor dialog box to define/edit page conditions.
- Page Code: Open the Edit XSL Code page, shown below, and generate the XSL code for the current page.
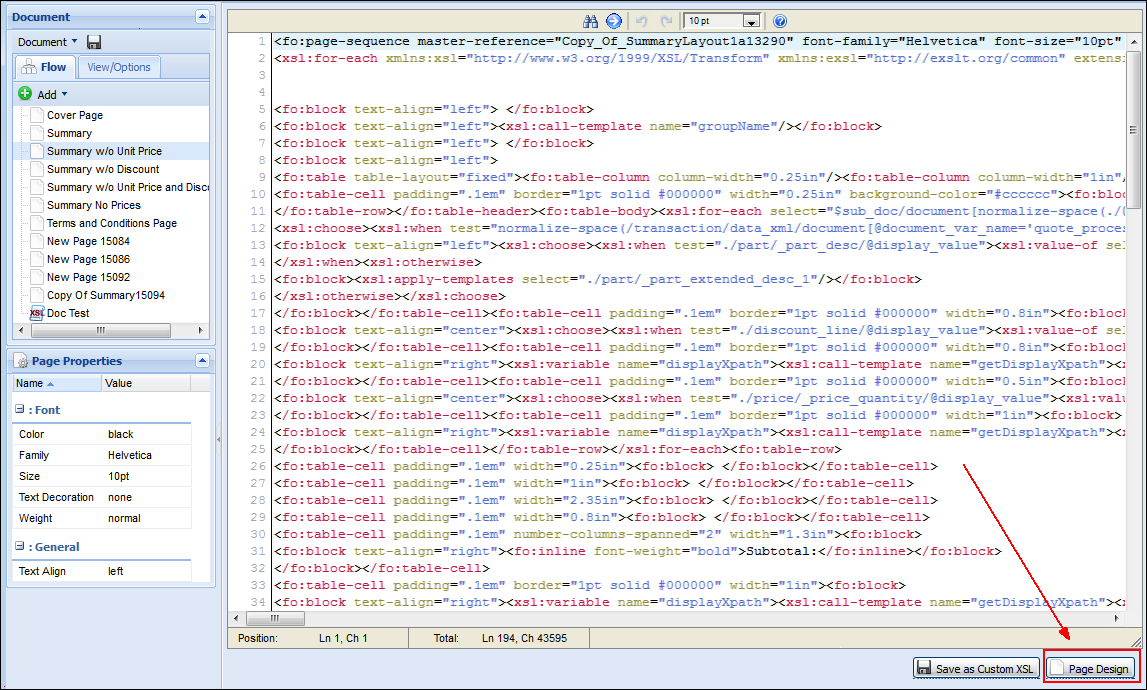
- Page Design: Click
 , in the bottom right corner, to return to the Page Design page.
However, if you click Save as Custom XSL, you cannot return to page design mode for this page.
The code is saved as an XSL snippet and can be edited within the Document Editor, as a snippet.
- Undo: Undo the last active editor action.
- Redo: Repeat the last active editor action.

- External Paste: Copy from an external application like Word, Notepad, and so on, and paste the content into the Editor.
- Cut: Cut a selection of text and store it in the clipboard.
- Copy: Copy a selection of text and store it in the clipboard.
- Paste: Paste the clipboard content into the Editor.
Pasting content into the editor cleans up any formatting automatically before inserting it into the Editor.
This group comprises of a set of formatting characteristics that you can apply to text, tables, and lists in your templates to quickly change their appearance.

- Clean Text: Remove the current format of the text and restore the formatting to the normal style for your content. This includes classes and styles related to formatting.
- Font Family: Select a font-family from the drop-down. The menu contains all supported-fonts.
- Font Size: Select a font size using the drop-down or type in a custom size. All font sizes are defined in points (pt).
- Font Color: Enter a hex color or select a color from the drop-down.
- Font Formatting:
- Bold: Select text and click the Bold icon.
- Italic: Select text and click the Italic icon.
- Underline: Select text and click the Underline icon.
- Underline Sub-Set: To access additional underline options, select the drop-down next to the Underline icon.
- Strike-through: Select text and click Strike-through.
- Superscript: Select text and click Superscript.
- Subscript: Select text and click Subscript.
- Alignment: Select Align Left, Align Center, Justify Full and Align Right.
- Indent/Out-dent: Select text to indent or out-dent or place your cursor on the line that needs to be indented/out-dented.

-
File Manager: Open the File Manager window.
Files cannot be added, deleted, or replaced from the Document Engine.
- Dynamic Data: Opens the Dynamic Content dialog box. Actions in this dialog box are covered in the topics Using Dynamic Data, Content Library, and Complex Conditionals.
- Insert Table: Insert, create, and edit tables.
- Insert Unordered List: Insert a bulleted list into the editing area. Lists can be nested.
-
Insert Ordered List: Insert a numbered list.
By default, the numbers are in a simple decimal format. After a list has been inserted, the list properties (bullet, and so on) can be edited through the List tab. The lists can be nested.
-
Insert Image from External URL: Insert an image from an external URL.
The Text field always displays the direct URL to the file, including the
HTTP://, for external images. - Insert Hyperlink: Insert a hyperlink.
-
Insert Special Character: Open a window to select from a visual list of characters to insert into the Editor.
If content that is stored in a secure File Manager folder is referenced, the path must be updated. - Insert Page Break: Insert a manual page break and start a new page.
- Insert XSL: Insert XSL code into your document.
RTF files can also accept PNG files.
This tab has tools that customize page content.
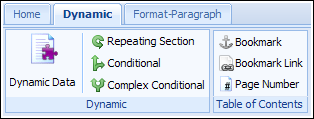
This group contains actions to enter dynamic, or variable, elements. You can also manage loops, conditionals and complex conditionals.
- Dynamic Data: Open the Dynamic Content dialog box. Actions in this dialog box are covered in the topics Using Dynamic Data, Content Library, and Complex Conditionals.
- Repeating Section: Insert a loop that displays repeatedly, depending on the conditions of the loop.. The content inside of loop can contain dynamic elements. This content can also be formatted. For more on adding/editing loops, see Loop Expression Editor.
- Conditional: Insert a conditional to define content that will be displayed only if a certain condition is met. The selected content is wrapped by an
{if...then}statement. For more information on conditionals, see the topic Expression Editor. - Complex Conditionals: Insert a complex conditional statements with multiple
if...elseclauses in-line within the content of a document, without using custom XSL snippets. See the topic Complex Conditionals for more information.
Bookmarks are internal links inside your document. You can insert bookmarks anywhere in your content and create dynamic hyperlinks and page numbers to reference the content.
To insert a bookmark:
- Start the Document Engine and open a document.
-
Click Bookmark.
The Bookmark dialog appears.
-
Enter a Name and Description.
The Name is used to refer to the bookmark from other places in the document and must be unique within a document.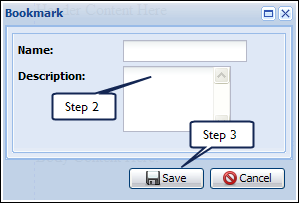
-
Select Save.
An anchor is inserted at the cursor location.
Bookmark elements are highlighted in green in the Editor.
 If you delete a bookmark, any references to it will not function anymore.
Use Bookmark Links to add text that will link to a bookmark location when the user clicks on it. It inserts a hyperlink that references an existing bookmark.
To insert a Bookmark Link:
- Start the Document Engine and open a document.
- Click Bookmark Link.
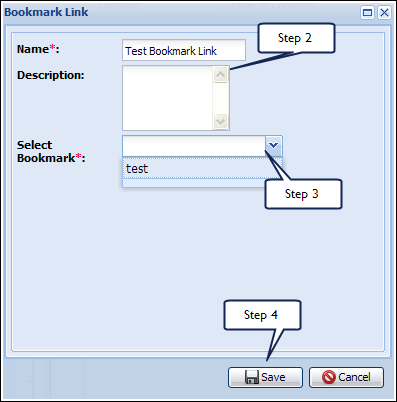
- Enter a Name and Description.
-
In the Select Bookmark drop-down, choose the bookmark that the current selection will be linked to.
-
Select Save.
Bookmark Link elements are highlighted in dark green in the Editor.

Double-click " X " to delete a Bookmark Link.
You cannot edit a bookmark link.
Use this feature to enter a Page Number.
- Start the Document Engine and open a document.
- In the Editor, place your cursor where you want to insert the page number, and click Page Number.
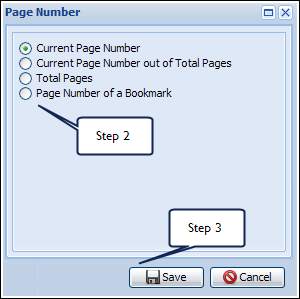
- Select from the following types of page numbers:
- Current Page Number: Displays the current page number on the output.
- Current Page Number out of Total Pages: Displays the current page, out of the total number of pages, on the output.
- Total Pages: Prints the total number of pages in the document.
- Page Number of Bookmark: Prints the page number of the page that contains a specified bookmark (used for Table of Contents).
-
Click Save.
Page Number elements are highlight in light blue in the Editor.

Double-click X to delete the Page Number element.
You can format elements in a document such as lists, paragraphs, and templates. This tab is always visible to the user. The name of this tab changes based on the current selected node, to indicate that the formatting on this tab applies to the select node only. To specify a format for the whole page, go to the Page Properties panel.

Action groups & related Actions:
-
Margins Group: This group specifies the Margin Size of the chosen node.
Margins can be defined on the four sides - Top, Bottom, Left, and Right.
- Padding Group: The padding group works similar to the Margins Group when the node selected is a
< td>or a cell in a table. - Background Group: The Background group specifies the background image or color for a page.
- Background Image: Click on the icon next to field to open file manager to select a background image.
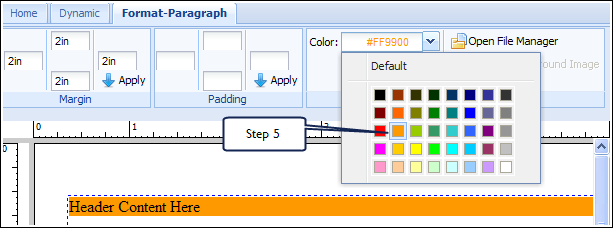
Background Color: Color picker that lets the user define the background color to apply to the block element.
Background Images or Color is not supported when the output is of RTF Type.
- Start the Document Engine and open a document.
-
Select a field within the Margins group (top, bottom, left or right). Enter the size of the margins.
Each field should have a number, followed by the appropriate units. Valid units are: in, cm, mm. pt and px.
-
Click Apply.

- Select a field within the Padding group (top, bottom, left, or right). This works similar to the Margins Group when the node selected is a
<td>or a cell in a table. -
Click Apply.

-
Select a background color. This color will apply to the block element.
-
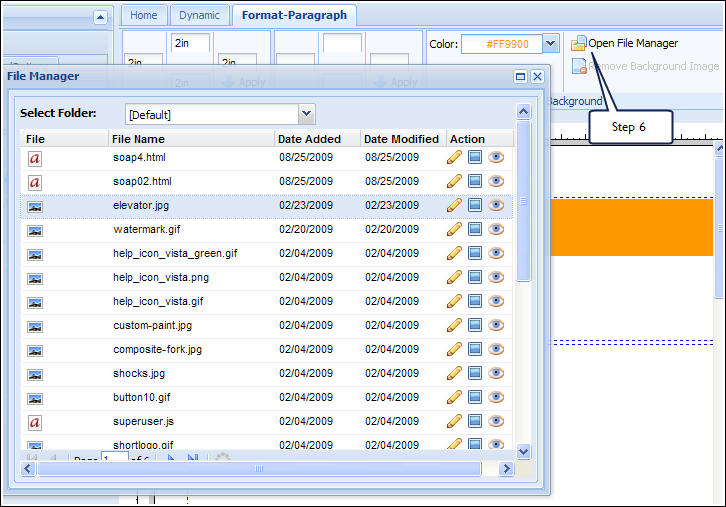
Click Open File Manager to select a background image.
The File Manager dialog box appears.
- Select the pencil icon to insert the file link.
- Select the photo icon to insert the file image.
- Select the eye icon to preview the file image.
The Table tab contains actions that allow the user to edit Table Properties. This tab is visible only when the cursor is placed inside a table. Placing your cursor over an icon displays its name.
- Start the Document Engine and open a document.
- Move your cursor to a location where you want to insert the new table.
-
Click Insert Table on the Home Toolbar.
The Insert Table dialog box appears.

- Determine the number of rows for the table.
- Enter the number of columns you need for your table.
-
Select the box next to " Include Table Header " to include a header row in your table.
This header row will appear with a darker dotted border in the editor. If the contents of the table flow onto the next page, the table header row will repeat on the next page as well.
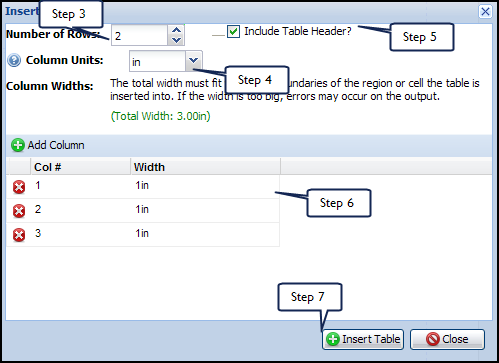
- Determine the width of each column (inches(in), centimeters(cm) or millimeters(mm)).
- Click Insert Table, or choose Close to close the dialog box without saving the changes or entering a table.
After your table as been created, and your cursor is in the table, the Table Tab appears:

- Start the Document Engine and open a document.
-
Click in a table and click Properties on the Table tab.
The Edit Table Properties dialog box opens.
- Change columns units, column width, and whether to include table header rows.
- Click +Column to add a column to your table.
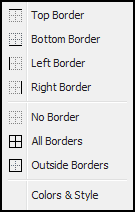
- To add borders to a cell, click Borders.
-
From the Borders menu, select the type of border you want to apply, as well as the color and style of the border.
- Select the cells to which you want to apply a background color and click Background from the menu.
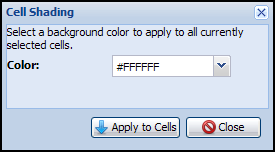
- Select Set Cell Background to open the Cell Shading dialog box.
- Select the desired color from the Color field.
-
Click Apply to Cells.
- To merge cells, select the cells you want to merge together.
-
Hold down CTRL as you click the cells to merge, and then click Merge. Repeat for Split.
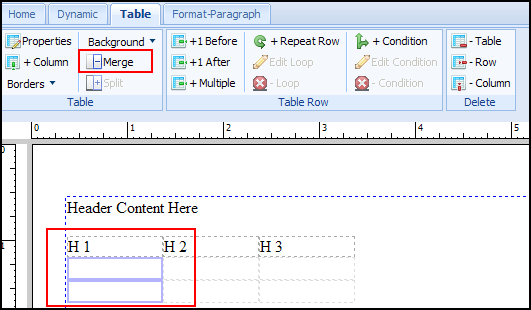
You can add rows to a table in several ways:
- +Before: Instantly adds a row before the cursor row.
- +After: Instantly adds a row after the cursor row.
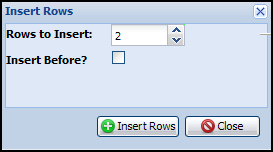
- +Multiple: Opens the Insert Rows pop-up and allows you to enter:
- Rows to Insert: The number of new rows you want to add.
- Insert Before: Check to insert the new rows before the cursor row. The default is to insert the new rows after the cursor row.
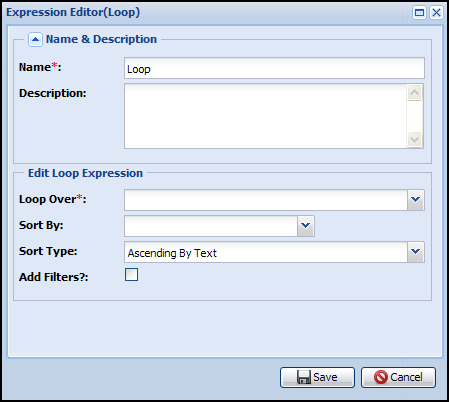
- If you want a table row to display for each line item in a transaction, place your cursor inside any table cell within the row that you want to repeat.
Click +Repeat Row.
The Loop Expression Editor appears.
The table row must not already be a repeating row or have an existing condition on it.
-
Define the loop to display on the output.
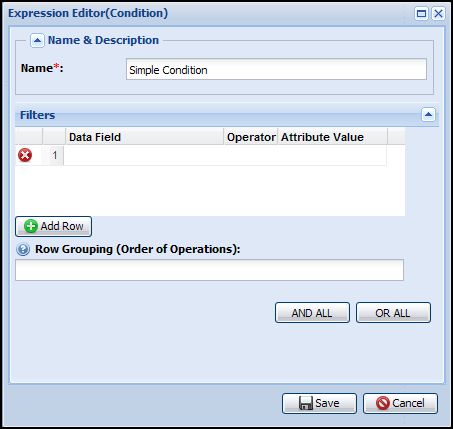
- To add a condition to a table row, place your cursor inside any table cell.
- Click +Condition.
The Condition Expression Editor appears.
Define conditions to be met for this table row to display on the output.
From the Delete group in the Table tab, you can delete a Table, Row or Column.

