Overview
System Configuration refers to the manner in which customers use Oracle CPQ to configure and bundle the product or set of products they wish to sell using a group of related models that together define an entire system. A system is a hierarchical arrangement of connected configurable models with a system root containing all of the other models. A Bill of Material (BOM) instance is used to represent a set of products being bought together on a Quote.
For example: Assume a telecommunications provider wants to offer multiple bundled packages to their customers or Sales teams, which could then be sold to large apartment complexes or businesses. These bundles typically have several models with multiple options and restrictions, such as:
- Different contract terms that can affect the price
- Different service areas that determine availability of various package items
- Various channel package options driven by region, contract term, and internet speed selection
- Internet speed options that have contract term restrictions and recommended equipment options
- Oracle CPQ also needs to capture other details to send to a fulfillment system. The sales user does not have to select these details (e.g. SKU numbers, internet details, cable wires, warranty information).
- The different products (e.g. cable boxes, internet routers, and phones) can reference the package attributes so the warranty periods for the different products are the same as the contract term, but there should be an option to set these items individually.
![]() Understand the BOM Hierarchy of a Child Model
Understand the BOM Hierarchy of a Child Model
A BOM (Bill of Material) is a multi-level hierarchical structure of parent and child items that defines the components needed to sell or manufacture a complex product. Model BOMs define the options displayed in an Oracle CPQ Configuration session and the set of Commerce line items that result from users’ Configuration choices.
Using Oracle CPQ System Configuration, model BOMs can now be reused as children of other, parent model BOMs or system model BOMs, which then allow the child models to be sold separately and as part of a bundle.
In order to reuse a child model BOM as part of a system BOM, Oracle recommends configuring BOM Mapping Rules for the child model BOM by defining it as its own root BOM item with a corresponding BOM Mapping Rule. The parent system model BOM is then also defined with its own root BOM item and corresponding BOM Mapping Rule, but with the child model BOM associated as a child.
Administrators may choose one of two different behaviors for the child model BOM within a system when setting up the system model BOM in the Oracle CPQ BOM Item Definition table.
- Default BOM items can be defined for the child model. Each default BOM item is listed as a child of the child model within the system model BOM. Customers leverage the system-level BOM definition to model the default BOM they wish to sell, allowing sales users to complete their order without needing to configure each of the child items. If the sales user chooses to configure the child model and override the defaults, the child model’s BOM Mapping Rules execute, avoiding duplication of the complete hierarchy definition in the system-level BOM. While the parent model defines the default contents of the child model, the child model will override the parent’s definition.
- No default BOM items are defined for the child model. The child model BOM alone is listed as the child of the system model BOM. Sales users must configure the child model as if they were buying that model on its own.
For example: A customer wants to sell a promotional back-to-school bundle for their laptop, printer, and smartphone products and sell software and data plans as child items under the laptop and the smartphone items. To accomplish this, the administrator would represent the promotional bundle, the laptop, the printer, and the smartphone products as separate models in the system. As a result, each of the child models can then be purchased or sold separately or as part of the bundle.
The administrator creates a bundle level root BOM in the BOM data tables, which defines the default set of BOM items for all these products. A specific laptop, software, printer, smartphone, and a specific data plan are defined as child items under the bundle’s root BOM item. If users do not configure laptop, printer, and smartphone models, they purchase the default promotion bundle. Alternatively, the sales user can choose to configure the smartphone model and select a different data plan than that defined as the default under the promotion. Administrators can model the different options available for the data plans in the BOM data table under the Smartphone model. In this example, the administrator does not need to duplicate all possible data options under the promotional bundle. By configuring the smartphone model, the buyer could select an option other than the one selected by default under the promotion.
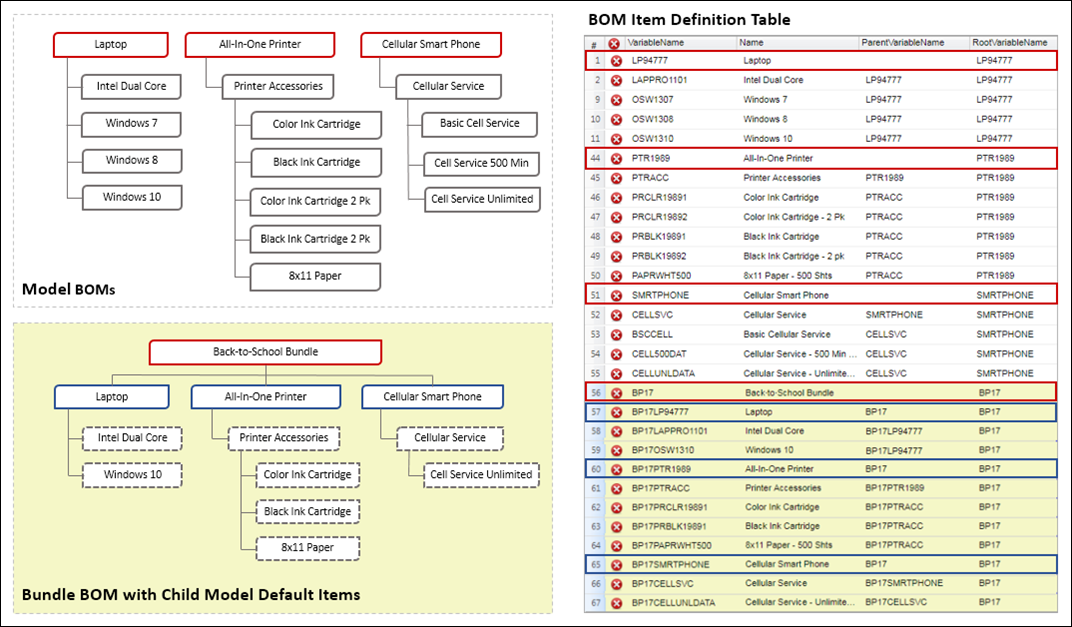
The following image illustrates the setup of the BOM items for the example described. The left side illustrates the logical model BOMs that are reused as children of the system-level model BOM. The Laptop, Printer, and Smartphone are root BOM items for their model definitions. For the promotional bundle, the laptop, printer, and smartphone are child models and the promotional bundle is the root BOM item. The right side illustrates the corresponding entries in the BOM Item Definition Table for the standalone models (white background) and for the system-level model containing these same models as children (yellow background). Default values have been specified for the child models in the system-level model BOM.
![]() System Configuration JSON Structure
System Configuration JSON Structure
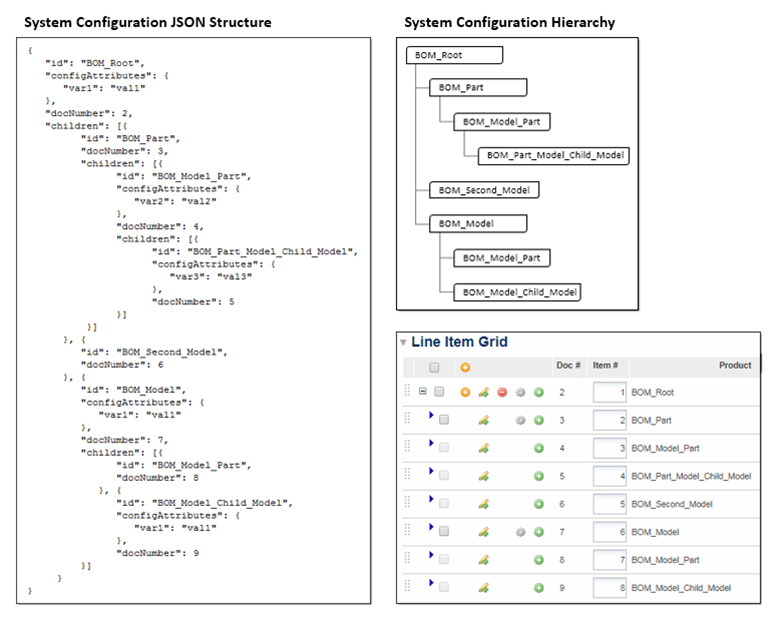
The following image displays a sample System Configuration JSON Structure along with a hierarchy diagram and a corresponding Line Item Grid. The System Configuration Hierarchy provides a visual representation of the items in the JSON Structure. This image also shows the relationship between the JSON Structure "documentNumber" field and the Line Item Grid "Doc #" attribute.
Note: If a child model within a system configuration does not have a corresponding BOM Item Definition and BOM Mapping Rule associated to it, the child model will not be included within the System Configuration JSON Structure. Attributes from this model cannot be retrieved using getSystemData, getSystemAttrValues, and getSystemMultipleAttrValues BML functions. Child models within a system configuration that do not have a corresponding BOM Item Definition and BOM Mapping Rule associated to it are not supported.
Administrators can now view folders for each model in a BOM hierarchy when adding attribute references to an advanced BML function. The System Configuration folder is available when there is at least one root item defined in an active BOM Item Definition Table, and will be shown when an administrator selects Add Attributes from within an advanced BML function. The root items for defined systems are shown within the System Configuration folder. Administrators can navigate through the folder structure to select and add attributes.
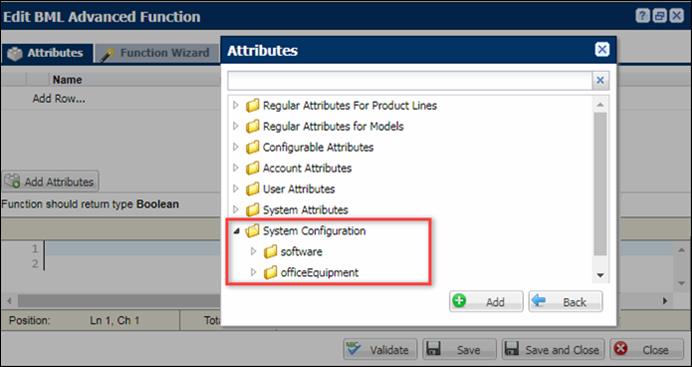
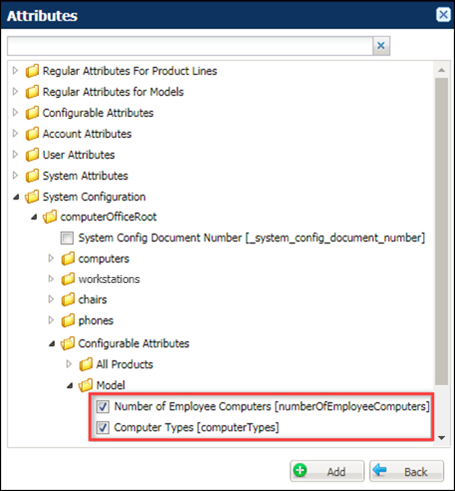
The System Configuration folder will show all available root items on the site. Upon expanding a folder, the model and its associated line-level attributes are displayed. Only those BOM models that exist within the same product family as the rule that is being defined are shown in the Configurable Attributes folder. Administrators select attributes from the Configurable Attributes folder to populate the advanced BML function. For example: the following image shows Configurable Attributes for "computerOfficeRoot".
Notes:
- Prior to Release 18B, the System Configuration inter-model attributes were not updated until the System Configuration or BOM was invoked into Commerce. Beginning in Release 18B, all values are updated when an update is performed after a Configuration rule runs.
- In Release 18A, customers must use BML to select BOM system attributes from other product families. For more information, refer to Use BML to Select Attributes from Other Product Families.
- Attribute values from BOM models will be empty until the BOM model is configured.
- Administrators cannot create a configuration rule that directly references a configuration attribute from a different product family. If a system model does not exist within the same product family as the configuration rule, the Configuration Attributes folder is not available. The only way to get the value of the attributes in other product families is to use the following BML functions:
getsystemattrvalues()andgetsystemmultipleattrvalues(). On the All Product Family level, however, none of the BOM systems will have a Configurable Attributes folder as it exists outside of a specific family.
![]() System Configuration Document Number
System Configuration Document Number
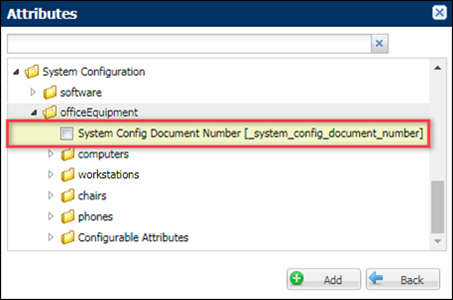
After each model in a system is configured and saved in a Commerce Transaction, a System Config Document Number is assigned to configured items. The value of the System Config Document Number corresponds to the Commerce Line Item Document Number attributes.
![]() System Configuration Variable Names
System Configuration Variable Names
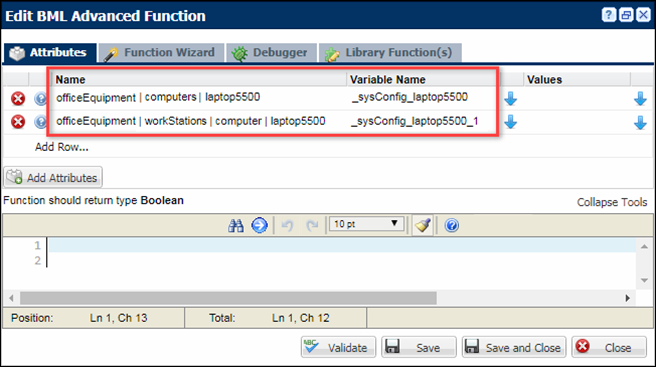
When attributes are added to a rule for a system configuration, "_sysConfig_" is added to the beginning of the variable name. If multiple attributes with the same variable name are added, sequential numbers will be appended to the end of the variable name.
For example: The following example displays attributes for system configuration with a laptop5500 computer and a laptop5500 computer within a workstation. The "_sysConfig_" prefix is added to beginning of the "laptop5500" variable names, and since the variable name for both attributes is the same, "_1" is added to the end of the "officeEquipment | computers | laptop5500" variable name.
![]() Invalid BOM Item Definition Folders
Invalid BOM Item Definition Folders
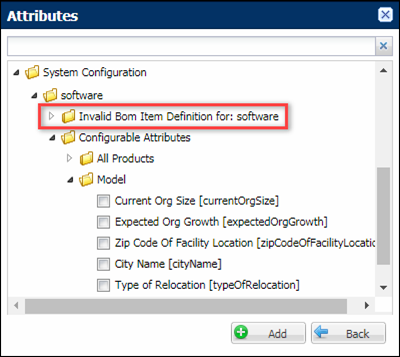
If a system configuration contains an invalid BOM Item Definition, the details will be listed in the folder structure for the invalid root item. The BOM Item Definition is marked as invalid if errors exist in the item definitions, attribute definitions, or attribute translations. The Configurable Attributes and Document Number are available even when the model's BOM rule is broken. For example: The following image displays an invalid BOM Item Definition folder for the "software" root item.
The System Navigation Panel contains model and part icons to show the hierarchy of a system and status icons to identify models requiring user action.The system navigation panel will display items that are valid, incomplete, and invalid. It will also indicate if models have warnings or errors. The following table describes possible states for models within the system navigation panel and identifies if invocation is allowed for each state.
|
Icon |
State |
Description |
Allow Invocation When Active |
|---|---|---|---|
|
|
Valid Root Configuration |
The model is the root model and contains no errors or issues |
Yes |
|
|
Valid Configuration |
The model has been configured and contains no errors or problems |
Yes |
|
|
Configuration Not Started |
The model configuration has been created, but the model details have not been viewed or modified. |
Yes |
|
|
Invalid |
The model configuration is invalid. This could be the result of invalid BOM Mapping rules or a missing configuration flow. |
Yes |
|
|
Warning |
The model configuration contains items that
should be reviewed, such as reverse BOM mapping errors, altered configuration
values, or altered recommended items. |
Yes |
|
|
Incomplete |
The model configuration has multiple nodes and the configuration hasn't progressed to the end node. Users must complete the associated model configuration before proceeding. |
No |
|
|
Error |
The model configuration has constrained values, missing mandatory items, or empty required attributes. When a model has an error, users must correct the associated error before proceeding. |
No |
![]() System Navigation Panel Example
System Navigation Panel Example
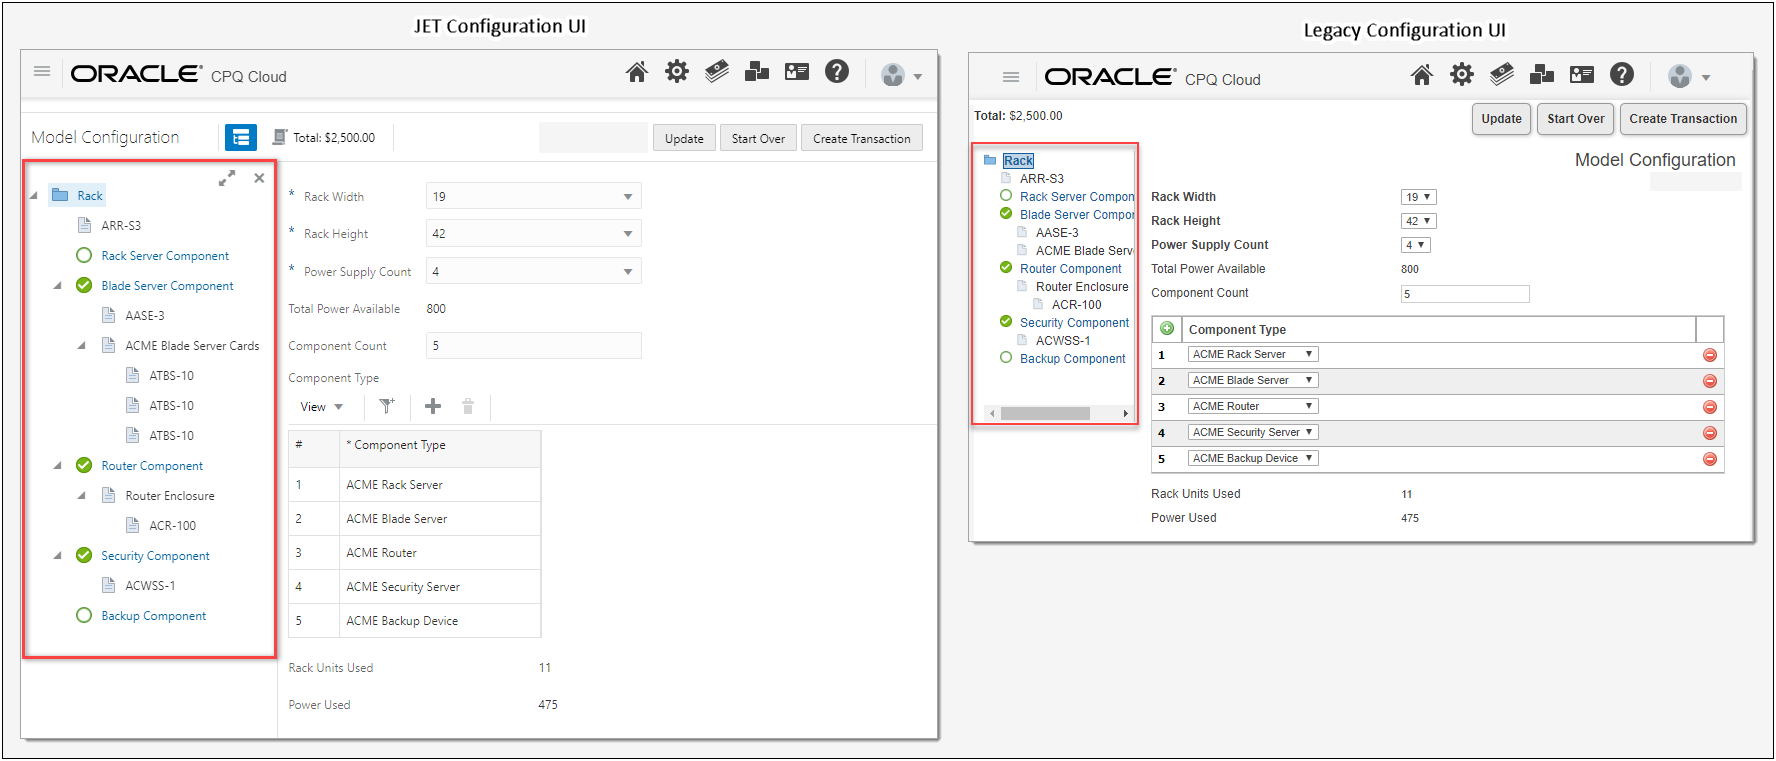
The following image shows a system configuration with five models. The status icons in the system navigation panel indicate valid completed configurations for the Blade Server, Router, and Security models. The status icons for the Rack Server and Backup Device models indicate these items have not been configured.
If multiple statuses are present on a single model, the order of precedence that determines which icon is displayed is as follows:
- Root Model: Invalid > Incomplete > Error > Warning > Valid Root Configuration
- Child Model: Invalid > Incomplete > Error > Warning > Configuration Not Started > Valid Configuration
![]() System Path Warnings for Favorites and Pending Configurations
System Path Warnings for Favorites and Pending Configurations
System configurations use system paths to identify the location of each instance of a model within a system. Beginning in 19D, Oracle CPQ will apply a new CSS warning class to any model in a system whose system path exceeds the maximum supported length. Systems containing a model whose system path exceeds the supported length cannot be saved to Favorites, nor fully populated when restoring from a Pending Configuration.
-
Pending Configuration Behavior for Models with Excessive System Path Lengths
When Pending Configurations are enabled, models with excessive system paths are highlighted in the system navigation panel. When a user hovers over a highlighted model a message is displayed to notify the user that the Pending Configuration for this model could not be saved.
When restoring the Pending Configuration of a system configuration that contained one or more models whose system path exceeds the maximum size, only those configured models that could be saved are restored. Any models with excessive system paths are returned to an unconfigured state and a warning message is displayed to notify the user that the Pending Configuration for this system could not be fully restored.
-
Favorites Behavior for Models with Excessive System Path Lengths
Users cannot create a Favorite for a system configuration that contains one or more models whose system path is beyond the maximum size.
Notes:
- Price Books can only be selected on the root model. All sub-models will show the selection made in the root in read-only mode.
- If multiple system models are configured and one of the models contains an error (such as an active constraint), a CSS style named “config-contains-error” is given to the system navigation panel link. This allows administrators to use CSS to adjust how affected models are displayed.
![]() System Configuration Initialization
System Configuration Initialization
In prior releases the child models were not configured until the Configuration UI was launched for each child model. Beginning in Oracle CPQ 19D, when customers launch system configurations a defined collection of child models can have an initial configuration applied. The initial configuration will consist of attribute default values, layout default values, and the result of configuration rules. New system configuration options allow administrators to define the number of models and the depth of descendant models to initialize.
For example, a cellular provider offers a Family Connect Plan that comes standard with four lines. Each line comes with an xPhone S with a 2 year warranty, and an Unlimited Nation-wide Plus plan that has unlimited nation-wide calls, text, and data.
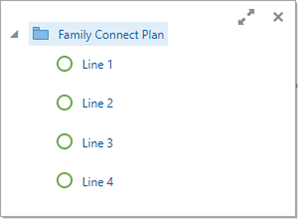
Without system configuration initialization the child models are not configured when the Configuration UI for the root model is launched. The following image shows the Family Connect Plan system with the un-configured child models. This is the same behavior when system configuration initialization is disabled.
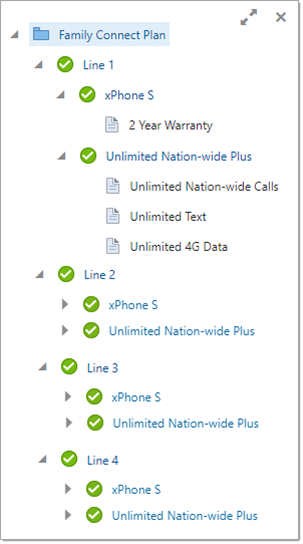
When system configuration initialization is enabled the child models can be configured when the Configuration UI for the root model is launched. The following image shows the Family Connect Plan system with all of the child models initialized and configured.
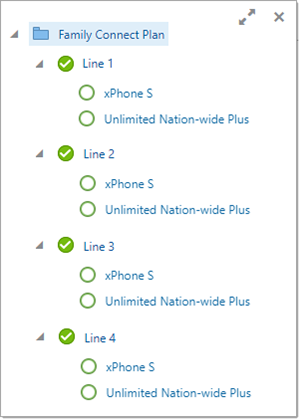
There are initialization scenarios when the system will be partially configured. This can occur when the depth of descendant models setting is lower than the number of descendant levels in the system. For example, the following image shows a system where the depth of descendant models is set to "1", the number of models is set to "20", and the system configuration has two descendant levels. Notice only the level one child models are configured (Line 1, Line 2, Line 3, and Line 4).
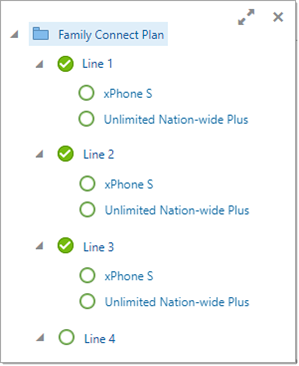
Another scenario that can cause partial configuration is when the when the number models setting is lower than the number of models in the system. The system will initialize all of the first level children and then continue to the next enabled level until it reaches the limit set for the number of models. For example, the following image shows a system where the depth of descendant models is set to "3", the number of models is set to "3", and the system configuration has two descendant levels and twelve descendant models. Notice only the first three level one child models are configured (Line 1, Line 2, and Line 3).
Refer to Enable System Configuration Initialization for instructions to enable this feature.
![]() Cascade Child Models in System Configuration Initialization
Cascade Child Models in System Configuration Initialization
Previously, system configuration initialization would add child models during the initial configuration. Oracle CPQ 24C provides the ability to invoke rules for child models during system configuration. Unlike system configuration initialization which only occurs during the initial configuration, the cascading configuration of descendant models will automatically apply default values during reconfiguration and from favorites. New models added to a System Configuration are immediately configured using default and rule-defined values.
-
Automatic configuration will continue for descendant models added by the new model’s rules.
-
Each configured System Model is marked with the appropriate status icon in the System Navigation Panel.
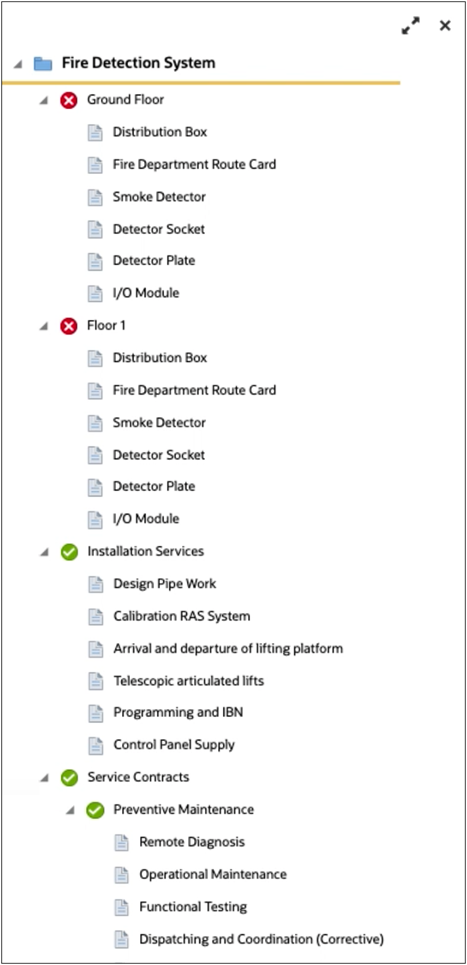
Refer to Enable Cascading Configuration of Newly Added Descendant Models for instructions to enable this feature.
![]() Incomplete System Configurations
Incomplete System Configurations
Beginning in Release 18C, users can access incomplete system configurations from the existing Pending Configurations page. An incomplete system configuration is the result of configuring a system in the Model Configuration page and navigating away from the page. An incomplete system configuration can also occur when users are configuring a system and are accidentally logged out of their session or lose a network connection. When any of these scenarios occur, the entire system is saved as a draft on the Pending Configurations page.
Refer to Managing Pending Configuration for instructions to enable the Pending Configuration page.
![]() Access Incomplete System Configurations from the Pending Configurations Page
Access Incomplete System Configurations from the Pending Configurations Page
Users can resume work on incomplete systems and models they have created by clicking Pending Configurations from the top of the Oracle CPQ workspace. In the below example, Alta Navigation is enabled. Users can access their incomplete configurations by clicking the Pending Configurations icon (outlined in red) from the list of global links.
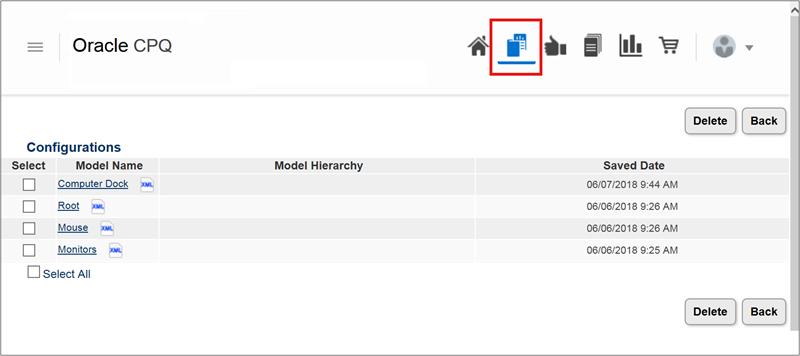
Notes:
-
The name of a system is always the root model’s name, regardless of the model the user was configuring when they navigated away.
-
There can only be one instance of a particular system per user. If users start configuring the same system again, or reconfigure the same system from Commerce, the current pending configuration is replaced.
-
The deployment of a product family will remove all pending configurations that contain any model from that product family.
-
When the Add from Catalog action is performed in Commerce, users can add systems saved to the Pending Configurations page to the current Transaction.
![]() Resume Work on Incomplete Configurations
Resume Work on Incomplete Configurations
Users can resume work on an incomplete configuration by clicking on a model name from the list of pending configurations. The Model Configuration page then opens, allowing the user to continue working on the configuration.
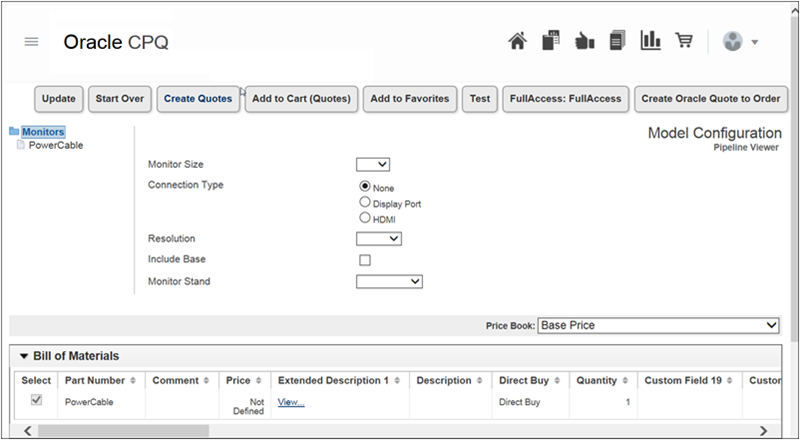
Notes:
-
Upon opening a pending system configuration, the last system model the administrator was working on displays in the Model Configuration page.
- If a pending configuration is created while reconfiguring or adding from catalog, the Transaction is also associated with the pending configuration and loaded into memory.
- When pending configurations is enabled and the system navigation panel is also enabled, users do not need to click Update to save the values entered when they navigate between models.
-
When pending configurations is enabled, rules are not invoked when users navigate away from a model. They are invoked when users navigate back to the model or they save the data. Since rules are not immediately invoked, an invalid configuration could appear as though it is configured correctly. Users can either click Update to validate their selections or wait until the rules invoke to see errors.
- When pending configurations is not enabled, users should always perform an Update (either manual or via auto-update) before navigating to a different model. If a change is made and an Update is not performed before navigating to a different model, the final pending changes are lost.
-
If a BOM Mapping Rule changes, the system structure is updated upon opening the pending configuration. For example: New models and parts are added to the hierarchy, items that no longer exist are removed from the hierarchy, and items and parts that do not change remain unchanged in the hierarchy. If the model a user was configuring is removed from the system definition, its parent configuration flow is loaded.
![]() Inter-Model Rules with References to Attributes in Other Product Families
Inter-Model Rules with References to Attributes in Other Product Families
Beginning in Release 18B, administrators can create Configuration rules that reference Configuration attributes from different Product Families. The System Configuration folder is available when there is at least one root item defined in an active BOM Item Definition Table, and will be shown when an administrator selects Add Attributes from within an advanced BML function.
The System Configuration folder shows all available root items on the site. Upon expanding a folder, the model and its associated attributes are displayed. In prior releases, only the models within the same product family as the rule being defined had the Configurable Attributes folder. Administrators select attributes from the Configurable Attributes folder to populate the advanced BML function.
For example: The following image shows a Constraint Rule for a cable modem within the Internet model, that references the phoneServiceType attribute within the Phone model.
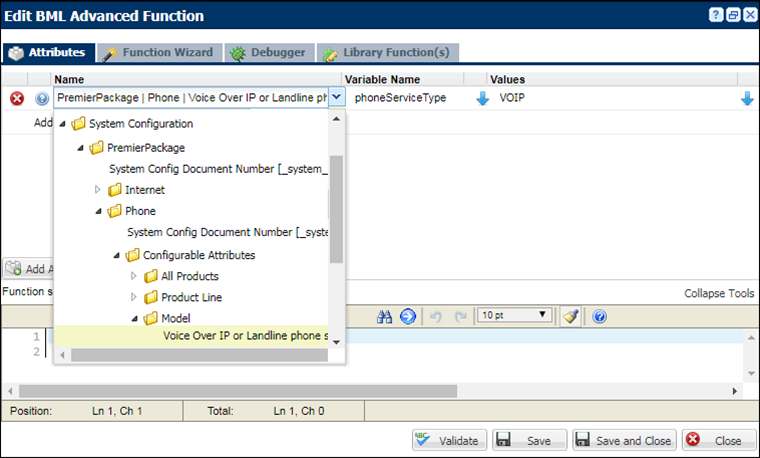
Notes:
-
Attribute values from BOM models will be empty until the BOM model is configured.
-
When creating inter-model Configuration rules, the Part Number field in the BOM Item Definition Data Table should contain the Model path
productFamilyVariableName:productLineVariableName:modelVariableName. -
The Model path is not case sensitive.
-
Be aware that in some instances with inter-model Configuration rules, the data that drives the inter-model rules may not be fully-populated when the rule is run. This occurrence is specific to each System Configuration and the associated rules. For example, this can occur when a rule in a current model is driven from data in an optional child model.
![]() View the Full BOM of the System when Configuring a Model
View the Full BOM of the System when Configuring a Model
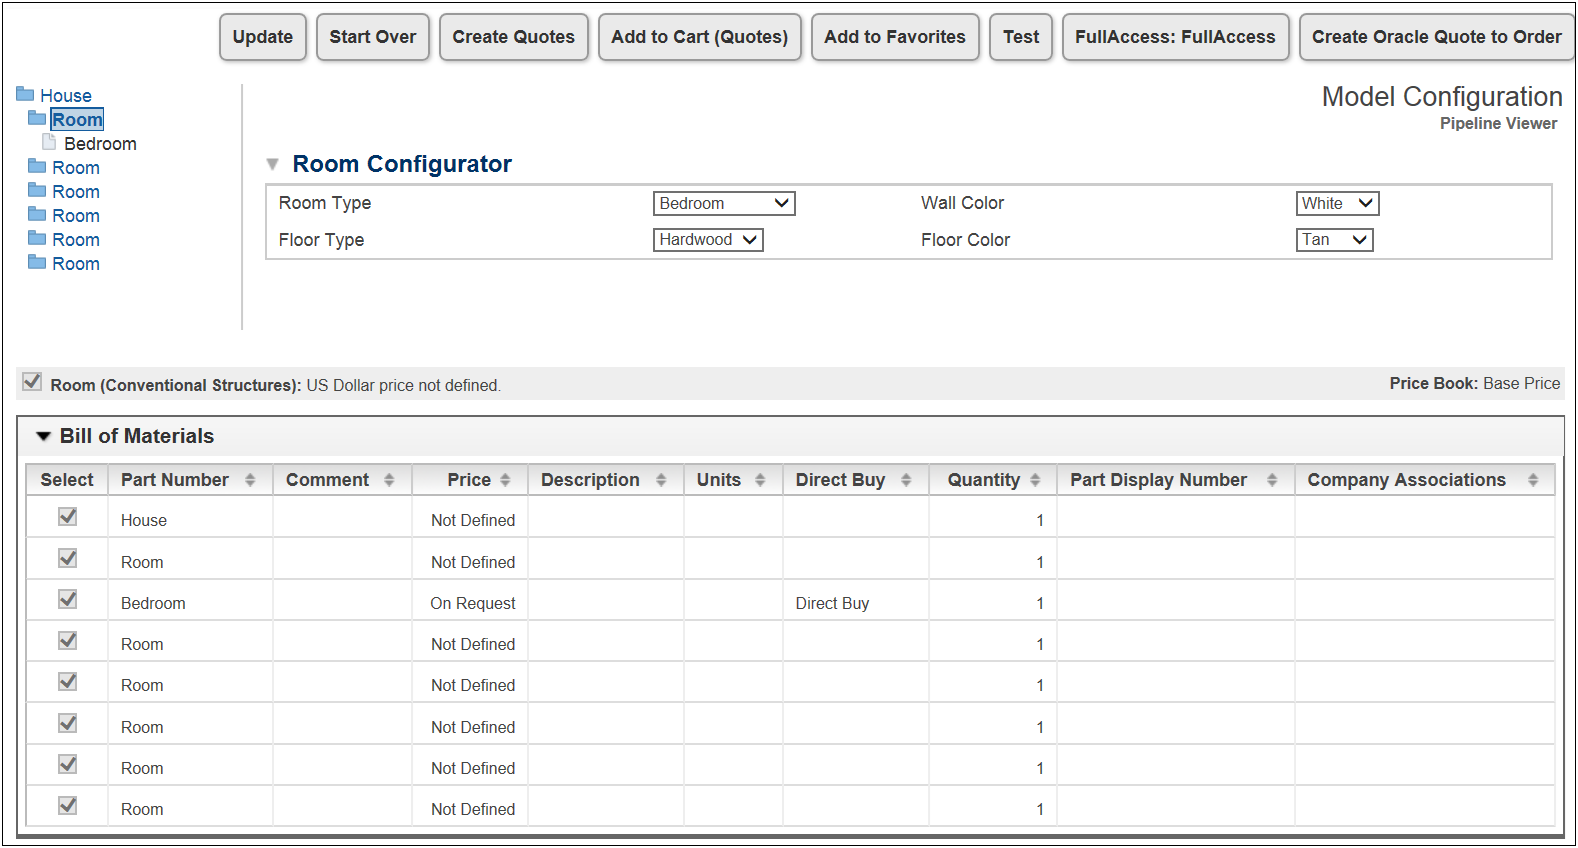
When users select a model from the system navigation panel and proceed to configure the model, the full system to which the model belongs is visible in the Bill of Materials panel. In the below example, the user is configuring room models. As each room is configured, the associated BOM parts are added to the Bill of Materials panel to denote the configuration status, or selected settings, for the model. This enhancement allows users to track the progress of the entire system.
Prior to Oracle CPQ Release 18D, only the Bill of Materials for the current model were displayed in the Bill of Materials panel.
![]() Reconfigure Child Models from Commerce
Reconfigure Child Models from Commerce
As a prerequisite to users’ ability to reconfigure a child model from the line item grid, administrators would first define a BOM hierarchy for each BOM-enabled configurable model in the system. As in prior releases, administrators can build the System Configuration from the Oracle CPQ Home page. The same Reconfigure icon that displays next to the root model also displays next to the child models in the line item grid.
Complete the following steps to reconfigure a child model from the line item grid:
- Log in to CPQ.
-
Open a quote containing child models, which will display in hierarchical order under the root model in the line item grid.
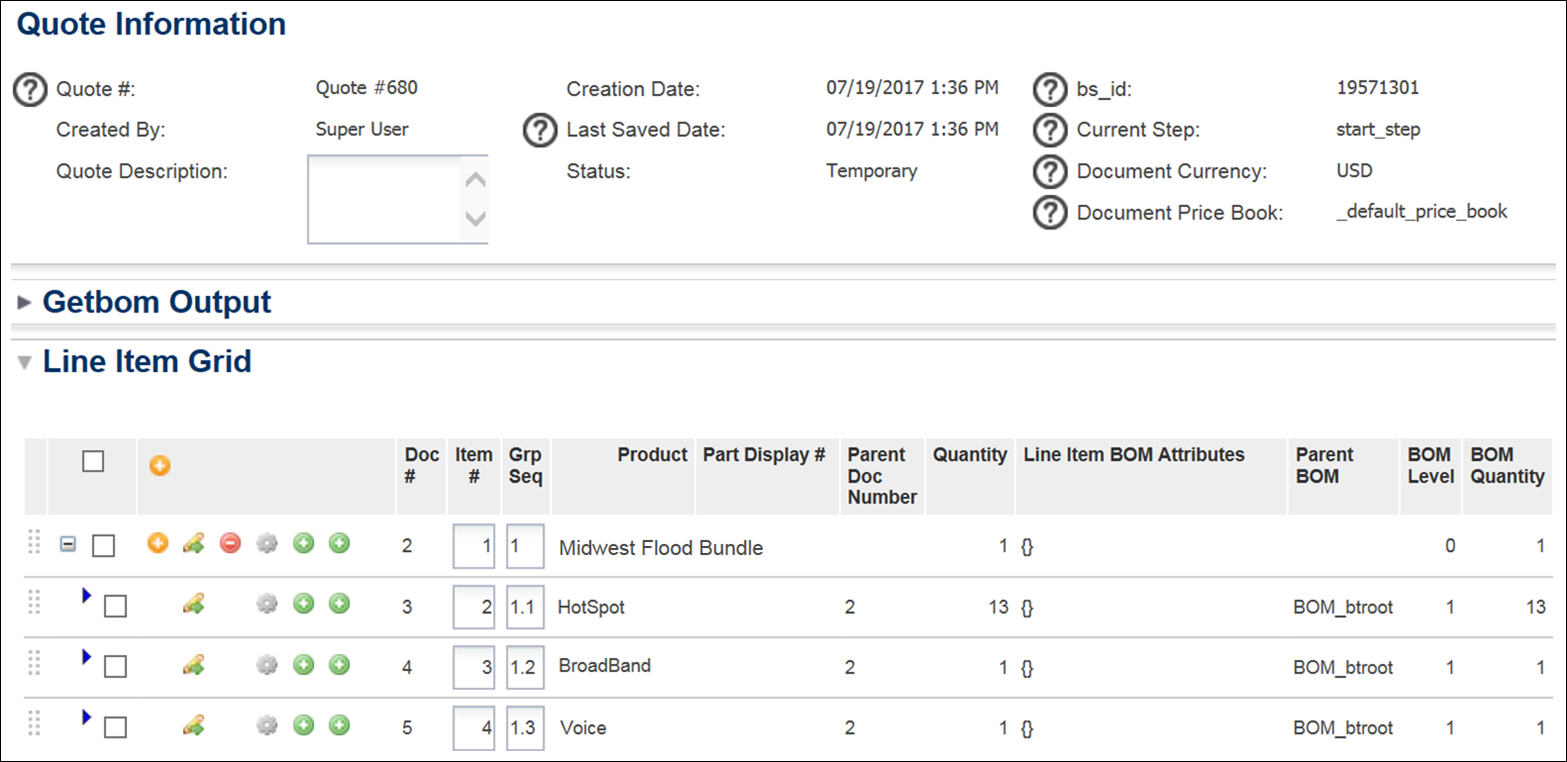
Notes: Four sequencing numbers are available for display within the Oracle CPQ Commerce line item grid to clarify sequences and relationships between line items. The sequencing numbers have been enhanced to support System Configuration.
- Document Number (“Doc #” shown in screenshot above) - Generated upon creating a Transaction or Transaction lines, the Document Number (variable name _document_number) serves as an identifier for the main doc or sub doc within a Transaction. For Transaction lines, this represents the numerical order in which each line item was created.
- Parent Document Number (“Parent Doc Number” shown in the screenshot above) - The Parent Document Number (variable name _parent_doc_number) of each line is the Document Number for its parent line. This represents the hierarchical order of the BOM and supports multiple layers of model and part relationships. As of Oracle CPQ 2017 R2, the Parent Document Number reflects the BOM hierarchy from which the line items were built. Non-BOM models and parts will function as in prior releases, but BOM-derived line items use their Parent Document Number to reflect the structure as defined in the BOM.
- Sequence Number (“Item #” shown in the screenshot above) - The Sequence Number (variable name _sequence_number) indicates the order in which a line item displays in the line item grid and will change if the user re-sequences the lines on the Transaction.
- Group Sequence Number (“Grp Seq” shown in the screenshot above) - The Group Sequence Number (variable name _group_sequence_number) is an extension of the Sequence Number and represents the hierarchy of each specific line item in the line item grid. Beginning in 2017 R2, the Group Sequence Number is no longer strictly a two-level indicator and can extend as much as necessary for BOM-derived line item grid content. For additional information about the Group Sequence Number, refer to the Oracle CPQ Administration Online Help.
- Users can reorganize the order of line items by dragging and dropping line items in the line item grid. In all hierarchies, one can only move a line item in respect to that line’s siblings. Parentage and children cannot be changed.
Administration
![]() Capture the BOM Hierarchy of a Child Model by Calling "getbom"
Capture the BOM Hierarchy of a Child Model by Calling "getbom"
Administrators can capture the BOM hierarchy of a child model by calling the “getbom” BML function using the document number of any BOM element. Administrators can use this functionality to retrieve details of the parent or child BOM items while configuring a given model. They can then choose to apply rules for the current child configuration, allowing the application of system level constraints or recommendations to the current model.
Notes:
- Releases prior to 2017 R2 only supported calling “getbom” using the document number of the root element.
- For additional information about the “getbom” BML function, refer to Other Functions - BOM Mapping Functions.
![]() Create HTML Attribute to Display a Hierarchical BOM Elements in a Transaction
Create HTML Attribute to Display a Hierarchical BOM Elements in a Transaction
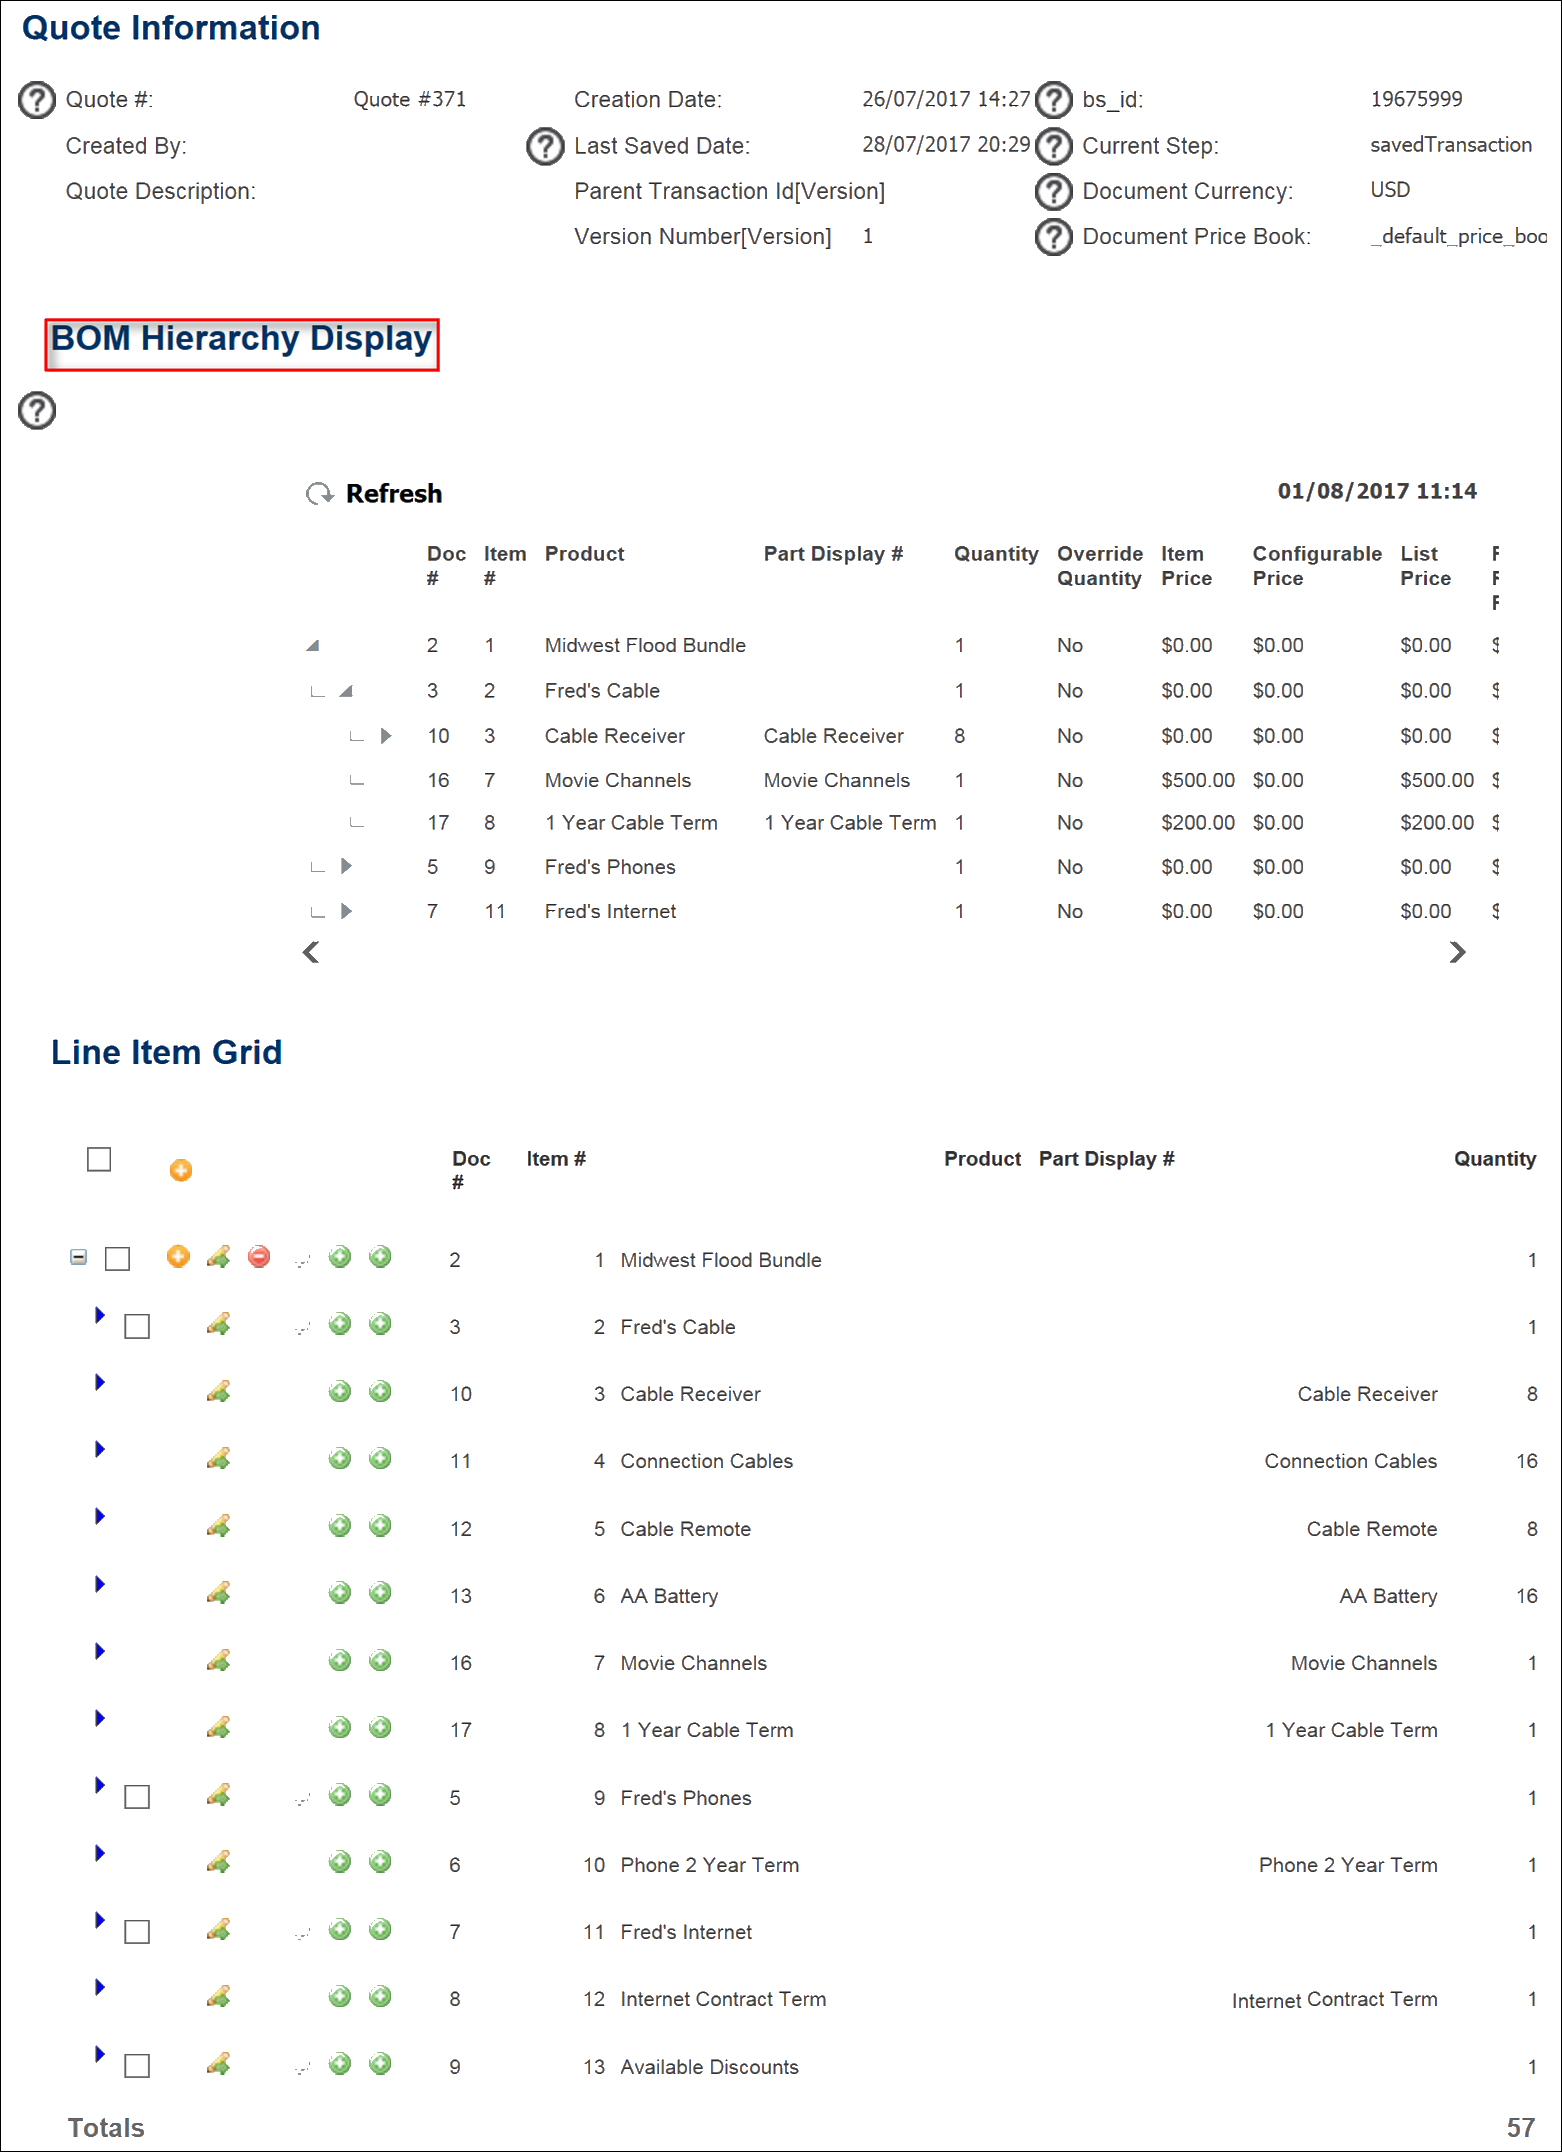
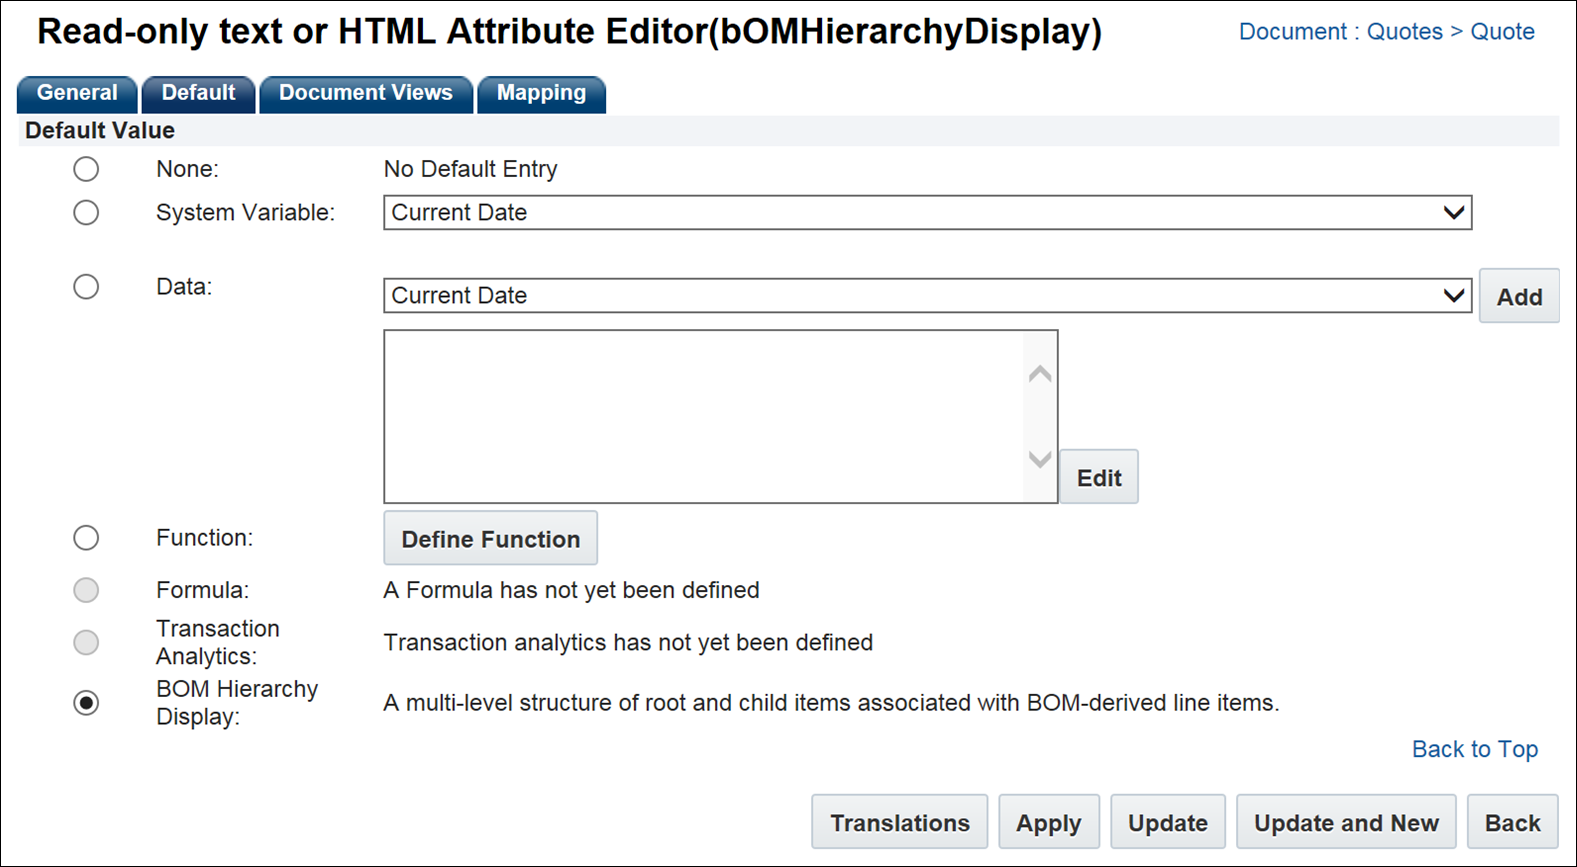
Administrators can create a read-only HTML attribute and use the attribute to display a hierarchical representation of BOM-derived elements from the line item grid. Once created, the populated attribute displays a multi-level structure of BOM-derived root and child items in a Transaction.
![]() Example of BOM Hierarchy Display Attribute in a Transaction
Example of BOM Hierarchy Display Attribute in a Transaction
Complete the following steps:
- Navigate to the Admin Home page.
-
Under Commerce and Documents, click Process Definition.
The Processes page opens with Documents displaying by default in the Navigation drop-down menu for each Commerce process listed.
-
Next to the process name for which you are creating the attribute, click List.
The Document List page opens with Attributes displaying by default in the Navigation drop-down menu for each document listed.
-
Click List next to the main document for which you are creating the attribute.
The Attribute List page opens.
-
Click Add.
The Attribute Editor opens.
- In the Label field, enter a name for the attribute, such as BOM Hierarchy Display.
- Click in the Variable Name field to auto-populate the field.
-
In the Attribute Type drop-down menu, select Read-only text or HTML.

-
Click Add.
The Read-only text or HTML Attribute Editor opens with the Exclude from XML checkbox selected by default. Keep the checkbox selected.
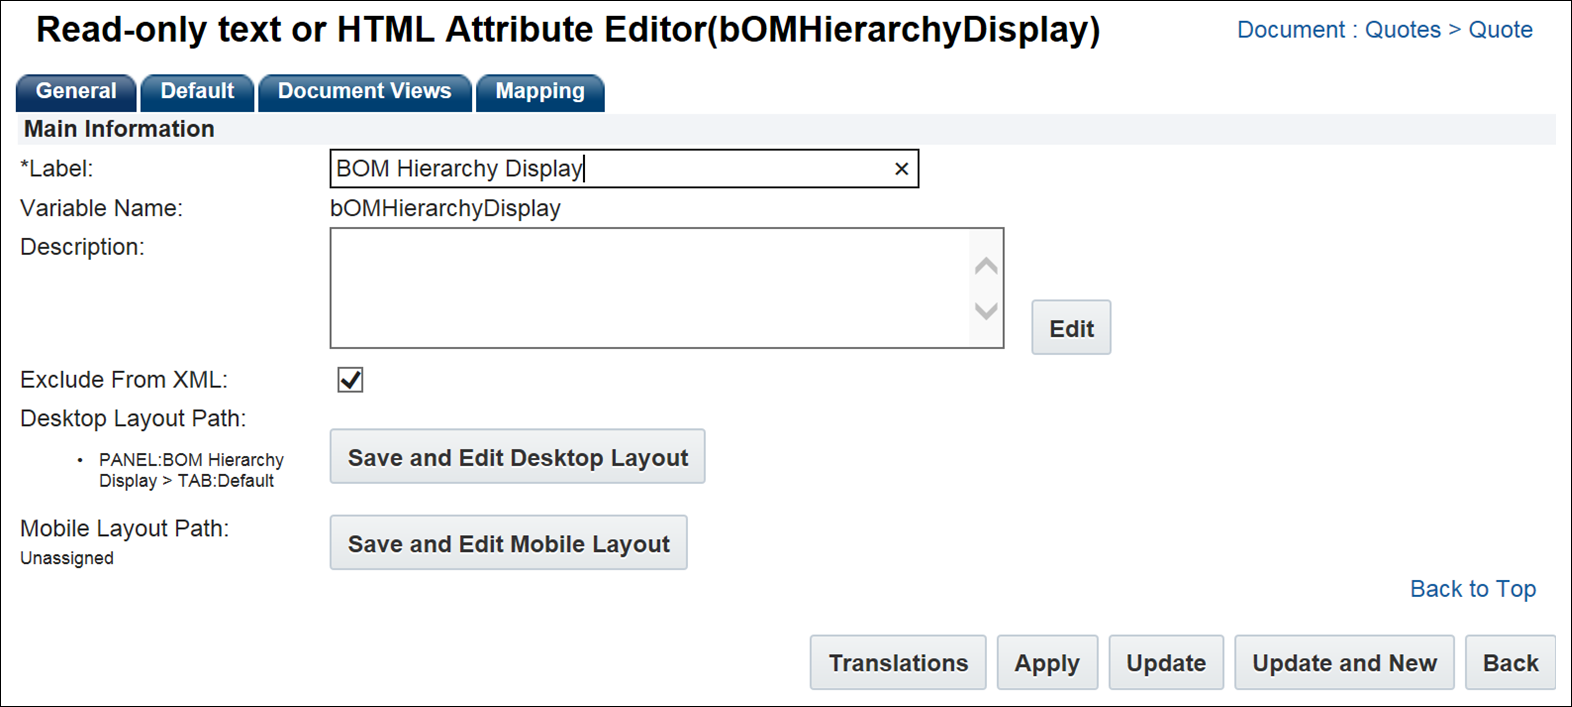
-
In the Default tab, select the BOM Hierarchy Display option.
-
Click the Save and Edit Desktop Layout button or the Save and Edit Mobile Layout button to open the layout.
-
Add the attribute to the layout using the standard drag and drop functionality available in prior releases. For additional information, refer to the Layout Editor Overview topic.
-
Click Save.
-
Click Apply.
-
Use the Mapping tab if you want to hide the attribute on Transactions.
-
Click Apply.
-
Click Update to return to the Attribute List page.
![]() Cross-Product Family Migration
Cross-Product Family Migration
Beginning in Release 18B administrators can migrate Configuration rules that reference System Configuration attributes even if they do not exist on the target site. Upon opening a migrated Configuration rule with references to an attribute that does not exist on the current site, administrators are given a warning message stating a reference is missing. During Configuration, an empty result value is returned when a referenced attribute does not exist.
For example: The following image shows a warning message that is displayed when an administrator opens a migrated rule where the attribute does not exist on the current site.
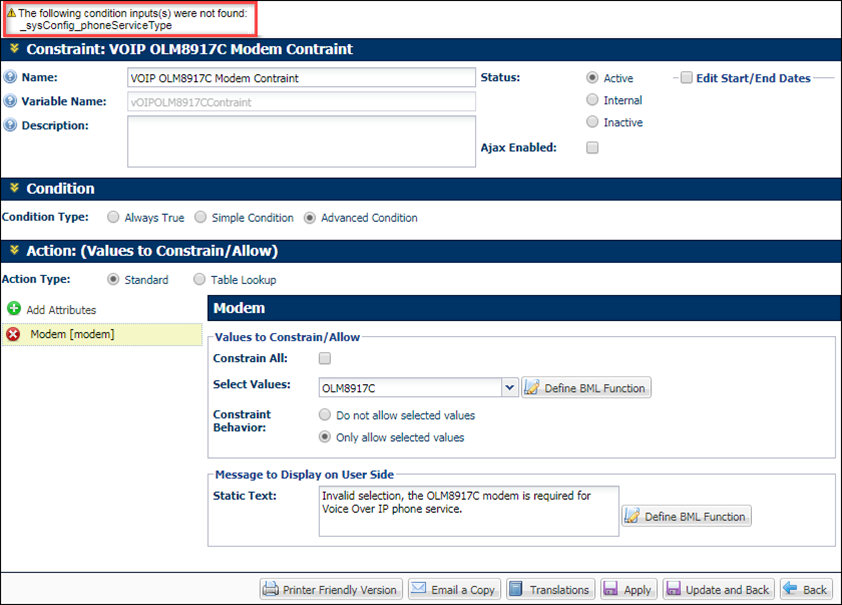
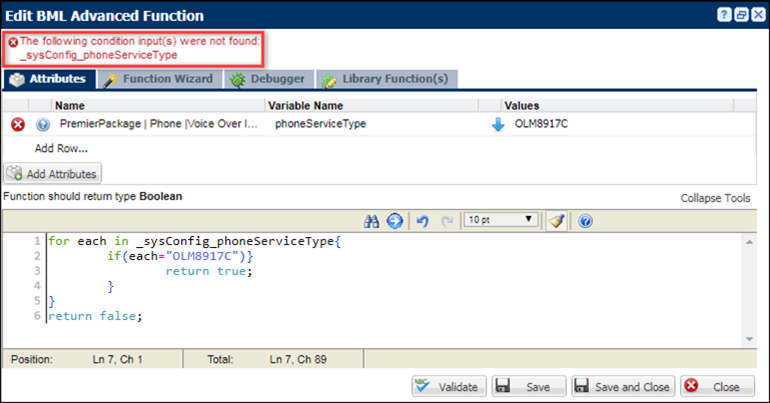
Administrators can close the rule, but no changes to the rule can be saved until the reference is removed or the corresponding attribute exists on the current site. The warning message will change to an error message if the administrator attempts to validate or save a rule with a missing reference warning. Warning and error messages are also displayed in the BML Editor when the administrator views the advanced BML function.
For example: The following image shows a warning message that is displayed when an administrator attempts to validate or save the advanced BML function for a migrated rule where an attribute does not exist on the current site.
![]() Debugging Advanced System Configuration Rules
Debugging Advanced System Configuration Rules
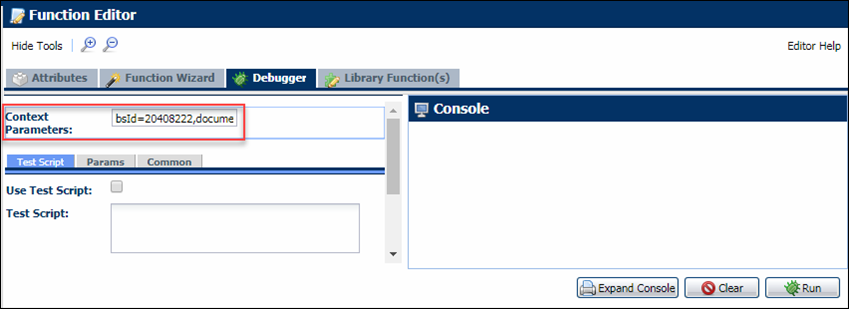
A Transaction ID and the document number of the root system can be used to debug system configuration inter-model rules. The Context Parameters field has been added to Debugger tab for BML Function Editor.
To debug system configuration inter-model rules, enter the bsId and documentNumber, and then run the script using the Debugger's Run action. This will automatically pull the specified system into memory and evaluate the attributes based on the specified system's data.
Syntax: bsId=#######,documentNumber=#
![]() Define Model Path for a BOM Item
Define Model Path for a BOM Item
The BOM Item Definition table stores the BOM hierarchical relationships used in the fulfillment system along with item variable references that link child items to parent items. The table also stores fulfillment system IDs, default quantities, and BOM item effective dates for the fulfillment BOM.
In Oracle CPQ Release 18C, a ModelPath column is also available in the BOM Item Definition table. This is an optional column that allows administrators to define the path to a model for a BOM item. The model at the path specified is added to the BOM hierarchy, allowing users to configure or reconfigure the model from the system navigation panel. When entering a value in the ModelPath column, administrators must use the following format: productFamilyVariableName:productLineVariableName:modelVariableName.
Notes:
-
Oracle CPQ does not support the entry of a model path in both the PartNumber column and the ModelPath column. Enter a model path in only one of the columns.
-
When a part number is entered in the PartNumber column and a model path is entered in the ModelPath column, the item is treated as a model that users can navigate to and configure from the system navigation panel.
-
In future releases, administrators will be required to enter a part in the PartNumber column and a model path in the ModelPath column to use System Configuration and Asset-Based Ordering on the same Oracle CPQ site.
-
When a model path is entered in the PartNumber column but not in the ModelPath column, Oracle CPQ functions as in prior releases and creates a child model at the path specified.
![]() Enable System Configuration Initialization
Enable System Configuration Initialization
Complete the following steps to enable system configuration initialization.
-
Navigate to the Configuration Options page.
Admin Home > Products > Configuration Settings
- Set the Number of descendant models to initialize.
-
Set the Depth of descendant models to initialize.
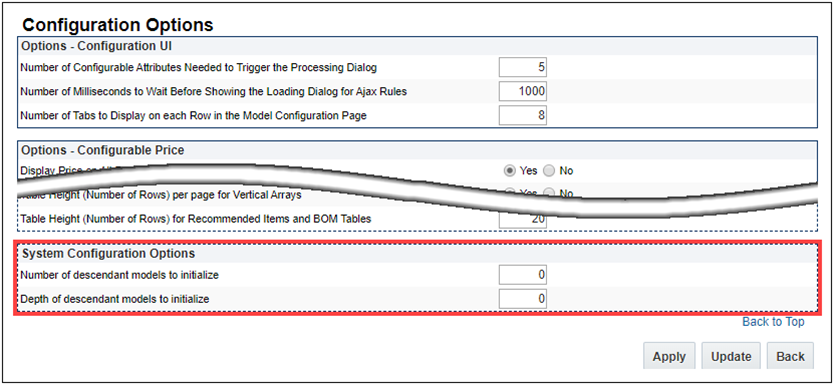
- Click Update to save your changes and return to the previous page.
Notes:
- In Oracle CPQ 19D, the default setting for the system configuration initialization options is zero. In other words, system configuration initialization is disabled by default in Oracle CPQ 19D.
- Model configurations with multiple nodes are not fully configured during initialization. These models are incomplete until the configuration has progressed to the end node and users must complete the associated model configuration before proceeding.
- Attribute changes resulting from inter-model rules are not applied until system invocation or the user opens the configuration UI for the impacted model.
![]() Enable Cascading Configuration of Newly Added Descendant Models
Enable Cascading Configuration of Newly Added Descendant Models
Complete the following steps to initialize rules for child models during system configuration initialization.
-
Navigate to the Admin Home Page.
-
Click Configuration Settings in the Products section.
-
Set the Enable cascading configuration of newly added descendant models option to Yes.
-
If applicable, set the Total number of descendant models to configure value. *default value is 20
-
If applicable, set the Limit number of cascaded descendant models (depth) value. *default value is 6
-
Click Apply or Update.
![]() System Configuration Model Path
System Configuration Model Path
Oracle CPQ 19C introduces the new System Configuration Model Path (_system_config_model_path) system attribute to return a JSON path with the exact location of the current model in the system. "_system_config_model_path" returns a path that includes all of the current model's parent models and the array index associated with the current model.
The indices provided in the JSON path system attribute leverage the absolute position of the elements. They describe the BOM hierarchy path to get to the current model. Even though system configuration model paths are only returned for models, all BOM items (i.e. models and parts) get their own index in the list of children at each level of the hierarchy. The following example shows the system configuration model paths for a basic system configuration.
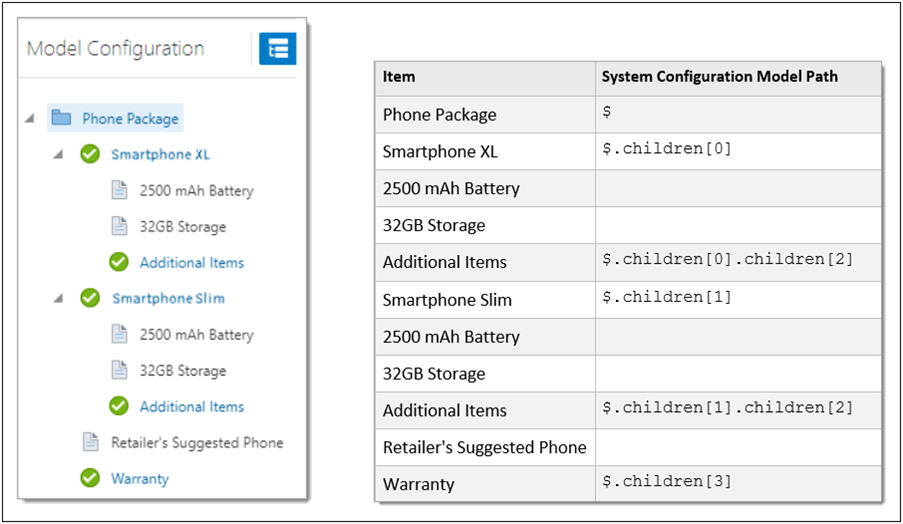
Administrators can use "_system_config_model_path" in inter-model rules to retrieve a path that includes all of the current model's parent models and the array index associated with the current model. For example, a customer wants to retrieve the "color" attribute value from its direct parent model. The following code sample uses "_system_config_model_path" to retrieve the path for the parent model.
parentPath = stringbuilder();
pathElementSeparator = ".";
pathElementArray = split(_system_config_model_path, pathElementSeparator);
pathElementArraySize = sizeofarray(pathElementArray);
pathElementIndex = 1;
for pathElement in pathElementArray {
  if (pathElementIndex < pathElementArraySize) {
    sbappend(parentPath, pathElement, pathElementSeparator);
  }
  pathElementIndex = pathElementIndex + 1;
}
sbappend(parentPath, "configAttributes", pathElementSeparator, "color");
parentAttrVals = string[];
parentAttrVals = getsystemattrvalues(parentPath);
return parentAttrVals[0];
Note: Due to the sequence in which configuration rules run, the very first time a newly created configuration has its rules run, the _system_config_model_path system attribute will be empty. That is because until the model's BOM Mapping rules execute and that output gets added into the system data, the current model isn't yet part of the system and as such doesn't know where it resides within the system.
![]() System Navigation Panel Item Naming
System Navigation Panel Item Naming
The system navigation panel now displays item names that can be defined by a new attribute mapping type in the BOM Attribute Map table. This allows administrators to dynamically name individual instances of a model or part item. In other words, a single item can have different names when it is referenced multiple times within a BOM structure. Additionally, parts in systems now display their "Part Display Number".
For Example: The following image shows a system configuration with BOM attribute mapping item names, which are highlighted in red. In this configuration, two Backup Device models were added. The first "Backup Device" model was renamed "Primary Backup" using the Component Name attribute, which updates the model name in the system navigation panel using the new "DISPLAY_NAME" Target Type in the BOM Attribute Map table. The second "Backup Device" model was also renamed to "Secondary Backup" on the configuration page for that model.
The item highlighted in blue shows a system part, which now displays the Part Display Number (SSD Backup) instead of the Part Number (ASB). For details about the Part Display Number functionality, refer to the Oracle CPQ Administration Online Help.
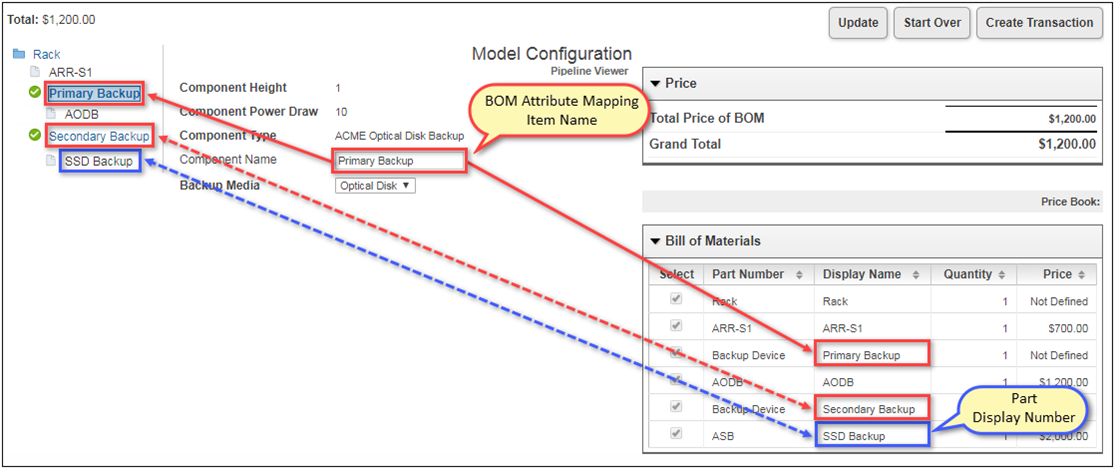
The following image shows the Backup Device entry in the BOM Attribute Map table.

Items renamed using BOM attribute mapping item names or the Part Display Number will display the updated names in the Bills of Materials panel, Recommended Items panel, Favorites, and the Commerce Transaction UI.
Item Naming Order of Precedence
If multiple names are present on a single item, the order of precedence that determines which name is displayed is as follows:
- Models: BOM Attribute Mapping Item Name > BOM Model Name
- Part Numbers: BOM Attribute Mapping Item Name > Part Display Number > Part Number
Display Item Names Using BOM Attribute Mapping
To implement BOM attribute mapping Item names the following tasks must be completed.
- Create a Configuration attribute to capture the new item name.
- Add the attribute to the Configuration Flow page for the applicable model.
-
Add a row to the BOM Attribute Map table and enter the applicable data for the fields displayed in the following table:
Field
Value
TargetType
DISPLAY_NAME
SourceType
Select one of the following options:
- CONFIG_ATTRIBUTE
Select this option to set the target to the value of the configuration attribute - CONDITIONAL_STATIC_ENTRY
Select this option to set the target if the specified attribute's value matches the value in the Static Entry column of the Attribute Mapping table. Multiple entries can be created to display different names based on which defined options are selected. - STATIC_ENTRY
Select this option to set the target to a specific value.
ConfigAttrVarName
The variable name of the configuration attribute used to designate the new item name.
BomItemMapVarName
The BOM Item ID of the parent item, this value is listed in the "VariableName" column of the BOM Item Mapping table. This value designates which BOM item will be renamed.
RootBomMapVarName
The variable name of the BOM Map configuration rule, this value is listed in the "ParentBomMapVarName" field in the BOM Item Map table.
- CONFIG_ATTRIBUTE
Note: If the BOM Attribute Map table does not exist on your site, refer to the BOM Implementation Guide for information about adding and implementing this table.
![]() Line BOM Display Name Attribute
Line BOM Display Name Attribute
Oracle CPQ 19B introduces the _line_bom_display_name Commerce sub-document system attribute to support BOM Attribute Mapping Item Naming.
- This attribute holds the value of the Display Name set in Configuration.
- This attribute is only available via BML. Administrators must output this value into an attribute that accepts strings in order for it to be visible on a buy-side Commerce transaction.
- If a display name is not defined, the attribute value will be blank.
![]() System Navigation Panel Style Customizations for Legacy Configuration UI
System Navigation Panel Style Customizations for Legacy Configuration UI
The default system navigation panel elements can be customized using a CSS file. The root item model has a unique class. The status icons are not applied to the root model. The child models are represented by four different classes to indicate the status of the model configuration. When warnings or errors exist, the applicable class is applied to the relevant model. If desired, administrators can use an alternate CSS file to customize the system navigation panel styles and assign different styles or icons for the specific warning or error classes.
The following table shows the default icons and identifies the CSS class names for the status, warning, and error classes.
|
Category |
Icon |
CSS Class Name |
Description |
|---|---|---|---|
|
Root |
|
config-root |
Root Items |
|
Status |
|
config-valid |
Valid Configuration, this class item is included with the root item and configuration not started. |
|
|
config-notstarted |
Configuration not started |
|
|
|
config-incomplete |
Incomplete Configuration |
|
|
|
config-invalid |
Invalid Configuration |
|
|
Warnings |
|
config-warning |
General configuration warning, this class item is included with all configuration warnings. |
|
config-reverse-bom-failures |
Specific configuration warning that indicates reverse BOM attribute mapping failed. |
||
|
config-altered |
Specific configuration warning that indicates there are unsaved changes to the item list but the configuration is still valid. |
||
|
Errors |
|
config-contains-error |
General configuration error, this class item is included with all configuration errors. |
|
config-constrained |
Active constraints |
||
|
config-missing-mandatory |
Missing mandatory recommended items |
||
|
config-empty-required |
Empty required attributes |
Notes:
- The alternate CSS file for system navigation panel customizations should be added to the product stylesheets page. To add the alternate CSS file, administrators navigate to: Admin > Products > Catalog Definition > Stylesheets
- Administrators must associate the alternate CSS file to each Configuration flow where system navigation panel customizations are desired.
- For details about CSS customization, refer to Style & Templates.
![]() Use a Single Value Populated by a URL Parameter Across All Models in a System
Use a Single Value Populated by a URL Parameter Across All Models in a System
A new system attribute is available in Release 18D for use in all Configuration rules to facilitate punch in to Oracle CPQ for ABO and System Configuration operations. The system attribute "_config_upgrade_name" is supported as a Simple Condition in a Configuration rule or as an Advanced Condition in a Configuration rule, where an action references the system attribute. For example: Administrators can use the "_config_upgrade_name" system attribute in a "Bulk Table Lookup" recommendation rule condition. When users punch-in to the Model Configuration page, the URL parameter populates the value of "_config_upgrade_name" across all models in a system.
![]() Use BML for Cross-Model Configuration Rules
Use BML for Cross-Model Configuration Rules
Administrators can use Advanced Conditions and the new BML functions to retrieve System Configuration attribute values from other configured system models. They can set the configuration flow and build rules to constrain, hide, recommend, and price sub model values.
Constraint rules are used to let the user know which values are allowed for selection in a particular configuration. Refer to the following use case examples:
- A user changes the power supply on a parent server rack from an American option to a European option, but one of the configured sub model servers does not support the European power supply. The administrator can use a constraint rule on the parent server rack or power supply options to require sub model reconfiguration when a parent attribute is changed.
- An insurance company offers services based on location, as well as other personal information. An administrator can use constraint rules on a root customer model to capture user information and limit sub model services based on location.
Hiding rules tell the system to hide select attributes when a pre-defined condition is satisfied. Like other rules, hiding rules are made up of a condition and an action. The value of the selected condition attribute determines the result of the condition, which when true triggers the hiding of the selected action attributes. Refer to the following use case example:
- A telecommunication provides various cell phone device models. An administrator can use cross-model hiding rules on the device models to hide attributes on an accessory configurator based on the device model selection.
![]() Cross-model Recommendation Rules
Cross-model Recommendation Rules
Recommendation Rules can be used to help buyers configure products by offering suggested attribute values. When an administrator sets up a System Configuration, they can use cross-model recommendation rules to set recommended sub model attributes. Refer to the following use case example:
- As part of a training package, Silver certification is available without charge. The administrator can use an array in the certification model sets to set all the values to silver. In addition, the bronze value could be constrained using a constraint rule.
![]() Cross-model Recommended Item Rules
Cross-model Recommended Item Rules
Recommended Item rules enable administrators to associate parts and models with products based on user-configured values. If the recommended item is mandatory, then the user must buy the selected model with the recommended item. If the item is not mandatory, then the user does not have to buy the recommended item. Refer to the following use case example:
- A telecommunications company is having a VoIP promotion, where, if a customer orders over 100 Bluetooth headsets, they will each come with an additional free battery pack. The promotional batteries are not part of a BOM, and have a lower cost to the company than the battery packs regularly offered. The administrator can use a cross-model recommended item rule add the free battery packs when the VOIP promotion is selected.
Pricing rules are used to calculate price based on how a product is configured. Pricing rules can be based on a combination of one or more configured values. Like most rules, a pricing rule also has a condition and an action. The action determines the price of the model being configured. Refer to the following use case example:
- A telecommunication company has a pricing rule on a phone plan model to cover initial connection fees. The company is offering a promotional bundle with 90% off the connection fee. The administrator can use a cross-model pricing rule on promotional bundle that will set the price for sub model phone plan. The original rule will not fire on the phone plan sub model.
![]() Cross-model Configuration Flows
Cross-model Configuration Flows
Configuration Flows are used to walk buyers through the Configuration Process. Configuration Flows help arrange and organize configuration attributes to make Configuration user-friendly. For products with large sets of configuration attributes, Configuration Flows can be used to group different attributes and display them on separate tabs. Configuration Flows can also be set up to direct users to different pages or flows based on their input selections.
- A user selects an Android or Apple phone, and the phone model determines which configuration flow to show the user based on the parent selection.
![]() Use BML to Select Attributes from Other Product Families
Use BML to Select Attributes from Other Product Families
Customers can use BML to select attributes from other product families. Advanced rule attributes from the "System Configuration" folder are always an Array of the type of the referenced attribute. Since the specified path can contain multiple models, the value for the each model is placed in a different index in the provided array. No assumptions should be made about the index at which a specific model's attribute value will be found. If the referenced attribute is an array, each model's attribute value will be a delimited collection of all of the array values for that attribute.
For example: the customer has a system with a Package Bundle as the system root. Under the root level, there are three child systems: internet, cable, and telephone. The cable system contains a premium channels model. The following image displays the BML code to capture the value of "premiumSelection" under premium channels. In this example, "selectedChannels" contains the value of the attribute.
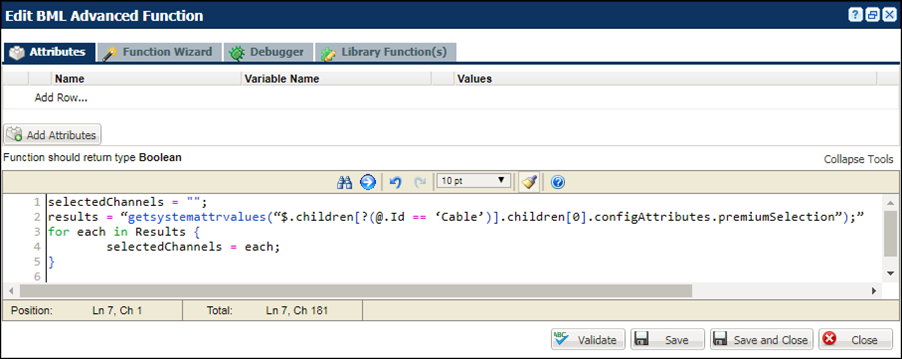
The getSystemMultipleAttrValues BML function can also be used to return dictionary key and value string arrays containing attribute values from a system configuration.
Notes:
- All BOM System attributes are returned as an array of their data type. For instance, when retrieving an integer from another model the integer is returned as an integer array with one element.
- In the event the model is added via an array, all of the values will be contained in that array.
![]() Use System Configuration with Asset-Based Ordering and Oracle CX Commerce Integrations
Use System Configuration with Asset-Based Ordering and Oracle CX Commerce Integrations
In Oracle CPQ Release 18D, customers can use System Configuration in conjunction with the ABO and Oracle CX Commerce integrations. The 18D ABO Implementation Package provides support for system assets, allowing customers to use ABO flows on System Configuration models in Oracle CX Commerce order scenarios.
For example: Oracle CX Commerce self-service users can securely access the Model Configuration page via an iFrame that displays within Oracle CX Commerce. They can then use the system navigation panel to choose a system model or child model to configure or reconfigure. Using the Add to Cart action, the Oracle CX Commerce shopping cart is then updated.
Notes:
-
To use System Configuration with the Asset-Based Ordering and Oracle CX Commerce integrations, administrators must implement the Oracle CX Commerce integration and the 18D ABO Implementation Package.
-
Oracle CPQ Release 18C and later supports systems in Oracle CPQ APIs that are used in Oracle CX Commerce.
![]() Add System Data to Integration Action BML
Add System Data to Integration Action BML
Oracle CX Commerce self-service users can securely access the Oracle CPQ Model Configuration page via an iFrame that displays within Oracle CX Commerce. Using the system navigation panel, they can choose a system model or child model to configure. When the configuration is complete and Oracle CX Commerce self-service users click the integration action (i.e. Add to Cart), the return payload sent to Oracle CX Commerce now includes the systems included in the configuration.To support this functionality, system information is now included in the configXML payload available in the BML when the integration action is performed. While the configXML is available in the Pipeline Viewer, it does not contain the same information as the integration action.
To validate that system information is included in the return payload of the integration action BML, perform the following steps:
- Open the Admin Home page.
- Select General Site Options under General.
The Options - General page opens. - Set the Enable BML print logging option to Yes.
- Click Apply.
- Place the following line in the BML for the integration action:
print(configXML) - Run the Integration action from the Oracle CPQ Model Configuration page.
- Check the log.
The configXML payload displays and includes system information.
Notes:
-
Setting the Enable BML print logging option to Yes will put all print statements in the log, which can hurt performance..
-
The maximum number of characters logged to the configXML log is 4000.
Oracle CPQ provides system configuration support for Commerce integration quote requests, also known as Request For Quote (RFQ). Commerce integration self-service users can request an Oracle CPQ quote, thereby initiating an Oracle CPQ transaction that a sales specialist can modify, reconfigure, or discount. Once finalized in CPQ, the quote is returned to the Commerce integration for acceptance and ordering by the self-service user.
Prior to Oracle CPQ 19C, an RFQ for a system configuration created a transaction with the root model and child models, but the models were not configured. Beginning in Oracle CPQ 19C, an RFQ for a system configuration will add all configured models in the system to the transaction.
For additional information about the Request for Quote Flow, refer to the Integrating Oracle CX Commerce and Oracle CPQ Implementation Guide.
Notes
- System Configuration does not support the Legacy Template for Configuration Layouts.
- When referencing attribute values made from system data via direct reference or BML system data functions prior to Oracle CPQ Release 18D, users had to click Update twice from the Model Configuration page to apply applicable Configuration changes and rules to the active model. In Release 18D, clicking Update once applies all applicable Configuration changes and rules to the active model.
- Users can delete Configurations added by array-type item mappings by deleting the associated index.
- The configuration and getConfigurations WSDL definitions were enhanced in Release 18D to represent the BOM Item response.
- The
getSystemAttrValuesandgetSystemMultipleAttrValuesBML functions are recommended to retrieve attribute values in inter-model rules for multi-level models to ensure the correct attribute value path is retrieved. The attribute value path retrieved using the "System Configuration" folder in BML will change depending on whether the parent model is configured or not. - Oracle recommends setting the "The Disable BOM-Mapping Rules During Updates" Configuration Options setting to "Yes" when multi-node Configuration flows are used with System Configuration.
- Prior to Release 18B, the System Configuration inter-model attributes were not updated until the System Configuration or BOM was invoked into Commerce. Beginning in Release 18B, all values are updated when an update is performed after a Configuration rule runs.
- At the all product family level, System Configuration attributes are not available in the attribute selector in advanced BML Editors. Administrators must use BML functions to create an inter-model rule on the all product family level.
- The Alta Responsive Layout introduced in Oracle CPQ 2017 R2 does not support the BOM Hierarchy Display setting located on the Read-only text or HTML Attribute Editor.
- Administrators can customize the presentation of the BOM Hierarchy Display.
- When working with a system containing Recommended Item rules on a site where the system navigation panel is enabled, the Retain Selection of Optional Items on Reconfigure option on the Configure Options page must be set to Yes to reconfigure and re-invoke a system without navigating to every model. Without doing this, all recommended items from models that were not visited on reconfigure are lost.
- When a warning displays on the page as a result of BOM Attribute Mapping attempting to write conflicting values to the same configuration attribute, the warning remains on the page until the user acknowledges the warning by performing an update. At this time, the value of the configuration attributes revert to their values when originally invoked. The warning shows the different values attempting to be set. The user is then responsible for populating the correct value before invoking.
- In Release 18B, certain conditions would break a system, such as a root adding parent models based on an array and those parent models adding children via an array. To add this functionality to system configurations and use it with system Transactions created in Release 18B and prior, customers must open and reconfigure each legacy system.
- Oracle does not recommend using multi-node model configurations in a system where that model has, or could have, child models.
- When working with models added by an array condition in a system's parent, using the "-" and "+" icons to add to or remove array elements will lose configurations or confuse configurations.
- To shrink the array size, change the number in the array controller.
- To remove a specific model in an array, change the condition to “false” instead of removing the index.
- To prevent users from removing an index from an array with the "-" icon:
- Move the array controller to a different tab or node
- Make the array controller a Single Select Menu
- Have the array controller control more than one array set


