Configuration Flows
Overview
What are they?
Configuration Flows are used to walk buyers through the Configuration Process. Configuration Flows help arrange and organize configuration attributes to make Configuration user-friendly. For products with large sets of configuration attributes, Configuration Flows can be used to group different attributes and display them on separate tabs. Configuration Flows can also be set up to direct users to different pages or flows based on their input selections.
How do they work?
A Configuration Flow rule consists of a condition and flow attributes. The Configuration Flow is triggered when the condition is true. The condition usually depends on user specified values for displayed attributes (account, configurable, regular or user attributes).
 Evaluation of a Configuration Rule
A status check is done to evaluate whether a Configuration Flow rule is active. It must be active for the condition to be evaluated. A Configuration Flow is inactive if any of the condition attributes are not available to the current user. All the condition attributes must be available to the user in either the current or previous flows for the rule to be valid. An attribute is considered to be in a Configuration Flow if it is in the reference attribute, current display, affected attribute, or next display attributes list.
Flow Selection Logic when Multiple Flows are Applicable
When more than one Configuration Flow is applicable at the same time, the flows are sorted based on the following criteria (in sequence) to pick up the first flow:
- Descending order of validity of flows
-
Descending order in product hierarchy
For example, model-level rules have highest precedence and all-family level rules have lowest precedence.
-
Ascending order of node type.
See the section Rules for Selecting Node Types.
-
Descending order by number of rule inputs
Rules with simple inputs are evaluated last.
-
Ascending order by rule order number
See the section Reordering Rules in the topic Configuration Rule Overview.
Rules for Selecting Node Types
- The first flow must be one of the following node types:
- Start Node
- Start and End Node
- Primary Start Node
- Primary Start and End Node.
Otherwise, attributes are displayed using the default wizard.
- If more than one flow is defined, then the first flow has to be one of the following:
- Start Node
- Primary Start Node
- Transition Node
Also, the last row has to be of node type: End Node (NOTE_TYPE_START_END) for all the flows to show up.
Node Precedence
- Primary Start Node
- Primary Start and End Node
- Start Node
- Start and End Node
- Transitional Node
- End Node
Flow Selection for Different Cases
There are several different ways to reach the Model Configuration page to run the flow selection logic. For each situation, the logic is given below:
-
Punch-in or Selector Search Result:
When the Configuration page is reached through punch-in or a Selector Search Results page, the first flow condition is evaluated based on the selector input values.
To be considered as a first flow for simple and advanced type conditions, all the configurable condition attributes must be present in the selector input.
Otherwise, the flow is not picked up.
-
Configure by Navigation Through Model Detail Page:
When the Configuration page is reached through the Model Detail page with no selector input value, only the flows without configuration attributes as condition attributes can be selected as the first flow.
Exception: The "Always True" type flow can be picked up as a first flow, even if it has a configuration attribute as a condition.
-
Reconfigure from Commerce Document or Favorites Item:
A model can be reconfigured from a Commerce document line item or from a Commerce list item. The first flow is picked up based on the values for the configuration attributes that are stored.
The flow that must be used next is re-evaluated based on the user's input selections.
-
Update Button on Model Configuration Page:
Configuration pages can be updated by either the first flow or another flow.
-
The first flow is always evaluated using the users input selections.
Other flows are evaluated based on the attribute values read from the request, which could be either user's input, selector search results, or recommended values.
-
Next Button on Model Configuration Page:
When the Next button is clicked, the next flow is evaluated as described in the selection flow logic from the list of flows with the exception of flows that have been used so far.
-
Flow selection through SOAP:
The flow selection logic works in the same way as in the case of the UI. To select a particular flow as the first flow, all the condition attributes with the values satisfying the flow condition for the flow to be picked up are specified as selector input values in the SOAP input XML.
Administration
Creating a Configuration Flow
-
Navigate to the Configuration Flow: Rules List page.
- Click Admin to go to the Admin Home Page.
-
Click Catalog Definition in the Products section.
The Supported Products page opens.
-
Confirm that Product Families is listed in the Navigation column, and click List.
The Supported Product Families page opens.
-
For the Product Family you are interested in, select Configuration Flows from the Navigation drop-down and click List.
The Configuration Flow: Rules List page opens.
- Click Add to create a new flow rule.
-
Enter the Name, Variable Name, and Description of the rule.
The Variable Name field populates automatically. Variable names can only contain alpha-numeric characters and underscores. The entry can be changed before saving, but after saving the value is read-only.
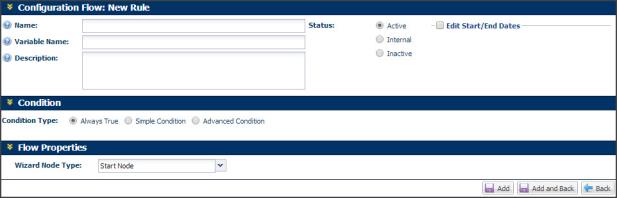
- Select the Status of the rule.
- Active: The rule must fire if the condition is satisfied.
- Inactive: The rule does not fire, even if the condition evaluates to true.
- Internal: The rule only fires if the FullAccess user is the user and the condition evaluates to true.
-
If applicable, click Edit Start/End Dates to select the time period for which the rule is valid.
If no Start/End dates are selected, then it is assumed that the status is valid until the FullAccess user changes it.
- Choose your Condition Type.
- Specify the Wizard Node Type:
- Start Node: Where the Configuration Flow will begin. You can have more than one start node, so if you plan on having multiple, this will be what you set your beginning nodes to.
- End Node: Final node of the flow. This is where you'll see your action buttons like Add to Quote, as well as any recommended line items. As with start nodes, you can have multiple end nodes. The proper end node is set by attributes in the condition.
- Start and End Node: Start and End Nodes are combined.
- Transition Node: Transitions user from one node to another based on attribute selections.
- Primary Start Node: When there is more than one start flow, this lets the application know to start here first.
- Primary Start and End Node: Primary Start and End nodes are combined.
-
Click Add.
The following buttons appear below the newly-created Configuration Flow Rule:

-
In the Layout drop-down, select Desktop or Create Mobile to edit Layout Properties.
The Layout Editor appears.

For more information on creating a Mobile Configuration Flow Rule, see the topic Mobile Configuration.
-
Click Layout Properties.
The Layout Properties dialog box appears.
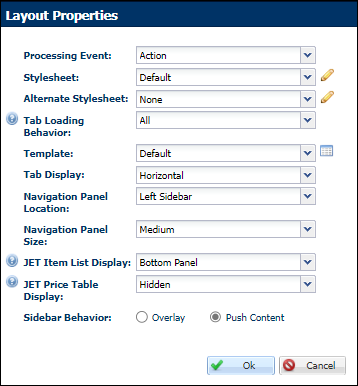
Note: The following JET-specific properties were added in release 19B:
- Tab Display
- JET Item List Display
- JET Price Table Display
- Sidebar Behavior
These properties are not applicable to Legacy UIs.
- Specify the Processing Event:
- Action: The condition for the flow is evaluated when an action occurs (the user clicks a button) on the Model Configuration page.
- Value Change: The condition for the flow is evaluated when the users change a value for a configuration attribute.
- Tab Change: The condition for the flow is evaluated when the users move from one tab to another on the Model Configuration page.
-
Select a Stylesheet from the drop-down. Click the pencil icon  to make changes to the stylesheet.
JET uses
a different CSS stylesheet from the legacy standard and alt stylesheets.
As a result, CSS customizations may need to be refactored to work correctly
with the JET Configuration UI. For additional
details, refer to
Oracle CPQ JET CSS: Branding and
Styling (Doc ID 2462711).
-
Select an Alternate Stylesheet from the drop-down. Click the pencil icon to make changes to the stylesheet.
JET uses
a different CSS stylesheet from the legacy standard and alt stylesheets.
As a result, CSS customizations may need to be refactored to work correctly
with the JET Configuration UI. For additional
details, refer to
Oracle CPQ JET CSS: Branding and
Styling (Doc ID 2462711).
- Select Tab Loading Behavior:
- All: Loads all data across tabs.
- Lazy: Loads data on only the active tab in configuration.
Users might see a loading page appear when the switch tabs, as the next set of data is being loaded. Selecting this option improves performance and rendering speed on larger Configuration Flows.
-
Select a Template.
The layout Template is only used for Legacy layouts. Templates do not control the layout for JET Configuration UIs.
-
Select the Tab Display for JET Configuration UIs.
- Horizontal - Tabs are displayed horizontally at the top of the panel.
- Vertical - Tabs are arranged on the left side of a panel.
-
Set the JET
Item List Display for JET Configuration UIs.
This
option controls whether items lists (e.g. recommended items, mandatory items,
and BOM items) are displayed in the right sidebar or the bottom panel.
-
Set the JET
Price Table Display for JET Configuration UIs.
This
option controls whether price tables are displayed in the right sidebar,
bottom panel, or hidden. When item lists are displayed in the right
sidebar, the price table can only be displayed in the right sidebar or
hidden.
-
Set the Sidebar
Behavior for JET Configuration UIs.
This
option controls sidebar behavior when price tables or item lists are
displayed as right sidebars. Overlay or push content behavior can be
selected.
-
Click  to preview the template.
The preview only displays the Legacy Configuration UI.
-
Click Ok.
The Layout Properties dialog box closes.
- Click Save.
- Click Add and select Attributes or Layout Elements to begin setting up the user-side layout with the Configuration Layout Editor.
Desktop and Mobile Layouts are considered separate Flows. If a change is made to one flow, it will not automatically be reflected in the other. User must make changes in BOTH the Desktop and Mobile Layout Flows.
Notes
All attributes are considered to be in the default flow.
The flow node type must be Primary Start and End Node or Start and End Node for multiple flow cases in SOAP API. This is because multiple flow functionality is not supported in this case.
For a forced end type flow, all attributes are considered in the flow.
If, due to setup error, the condition attributes appear in the forward flows (next flows), the rule is marked as invalid.
If there is an End Node flow at the model level and a Start Node at the product line level, the End Node flow will be picked up because of the ordering of the product hierarchy.
Related Topics
See Also


