Selecting Condition Attributes
Overview
A rule is composed of a condition and an action. The condition is evaluated first. If the condition is evaluated to true, then the rule is fired. That is, an action is performed.
Rule Condition types
Always True: The rule always fires.
Simple Condition: Simple Conditions can be easily set up without the need to resort to coding. The users simply have to select the necessary condition attributes and specify the values of the attributes for which the rule is fired. Several comparison operators are provided for this purpose.
Advanced Function: The advanced function is meant for complex condition logic. The users build their logic using BML in the function editor.
Administration
 Managing Simple Conditions
You can select attributes to use in simple conditions and advanced functions. Use simple conditions when you are writing a rule that needs to run under certain conditions. Instead of selecting Always True, select the Simple Condition radio button in the Condition section of the rule.
When using simple conditions, you have to select the necessary condition attributes and specify the values of the attributes for which the rule is fired. Several comparison operators are available for this purpose.
- Navigate to a rule.
- Select Simple Condition in the Condition section of the rule.
- Click Add Row in the Condition section of the rule.
- In the Attribute drop-down, select your first condition attributes.
-
In the Operator drop-down, select an Operator.
| Text |
- =
- Not =
- Starts With
- Not Starts With
- Ends With
- Not Ends With
- Contains
- Not Contains
|
| Currency, Float or Integer |
|
| Single Select Menu |
|
| Multi Select Menu |
- =
- Not =
- Contains
- Not Contains
|
| Date |
- =
- Not =
- Before
- On or Before
- After
- On or After
|
Note: Only "=" and "Not =" operators can be used for simple conditions to compare non-menu attributes with a "Multi Select Menu" Value and "Attribute" Value Type. Using any other operators will cause errors during save.
- In the Value Type drop-down, select the Value Type.
-
Choose the value(s) for the condition.
There may be a checkbox that is blank. You'll want to deselect this unless you want the rule to run for "none".
Simple Logic with Grouping
You can choose the order in which the statements are evaluated by choosing settings in the Row Grouping section.
The default evaluation happens from left to right. You can explicitly specify the order of operations with the help of parentheses. For example, the condition 1 AND 2 OR 3 is evaluated by default as (1 AND 2) OR 3. You can change the order of operations by typing 1 AND (2 OR 3)in the row grouping section.
You can view the order of operations in either the Row Grouping section (by entry row) or in the Condition Summary section.

Row Grouping
| 1 AND 2 AND 3 |
Rule fires when: myColor = "Red" AND myShape = "Circle" AND mySize = "Small" |
Click AND ALL to achieve this result. This is default logic. |
| 1 OR 2 OR 3 |
Rule fires when myColor = "Red" OR myShape = "Circle" or mySize = "Small" |
Click OR ALL to achieve this logic. |
| (1 AND 2) OR 3 |
Rule fires when: myColor = "Red" AND myShape = "Circle" OR mySize = "Small" |
Default parentheses from left to right. Assumes that first 1 AND 2 is evaluated and the result is OR'd with 3. |
| 1 AND (2 OR 3) |
Rule fires when: "myColor = "Red" AND myShape = "Circle" OR mySize = "Small" |
The explicit parentheses in this statement changes the order the attributes are evaluated. At first, 2 or 3 is evaluated. The result of this is then AND-ed with 1. |
Managing Advanced Conditions
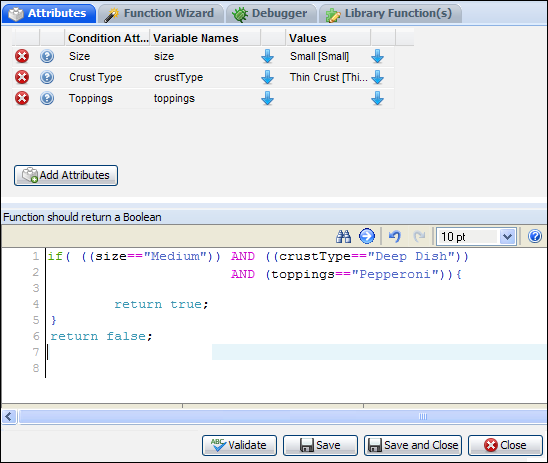
The advanced function is meant for complex condition logic. You build the logic using BML, in the Function Editor. Click View/Edit the BML Function to access the Function Editor.
For more information, see the topic What is BML?.
Sample of Advanced Conditions:
Notes
For legacy rules, ranges are now removed and the condition is enhanced to meet the use case. For example, itemInMenu>=1 AND itemInMenu=>3 will now be itemInMenu = 1 OR 2 OR 3.
When defining an array in the rule condition, you should be aware that the return types of the advanced action will match the return type of the configurable array being acted upon (string, int, float, and so on).
Related Topics
See Also


