Transition Rule Notifications
Overview
Once transition rules are set up, step transitions in Oracle CPQ can trigger transition rule notifications.
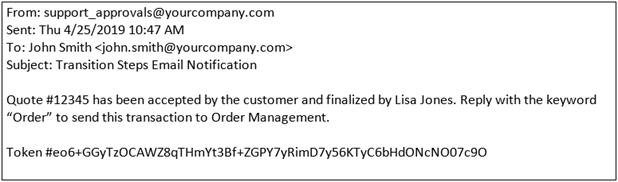
Sample Transition Rule Notification
Mailto links are not supported with Transition Rule Notifications. Do not use an Email Template which contains mailto links with Transition Rules.
Administration
 Defining a Notification Type
- Navigate to a Transition Rule.
- Click Define Notifications.
- Select the Method(s) of Notification. You can check either or both the options provided:
Send XML
Note: XML notifications can only be sent if XML Integrations are set up. Refer to XML Integration for more information.
Send Email
Checking this option displays the Email Information section where you must fill out the following information:
| Sender | Simple Sender Email Address: Enter comma-delimited email addressed in the text field. Advanced Sender Email Address: Click Define Function to write a BML script that will populate the sender email address(es). |
|---|
| Recipient(s) | Simple Recipient Email Address: Enter comma-delimited email addressed in the text field. Advanced Recipient Email Address: Click Define Function to write a BML script that will populate the recipient email address(es). |
|---|
| Cc Recipient(s) | Select additional recipients to be copied. Choose from: - Document Creator: Person who created the previous main document in a process containing multiple main documents
- Transaction Creator: Person who created the transaction.
- Next Step Participants: Person(s) who belong to the next step in the workflow.
- Current Step Participants: Person(s) who belong to the current step in the workflow.
|
|---|
| Subject | Type text, up to 255 characters, for the Subject line of the notification. You can also append current document attributes, on which the action is present, which will be dynamically populated when a notification email is sent. |
|---|
| Body | Choose the source of the Body: - Transaction formatted with an XSL File: This will output HTML content using a Printer-Friendly XSL/History XSL.
- Body text with Smart Tags: Type custom text, up to 4000 characters, for the Body of the notification. You can also append current document attributes, on which the action is present, which will be dynamically populated when a notification email is sent.
|
|---|
| Attachments | Select attachments to be sent with notification email. - Transaction formatted with an XSL file: Use an XSL template from the Printer Friendly and History XSL views.
- Attachment name with Smart Tags: Name your attachments using the current document attribute smart tags.
|
|---|
Selecting a Template for Transition Rule Email Notification
If you have not defined an email notification for a step transition and want to create one, complete the following steps:
- Navigate to the Process page.
Admin > Process Definition > Processes
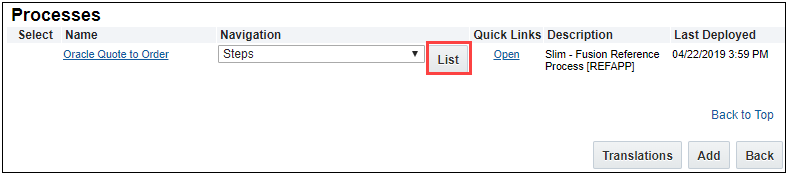
- For a process, select Steps from the Navigation drop-down and then click List. The Process Steps List page displays.
- Select a Transition Rule you wish to add an Email Notification. The Transition Rule detail panel displays.
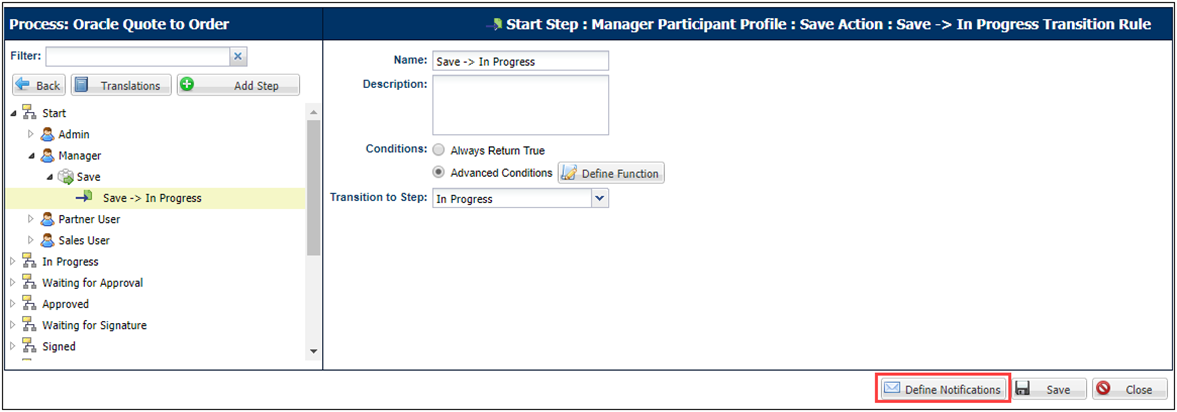
- Click Define Notifications. The Add Notification Rule page displays.
- Select the Send Email checkbox. The Email Information displays.
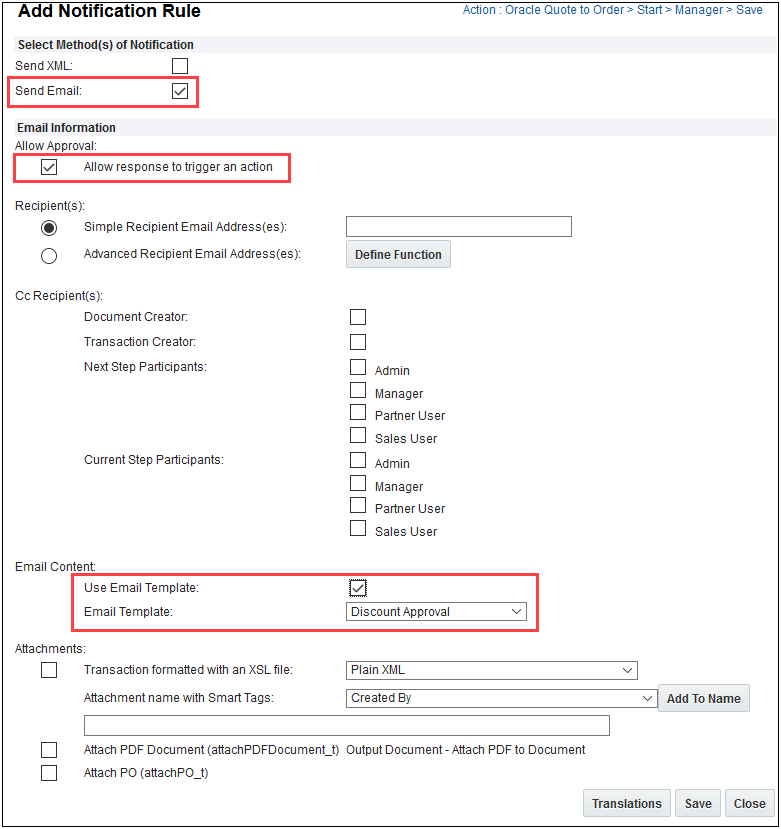
- If you want the recipient to be able to respond to the notification and trigger an action, select the Allow response to trigger an action checkbox in the Allow Approval section
If you do not select the Allow response to trigger an action checkbox, a token is not added to the notification because it is not needed.
- Select the Use Email Template checkbox in the Email Content section. Once the box is checked, an Email Template drop-down displays.
- Select the Email Template to associate with the Step from the Email Template drop-down.
- Click Save.
- Click Close.
Only one Email Template within a particular Commerce Process may be selected.
Related Topics
See Also


