User Sync

Overview

Integrated users will have two user accounts—one in Salesforce and one in Oracle CPQ. The User Sync features allow users to manage their preferences and credentials in one system. It also saves administrator time by automating the provisioning and pairing of new users. Once users are provisioned and paired, users are able to Single Sign On (SSO) from Salesforce to Oracle CPQ.

Once the Oracle Connector for Salesforce is installed and set up, you can synchronize user records between the applications. This topic provides relevant user type and permission information and instructions for maintaining user details between the two applications.

This information is available for Oracle CPQ 22C or later sites and are running Oracle CPQ Connector for Salesforce v8.4 or later. For more information about getting the latest Oracle CPQ Connector for Salesforce, refer to the Oracle CPQ Connector for Salesforce Installation and Setup Guide.

User Types and Permissions

There are two general user roles: administrators who are typically responsible for setting up and maintaining the systems and sales users who typically create quotes, approve quotes and use the applications to sell. Because these roles are conceptual and not explicitly defined as discrete user types in either system we feel it's helpful to describe what access and permissions a given user would need to perform these roles.

Administrator

The following table provides required user type and permission settings for an Administrator who can manage CPQ Users.

Salesforce System Administrator Oracle CPQ User Administrator
  • User License: Salesforce
  • User Profile: System Administrator or equivalent
  • Assigned the Oracle CPQ Extension Admin permission set
  • Assigned the Oracle Adapter Admin permission set
  • User Type: FullAccess User

  • User Administrator Enabled
  • Access Administrator Enabled

When Administrator Groups are enabled, administrators need to be assigned to the following:

  • at least one Admin Group with the Internal Users access
  • at least one Admin Group with the Groups access
To check if Administrator Groups are enabled, refer to General Site Options.
Sales User

The following table provides required user type and permission settings for a Sales User who can access CPQ.

Salesforce User Oracle CPQ User
  • User License: Salesforce
  • User Profile: Standard User or equivalent
  • Assigned the Oracle CPQ Extension Sales User permission set
  • Assigned the Oracle Adapter Sales User permission set

For Community Users:

  • User License: Company Communities
  • Assigned the Oracle CPQ Extension Community Sales User permission set
  • User Type: FullAccess, Sales Agent, Channel Agent, or Restricted Access
  • Link to CPQ User is Enabled

Synchronized User Data

The following table lista the fields which are transmitted from Salesforce to CPQ, shows the access rights by role, and how they are mapped.

Source Record Source Field Destination Admin Sales Notes
User Active Main Information > Status Green checkmark icon Red X icon Value retrieved from the Salesforce User directly
User Email Main Information > Email Green checkmark icon Green checkmark icon  
User Fax Personal Information > Fax Green checkmark icon Green checkmark icon  
User First Name Personal Information > First Name Green checkmark icon Green checkmark icon Warning: Optional in Salesforce, but required by CPQ
User Last Name Personal Information > Last Name Green checkmark icon Green checkmark icon  
User Phone Personal Information > Phone Green checkmark icon Green checkmark icon  
User Title Personal Information > Job Title Green checkmark icon Green checkmark icon  
User First Name Bill To > First Name Green checkmark icon Green checkmark icon Will always be the same as the CPQ User's Personal Information > First Name
User Last Name Bill To > Last Name Green checkmark icon Green checkmark icon Will always be the same as the CPQ User's Personal Information > Last Name
User Company Bill To > Company Name Green checkmark icon Green checkmark icon Company Name 2 is not populated during User Sync
User Street Bill To > Address Green checkmark icon Green checkmark icon Newlines from Salesforce will be removed and the second street line is unused
User City Bill To > City Green checkmark icon Green checkmark icon  
User State/Province Bill To > State / Province Green checkmark icon Green checkmark icon Warning: This is verified by CPQ
User Zip/Postal Code Bill To > Zip / Postal Code Green checkmark icon Green checkmark icon  
User Country Bill To > County Green checkmark icon Green checkmark icon Warning: This is verified by CPQ
User Phone Bill To > Phone Green checkmark icon Green checkmark icon Will always be the same as the CPQ User's Personal Information > Phone
User Fax Bill To > Fax Green checkmark icon Green checkmark icon Will always be the same as the CPQ User's Personal Information > Fax
User Email Bill To > Email Green checkmark icon Green checkmark icon Will always be the same as the CPQ User's Personal Information > Email
User Username User Integrations > Login Info icon Info icon The Partner Login must be unique within an entire CPQ Site
Oracle User Oracle CPQ Cloud Login Main Information > Login Green checkmark icon Red X icon The Partner Login must be unique within a give Partner Organization or Host Organization
Oracle User User Type Main Information > Type Green checkmark icon Red X icon
  • Users (regardless if fullaccess or not) cannot edit their own user type
  • Before the user type can be downgraded from a fullaccess anything else, any/all admin groups must be unassigned from the user
Oracle User Partner User n/a Green checkmark icon Red X icon This checkbox will determine if the "Partner Origination" is synced to CPQ or not
Oracle User Partner Organization Personal Information > Company Name Info icon Info icon If "Partner User" is checked, then will automatically retrieve the User's Account's Partner Organization's value as the company name
Oracle User Delegated Approver Preferences > Delegated Approver Green checkmark icon Green checkmark icon The select user must already have a matching user in CPQ
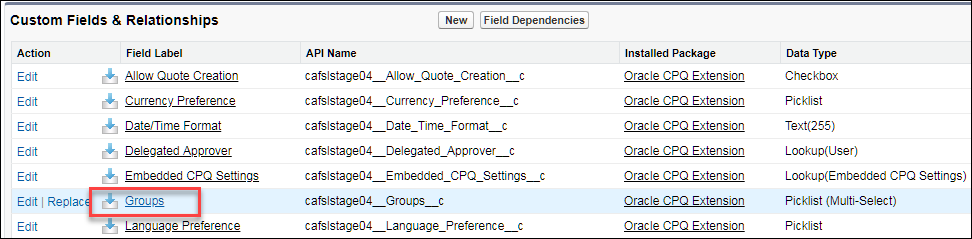
Oracle User Groups Groups Tab Green checkmark icon Red X icon This can contain both Admin or Sales groups
Oracle User Language Preference Preferences > Language Preference Green checkmark icon Green checkmark icon The displayed value is the English label of a language local code, but local code is sent to CPQ. Example "English = en_US"
Oracle User Currency Preference Preferences > Currency Preference Green checkmark icon Green checkmark icon

If left blank during user creation, will default to the value found on your Host Company Info page in CPQ Setup

Oracle User Number Format Preferences > Number Format Green checkmark icon Green checkmark icon If left blank during user creation, will default to the value found on your Host Company Info page in CPQ Setup
Oracle User Units Preferences > Units Green checkmark icon Green checkmark icon If left blank during user creation, will default to the value found on your Host Company Info page in CPQ Setup
Oracle User Date/Time Format Preferences > Date/Time Format Green checkmark icon Green checkmark icon If left blank during user creation, will default to the value found on your Host Company Info page in CPQ Setup
Oracle User Time Zone Preferences > Time Zone Green checkmark icon Green checkmark icon If left blank during user creation, will default to the value found on your Host Company Info page in CPQ Setup
System false (hardcoded) Main Information > Email Password  Info icon Info icon This means a newly created user (in CPQ) will not receive an email about account creation.
System UserInfo.getOrganizationId() User Integrations > Organization Id Info icon Info icon Not visible to CPQ users unless the CPQ site has been configured to connect to multiple Salesforce instances

Info icon = System Generated

Green checkmark icon = Editable in Salesforce

Red X icon = Not editable in Salesforce

Administration

The following procedures assume that the Oracle CPQ and Salesforce Integration has been installed and setup. For more Oracle CPQ and Salesforce integration information, refer to the Oracle CPQ Connector for Salesforce Installation and Setup Guide.
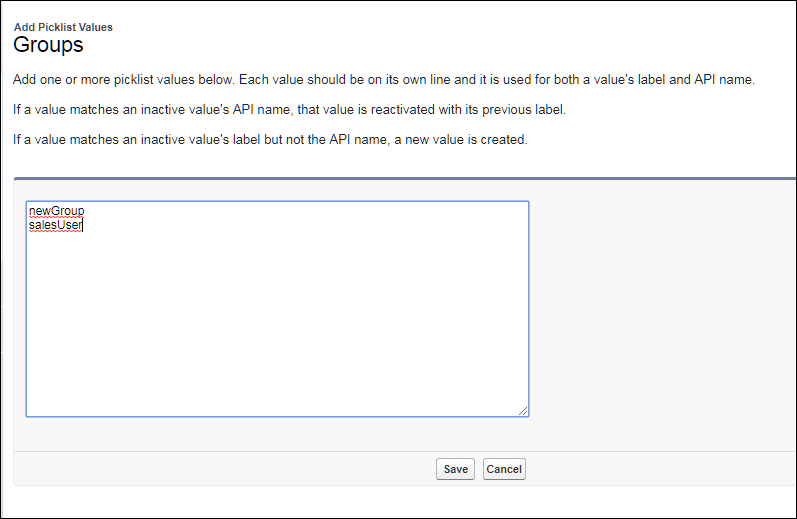
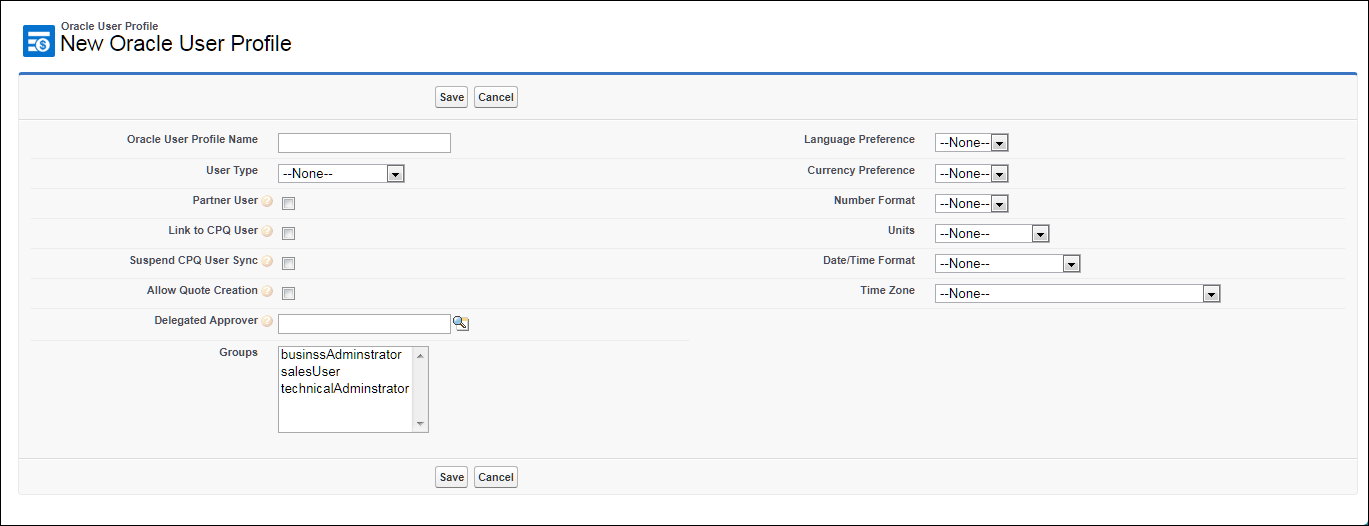
ClosedAdd or Remove a User Group in Salesforce
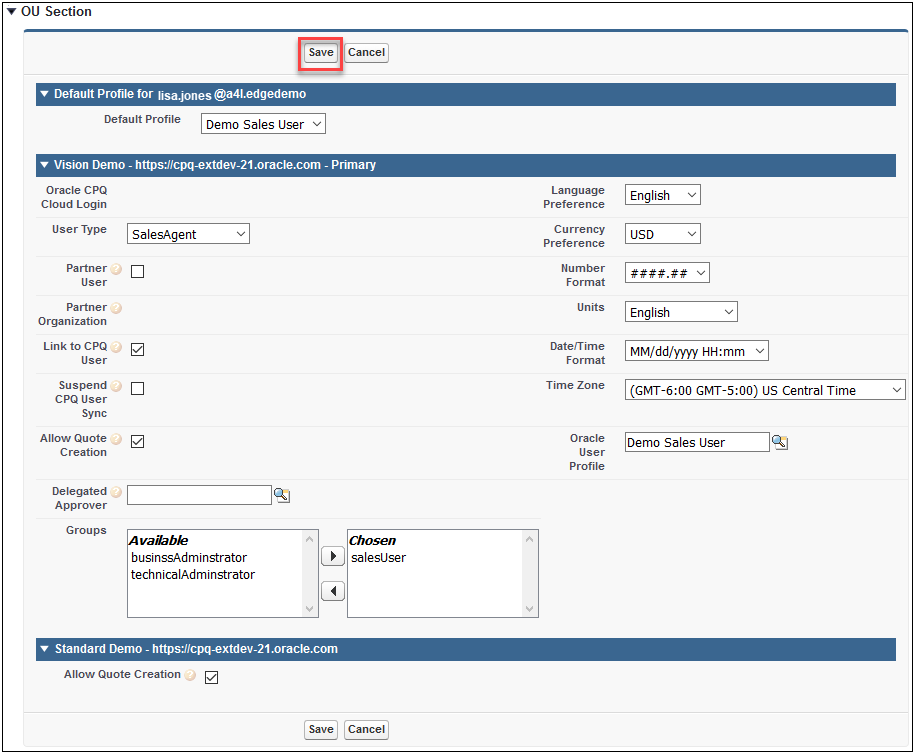
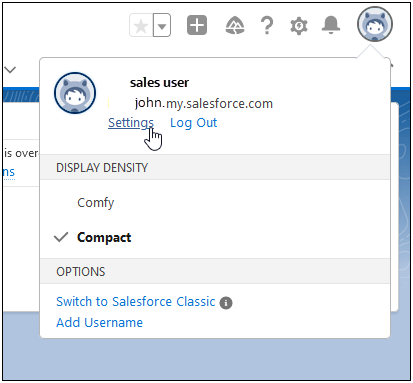
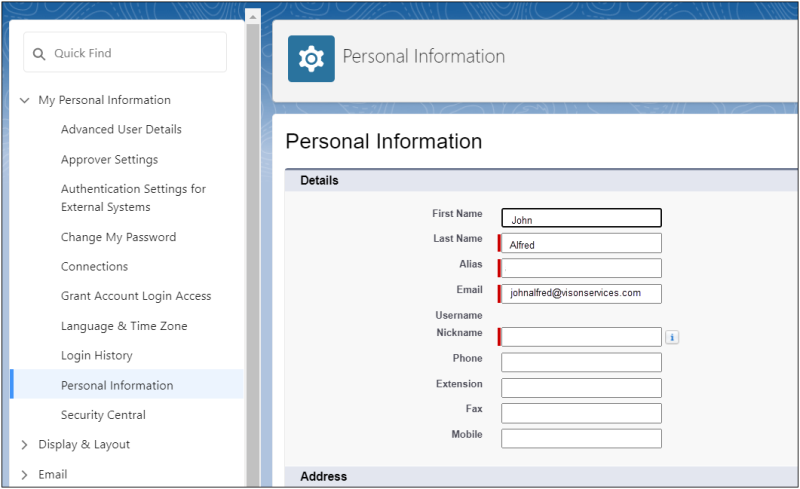
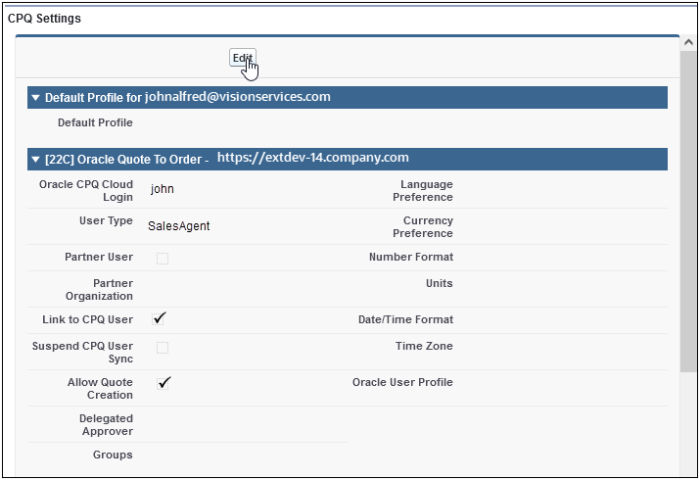
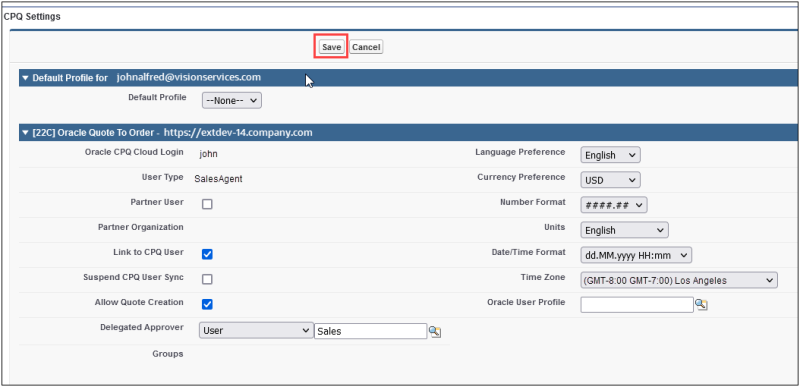
As part of your initial Salesforce integration install and setup, administrators were instructed to provide the assignable Group names for each active Group in CPQ. If new Groups are created or deleted later, you must update this Groups list in Salesforce to ensure that they can be properly assigned to Salesforce users

Refer to the Setting Up Groups topic to setup, view, and maintain Oracle CPQ User Groups.

To add a CPQ Group as an assigned Group in Salesforce, you must add the varname for that group to the Groups Picklist on the Oracle User object. The following steps show how this is done:

  1. In Salesforce, navigate to Setup.
  2. Navigate to Platform Tools > Objects and Fields > Object Manager to open the Object Manager page.
  3. Click Oracle User.
  4. In Fields & Relationships, click on the Groups link under Field Label. The Custom Field Definition Detail information displays.

    Groups Link within Custom Fields and Relationships

  5. Click New under Values.

    New Groups within Values Section

  6. In the Groups page, enter the variable names of each CPQ User Group that you retrieved from Oracle CPQ. Enter each variable name on a separate line.

    Add Group Variable Names within Groups Page

  7. Click Save.
  8. In Picklist Values, delete any user group entry which does not exist in CPQ or should never be assined.

    Standard Group within Picklist Values


ClosedUsing User Profiles

User profiles can be thought of as templates for grouping together common default settings for a set of similar users. This can be helpful when you have users in different countries who have differing language and currency preferences. Another scenario for user profile is if users work in different lines of business and require membership to different groups. Defining user profiles makes it easier for an administrator to provision users.

To create a new CPQ User Profile in Salesforce, complete the following steps:

1. In Salesforce, open the Oracle User Profiles object.

3. Click New. The New Oracle User Profile page displays.

New Oracle User Profile

4. Enter the values for the fields for the desired user profile. Refer to the table below for field information.

New Oracle CPQ User Profile Fields

Purpose/Description

Oracle User Profile Name

Enter the desired name for the User Profile.

User Type

Select the designated user type, for example, FullAccess, SalesAgent ChannelAgent, RestrictedAcesses

Partner User

Check this if the users are to be paired with a “Partner User”.

Link to CPQ User

Check this to allow for users to be created in CPQ, if one does not exist.

Suspend CPQ User Sync

Check this to not send changes that are made on the User Profile in Salesforce to be sent to CPQ.

Allow Quote Creation

Check this if users are allowed to create quotes.

Designated Approver

Enter the name of the designated approver for the user profile.

Groups

Select from the list of groups available. Refer to Create User Groups in Salesforce.

Language Preference

Select the preferred display for the language for the users assigned this profile.

Currency Preference

Select the preferred display for currency for the users assigned this profile.

Number Format

Select the number format default for this user profile. Select decimal or comma.

Units

Select the preferred display for units of measure for the users assigned this profile.

Data Table Format

Select the preferred display of the data table format for the users assigned this profile.

Time Zone

Select the time zone for the users assigned this profile.

5. Click Save.


ClosedProvision a Oracle CPQ User

One the key capabilities of the User Sync feature is the ability for an Administrator to provision a new CPQ user from Salesforce. This allows companies to onboard new Sales Reps without having to create user accounts in both systems and manually integrate these accounts, User Sync handles this for you.

To provision CPQ users, complete the following steps:

1. In Salesforce, navigate to the Setup > Users > Users.

2. Click on the user that you want to pair with CPQ and scroll down to the Oracle User section.

3. Click Edit on the Oracle user record.

Edit Oracle User Record

4. (Optional) If you have created user profiles, select a Default Profile from the available drop down. The user settings and preferences automatically populate once the profile is selected.

Oracle User Default Profile Selection

The default profile feature only works when Oracle users are first created. Subsequent changes to the user preferences must be entered manually.

5. (Optional) If you are not using default profiles, fill in the preferences for this user. Refer to the table below for field information.

Oracle CPQ User Fields

Purpose/Description

Oracle CPQ Cloud Login

Maps the Saleforce user record to the CPQ User Login. This is automatically generated based on the User Account Pattern when provisioned. Administrators can manually override the default Oracle CPQ User Login.

Administrators can use this field to remap a Salesforce user record to a different/existing CPQ user when needed.

User Type

Select the designated user type, for example, FullAccess, SalesAgent ChannelAgent, RestrictedAcesses

Partner User

Check this if the users are to be paired with a “Partner User”.

Link to CPQ User

Check this to allow for users to be created in CPQ, if one does not exist.

Suspend CPQ User Sync

Check this to not send changes that are made on the User Profile in Salesforce to be sent to CPQ.

Allow Quote Creation

Check this if users are allowed to create quotes.

If this is not selected at the time of the User record creation for each CPQ site or process, you will need to modify this setting later in order for the user to be granted the ability to create quotes in the CPQ site or process.
Designated Approver

Enter the name of the designated approver for the user profile.

Groups

Select from the list of groups available. Refer to Create User Groups in Salesforce.

Language Preference

Select the preferred display for the language for the users assigned this profile.

Currency Preference

Select the preferred display for currency for the users assigned this profile.

Number Format

Select the number format default for this user profile. Select decimal or comma.

Units

Select the preferred display for units of measure for the users assigned this profile.

Data Table Format

Select the preferred display of the data table format for the users assigned this profile.

Time Zone

Select the time zone for the users assigned this profile.

6. Click Save. The Salesforce Connector creates a user in Oracle CPQ which uses the preferences settings as entered above.

7. (Optional) Log in to CPQ as an administrator and verify the user was created.

  • After the user has been initially provisioned, you can return to this page to modify the user preferences at any time. Each change gets synchronized to Oracle CPQ when you click Save.
  • If you receive an error, verify that you have proper permissions.
  • Beginning in Oracle CPQ Connector for Salesforce Managed Package v8.5 and later, when a user is created in Oracle CPQ, the username is automatically generated based off the User Account Pattern setting. The following User Account Pattern options are supported: Salesforce username prefix (default), Salesforce Username, or Email address. Refer to the Oracle CPQ Update 22D What's New for details about this feature.

ClosedUpdating CPQ User Details from My Settings

User Sync also allows users to update their own personal information and preferences from Salesforce to Oracle CPQ. Any logged in user who has a linked CPQ account can make changes to their profile including name, email, localization preferences and delegated approver.

To update your user details and sync them to CPQ:

  1. In Salesforce, navigate to your Personal Setting page.
  2. Click Settings.

    Personal Settings

  3. Modify your Personal Information. You can edit your Name, Job Title, Address, Email, Phone, and Fax.

    My Personal Information

  4. Click Save.
  5. Go to Advanced User Detailsand scroll to your CPQ user settings.
  6. Click Edit to modify your user preferences.

    CPQ user settings

    The following table defines the user fields.

    Oracle CPQ User Fields

    Purpose/Description

    Oracle User Profile Name

    Enter the desire name for the User Profile.

    User Type

    Select the designated user type, for example, FullAccess, SalesAgent ChannelAgent, RestrictedAcesses

    Partner User

    Check this if the users are to be paired with a “Partner User”.

    Link to CPQ User

    Check this to allow for users to be created in CPQ, if one does not exist.

    Suspend CPQ User Sync

    Check this to not send changes that are made on the User Profile in Salesforce to be sent to CPQ.

    Allow Quote Creation

    Check this if users are allowed to create quotes.

    Designated Approver

    Enter the name of the designated approver for the user profile.

    Groups

    Select from the list of groups available. Refer to Create User Groups in Salesforce.

    Language Preference

    Select the preferred display for the language for the users assigned this profile.

    Currency Preference

    Select the preferred display for currency for the users assigned this profile.

    Number Format

    Select the number format default for this user profile. Select decimal or comma.

    Units

    Select the preferred display for units of measure for the users assigned this profile.

    Data Table Format

    Select the preferred display of the data table format for the users assigned this profile.

    Time Zone

    Select the time zone for the users assigned this profile.

  7. Verify the Link to CPQ User checkbox is checked. If not checked, the Salesforce user is not linked to a CPQ user.
  8. Verify the Suspend CPQ User Sync checkbox is not checked. If checked, user record changes made in Salesforce are not being sent to Oracle CPQ.
  9. Modify user preference field(s). The fields that are editable will vary based on the type of user viewing the page.
  10. Click Save.

    User Preferences - Save

    The user preference settings will be synced to the My Profile page in Oracle CPQ.


ClosedGlobally Disabling User Sync

Oracle CPQ Connector for Salesforce allows administrators to globally disable user sync between Salesforce and Oracle CPQ. When disabled, changes to Users or Oracle Users in Salesforce will not trigger an update to Users in Oracle CPQ. Administrators may find this feature helpful when performing a bulk update of User or Oracle User records in Salesforce. By disabling user sync, admins are able to avoid errors caused by integration timeouts and other Salesforce platform governor limits triggered with bulk operations.

To use the toggle to globally disable User Sync between Salesforce and Oracle CPQ, administrators can perform the following steps:

  1. In Salesforce, navigate to Setup and enter Custom Settings in the keyword search. The Custom Setting page displays.

  2. Click Manage to go the CPQ Extensions Setting page.

    Saleforce Custom Settings

  3. Click New or Edit for the Default Organization Level Value for the CPQ Extension Settings.

    Disable User Sync - Edit

  4. Select the Disable User Sync checkbox to stop synchronizing user record details to Oracle CPQ.
  5. Click Save.

    Disable User Sync - Save

    The CPQ Extension Setting Detail page displays a checkmark in the Disable User Sync setting and indicates that user details are currently not being synchronized between Salesforce and Oracle CPQ.

    CPQ Extension Settings Details Page

    The disable/enable user sync setting can be controlled manually or via automation. If you would like to automate the Disable User Sync action, refer to Salesforce documentation for information on modifying custom settings.

Notes

In order to prevent conflicts with the activation/deactivation of users and/or update of user fields, we always recommend running the latest managed package on all of your sites instead of running multiple managing packages across various sites.

Related Topics

Related Topics Link IconSee Also