Overview
Commerce attributes are the foundation for input fields to collect data such as billing, shipping, parts, pricing, and revenue information. They apply to a Transaction as a whole, or its specific line items, depending on in which Commerce document the attribute is created. Oracle CPQ provides default attributes as well as default attribute sets, for collecting data such as billing, shipping, and pricing information. You can also create custom Commerce attributes.
Notes:
- Standard Process attributes (introduced in Oracle CPQ 23B) were rationalized to remove redundant attributes and to streamline and simplify Commerce integrations.
- Standard Process attributes cannot be deleted or reordered, but default values and modify actions can be overridden.
Standard Process attributes cannot be deleted or reordered, but default values and modify actions can be overridden. To quickly return to the standard default values, simply uncheck the applicable override option, and then click Apply.
Default modify actions, functions, and settings can also be overridden and reverted.
In general, for attributes to appear on documents, they must be included in document views on a layout. However, you can change the access to an attribute, choose to hide or show it, use an attribute that isn't on a layout. For more information, see the topic Accessing, Hiding, and Reading Attributes.
Attribute Types
The following attributes can be added to Commerce documents. For information about attribute and array sets, refer to Commerce Attribute Sets and Transaction Arrays.
Boolean attributes allow you to define a field as any two choice option. Common uses are to indicate true/false, either/or, valid/invalid or to include/not include.
Boolean attributes are available for main documents and sub-documents.
| Editor Properties | |
|---|---|
| Available Tabs: | General, Default, Modify, Document Views, Mapping |
| Required: |
If this option is selected, the user will be required to enter a value before proceeding. |
| True Label | Text to appear for 'true' option. |
| False Label | Text to appear for 'false' option. |
| Exclude from XML: |
This selection determines if an attribute is available to include in Email Designer and Document Designer documents. The attribute is available when this option is unselected. |
| Trigger Auto Update: |
If this option is selected, a change of value of this attribute by the user will trigger updates by the system without the user invoking an action. Note: Administrators should note that transaction level Auto Update Before Formulas will not execute for attributes without auto-update enabled. So if an attribute with Trigger Auto Update enabled has formula that references an attribute without auto-update, the attribute with Trigger Auto Update enabled will not execute the Auto Update Before Formulas when the attribute without auto-update is modified. |
| Validation: | There are three validation options: None, Must be True, Must be False. |
The currency attribute is displayed as a floating point number field that will display the number in currency format. The currency displayed is the user's currency. A range check can be defined on currency attributes. Currency is formatted based on the current user's currency preference.
Currency attributes are available for main documents and sub-documents.
| Editor Properties | |
|---|---|
| Available Tabs: | General, Default, Modify, Document Views, Mapping |
| Required: |
If this option is selected, the user will be required to enter a value before proceeding. |
| Exclude from XML: |
This selection determines if an attribute is available to include in Email Designer and Document Designer documents. The attribute is available when this option is unselected. |
| Trigger Auto Update: |
If this option is selected, a change of value of this attribute by the user will trigger updates by the system without the user invoking an action. Note: Administrators should note that transaction level Auto Update Before Formulas will not execute for attributes without auto-update enabled. So if an attribute with Trigger Auto Update enabled has formula that references an attribute without auto-update, the attribute with Trigger Auto Update enabled will not execute the Auto Update Before Formulas when the attribute without auto-update is modified. |
| Decimal Places: |
This value determines how many decimal places are allowed for supported currency types. |
| Groups: |
Used to add an attribute to an Attribute Group. Attribute Groups can contain one or more attributes and can be referenced in SUM and AVG aggregation functions in Formulas For more information, refer to Attribute Groups. |
| Maximum Field Length: |
This value determines the maximum number of characters that can be input into the field. The valid range for this value is 1 through 255. |
| Validation: |
There are five validation options: Check Currency, Check Currency in Range, Check Currency for Maximum, Check Currency for Minimum, Check Currency for Non-negative. |
| Maximum Value: | This field contains the maximum monetary value that can be input into the currency attribute. |
| Minimum Value: | This field contains the minimum monetary value that can be input into the currency attribute. The minimum value must be less than the maximum value. |
| Deal Negotiation: |
When Deal Negotiation is enabled for currency-type Commerce attributes, the Last Price Paid can be selected. Administrators can set the following attributes to specify Last Price Paid criteria: Customer Attribute, Net Price Attribute, Date Attribute, and Duration Attribute. This option is only available for sub-document attributes. |
Creates the special customer id field and its attached actions in order to integrate Accounts data.
- The Customer Id attribute is only available for main documents.
- Only one Customer Id attribute can be added per main document.
| Editor Properties | |
|---|---|
| Available Tabs: | General, Default, Modify, Document Views, Mapping |
| Required: |
If this option is selected, the user will be required to enter a value before proceeding. |
| Exclude from XML: |
This selection determines if an attribute is available to include in Email Designer and Document Designer documents. The attribute is available when this option is unselected. |
| Maximum Field Length: |
This value determines the maximum number of characters that can be input into the field. The valid range for this value is 1 through 255. |
Creates an input field and validations for date inputs.The date attribute is displayed as a text box with a date selector tool. This gives the user the option to either enter a date manually or select one from the calendar. An automatic validation runs to ensure that the date complies with the application and user profile information.
Date attributes are available for main documents and sub-documents.
| Editor Properties | |
|---|---|
| Available Tabs: | General, Default, Modify, Document Views, Mapping |
| Required: |
If this option is selected, the user will be required to enter a value before proceeding. |
| Exclude from XML: |
This selection determines if an attribute is available to include in Email Designer and Document Designer documents. The attribute is available when this option is unselected. |
| Includes Time: |
This checkbox determines if a timestamp is included with the date. |
| Maximum Field Length: |
This value determines the maximum number of characters that can be input into the field. The valid range for this value is 1 through 255. |
| Validation: |
There are three validation options: None, Check for Future Date, Check Date in Range. |
| Start Date: |
This field contains the start date value that can be input into the date attribute. This field must be specified if Check Date in Range validation is selected. |
| End Date: |
This field contains the end date value that can be input into the date attribute. This field must be specified if Check Date in Range validation is selected. |
Creates a file attachment field for additional documents, such as proposals or eSignature documents.
File Attachment attributes are available for main documents and sub-documents.
| Editor Properties | |
|---|---|
| Available Tabs: | General, Document Views, Mapping |
| Required: |
If this option is selected, the user will be required to enter a value before proceeding. |
| Exclude from XML: |
This selection determines if an attribute is available to include in Email Designer and Document Designer documents. The attribute is available when this option is unselected. |
| Exclude from PDF Merge: |
This checkbox determines if the file uploaded to this attribute can be merged with the PDF proposal. |
| Allowed Extensions: |
This menu selection specifies that only selected extensions will be supported in the file attachment attribute. |
Creates an input field and validations for floating point numbers.
The Float attribute is available for main documents and sub-documents.
| Editor Properties | |
|---|---|
| Available Tabs: |
General, Default, Modify, Document Views, Mapping |
| Required: |
If this option is selected, the user will be required to enter a value before proceeding. |
| Exclude from XML: |
This selection determines if an attribute is available to include in Email Designer and Document Designer documents. The attribute is available when this option is unselected. |
| Trigger Auto Update: |
If this option is selected, a change of value of this attribute by the user will trigger updates by the system without the user invoking an action. Note: Administrators should note that transaction level Auto Update Before Formulas will not execute for attributes without auto-update enabled. So if an attribute with Trigger Auto Update enabled has formula that references an attribute without auto-update, the attribute with Trigger Auto Update enabled will not execute the Auto Update Before Formulas when the attribute without auto-update is modified. |
| Decimal Places: |
This field determines the number of decimal places that will be supported. The maximum number of decimal places that can be supported is 16. |
| Groups: |
Used to add an attribute to an Attribute Group. Attribute Groups can contain one or more attributes and can be referenced in SUM and AVG aggregation functions in Formulas For more information, refer to Attribute Groups. |
| Maximum Field Length: |
This value determines the maximum number of characters that can be input into the field. The valid range for this value is 1 through 255. |
| Validation: |
There are four validation options: Check Numeric, Check Positive, Check in Range, Check Positive or Zero. |
| Maximum Value: |
This field contains the maximum value that can be input into the float attribute. |
| Minimum Value: |
This field contains the minimum value that can be input into the float attribute. The minimum value must be less than the maximum value. |
| Conversion Group: |
This menu lists available conversion methods. When a conversion class is associated with a float attribute, users can indicate which units they are using when setting attribute values. Customers can use one of the built in conversion classes or they can create their own. The conversion classes are sets of units of measurement with multipliers that will convert values from one unit type to another. Administrators create two attributes; one for input and another for output. The first attribute, which is associated with a conversion class, is the input attribute. The second attribute is the output attribute. When a user enters a value and selects a unit of measure, the converted value will display in the output attribute. For more information about , refer to Implement Unit Conversion Use Case. |
| Conversion Fields: |
When a Conversion Group is selected, this menu lists available conversion units |
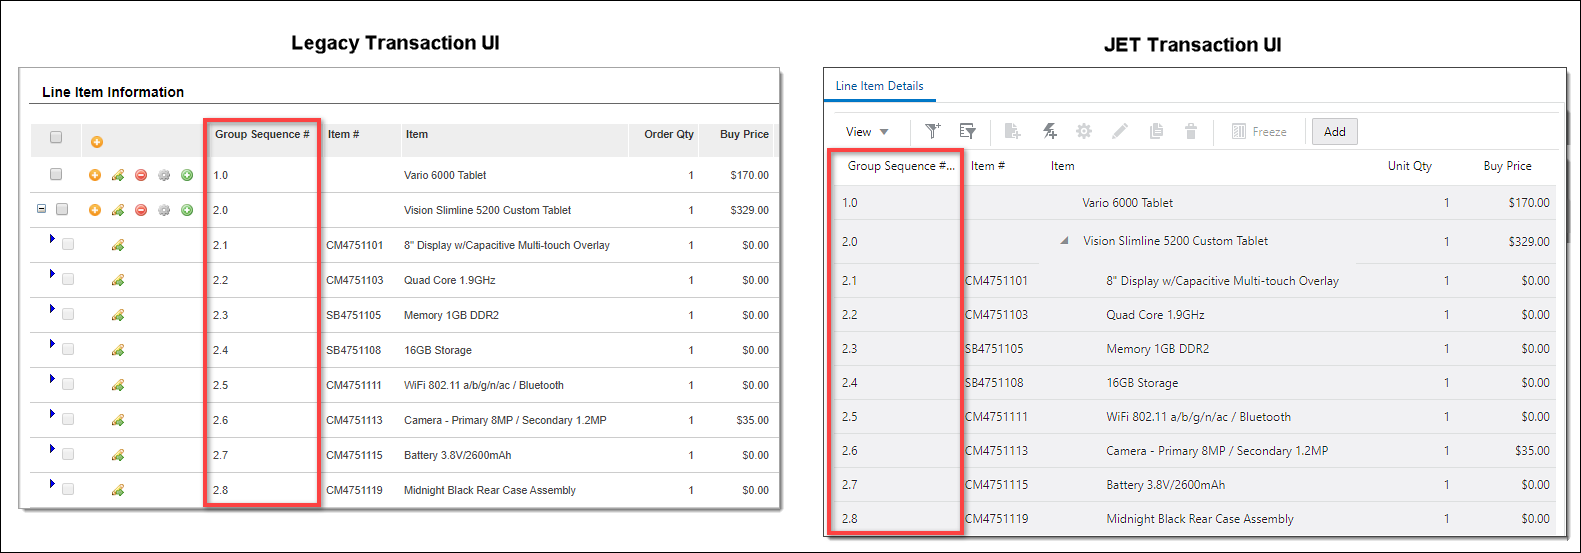
The Group Sequence Number (variable name _group_sequence_number) is an extension of the Sequence Number and represents the hierarchy of each specific line item in the line item grid.
- The Group Sequence Number attribute type is only available for sub-documents.
- Only one Group Sequence Number attribute can be added per sub-document.
- For more information, refer to Enabling Group Sequence Number.
End users can view recommended items and child line items with sequence numbers that are counted based on the parent line item's sequence.
Example: A parent line item can have a group sequence number of 1 and then the child items will have group sequence number of 1.1, 1.2, 1.3... and so on. This functionality is enabled when you add the _group_sequence_number attribute to the attribute list and the line item grid instead of _sequence_number.
| Editor Properties | |
|---|---|
| Available Tabs: | General, Default, Modify, Document Views, Mapping |
| Required: |
If this option is selected, the user will be required to enter a value before proceeding. |
| Exclude from XML: |
This selection determines if an attribute is available to include in Email Designer and Document Designer documents. The attribute is available when this option is unselected. |
| Maximum Field Length: |
This value determines the maximum number of characters that can be input into the field. The valid range for this value is 1 through 255. |
Creates a text area field which always appends the new input along with the user's name and time. This attribute can not be cleared or edited. This attribute type is not expected to automatically update but rather is updated by other actions.
The History attribute is available for main documents and sub-documents.
| Editor Properties | |
|---|---|
| Available Tabs: | General, Modify, Document Views, Mapping |
| Exclude from XML: |
This selection determines if an attribute is available to include in Email Designer and Document Designer documents. The attribute is available when this option is unselected. |
Creates an input field and validations for integer numbers.
The Integer attribute is available for main documents and sub-documents.
| Editor Properties | |
|---|---|
| Available Tabs: |
General, Default, Modify, Document Views, Mapping |
| Required: |
If this option is selected, the user will be required to enter a value before proceeding. |
| Array Control Attribute: |
Array Control Attributes can be used to set the size of an array set. Enabling this option designates the attribute as an Array Control Attribute. Array Control Attributes can be associated with multiple array sets. |
| Exclude from XML: |
This selection determines if an attribute is available to include in Email Designer and Document Designer documents. The attribute is available when this option is unselected. |
| Trigger Auto Update: |
If this option is selected, a change of value of this attribute by the user will trigger updates by the system without the user invoking an action. Note: Administrators should note that transaction level Auto Update Before Formulas will not execute for attributes without auto-update enabled. So if an attribute with Trigger Auto Update enabled has formula that references an attribute without auto-update, the attribute with Trigger Auto Update enabled will not execute the Auto Update Before Formulas when the attribute without auto-update is modified. |
| Groups: |
Used to add an attribute to an Attribute Group. Attribute Groups can contain one or more attributes and can be referenced in SUM and AVG aggregation functions in Formulas For more information, refer to Attribute Groups. |
| Maximum Field Length: |
This value determines the maximum number of characters that can be input into the field. The valid range for this value is 1 through 255. |
| Validation: |
There are four validation options: Check Numeric, Check Positive, Check in Range, Check Positive or Zero. Commerce integer attributes with range validation will no longer validate 0 if 0 is out of range. |
| Maximum Value: |
This field contains the maximum value that can be input into the float attribute. |
| Minimum Value: |
This field contains the minimum value that can be input into the float attribute. The minimum value must be less than the maximum value. |
| Enable Price Score: |
When Price Score is enabled, administrators can select the Price Score Method and the attributes used in the calculation. For more information, refer to the Deal Management Price Score topic. |
The Language attribute can be created at the Quote/Transaction-level and placed on the Commerce layout. When linked to a Print or Email action, the value of the Language attribute specifies what language the Document Designer template that is linked to the action should be outputted in upon printing. A Language attribute menu now exists on the XSL Views tab of Print and Email actions in order to associate a Language attribute with the action.
The Language attribute type is only available for main documents.
| Editor Properties | |
|---|---|
| Available Tabs: | General, Default, Modify, Document Views, Mapping |
| Required: |
If this option is selected, the user will be required to enter a value before proceeding. |
| Exclude from XML: |
This selection determines if an attribute is available to include in Email Designer and Document Designer documents. The attribute is available when this option is unselected. |
| Constrained Menu Option Behavior: |
This selection determines is constrained options are hidden or disabled. |
| Trigger Auto Update: |
If this option is selected, a change of value of this attribute by the user will trigger updates by the system without the user invoking an action. Note: Administrators should note that transaction level Auto Update Before Formulas will not execute for attributes without auto-update enabled. So if an attribute with Trigger Auto Update enabled has formula that references an attribute without auto-update, the attribute with Trigger Auto Update enabled will not execute the Auto Update Before Formulas when the attribute without auto-update is modified. |
| Menu Entry: |
This option allows the administrator to select which languages are listed in the language menu. |
Creates a menu field which may be multi-select or single select.
The Menu attribute type is available for main documents and sub-documents.
| Editor Properties | |
|---|---|
| Available Tabs: |
General, Default, Modify, Document Views, Mapping |
| Required: |
If this option is selected, the user will be required to enter a value before proceeding. |
| Array Control Attribute: |
Array Control Attributes can be used to set the size of an array set. Enabling this option designates the attribute as an Array Control Attribute. Array Control Attributes can be associated with multiple array sets. |
| Exclude from XML: |
This selection determines if an attribute is available to include in Email Designer and Document Designer documents. The attribute is available when this option is unselected. |
| Menu Type: | This field is used to specify if the menu attribute is a Single-Select or Multiselect Menu. |
| Constrained Menu Option Behavior: | This selection determines is constrained options are hidden or disabled. |
| Trigger Auto Update: |
If this option is selected, a change of value of this attribute by the user will trigger updates by the system without the user invoking an action. Note: Administrators should note that transaction level Auto Update Before Formulas will not execute for attributes without auto-update enabled. So if an attribute with Trigger Auto Update enabled has formula that references an attribute without auto-update, the attribute with Trigger Auto Update enabled will not execute the Auto Update Before Formulas when the attribute without auto-update is modified. |
| Menu Population |
This section is used to create options for the menu attribute.
Menu items appear in the order they are listed in the Current Menu Entries list box. To reorder the list, highlight an item, and click the corresponding Up or Down button. The Entry Manager can also be used to manage menu items. |
Creates a read-only field for text or HTML.
The Read-only text or HTML attribute type is available for main documents and sub-documents.
| Editor Properties | |
|---|---|
| Available Tabs: |
General, Default, Document Views, Mapping
|
| Exclude from XML: |
This selection determines if an attribute is available to include in Email Designer and Document Designer documents. The attribute is available when this option is unselected. |
Creates the main document Revenue Category attribute that identifies the category of revenue for the sales transaction (e.g. renewal versus new business). When an administrator adds a new Revenue Category type attribute, the Revenue Category (_revenueCategory_t) is generated. This is a Single Select Menu with "New", "Renew", and "Expansion" menu options.
- The Revenue Category attribute is only available for main documents.
- Only one Revenue Category attribute can be added per main document.
- The Revenue Category attribute Variable Name (
_revenue_category_t)is not editable.
| Editor Properties | |
|---|---|
| Available Tabs: | General, Default, Modify, Document Views, Mapping |
| Required: |
If this option is selected, the user will be required to enter a value before proceeding. |
| Exclude from XML: |
This selection determines if an attribute is available to include in Email Designer and Document Designer documents. The attribute is available when this option is unselected. |
| Constrained Menu Option Behavior: |
This selection determines is constrained options are hidden or disabled. |
| Trigger Auto Update: |
If this option is selected, a change of value of this attribute by the user will trigger updates by the system without the user invoking an action. Note: Administrators should note that transaction level Auto Update Before Formulas will not execute for attributes without auto-update enabled. So if an attribute with Trigger Auto Update enabled has formula that references an attribute without auto-update, the attribute with Trigger Auto Update enabled will not execute the Auto Update Before Formulas when the attribute without auto-update is modified. |
| Menu Population |
This section is used to manage menu options for the menu attribute. This attribute contains "New", "Renew", and "Expansion" menu options. You can modify the display text for the menu options and provide translations for the display text.
Menu items appear in the order they are listed in the Current Menu Entries list box. To reorder the list, highlight an item, and click the corresponding Up or Down button. The Entry Manager can also be used to manage menu items. |
Creates an attribute that can be populated by the end user on the Commerce document.
The Rich Text attribute is available for main documents and sub-documents.
| Editor Properties | |
|---|---|
| Available Tabs: |
General, Default, Modify, Document Views, Mapping
The Rich Text Editor is used to edit attributes and associated templates. For more information, refer to Rich Text Editor. |
| Required: |
If this option is selected, the user will be required to enter a value before proceeding. |
| Exclude from XML: |
This selection determines if an attribute is available to include in Email Designer and Document Designer documents. The attribute is available when this option is unselected. |
| Manage Templates: |
Allows the user to create a new template or edit an existing template. Full access users can choose to save a template in the Shared Template folder. This makes the template available for other rich text type attributes within the process. The template can also be saved in a folder created automatically for this attribute. This ensures that the template is available for this attribute only. The name of the folder is the same as the variable name of the attribute. |
| Number of characters to show: |
This option determines how many characters are displayed for the attribute summary |
Captures the entry in memory, masking its appearance on the page as it is entered.
- The Secure attribute type is only available for main documents.
- For more information refer to Secure Attributes.
| Editor Properties | |
|---|---|
| Available Tabs: | General, Default, Modify, Document Views, Mapping |
| Required: |
If this option is selected, the user will be required to enter a value before proceeding. |
| Exclude from XML: |
This selection determines if an attribute is available to include in Email Designer and Document Designer documents. The attribute is available when this option is unselected. |
| Maximum Field Length: |
This value determines the maximum number of characters that can be input into the field. The valid range for this value is 1 through 255. |
The Sequence Number (variable name _sequence_number) identifies the line number sequence.
- The Sequence Number attribute type is only available for sub-documents.
- Only one Sequence Number attribute can be added per sub-document.
| Editor Properties | |
|---|---|
| Available Tabs: | General, Default, Modify, Document Views, Mapping |
| Required: |
If this option is selected, the user will be required to enter a value before proceeding. |
| Exclude from XML: |
This selection determines if an attribute is available to include in Email Designer and Document Designer documents. The attribute is available when this option is unselected. |
| Maximum Field Length: |
This value determines the maximum number of characters that can be input into the field. The valid range for this value is 1 through 255. |
Creates an input field for short strings.
The Text attribute is available for main documents and sub-documents.
| Editor Properties | |
|---|---|
| Available Tabs: | General, Default, Modify, Document Views, Mapping |
| Required: |
If this option is selected, the user will be required to enter a value before proceeding. |
| Exclude from XML: |
This selection determines if an attribute is available to include in Email Designer and Document Designer documents. The attribute is available when this option is unselected. |
| Maximum Field Length: |
This value determines the maximum number of characters that can be input into the field. The valid range for this value is 1 through 255. |
Creates a text area field for strings that are greater than 255 characters in length.
The Text Area attribute is available for main documents and sub-documents.
| Editor Properties | |
|---|---|
| Available Tabs: | General, Default, Modify, Document Views, Mapping |
| Required: |
If this option is selected, the user will be required to enter a value before proceeding. |
| Exclude from XML: |
This selection determines if an attribute is available to include in Email Designer and Document Designer documents. The attribute is available when this option is unselected. |
Administration
![]() Add Attributes to a Document
Add Attributes to a Document 
By default, the Document attributes are listed on the Attribute Lists page in the order that they are created. Composite attributes are always listed last.
- Login to Oracle CPQ and navigate to the Admin home page.
-
Navigate to the Attributes List page.
Admin > Process Definition > Documents > Main or Sub-Document Attributes
- Click Add.
-
Enter the Label and Variable Name of the attribute.
The Variable Name field populates automatically. Variable names can only contain alpha-numeric characters and underscores. The entry can be changed before saving, but after saving the value is read-only.
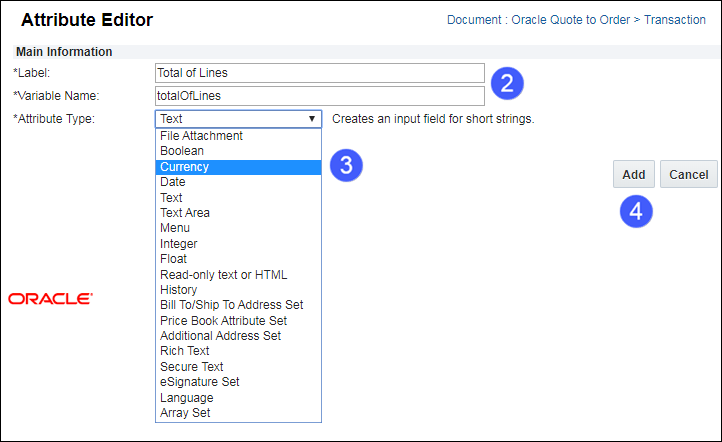
- Choose the Attribute Type from the drop-down.
-
Click Cancel to return to the Attributes List page without saving changes or click Add to save changes and open the Attribute Editor. The other fields on the Attribute Editor page depend on the attribute type.
Notes:
- After creating Document attributes, select one of the attributes to set a tab name for the Commerce Process.
- Tabs are used to designate separate transactions on the Commerce Manager List page.
![]() Edit a Document Attribute
Edit a Document Attribute
- Login to Oracle CPQ and navigate to the Admin home page.
-
Navigate to the Attributes List page.
Admin > Process Definition > Documents > Main or Sub-Document
- Perform one of the following options:
- To edit an individual attribute: Click the attribute name.
- To edit an attribute set: Click the attribute set name. Then click the attribute you want to edit.
-
Edit any of the fields displayed in the Attribute Editor.
To edit the default value, access rights, layout or product mapping, click a tab name and edit the information displayed.
The Variable Name field populates automatically. Variable names can only contain alpha-numeric characters and underscores. The entry can be changed before saving, but after saving the value is read-only.
-
Click Apply to remain on the current page or click Update to return to the Attributes List page. Click Cancel to return to the Attributes List page without saving changes.
Document attributes can be edited at any time.Edits are not visible until the process is deployed (or re-deployed).
![]() Reorder Commerce Attributes
Reorder Commerce Attributes
Complete the following steps to reorder Commerce attributes
-
 Navigate to the Document List page.
-
Click Admin to go to the Admin Home Page.
-
Click Process Definition in the Commerce and Documents section.
The Processes page opens.
- Select Documents from Navigation drop-down for the applicable process.
-
Click List.
The Document List page opens.
-
- Select Attributes from the applicable document Navigation drop-down.
-
Click List.
The Attribute List page opens.
-
Scroll to bottom of page and click Reorder.
Editable text fields appear in the Order column.
- Enter a new order number for the attributes you wish to reorder.
-
Click one of the following actions:
- Apply: saves changes and remains on the page.
- Update: saves changes and returns to the Attribute List page.
- Back: returns to the Attribute List page without saving changes.
Notes:
- You can't reorder auto-generated Standard Process attributes.
- Custom attributes are added after the last auto-generated Standard Process attribute.If multiple custom attributes are added, the custom attributes can be reordered.
![]() Delete a Document Attribute
Delete a Document Attribute
- Login to Oracle CPQ and navigate to the Admin home page.
-
Navigate to the Attributes List page.
Admin > Process Definition > Documents > Main or Sub-Document Attributes
- Select the checkbox next to the desired attribute.
- Click Delete.
-
If you want to delete an entire attribute set, click the <attribute_set_name> and click Delete All.
Warnings:
- When an attribute is deleted, it is simultaneously deleted from all document views. It is not possible to recover the deleted data.
- System attributes cannot be deleted. nor can you delete individual attributes from within an attribute set.
Notes:
- You can't delete auto-generated attributes from a Standard Process. Custom attributes created in a Standard Process can be removed.
- If you delete attributes after deploying, re-map and repopulate your data columns. Otherwise, the Transaction Manager will not work correctly.
- The remaining attribute(s), if any, will be automatically reordered when the page reloads.
![]() Set a Default Value for a Commerce Attribute
Set a Default Value for a Commerce Attribute
-
Navigate to the Attribute Editor page.
- Click Admin to go to the Admin Home Page.
-
Click Process Definition in the Commerce and Documents section.
The Processes page opens.
-
For the process you are interested in, confirm that Documents is selected in the Navigation drop-down menu, and click List.
The Document List page opens.
-
For the main document, confirm that Attributes is selected in the Navigation drop-down menu, and click List.
The Attribute List page opens.
-
Click the name of the attribute for which you want to set a default value.
-
Select the Default tab.
Note: Defaults are provided for auto-generated Standard Process attributes.
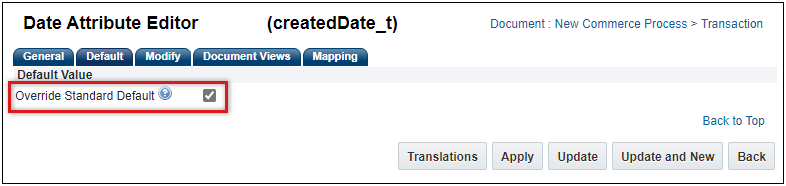
- To customize a default value, select the Override Standard Default option and then click Apply.
- To quickly return to the standard default values, simply uncheck the Override Standard Default option, and then click Apply.
-
Click one of the following radio button options:
Radio Button Options
Description None To not specify a default value, select the None radio button option. System Variable To set a default value based on a System attribute, click this radio button option and choose the System attribute you want to auto-populate the field. Data To set a static value, click this radio button option and enter a default value. Define Function To define a dynamic default value, click this radio button option and click Define Function. Use this advanced function editor to create a function that sets the default value into the field.
Note: BML functions can't be used to populate an RTE attribute, they can only be used to select an existing template that is available for the specified attribute. The "Select a Template" drop-down menu provides a list of available templates.
Refer to Rich Text Editor for information about shared templates.
Select a Template This is only an option for Rich Text attributes. If this option is chosen, then the Rich Text attribute is pre-populated with the selected template. -
Click Apply to remain on the current page or Update to save changes and return to the Attributes List page.
Defaults cannot be set for the following types of attributes: Summation, Read-Only Text, HTML File Attachment, Composite.
![]() Set Modify Behavior for a Commerce Attribute
Set Modify Behavior for a Commerce Attribute
-
Navigate to the Attribute Editor page.
- Click Admin to go to the Admin Home Page.
-
Click Process Definition in the Commerce and Documents section.
The Processes page opens.
-
For the process you are interested in, confirm that Documents is selected in the Navigation drop-down menu, and click List.
The Document List page opens.
-
For the main document, confirm that Attributes is selected in the Navigation drop-down menu, and click List.
The Attribute List page opens.
-
Click the name of the attribute for which you want to set the modify behavior.
-
Select the Modify tab.
-
Select the Process Actions, Transaction, or Transaction Line tab.
Note: Standard modify behavior is provided for auto-generated Standard Process attributes.
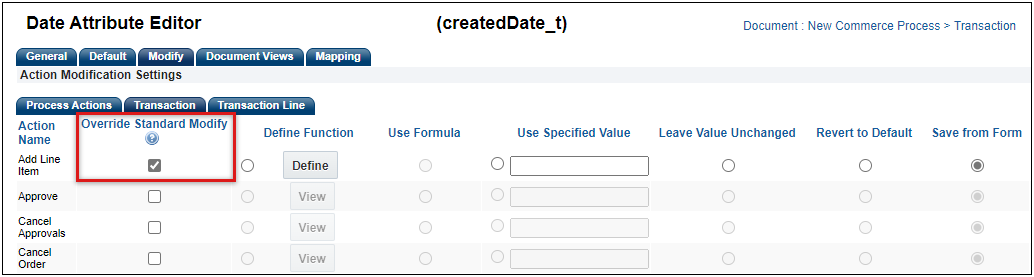
- To customize the modify behavior, select the Override Standard Default option and then click Apply.
- To quickly return to the standard modify behavior, simply uncheck the Override Standard Default option, and then click Apply.
-
Click one of the following radio button options:
Radio Button Options
Description Define Function To define a dynamic default value, click this radio button option and click Define Function. Use this advanced function editor to create a function that sets the default value into the field.
Note: BML functions can't be used to populate an RTE attribute, they can only be used to select an existing template that is available for the specified attribute. The "Select a Template" drop-down menu provides a list of available templates.
Refer to Rich Text Editor for information about shared templates.
Use Formula Use this option to modify the action based on a formula created using Formula Management. Use Specified Value Used to specify a specific value for an attribute's value when the associated modify action is invoked. Leave Value Unchanged Used to leave the attribute's value when the associated modify action is invoked. Revert to Default When the Revert to Default option is enabled, Oracle CPQ uses the default value set for the attribute itself. This option is useful for picking up the current date and time, one of the many uses you can choose this option for. Save from Form Saves values that were entered by the user. Click Apply to remain on the current page or Update to save changes and return to the Attributes List page.
Modify behavior cannot be set for the following types of attributes: Summation, Read-Only Text, HTML File Attachment, Composite.
![]() View Related Rules Associated with a Commerce Attribute
View Related Rules Associated with a Commerce Attribute
- Navigate to the Attribute List page.
- Click Admin to go to the Admin Home Page.
Click Process Definition in the Commerce and Documents section.
The Processes page opens.
For the process you are interested in, confirm that Documents is selected in the Navigation drop-down menu, and click List.
The Document List page opens.
For the main document, confirm that Attributes is selected in the Navigation drop-down menu, and click List.
The Attribute List page opens.
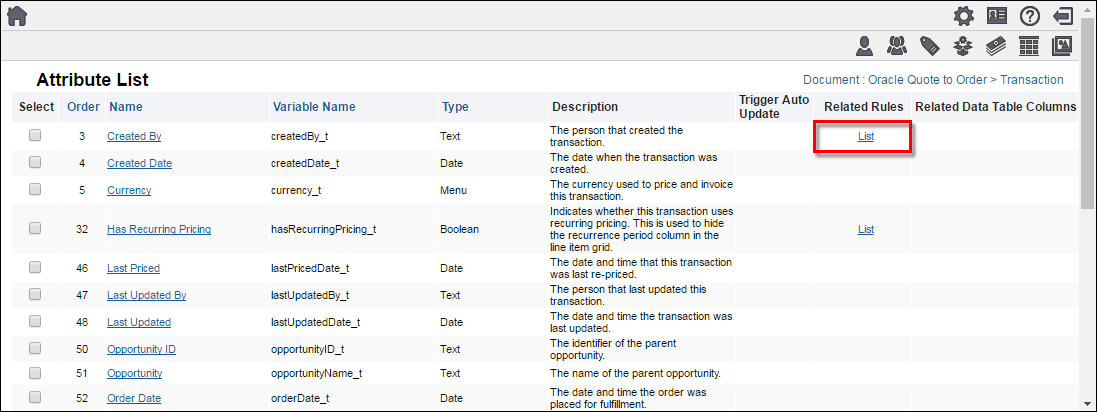
-
For an attribute with List in the Related Rules column, click List.
The List of Related Rules page opens.
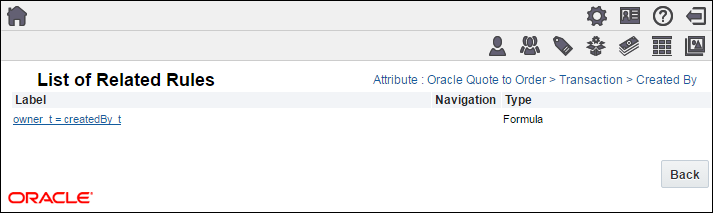
- Open the related rules using one of the following methods.
- Click Edit Function to open a function editor where the attribute is referenced, with the relevant script.
If there is no Edit Function link, click the Label link to view the related rule.
In this example, click owner_t=createdBy_t ) to open the Function Editor with the relevant script.
![]() Add Commerce System Variables to Documents
Add Commerce System Variables to Documents
You can display Commerce System attributes on documents or make them hidden and only use them in document calculations. When Commerce System attributes are mapped to document attributes, the variable values are determined once, at document creation time. To gain access to System attribute values at other times in a document's existence, you can return them in functions associated with Modify Commerce actions.
-
Create a Document attribute.
Most Commerce System variables are string types that can be quickly displayed using a text attribute.
- To associate a system variable value with the attribute, do one of the following:
- For Text attributes: After defining the attribute name, variable name and attribute description, click the Default tab and enable the System Variable radio button. Then highlight the system variable you want to display.
- For Numeric attributes: After defining the attribute name, variable name, attribute description, and any validation fields, click the Default tab and enable the Function radio button. Click Define Function, mark the system variable you want to display, scroll to the bottom of the window and click Next. In the Editor window, enter:
return (<_variable_name>);
- Click Finish.
XML Example
<current_date><![CDATA[ 05/31/2002 12:54PM ]]></current_date>
<supplier_base_currency><![CDATA[ USD ]]></supplier_base_currency>
<user_currency_pref><![CDATA[ AUD ]]></user_currency_pref>
<currency_conv_rate><![CDATA[ 1.79624 ]]></currency_conv_rate>
To enable Group Sequence Numbers complete the following steps.
-
Verify there is a Group Sequence Number sub-document (line) attribute with the variable name
_group_sequence_number.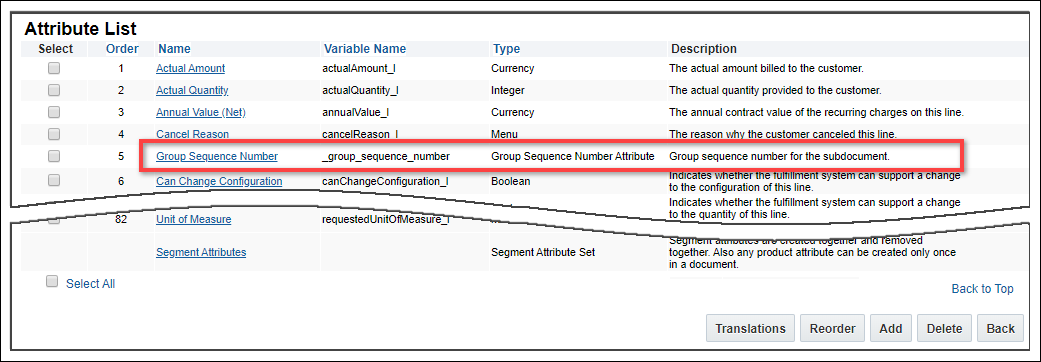
If the 'Group Sequence Number' attribute does not exist, complete the following steps to add the attribute:
- Scroll to the bottom of the sub-document Attribute List page and click Add.
- Select Group Sequence Number Attribute from the Attribute Type drop-down menu.
- Click Add, and then click Update.
-
Add the Group Sequence Number to the Line item Grid in the Main Document Layout Editor.
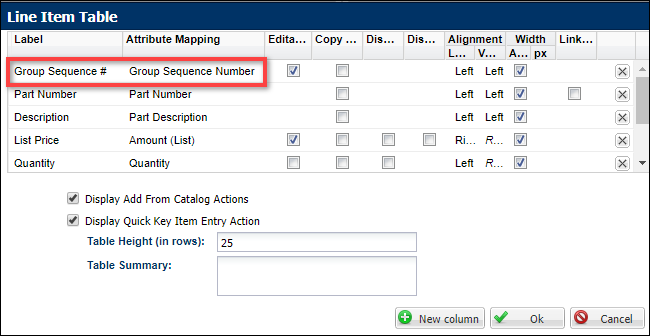
Notes:
- For detailed instructions, refer to Line Item Tables in Legacy Desktop Editor and JET Responsive Editor.
- Group Sequence Number functionality is independent of Sequence Number.
- Group Sequence Number should not be used in conjunction with Sequence Number.
![]() Use Case - Auto Update Sub-Document Attributes
Use Case - Auto Update Sub-Document Attributes
Administrators add Boolean, Currency, Date, Float, Integer, Menu, Text, and Text Area attributes to the output of their auto update action. Then when an end user triggers the auto update function, the function will modify the value of the specified attribute.
Sample Auto Update Use Case
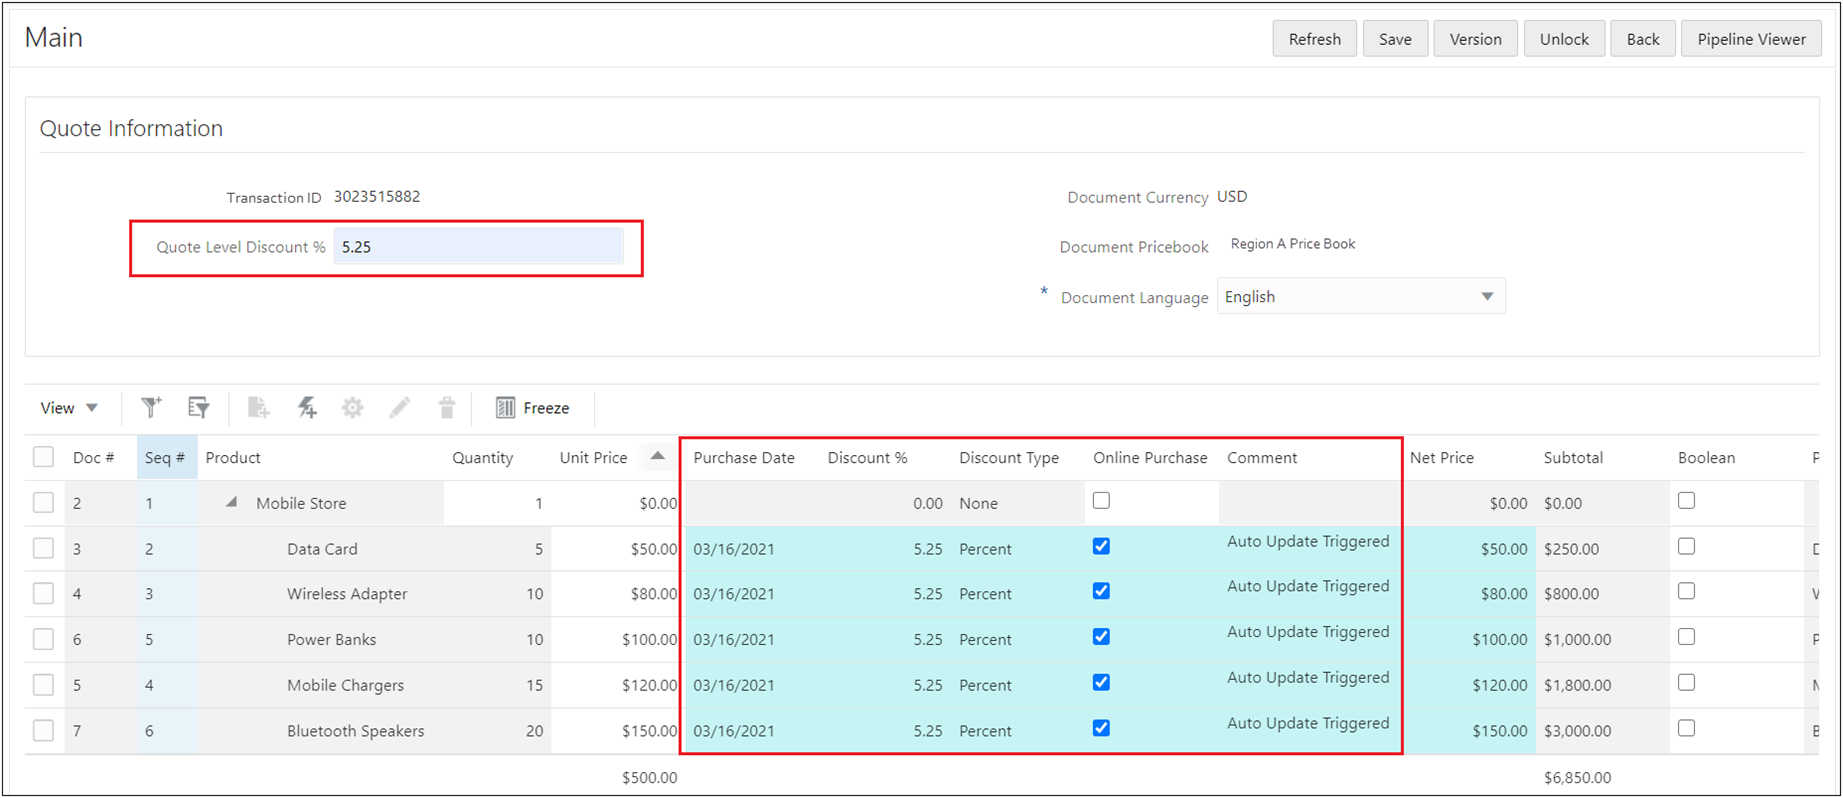
An end user may want to specify a quote-level discount percent to auto update all line items rather than manually entering a discount value for each line item, as follows:
-
Define the main doc-level attribute Quote Level Discount % with Trigger Auto Update selected. In this case Quote Level Discount is a Float attribute.
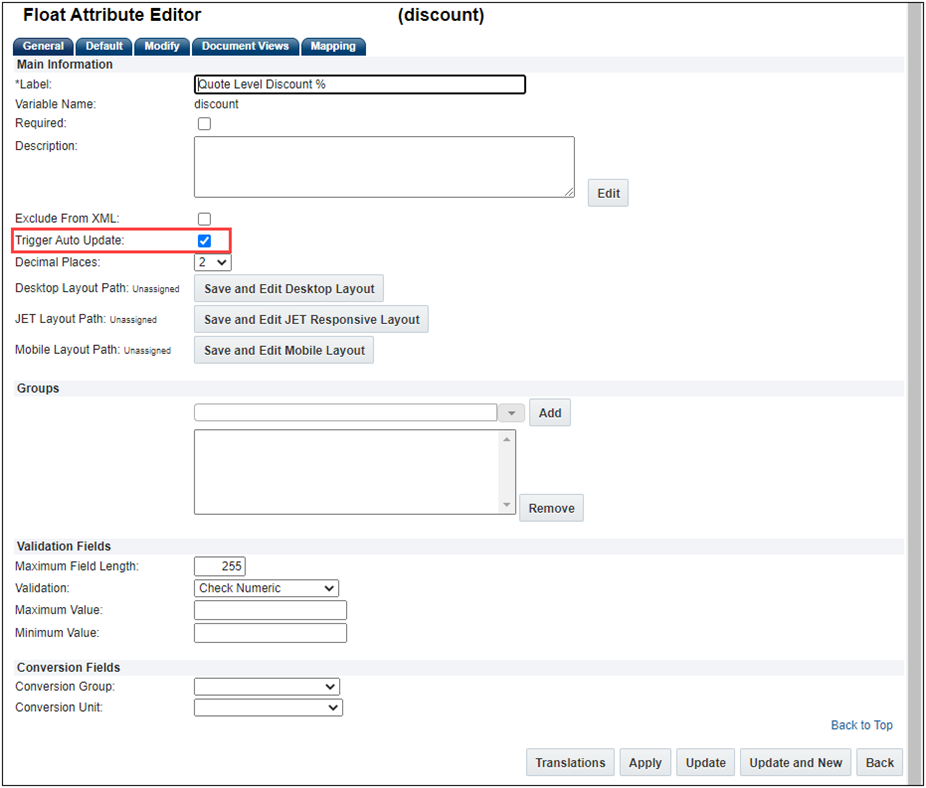
-
Define the BML Function for the Auto Update – Before Formula of the main doc calling out the Line Item attributes to auto update.
-
Once a Quote Level Discount % value is entered, the quote will auto update and apply the discount value to the applicable line item attributes including the Purchase Date, Discount %, and Override Discount.
-
Auto update of Commerce Boolean, Date, Single-Select Menu, Multi-Select menu, Commerce Dynamic Menu, and Text Area attributes is only applicable to the JET User Interface. This functionality is not supported using mobile or the legacy UI.
-
In Oracle CPQ 21A and earlier, non-supported attributes can be included in an auto update BML script. When the BML script is run these unsupported attributes types are skipped. Be advised that during Oracle CPQ 21B upgrade, Commerce Boolean, Date, Menu, and Text Area attributes included in an auto update BML script will no longer be skipped and will auto update accordingly.
![]() Prevent Posting of Read-Only Fields
Prevent Posting of Read-Only Fields
An internal property gives Oracle CPQ customers the option to prevent Commerce read-only fields from being posted back to the server after a Commerce action is invoked.
While enabling this property will have nominal impact on performance, it is recommended not to post information back to the server when the data will not have changed since it was last posted.
To enable this property, open a ticket on My Oracle Support.
Notes
- The Summation attribute was deprecated in Oracle CPQ 2016 R1.
- You cannot change the type of a Menu attribute if it is already on a layout.
- User are prevented from creating or adding Quotes from Configuration to Commerce if mandatory items are missing.
- NULL and blank Integer values are treated as separate values:
- NULL= 0
- Blank = ""
- Using NULL as an attribute value is strongly discouraged.
- If you use logic that tests for NULL values in rule conditions or BML, confirm that the logic takes this difference into account.
- Composite, read-only text, and HTML attributes are not editable by the user.
- Attribute range calculations are validated on the Value Punch-In.
- Example: If a value was passed in the URL to Configuration, it will be validated and an error message will appear.
- This affects both Mobile and Desktop.
Custom Variable Name Conventions
In Oracle CPQ 23D, CPQ adopted Oracle CX Sales variable naming conventions for custom items. When an administrator creates a new custom Commerce item, the "_c" suffix is appended to the variable name. The new naming convention for custom variable names provides more consistency for integrations with Oracle Sales.
Beginning in Oracle CPQ 24C, customers can submit a service request to disable the "_c" suffix on variable names for custom Commerce entities (Actions, Analytics, Attributes, Data Columns, Integrations, Library Functions, Rules, Steps, etc.). The "_c" suffix is enabled by default for standard and legacy Commerce processes.
- Customers can submit a Service Request (SR) on My Oracle Support to disable the "_c" suffix on variable names for custom Commerce entities
- When the "_c" is disabled, the "_c" variable name suffix will not be required for newly created custom Commerce entities.
- Disabling the "_c" variable name suffix for custom Commerce entities will not change existing variable names.
- The "_c" suffix setting will not impact existing variable names when cloning a Commerce process or migrating Commerce items. Target variable names will be the same as the variable names from the source Commerce process.
Transaction data is stored indefinitely unless archived. This includes file attachments, which are treated the same as transaction data.
Refer to Archiving Transactions for additional information.


