Overview
Introduced in Oracle CPQ 19B, the JET Configuration UI (also known as the JET Responsive Configuration UI) provides a modernized and fully responsive user experience allowing users to view and edit Configurations across multiple device types using the same Configuration layout. The responsive design provides layouts that can flow vertically to fit within different browser display widths and features a rich set of modern UI components with built-in accessibility and mobile support.
Oracle CPQ is committed to making our product accessible, which includes supporting the use of assistive technology such as keyboard access, screen readers, and screen magnifiers. See Accessibility Support
JET Configuration UI Features
When customers enable the JET Responsive layout, the new layout is generated based on the contents and layout of the Legacy Desktop Configuration. The JET Configuration UI and the Legacy Configuration UI use the same Desktop Layout, which differs from Commerce where the JET Transaction UI and the Legacy Transaction UI have their own Desktop Layout. Oracle CPQ retains most of the functionality from prior releases and users gain improvements from the new JET layout components, including several Price Table and Item List enhancements. Future releases will build upon the functionality of the new JET UI, prioritized based on customer feedback. Full parity of functionality is the ultimate goal of the JET Configuration UI.
![]() Multi-Charge Price in Configuration
Multi-Charge Price in Configuration
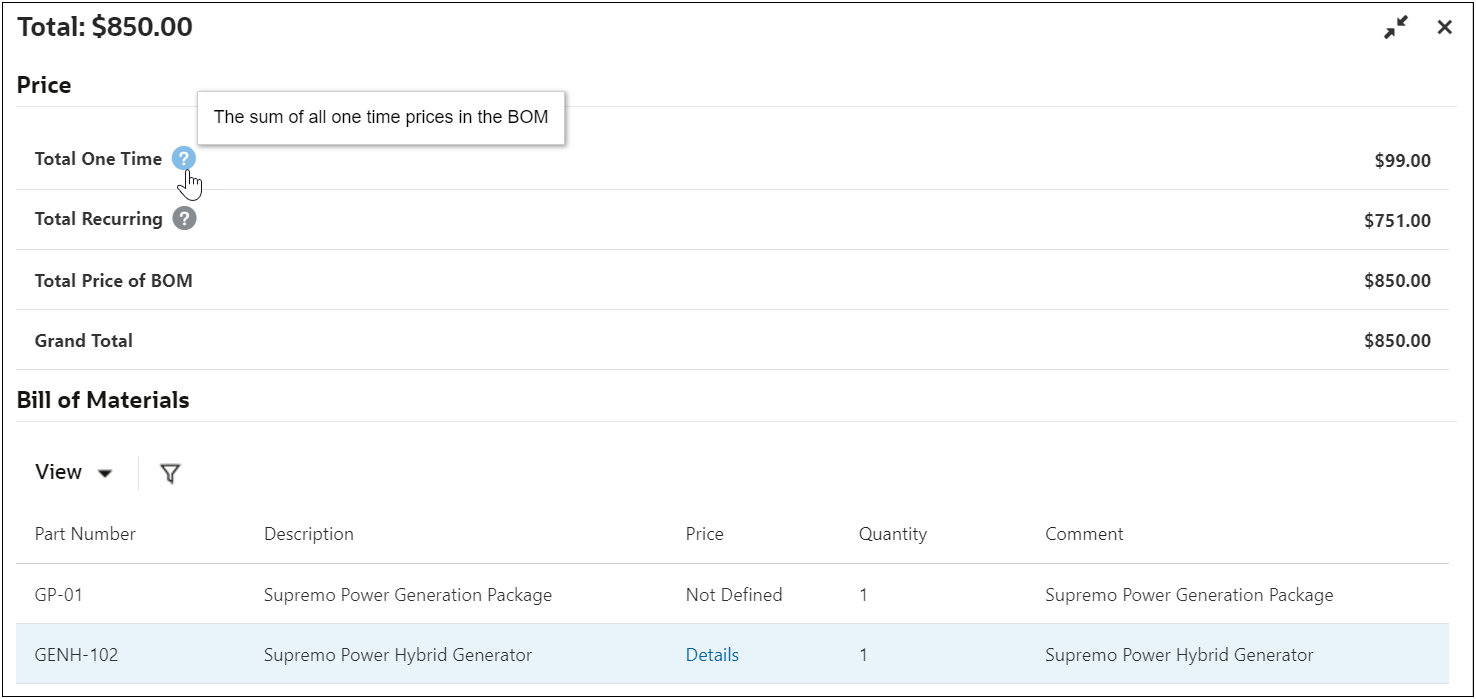
Beginning in Oracle CPQ 23C, the Bill of Materials panel will display multiple charges where applicable. When there is more than one price associated with a BOM item, the price value will be replaced with a link with the phrase "Details". Clicking on or hovering over the "Details" link will show a popup with specific price information.

Beginning in Oracle CPQ 23C, the Prices panel will display subtotals for the One-Time and Recurring charges. Customers can view subtotals for the One-Time and Recurring charges in the Configuration Prices panel. To view more information about the multiple changes they hover over or click on the Details link in the Bill of Materials panel.
The System Navigation Panel displays the hierarchical arrangements of configurable models within a system root item. Oracle CPQ 23A improves usability of the System Navigation Panel by expanding display options for the JET Configuration UI.
![]() "Sticky" System Navigation Panel
"Sticky" System Navigation Panel
Beginning in Oracle CPQ 23A, the system navigation panel will remain "sticky" as the user scrolls on the Configuration UI. The "sticky" system navigation panel is automatically enabled and cannot be disabled.
![]() System Navigation Panel Location
System Navigation Panel Location
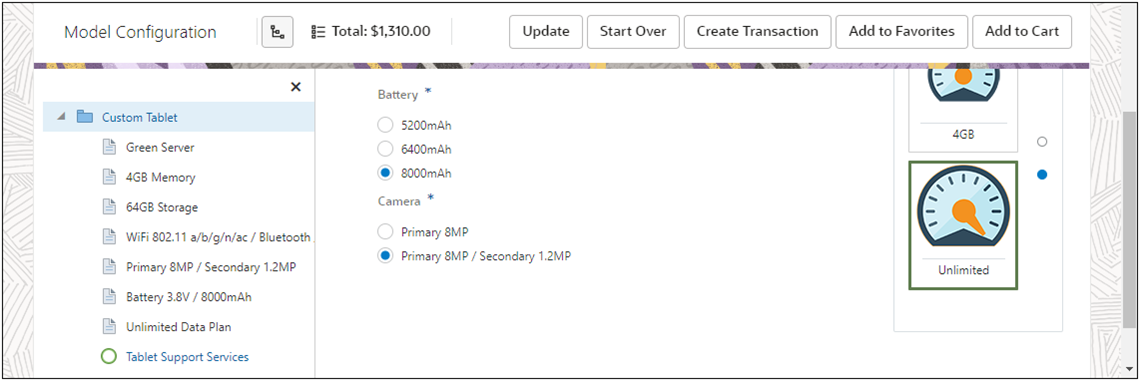
Previously, the System Navigation Panel could only be displayed in the left sidebar on the Configuration UI. Customers can now display the System Navigation in the left sidebar or in the right sidebar. The following image shows the System Navigation Panel displayed in the right sidebar.

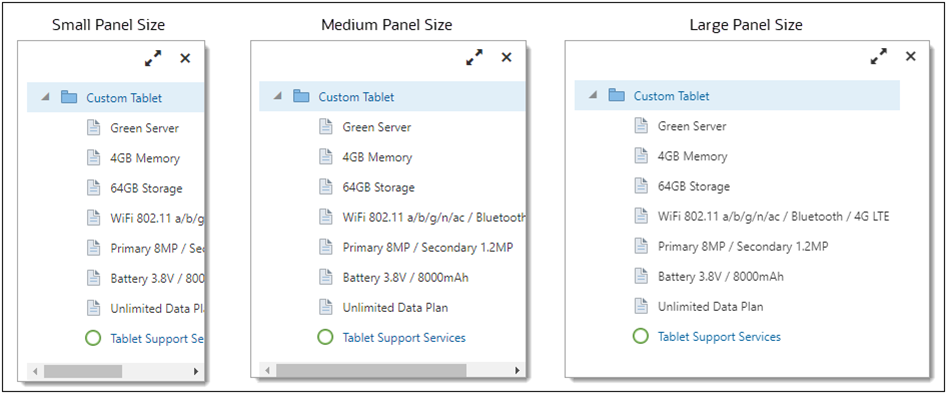
Customers can now display a small, medium, or large panel size when the System Navigation panel is displayed in the left sidebar on the Configuration UI. The medium panel size is the only option available when the System Navigation Panel is displayed in the right sidebar.
Refer to the Configuration Layout Editor to change the size or location of the System Navigation Panel.
Oracle CPQ 21B provides quicker and smoother interactions and implements sticky headers in arrays so headers are visible while scrolling through the array table. Oracle CPQ 21B also delivers several View and Context menu options for JET configuration vertical and horizontal arrays.
![]() Display Indicator Icons in Configuration Arrays
Display Indicator Icons in Configuration Arrays
Beginning in Oracle CPQ 21B, administrators can choose to display indicator icons for easier recognition of editable configuration array fields. Previously, display indicator icons only displayed when a field was selected for editing. Read-only fields will not display these indicators.
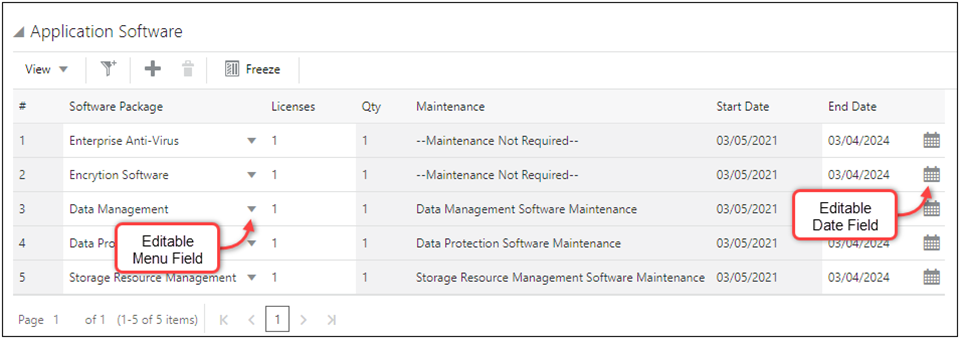
Refer to Display Editable Field Icons in Arrays for instructions to enable this feature.
![]() Enhanced CPQJS Wrapper for Attribute States
Enhanced CPQJS Wrapper for Attribute States
Oracle CPQ 21B introduces new JavaScript methods for attribute states that allow administrators to hide or set attributes to read-only. Custom JavaScript methods can be used to set visible and updatable states, offering administrators greater flexibility in their custom implementations.
Refer to the following resources for more information:
![]() Increased Pagination Limit for JET Configuration Arrays
Increased Pagination Limit for JET Configuration Arrays
In Oracle CPQ 21A and earlier, a maximum of 50 array records could be displayed per page for JET configuration arrays. Beginning in Oracle CPQ 21B, the number of viewable records is increased for configuration arrays.This UI enhancement allows users to view array information easily and reduces the number of pages to click through when displaying arrays with a large quantity of line items.
-
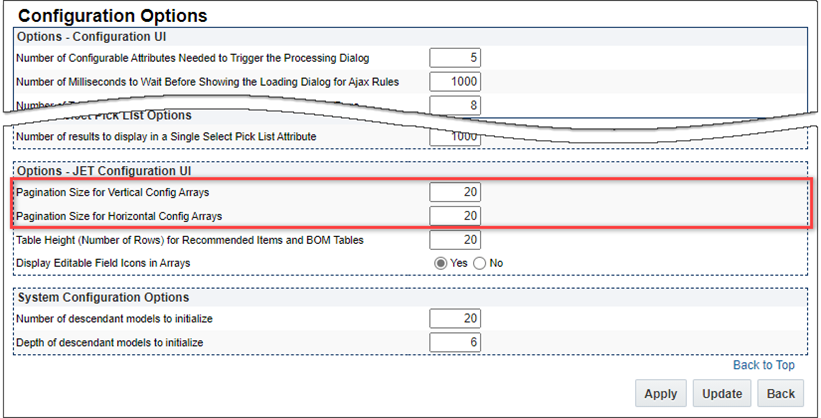
The pagination size limit is increased to 200 records for vertical and horizontal configuration arrays.
Note: Beginning in Oracle CPQ 21B, pagination is automatically enabled for Vertical and Horizontal Arrays in the JET Configuration UI.
![]() Set Pagination Size for Configuration Arrays
Set Pagination Size for Configuration Arrays
To customize page size for configuration arrays, navigate to Admin > Products > Configuration Settings.
![]() Manage Columns for JET Configuration Vertical Arrays
Manage Columns for JET Configuration Vertical Arrays
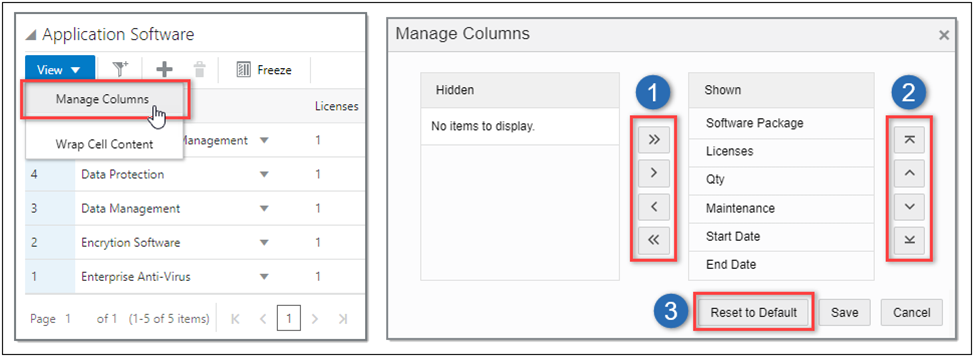
Oracle CPQ 21B provides the Manage Columns dialog for JET configuration vertical arrays. The Manage Columns dialog allows users to quickly hide, show, or reorder multiple columns. In addition, the Reset to Default function returns the array column display options to their default settings. The user's column settings are persistent for the user across sessions.
Users select Manage Columns from the View menu to select columns for the vertical array.
-
To show columns, use the shuttle controls to move columns from the Hidden list to the Shown list.
To hide columns, use the shuttle controls to move columns from the Shown list to the Hidden list.
-
To reorder columns, use the reorder controls for the Shown list to change the column order.
-
Use the Reset to Default function to return the array to default settings.
![]() Manage Rows for JET Configuration Horizontal Arrays
Manage Rows for JET Configuration Horizontal Arrays
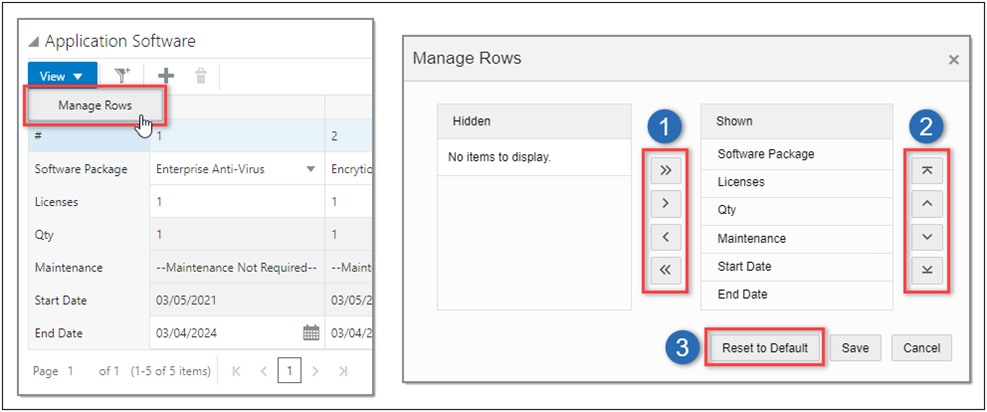
Oracle CPQ 21B provides the Manage Rows dialog for JET configuration horizontal arrays. The Manage Rows dialog allows users to quickly hide or show multiple rows. In addition, the Manage Row dialog provides reorder options and a reset function to return the array row display options to their default settings. The user's row settings are persistent for the user across sessions.
Users select Manage Rows from the View menu to select columns for the horizontal array.
-
To show rows, use the shuttle controls to move rows from the Hidden list to the Shown list.
To hide rows, use the shuttle controls to move rows from the Shown list to the Hidden list.
-
To reorder rows, use the reorder controls for the Shown list to change the row order.
-
Use the Reset to Default function to return the array to default settings.
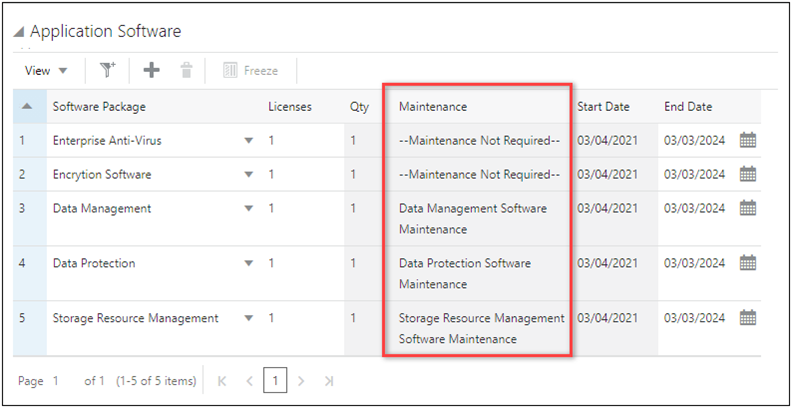
![]() Wrap Cell Content Option for JET Configuration Vertical Arrays
Wrap Cell Content Option for JET Configuration Vertical Arrays
Previously, JET configuration vertical arrays truncated overflowing content and users could hover over the cell to view the full content. To improve usability, Oracle CPQ 21B provides the Wrap Cell Content option in the View menu for the JET vertical array.
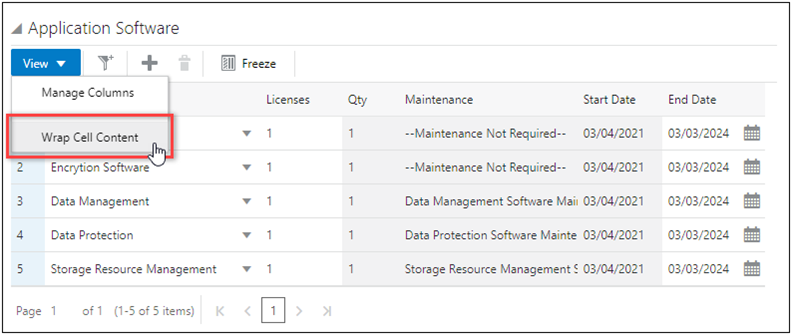
Rows will expand as needed to fit additional lines of content, as shown in the following image.
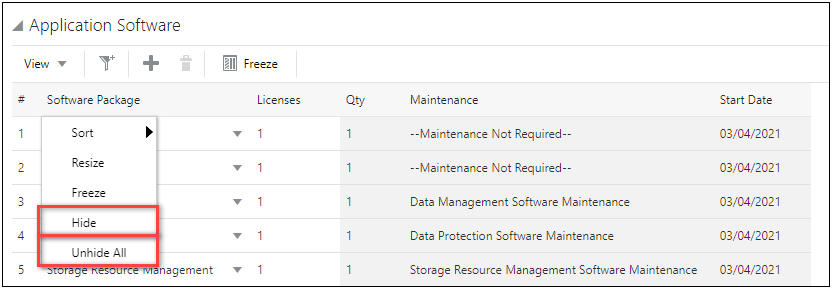
![]() Enhanced Context Menu Actions for Configuration Vertical Array Columns
Enhanced Context Menu Actions for Configuration Vertical Array Columns
Oracle CPQ 21B adds freeze, unfreeze, hide and unhide all actions to the context menu for vertical array column headers.
-
To freeze a column, right-click on the column header and then select Freeze from the context menu.
Alternatively, you can select the column and click the Freeze toggle in the array toolbar.
-
To unfreeze a column, right-click on a frozen column header and then select Unfreeze from the context menu.
Alternatively, you can select the column and click the Freeze toggle in the array toolbar.
-
Freezing columns is not available when wrapped cell content is enabled.
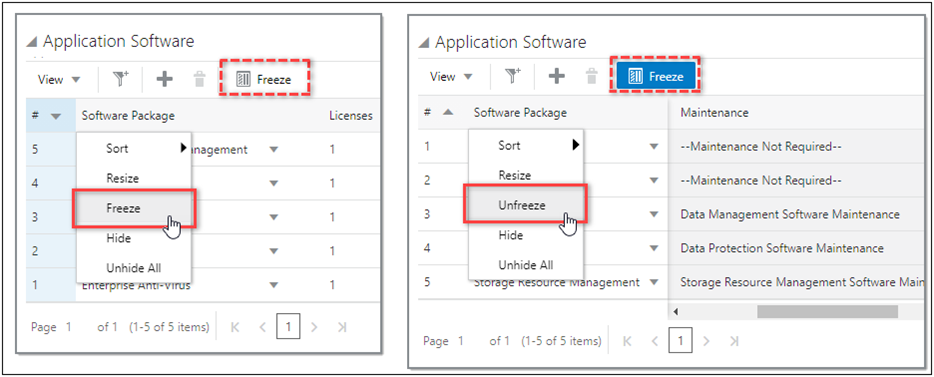
Users can also quickly Hide a column or Unhide All columns from the context menu.
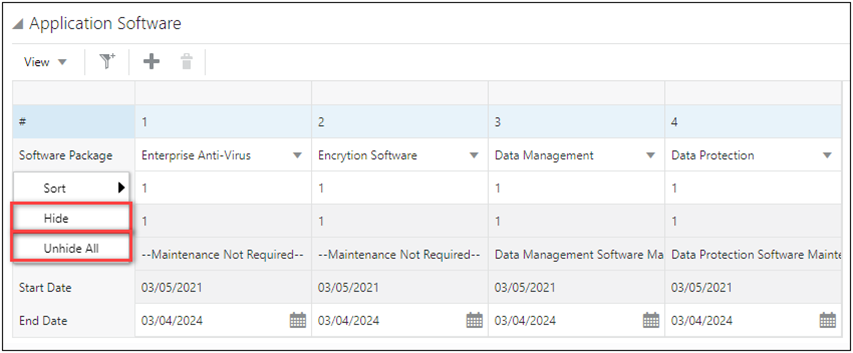
![]() Enhanced Context Menu Actions for Configuration Horizontal Array Rows
Enhanced Context Menu Actions for Configuration Horizontal Array Rows
Similar to the vertical arrays, users can also quickly Hide a row or Unhide All rows from the context menu. The new View and Context menu options provide increased usability for JET configuration arrays
In 20A, Oracle CPQ enhanced the JET Configuration UI by adding the following functionality:
![]() JET UI HTML Help Messages (Oracle CPQ 20A)
JET UI HTML Help Messages (Oracle CPQ 20A)
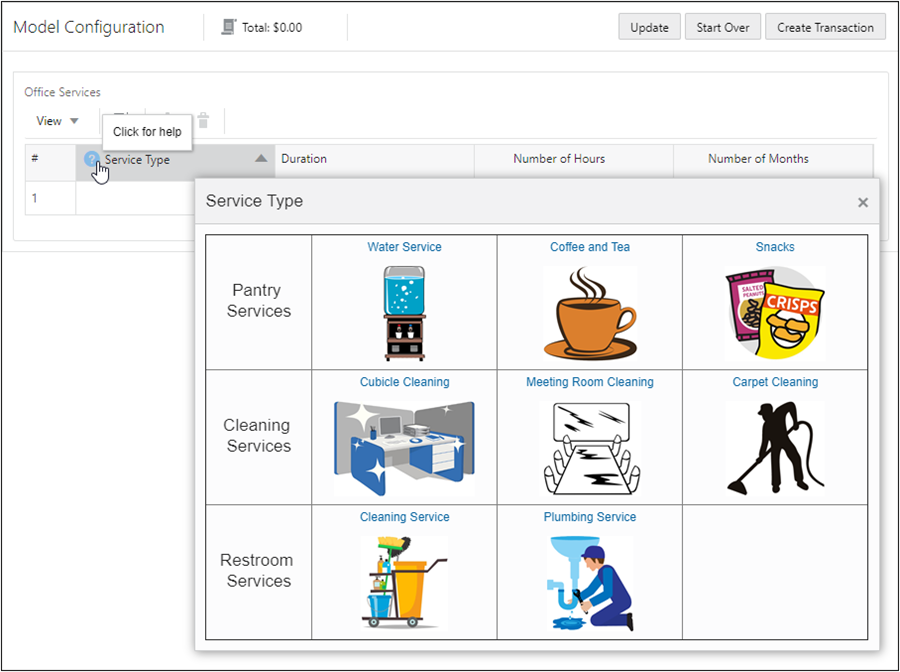
JET UI help messages can display Rich Text, links, and HTML content on the JET Configuration and Transaction UIs. The help icon will display plain text content in a tooltip format if there is no Rich text or HTML content present in that help icon's content.
For example: When HTML/Rich Text content is present, the user is prompted by a tooltip to click the icon which opens a dialog box containing the help information. The dialog box is automatically sized based on the content and browser size. The user can resize, move and close the dialog as desired.
Refer to the Attribute Help Icons topic for detailed help icon information and instructions.
![]() Enable AJAX for Configuration Rules with Array Attribute Inputs
Enable AJAX for Configuration Rules with Array Attribute Inputs
Beginning in Oracle CPQ 20A, administrators can enable AJAX for Configuration Constraint and Hiding rules that have array attributes for rule conditions or actions. Previously, Configuration rules with array attribute inputs were only evaluated if the attributes were set to auto update or if a user clicked the update action. With AJAX enabled, the rules are evaluated and the action is performed instantly when a user changes any rule input.
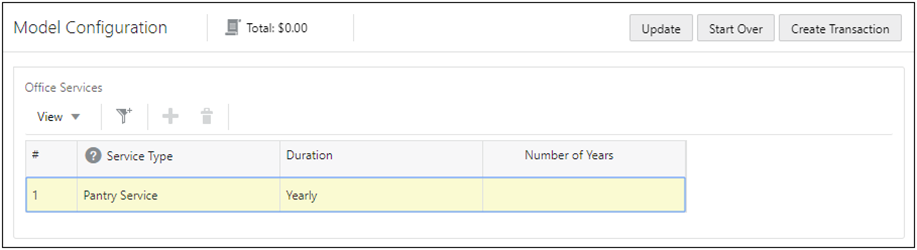
In the following example the administrator set up a rule to hide the Number of Hours, Number of Months, or Number of Years columns when the user selects array attribute item.

For example, when the user selects the "Yearly" Duration item the Number of Hours and Number of Months columns are hidden.
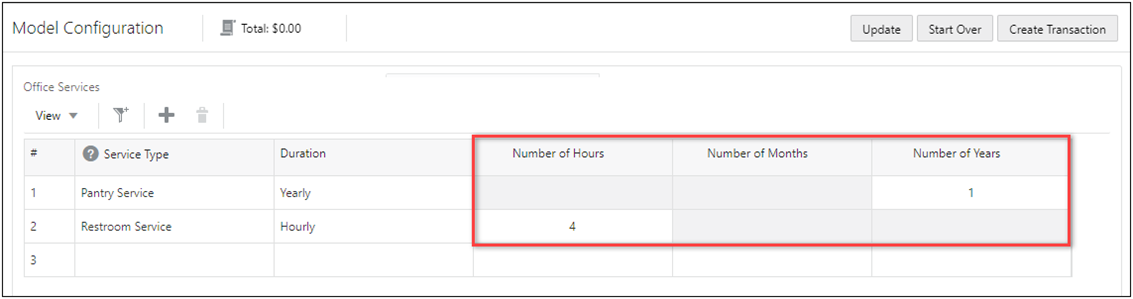
If multiple Duration items are added to the array items hidden items for associated lines are highlighted in gray and are not editable. For example, the Number of Hours and Number of Months cells for the row with a Yearly duration are gray and the Number of Months and Number of Years cells for the row with an Hourly duration are gray.
![]() Default Array Column Width for JET Configuration UI
Default Array Column Width for JET Configuration UI
Oracle CPQ 20A allows administrators to set default horizontal and vertical array column widths for the JET Configuration UI. In prior releases array columns were set to a default of 200px wide. Users will still be able to resize column widths as desired.
Refer to the Configuration Layout Editor - Adding Grids and Grid Elements procedure for detailed instructions to set column widths.
![]() Default Layout Properties, Layout Access Control, and Layout Access Control User Type Settings
Default Layout Properties, Layout Access Control, and Layout Access Control User Type Settings
Note: Beginning in Oracle CPQ 21B, JET UI is set as the default UI for new Configuration Layouts and Layout Access Control.
Changing the default Configuration UI makes it easier for administrators to set up new JET UI Configuration Layouts.
-
As Configuration flows are defined, the Layout Properties will default to the recommended JET UI settings.
-
JET Item List Display: Bottom Panel
-
JET Price Table: Right Sidebar
-
-
Additionally, by default the Mobile Override is set to Yes and access to the JET UI is granted to all user types.
-
By default, JET UI access rights are granted to all User Types and all User Groups
In 19C, Oracle CPQ enhanced the JET Configuration UI by adding the following functionality:
![]() Embedded JET Configuration UI Support
Embedded JET Configuration UI Support
Beginning in Oracle CPQ 19C, Oracle CPQ supports using Client-side integrations to display the JET Configuration UI within an iFrame for external integrations, such as Oracle CX Commerce. Client-side integrations enable the sharing of data between Oracle CPQ and a partner site. When an external user wants to configure a model, the Oracle CPQ JET Configuration UI page is embedded in an iFrame that displays within the integrated application.
Oracle CPQ 19C provides JET UI support for ABO operations. For Modify operations and Follow-on Orders the user can perform Update, Start Over, Add to Transaction, Return to Transaction, and Add to Cart actions. For Reconfigure operations, the user can Cancel or Save the reconfiguration.
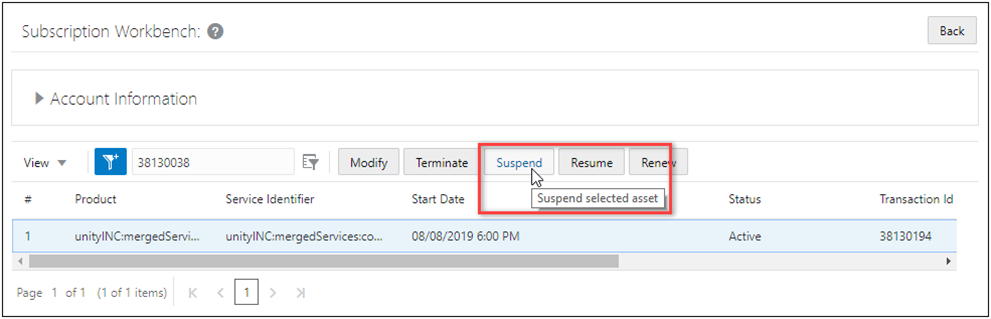
After creating assets, sales users can create a modify order to can perform any of the asset actions (i.e. Suspend, Resume, Renew, Modify, or Terminate).
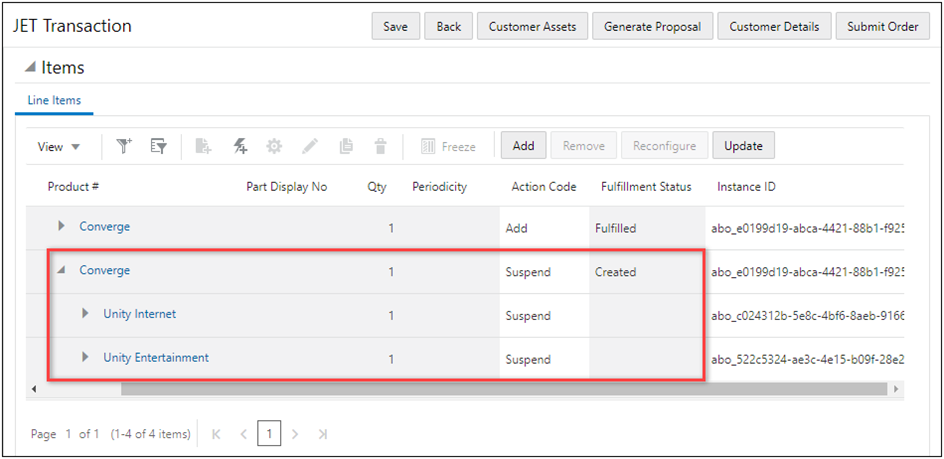
For example, a customer is going on vacation and they want to suspend their entertainment and internet services. The Customer Support Representative creates a new Transaction, enters the Request Date, and then clicks Customer Assets to open the Subscription Workbench to view active assets associated with the customer. The representative selects the appropriate asset and clicks Suspend.
The JET Transaction UI opens and the Action Codes reflect the requested changes, Unity Internet and Unity Entertainment are set to "Suspend".
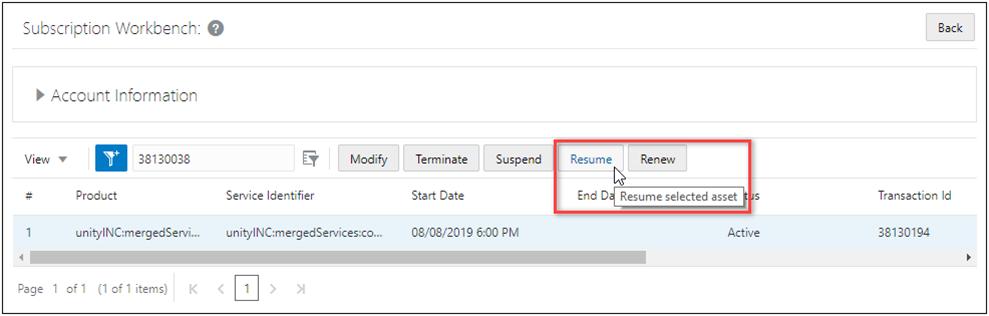
After the customer returns from vacation they want to resume their internet and entertainment services. The Customer Service Representative navigates to the Transaction, updates the Request Date, and then clicks Customer Assets to open the Subscription Workbench. The representative selects the appropriate asset and clicks Resume.
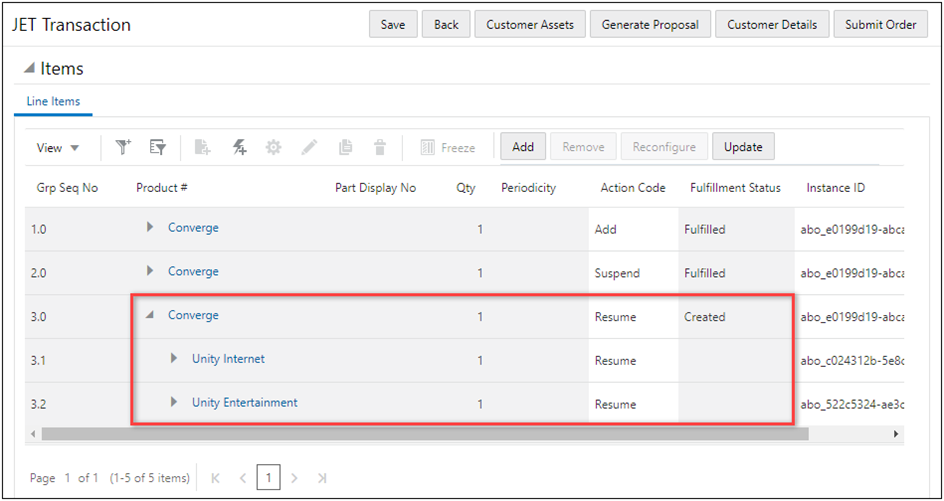
The JET Transaction UI opens and the Action Codes reflect the requested changes, Unity Internet and Unity Entertainment are set to "Resume".
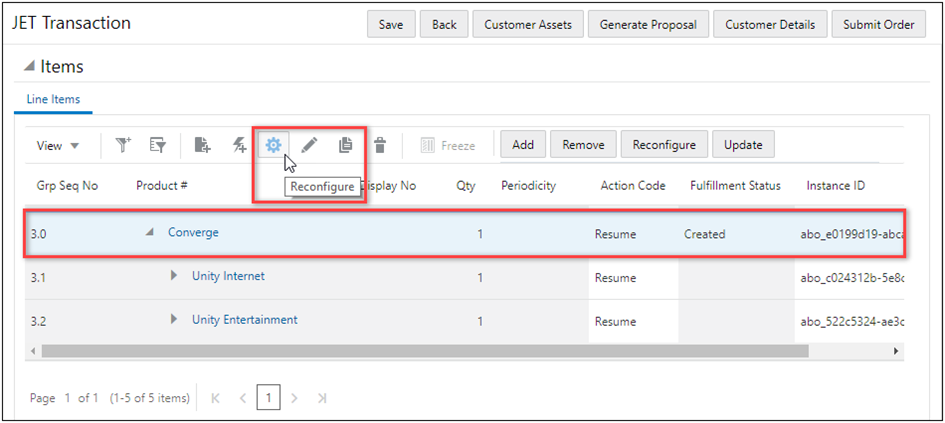
The customer also wants to upgrade their internet service. The Customer Service Representative selects the line item for the root item and clicks the Reconfigure icon.
The JET Configuration UI opens to the root system item. The representative clicks on the Unity Internet sub-model in the system navigation panel.
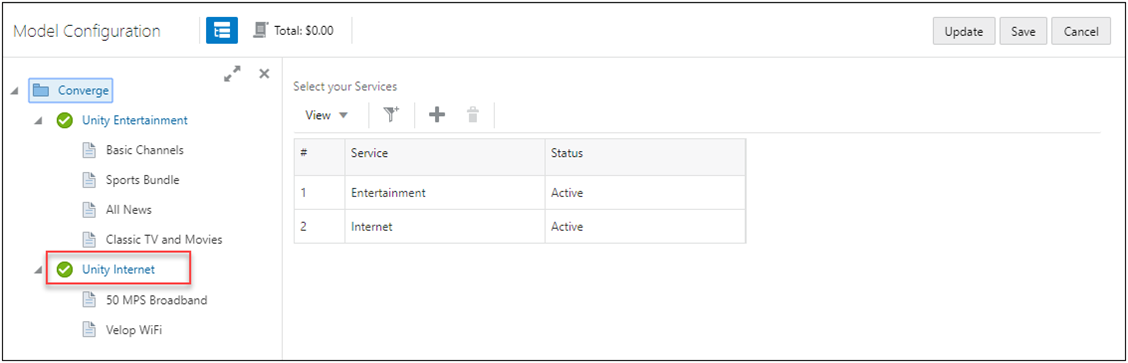
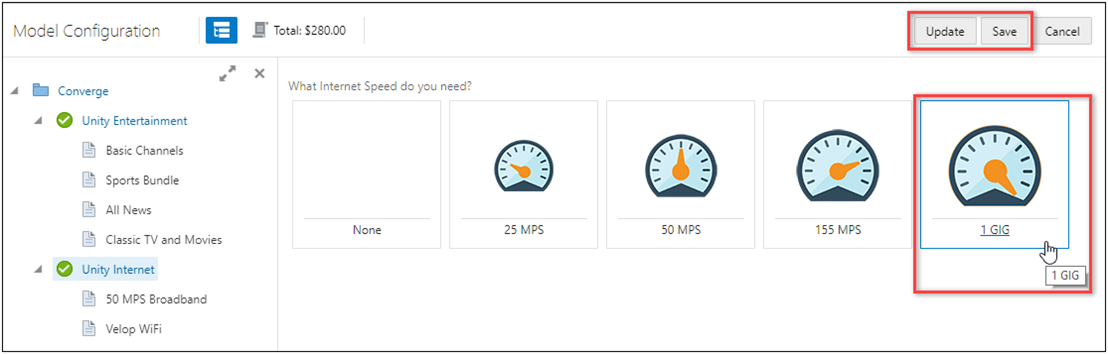
The Unity Internet model configuration opens. The representative upgrades the internet speed to 1 GB, clicks Update, and then clicks Save.
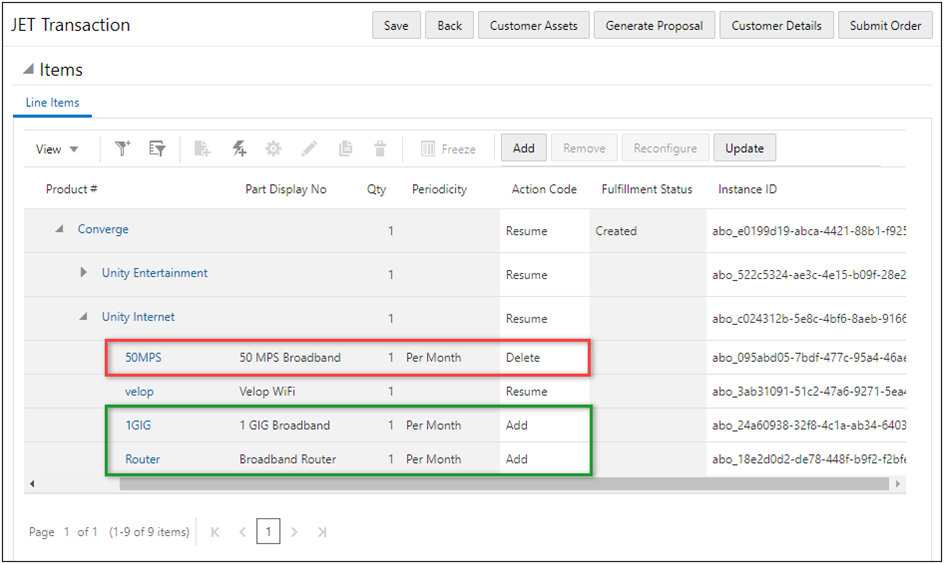
The JET Transaction UI opens and the Action Codes reflect the requested changes: the 50 MPS Broadband is set to "Delete" and 1 GIG Broadband and Broadband Router items are set to "Add".
Notes:
- The JET Configuration UI has been certified with the 19B ABO package and requires elements of that package to function properly with JET.
- To implement 19B ABO package, refer to the Oracle CPQ 19B Asset-Based Ordering Implementation Guide.
Beginning in Oracle CPQ 19C, the JET Configuration UI supports all features of system configurations, which are hierarchical arrangements of configurable models within a system root item. The system navigation panel contains icons to identify the status of models in the system, such as those requiring user action. The system navigation panel will display items that are valid, incomplete, invalid, and will also indicate if models have warnings or errors.
The system navigation panel is initially hidden on the JET Configuration UI. To view the system navigation panel, the user clicks on the system configuration icon.

The system navigation panel is displayed on the left side of the page. The Overlay or Push Content behavior for all JET Configuration UI sidebars is defined in the Configuration Layout Properties. To increase the size of the system navigation panel, users can click on the expand icon. The expand icon is outlined in blue in the following image.

User Access for System Configuration in JET Configuration UI
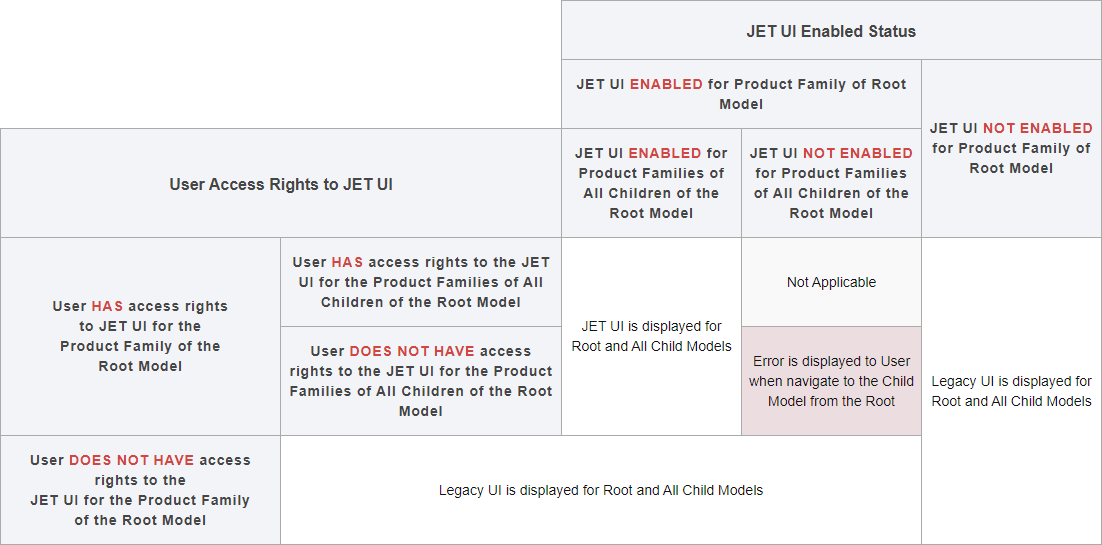
If all Product Families included in a system are JET enabled for a system with cross-family models that are configured so a user has a mix of legacy and JET flows, the Configuration UI that is displayed for a system configuration is determined by the root model. The following table shows the Configuration UI display for mixed legacy and JET flows.
|
JET
Configuration UI Enabled for |
User has JET
Configuration UI |
JET
Configuration UI Enabled for |
|---|---|---|
|
Yes |
Yes |
JET UI displays for the entire system, including child models. |
|
Yes |
No |
Legacy UI displays for the entire system, including child models. |
|
No |
No |
Legacy UI displays for the entire system, including child models. |
As part of CPQ's goal to provide a responsive high-performance JET UI, a Working Indicator is now displayed in the JET Configuration UI header. This provides an immediate, visual indication that the user's action has had an effect. When the user performs an action, such as clicking a button, an animated icon displays beside the page title notifying the user that the activity is being processed.

A tooltip note is available on this icon to provide more details.
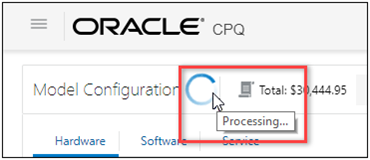
Some or all actions may be temporarily disabled while the system is processing, but the user is able to continue working during this time. Once completed, the indicator changes to show that the processing is complete.

![]() JET Configuration UI Layout Enhancements
JET Configuration UI Layout Enhancements
Enhanced UI features of the JET Configuration UI are defined by enhancements to the administration of attribute and UI layouts. A single configuration flow UI layout is used for both legacy and JET Configuration UIs. The JET-specific features will display only in the JET Configuration UI - when the end user has access rights to the JET Configuration UI for the associated Product Family.
The JET Configuration UI provides the following enhancements:
![]() Price Table and Item List Layout Enhancements
Price Table and Item List Layout Enhancements
Administrators can individually select the placement of price tables and items lists (e.g. recommended items, mandatory items, and BOM items). Right sidebars are initially hidden on the JET Configuration UI. To view the sidebar the user clicks on the Total price button. The following image shows two of the possible display options.
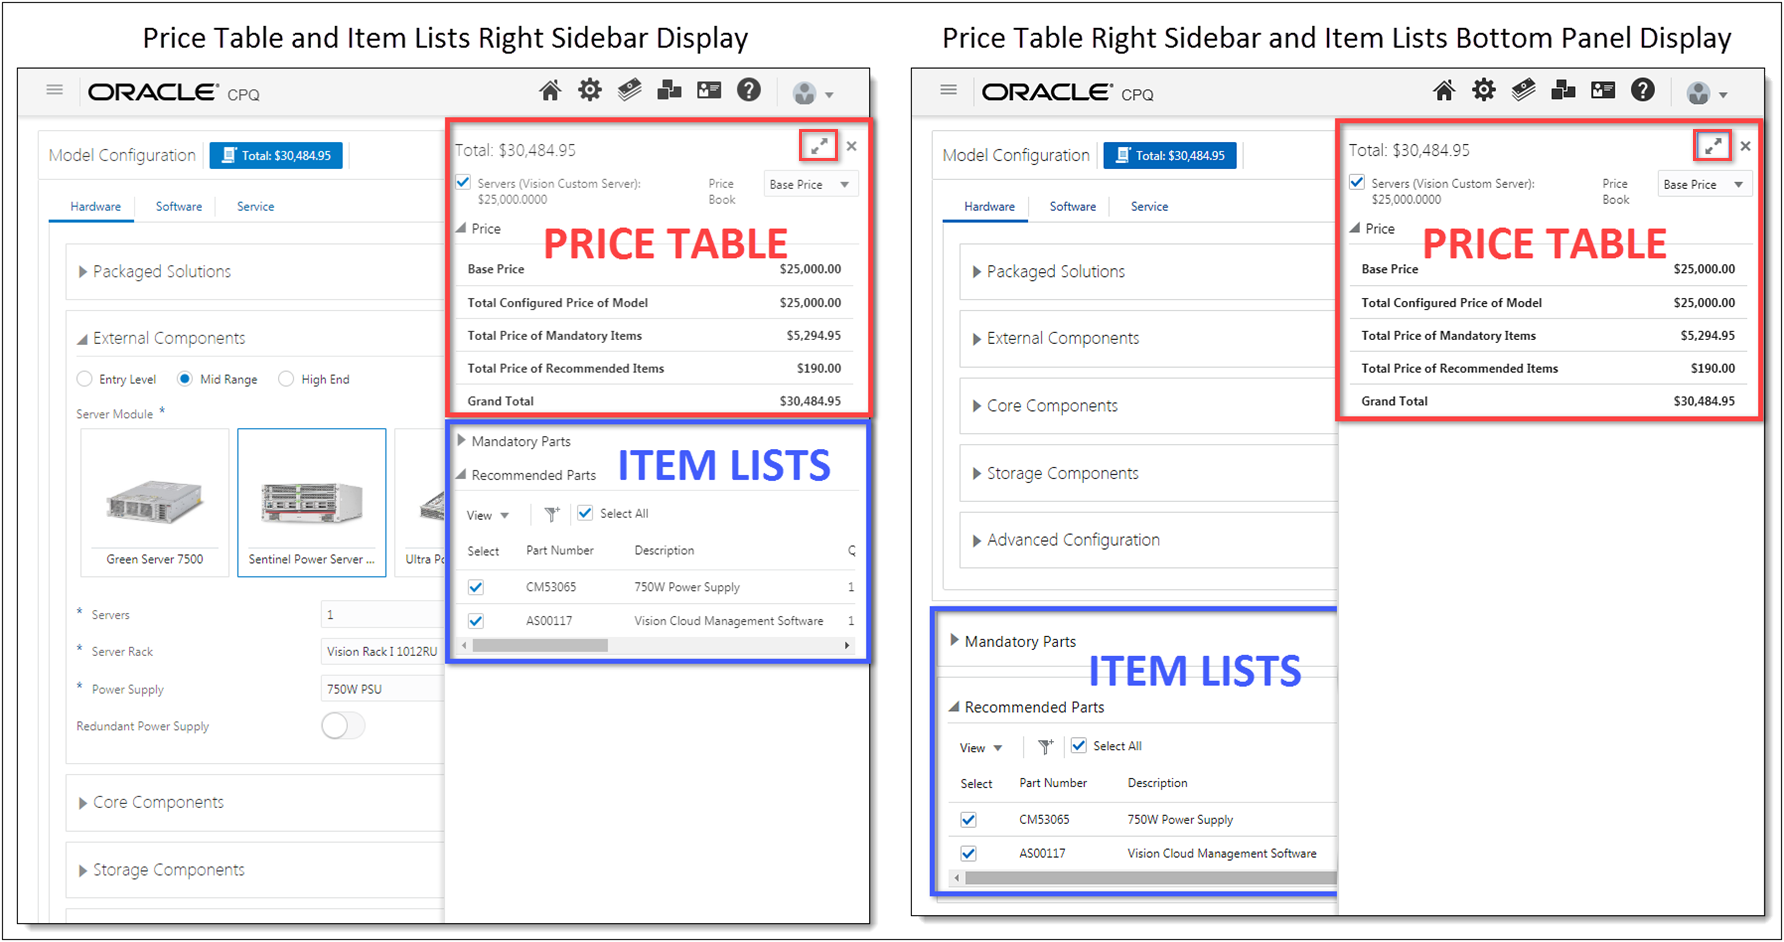
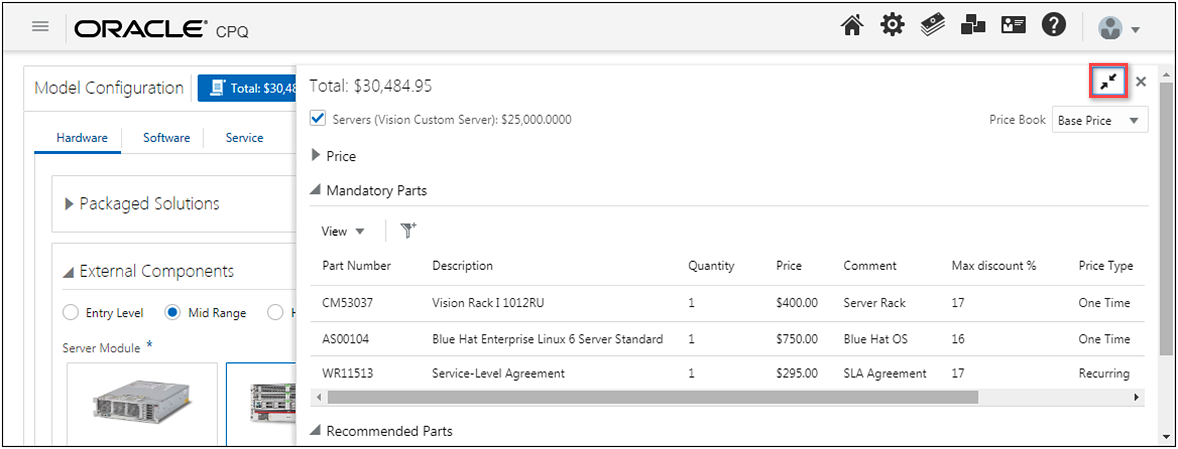
To improve viewing of item list tables with several columns, users can click on the expand icon to increase the size of the right sidebar.
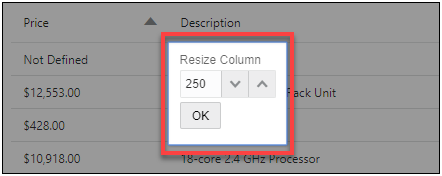
The column resize dialog is now available for all JET UI tables. The dialog provides a user-friendly method to resize columns, is much easier for tablet and phone displays, and allows users to enter a precise column width.
Users can right-click on the column header, select Resize, and then enter the column width. For tablet and phone displays, users tap and hold the column header to access the Resize option.
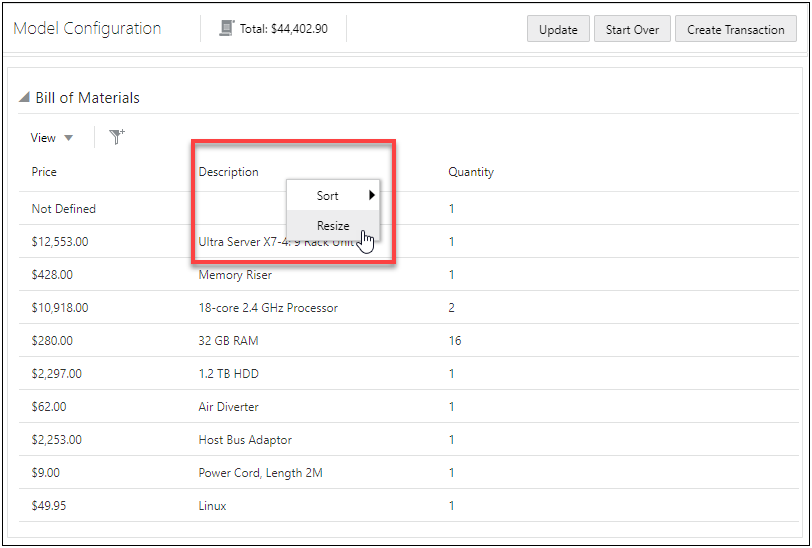
The Resize Column dialog allows users to specify the exact column width.
![]() Vertical Tabs for Configuration UI Panels
Vertical Tabs for Configuration UI Panels
In CPQ, administrators can use tab components to show different groups of content within the Configuration UI. Administrators can display vertical tabs for the JET Configuration UI. Vertical tabs are arranged on the left side of a panel instead of on the top in horizontal space.

![]() JET Configuration User Experience Enhancements
JET Configuration User Experience Enhancements
The JET Configuration UI provides a modernized and fully responsive user experience to walk users through the configuration process on any device and in any CPQ-supported language. CPQ’s JET Configuration UI supports virtually all of the most commonly used legacy UI features with the following user experience enhancements:
- Most actions now display updated content without requiring a full page refresh.
- Display a page loading indicator while the JET Configuration UI is being loaded into the page.
- The JET Configuration UI header and action toolbar remain "sticky" at the top of the screen to provide improved scrolling behavior.
- Simple filters allow users to quickly locate key items within arrays and item tables.
- View menus allow users to hide and show columns in arrays and item tables.
- Array and item list columns can be resized and sorted.
- Improved options for displaying Totals and Items List in side-panel.
- New display options are available for attributes and tabs.
- Error messages display inline and in a collapsible sticky header bar Error Panel.
![]() JET Configuration UI Support for Existing Functionality
JET Configuration UI Support for Existing Functionality
The JET Configuration UI supports all basic configuration features previously available in CPQ’s legacy Configuration UI:
- Product Hierarchy and configuration attributes of all data types, including Single Select Pick Lists (SSPLs); image menus; and horizontal, vertical, and tabbed arrays.
- Configuration rules, including: Recommendation Rules, Constraint Rules, Hiding Rules, Pricing Rules, Recommended Item Rules, and BOM Mapping Rules.
- Standard configuration actions, Process Invocations, punch-ins, and navigation to/from Commerce UIs including Update, Start Over, Next/Previous, Add to Transaction, Add to Favorites, Add to Cart, Add from Catalog, Reconfigure a model from Commerce, Reconfigure from Favorites, Resume Pending Configuration, and Search Flows.
- Single and multi-node configuration UI flows with Price, Recommended Item and BOM Item table panels, and Configuration flow rules.
- Configuration options, UI settings, and CSS styling customization.
JET Configuration UI Key Changes, Limitations, and Known Issues
The following list provides descriptions of key changes, limitations, and known issues present in the JET Configuration UI.
![]() View JET Configuration UI Limitations
View JET Configuration UI Limitations
|
User Interface Element |
Description of Key Changes, Limitations, and Known Issues |
|---|---|
|
Configurable Attribute Calculators |
The JET Configuration UI does not support configurable attribute calculators in CPQ. |
|
Configuration Integrations |
The JET Configuration UI does not support HTTP Post or Custom Configuration integrations in CPQ. |
|
External Configurator Integration |
Integration of the JET Configuration UI with external configurators is not supported in CPQ. |
|
Image Drop-down Menus (Select Choice) |
Image dropdown menus using the JET "Select Choice" display option only show images in the dropdown list. Images are not displayed for the selected items. |
|
JET CSS Stylesheet |
JET uses a different CSS stylesheet from the legacy standard and alt stylesheets. As a result, CSS customizations may need to be refactored to work correctly with the JET Configuration UI. Oracle CPQ JET CSS: Branding and Styling (Doc ID 2462711). |
|
JET HTML DOM |
JET uses a different Document Object Model (DOM) from legacy UI pages. As a result, JavaScript customizations may need to be refactored to work correctly with the JET Transaction UI. For additional details, refer to Oracle CPQ JET Configuration and Transaction UI: Refactoring Existing JavaScript Customizations (Doc ID 2490016). In addition, elements such as attributes that are hidden in the UI by Step or Hiding Rules, cannot be referenced in the DOM. These attributes can be referenced in BML. |
| Label Widths in Tabbed Arrays | Administrator settings for Label and Value widths are not applied to Tabbed Arrays in JET UI. |
|
Layout Preview |
The Configuration Layout Editor Preview will not display JET-specific controls and options. |
|
Message Display |
The JET Configuration UI does not support the "Bottom of Page" Message Placement option. The messages will display in the sticky header Error Panel. |
| Product Family, Product Line, and Model Names | The JET Configuration UI does not support Product Family, Product Line, or Model variable names with periods. (e.g. "A.1474" for a Model variable name). |
|
Search Flows, Favorites, Pending Configurations |
Navigation between the JET Configuration UI and Search Flow, Favorites, or Pending Configuration pages is supported, but these pages continue to display as legacy UI pages. |
|
System Navigation Panel Sidebar Behavior |
The navigation panel collapses when navigating between sub-models that switch between Overlay and Push Content sidebar behaviors. |
|
UI Controls in Configuration Arrays |
Integer and Float attributes with Slider controls, and Boolean attributes with Switch display type, are not supported in Vertical and Horizontal Configuration Array sets. |
Administration
![]() Enable the JET Configuration UI Layout
Enable the JET Configuration UI Layout
Administrators have the option of enabling the JET Configuration UI while continuing to use the legacy UI for some users. The JET UI is rendered from the same layout definition as the legacy UI. Administrators can assign user access to JET Configuration UI based on user type or user group. With both layouts enabled, customers can make the transition to the JET Configuration layout at their own pace. Since the JET Configuration UI is enabled at the Product Family level, customers can also gradually transition to the JET Configuration UI by enabling only selected Product Families.
Enable the JET Configuration UI Layout for a Product Family
To enable the JET Configuration UI for a product family and assign user access rights, perform the following steps:
-
Navigate to the Supported Product Families page.
Admin > Products > Catalog Definition > Product Families
-
Select Layout Access Control from the applicable Product Family Navigation drop-down, and then click List.
The Layout Access Control page opens.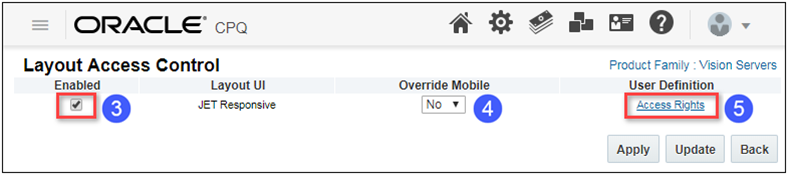
- Select the Enabled checkbox.
- (Optional) To replace the mobile layout with the JET Configuration layout, select Yes from the Override Mobile drop-down.
- Click the Access Rights link to assign user and group access.
-
Specify the user types and groups that will view the JET Configuration UI. Only the users types or groups assigned to the Show column will view this layout, all other users types or groups will view the legacy layout.
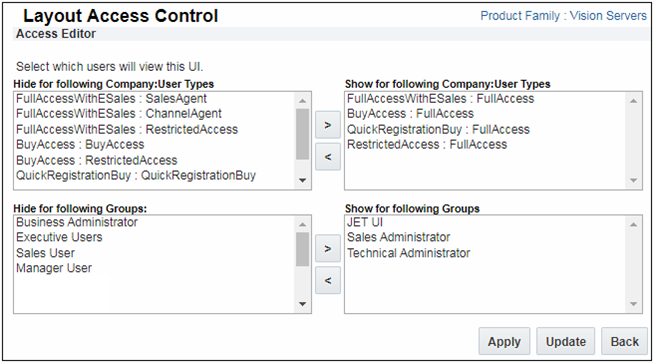
- Click Update to save user and group access rights.
- Click Apply or Update.
![]() Display Editable Field Icons in Arrays
Display Editable Field Icons in Arrays
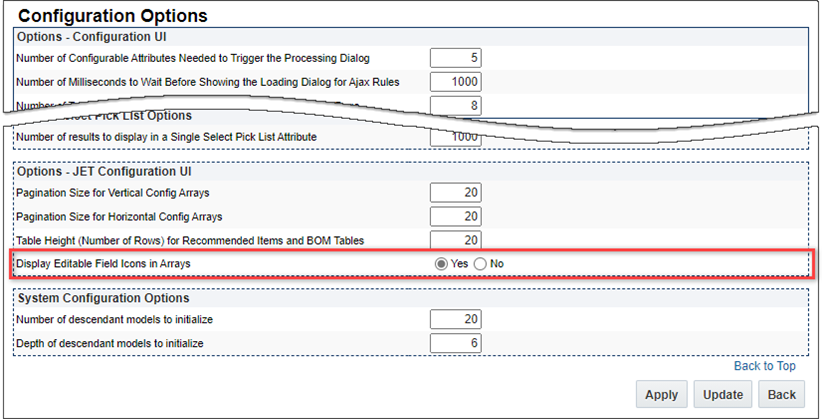
Complete the following steps to display indicator icons in configuration arrays.
-
Navigate to the Configuration Options page.
Admin Home > Products > Configuration Settings
-
Select Yes for the Display Editable Field Icons in Arrays option.
-
Click Update to save your changes and return to the previous page.
![]() CSS Customization of JET Configuration UI
CSS Customization of JET Configuration UI
A single JET-specific CSS file reduces complexity and provides a customized, seamless aesthetic for the JET Configuration and Transaction UIs as well as future JET UI enhancements.
Unlike Legacy UIs, the new JET UI applies only a single custom Stylesheet in addition to the base framework-generated styling. Any existing customizations applied through the other legacy CSS files will not affect the new JET UIs. The new JET Stylesheet applies to all JET UIs in Oracle CPQ site-wide rather than to a single UI or set of UIs. As a result, site-wide standards such as corporate styling can be implemented more easily, in one place. When additional JET UIs such as Homepage are released, these pages will also apply the single JET Stylesheet.
Rather than downloading an initial CSS stylesheet, modifying it and uploading the modified file, customers will now reference the JET UI’s system-generated CSS using a web development tool, such as Chrome Development Tools, create any desired modifications to the base styling, and then upload a custom CSS file to revise the JET styling. For optimal performance, it is recommended that only modifications to the styling be included in this CSS file.
Upload a Custom CSS File
The custom CSS file will be uploaded on the Stylesheet administration page.
-
Navigate to the Stylesheet Manager.
Admin > Style and Templates > Stylesheet
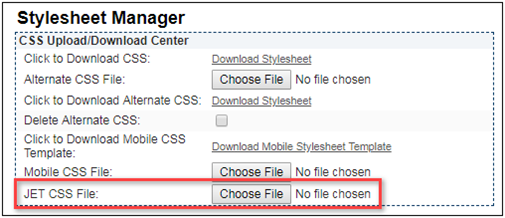
- Click Browse to upload and apply styling customizations to JET UIs.
Note: Administrators should review the Oracle CPQ JET CSS: Branding and Styling (Doc ID 2462711) document prior to implementing CSS Customization for the JET Configuration UI.
Notes
Notes: In Oracle CPQ 19C, the JET Configuration UI does not support: Attribute Calculators and External Configurators.
Notes:
-
The Configuration URLs are case sensitive. If the path parameters are not correct you will receive the following error message.
"You are attempting to open a page that can't be displayed. The JET UI has not been deployed for this product family. Please contact your site administrator if this problem continues."
- The Configuration cache must be enabled when using the JET Configuration UI. If the Configuration cache is disabled on your site, open a Service Request (SR) on My Oracle Support to enable the Configuration cache.
- The JET Configuration UI has been certified with the 19B ABO package and requires elements of that package to function properly with JET.
The JET Configuration experience retains the following legacy UI pages and dialogs:
- Pipeline Viewer
- Favorites
- Pending Configurations
- Shopping Cart
- Search Flows


