Configuration Attributes
Overview
Configurable attributes define the characteristics of Product Families that can be specified by the user. Much of the functionality of the Configurator requires the use of these attributes. They are used in search flows, configuration flows, and every type of configuration rule.
Beginning in 19D, Price attributes can be mapped to configurable attributes so that the Pricing Engine remains the central pricing logic manager for the products. The Pricing Engine can then support pricing updates from either a Product Configuration change or from a Commerce Transaction change.
In 19D and later there are two types of configuration attributes: configurable attributes and signed punch-in attributes.
Configurable Attributes
Configurable attributes can be of float, integer, HTML, date, currency, boolean, or text data type. The status of configurable attributes can be active, inactive, or internal. Configurable attributes can also be made active during certain time periods by specifying start and end dates.
Configurable attributes can be created as menus or text fields.
- Menus enable you to designate specific values (a discrete set of values) from which a user can choose one or more items.
- Text fields are more open-ended, allowing the user to type in values.
Configurable attributes can be defined as stand-alone attributes or as arrays. Array attributes group multiple scalar attributes. Usually, the size of an array attribute is specified by a control attribute.
Signed Punch-In Attributes
Oracle CPQ 19D introduces Signed Punch-in attributes to ensure proper pricing information is provided only to the designated buyer. These attributes function identically to Configurable attributes except they require verification of digital signature data before pricing data is provided to the end customer. The digital signature includes the configurable attribute request data and encoded key pairing of the Oracle CPQ public key and customer private key. Refer to Signed Punch-in Attributes for detailed information.
Signed Punch-in attributes can be of float, integer, date, currency, boolean, or text data type. The status of signed punch-in attributes can be active, inactive, or internal. Signed Punch-in attributes can also be made active during certain time periods by specifying start and end dates.
Signed Punch-in attributes can only be created as text fields.
Unlike Configurable attributes, Signed Punch-in attributes cannot be Array attributes, Multi Select Menu attributes, Single Select Menu attributes, Pick List attributes, or HTML attributes.
Administration
 Accessing the Attributes Administration List Page
-
 Navigate to the Attributes Administration List page.
-
Click Admin to go to the Admin Home Page.
-
Click Catalog Definition in the Products section.
The Supported Products page opens.
-
In the Navigation column, select Attributes and then click List.
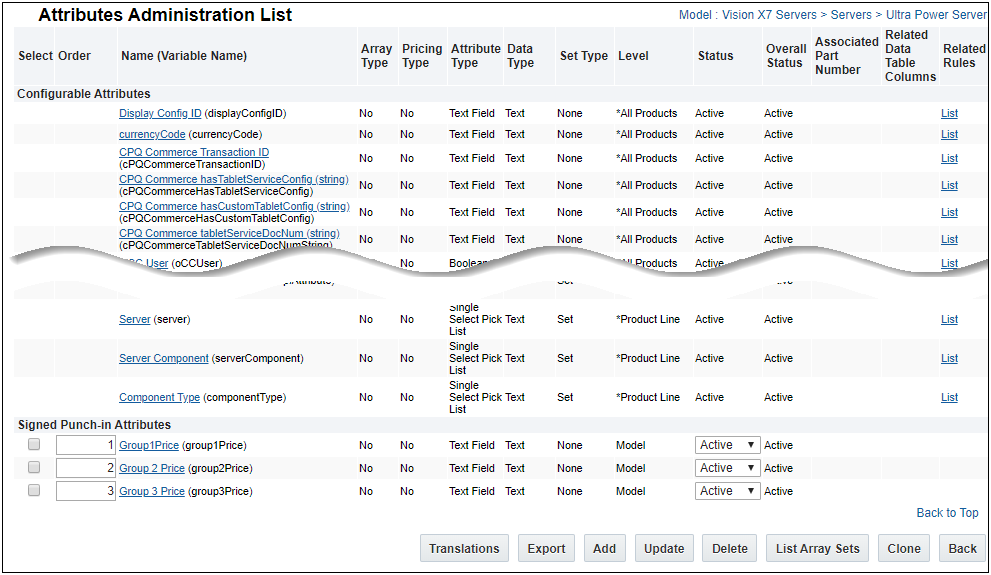
The Attributes Administration List page opens.
-
Perform one of the tasks in the following table.
| Delete Attributes |
In the Select column, select the attributes you want to delete and click Delete. |
| Re-order Attributes |
Change the numbering in the Order column, then click Update. |
| Add Attributes |
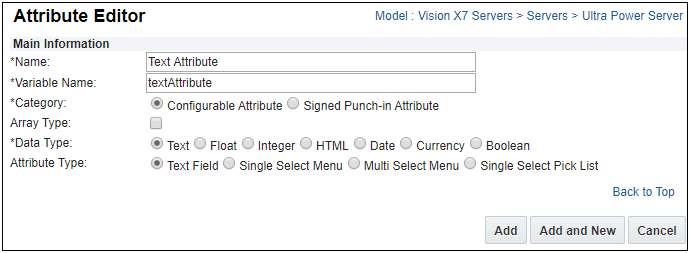
Click Add to open the Attribute Editor. |
| Edit Attributes |
In the Name column, click the link to open the Attribute Editor specific to the attribute type.
|
| Change Attribute Status |
Choose one of the following options from the Status drop-down: Active, Internal, and Inactive. |
| View Related Rules |
In the Related Rules column, click List to open the Attribute Editor.
|
| Manage Array Sets |
Click List Array Sets to open the Configurable Array Sets Administration List view.
|
| Clone Attributes |
Click Clone to add a new attribute based off an existing attribute. |
 Adding an Attribute
-
 Navigate to the Attributes Administration List page.
-
Click Admin to go to the Admin Home Page.
-
Click Catalog Definition in the Products section.
The Supported Products page opens.
-
In the Navigation column, select Attributes and then click List.
The Attributes Administration List page opens.
-
Click Add.
The Attribute Editor page opens.

-
Enter information for the items shown in the following table.
| Name |
Required.
The name of the configuration attribute
|
| Variable Name |
Required.
The Variable Name field populates automatically. Variable names can only contain alpha-numeric characters and underscores. The entry can be changed before saving, but after saving the value is read-only.
Note: Customers should not use any of the following names for Configuration attribute variable names. Using these values may cause issues with customer configurations and could possibly alter site functionality.
action_id
bm_cm_process_id
_bom_
bs_id
commerce_doc_url_params
commerce_list_id
document_id
document_number
folder_id
formaction
from_config
scrollTop
shopping_cart_id
step_id
token
version_id
|
| Category |
Required.
Select Configurable Attribute or Signed Punch-in Attribute.
A Signed Punch-in Attribute functions identically to Configuration attributes except they require verification of digital signature data before pricing data is provided to the end customer. See Signed Punch-in Attributes for more information.
Signed Punch-in Attributes cannot be Array attributes, Multi Select Menu attributes, Single Select Menu attributes, Picklist attributes, and HTML attributes.
|
| Array Type |
Designates that the attribute can be used as a column in an array set.
For more information, see the topic Managing Arrays and Sets.
|
| Data Type |
Required.
Select Text, Float, Integer, HTML, Date, Currency, or Boolean.
See the following table for more information.
|
| Attribute Type |
Select Text Field, Single Select Menu, Multi Select Menu, or Single Select Pick List.
|
Depending on which Category and Data Type you select, you will see different choices.
| Text |
Text Field
Single Select Menu
Multi Select Menu
Single Select Pick List
|
No |
| Float |
Text Field
Single Select Menu
Multi Select Menu
Single Select Pick List
|
No |
| Integer |
Text Field
Single Select Menu
Multi Select Menu
Single Select Pick List
|
Part Information |
| HTML |
none
|
none |
| Date |
none |
none |
| Currency |
none |
none |
| Boolean |
none |
Part Information |
-
Click Add to proceed to the Attribute Editor specific to your type of attribute (for example, the Text Attribute Editor), or click Add and New to create the attribute and return to the same blank Attribute Editor page.
For more information on how to finish entering your configuration attribute, go to the corresponding topic for the Attribute Type:
For a Text, Float, or Integer Data Type that has an Attribute Type of Single Select Menu or Multi Select Menu, see the topic Menu Attributes.
For a Text, Float, or Integer Data Type that has an Attribute Type of Single Select Pick List, see the topic Single Select Pick Lists.
 Cloning an Attribute
To clone a Configuration attribute and all of the associated attribute properties, complete the following steps:
-
 Navigate to the Attributes Administration List page.
-
Click Admin to go to the Admin Home Page.
-
Click Catalog Definition in the Products section.
The Supported Products page opens.
-
In the Navigation column, select Attributes and then click List.
The Attributes Administration List page opens.
-
From the Configurable Attributes Administration List page, perform one of the following steps:
- Select the checkbox next to the Configuration attribute you wish to clone and then click Clone.

Only one configurable attribute can be selected to clone at a time. Selecting multiple attributes from the Attributes Administration List page results in an error message.
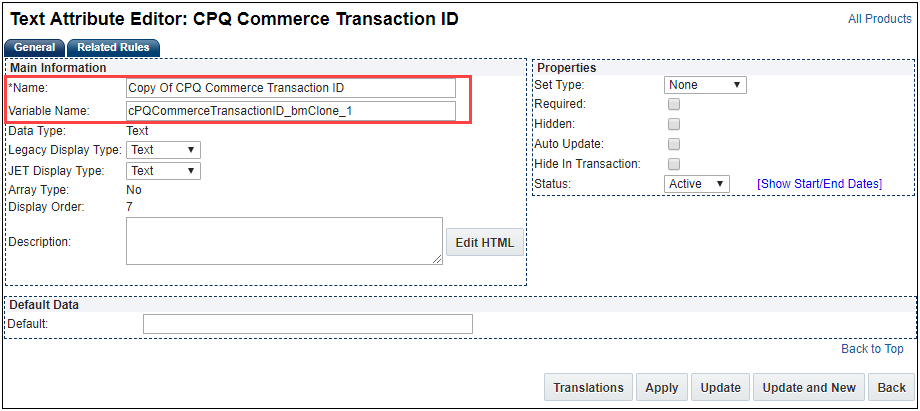
- Click on the configurable attribute you wish to clone. When the Text Attribute Editor page displays, click Clone.

The Text Attribute Editor page displays with the Name field showing "Copy Of" and a default Variable Name showing "Clone_1".

-
Enter a name in the Name field for the new cloned attribute.
-
Enter a unique variable name or accept the default variable name in the Variable Name field for the new cloned action.
-
Click Apply to create the new cloned configurable attribute. The Text Attribute Editor page for the new cloned configurable attribute displays.
-
(Optional) Modify the new cloned configurable attribute fields in the General and Related Rules tab as desired.
-
Click Update to save the changes to the new cloned configurable attribute.
The cloned configurable attribute is available to administrators to add to a layout. The cloned attribute is not automatically added to a layout even if the original attribute is on a layout.
 Deleting an Attribute
Watch Video
To delete a Configuration attribute and all of the associated attribute properties, complete the following steps:
-
 Navigate to the Attributes Administration List page.
-
Click Admin to go to the Admin Home Page.
-
Click Catalog Definition in the Products section.
The Supported Products page opens.
-
In the Navigation column, select Attributes and then click List.
The Attributes Administration List page opens.
-
Select the checkbox next to the configurable attribute you wish to delete.

Multiple configurable attributes can be selected for deletion at the same time.
- Click Delete.
 Ordering Configuration Attributes
Order the configuration attributes to set how they will appear in the document.
 Navigate to the Attributes Administration List page.
-
Click Admin to go to the Admin Home Page.
-
Click Catalog Definition in the Products section.
The Supported Products page opens.
-
In the Navigation column, select Attributes and then click List.
The Attributes Administration List page opens.
- Change the Order Number on the attribute you want to reorder.
-
Click Update to save your changes.
The new attribute order displays on the Attributes Administration List page.
You can reorder individual attributes, including the individual attributes contained within an attribute set.
Order changes take effect after the Configuration Product Family is deployed (or re-deployed). For more information about deployment, see the topic
Setting Up Product Families.
Notes
Avoid overriding menu attributes at lower levels in the product hierarchy.
Beginning in Oracle CPQ 19D, attributes which are inactive or on an inactive tab of the Configuration flow will not retain punch-in values. Attributes required to hold values from the punch-in must be active and on an active tab of the layout.
Related Topics
 See Also
![]() Accessing the Attributes Administration List Page
Accessing the Attributes Administration List Page
![]() Deleting an Attribute
Deleting an Attribute

![]() Ordering Configuration Attributes
Ordering Configuration Attributes


