Overview
Each Commerce process contains one or more document sets. There are two types of Commerce documents: main document (e.g. Transaction, Quote) and sub-document (e.g. Transaction Line, Line Item).
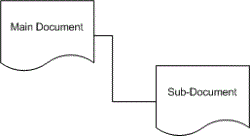
A document set is comprised of a main document, or a main document with an attached sub-document. Using these document types, you can create flexible Commerce processes.
- For every process, Commerce documents are created in a one-to-one relationship.
- Every main document can be mapped to only one sub-document.
- A summary of sub-document data also appears on main documents, in the Line Item Grid.
Example: A process named RFQ can contain a main document and a corresponding sub-document (RFQ sub). Main documents are used for general information pertaining to the Transaction, like customer name or billing and shipping information, while sub-documents are used as product detail pages.
The Standard Process documents come with predefined functional logic that is ready for customers' use. If required, seeded logic can be overridden by administrators to incorporate their customization logic. The standard main and sub-documents are Transaction and Transaction Line, respectively.
To override a default value, check the applicable override option, click Apply, and then define the new function. To quickly return to the standard function, simply uncheck the applicable override option, and then click Apply.
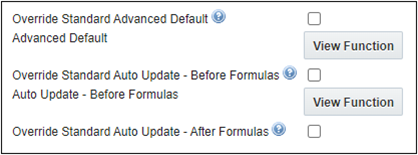
To view a pre-defined function in read-only mode, click View Function.
Attributes and Actions are the building blocks of documents. Attributes are used to create document fields, whereas actions trigger events. After generating document attributes and actions, all the pieces can be arranged using document views. Only those attributes and actions included in a view appear to users.
Administration
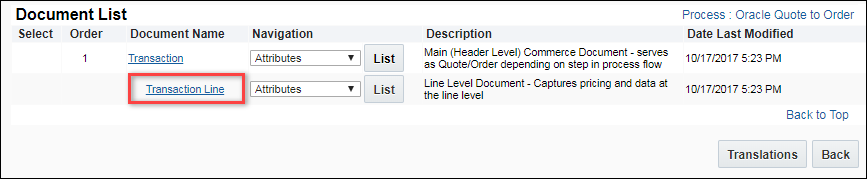
Use the Document List page to manage Commerce documents within the selected process.
-
 Navigate to the Document List page.
Click Admin to go to the Admin Home Page.
Click Process Definition in the Commerce and Documents section.
The Processes page opens.
Select Documents from the Navigation drop-down for the applicable process, and click List.
The Document List page opens.
-
Select an option from the Navigation drop-down and click List.
The corresponding screens (for the option selected) appear. The options are:
- Attributes: Clicking List next to Attributes displays the Attributes List page for managing attributes for documents within the selected process.
- Actions: Clicking List next to Actions displays the Actions List page.
- Groups: Clicking List next to Groups displays the Group List page.
-
Admins can select which Quote-level formulas will be executed when a new line item is added to a quote on the Modify tab within the Attribute Editor.
Main document formulas can be executed when users add a line item (sub-document) to the quote, regardless of whether the line item is a result of Configuration, Search, or Quick Key Line Items.
When a new line item is added to a Quote, the formulas that are defined for line item attributes will run to determine the default values of the attributes. - Click Back to return to the Processes page.
Complete the following steps to create a new sub-document for a Commerce process.
Notes:
- Customers can create a new pre-populated process using the Standard Process.
- It is very unusual to create a blank Commerce Process or documents from scratch; customers typically use the default Commerce Process and its documents.
- If another Commerce Process or Document is required, best practice is to clone the existing Commerce Process or Document and then delete everything that isn’t needed.
- For more information on cloning a Commerce Process, see Commerce Deployment Center.
- Navigate to the Admin Home Page.
- Click Process Definition in the Commerce and Documents section.
- Select Documents from Navigation drop-down for the applicable process.
-
Click List.
-
Click Add.
The Add button is only displayed when a Commerce Process has not been deployed. -
Enter a Name.
This label distinguishes one document from another and is used as the page title on the Commerce side whenever a user opens the document type.
- For the document Type, select the Sub Document option.
-
Enter a unique Variable Name.
The Variable Name field populates automatically. Variable names can only contain alpha-numeric characters and underscores. The entry can be changed before saving, but after saving the value is read-only.
- Enter a document Description.
-
Click Add.
The Document List page re-opens.
Note: The sub-document must be mapped to a main document before editing. Complete the following tasks to edit this sub-document:
- Add a Main Document and map to this sub-document.
- Proceed to Edit a Sub-Document.
Complete the following steps to create a new main document for a Commerce process.
Notes:
- Customers can create a new pre-populated process using the Standard Process.
- It is very unusual to create a blank Commerce Process or documents from scratch; customers typically use the default Commerce Process and its documents.
- If another Commerce Process or Document is required, best practice is to clone the existing Commerce Process or Document and then delete everything that isn’t needed.
- For more information on cloning a Commerce Process, see Commerce Deployment Center.
- Navigate to the Admin Home Page.
- Click Process Definition in the Commerce and Documents section.
- Select Documents from Navigation drop-down for the applicable process.
-
Click List.
-
Click Add.
The Add button is only displayed when a Commerce Process has not been deployed.The Add Document page opens.
-
Enter a Name.
This label distinguishes one document from another and is used as the page title on the Commerce side whenever a user opens the document type.
- For the document Type, select the Main Document option.
- Select the sub-document from the drop-down next to the Main Document option.
-
Enter a unique Variable Name.
The Variable Name field populates automatically. Variable names can only contain alpha-numeric characters and underscores. The entry can be changed before saving, but after saving the value is read-only.
- Enter a document Description.
-
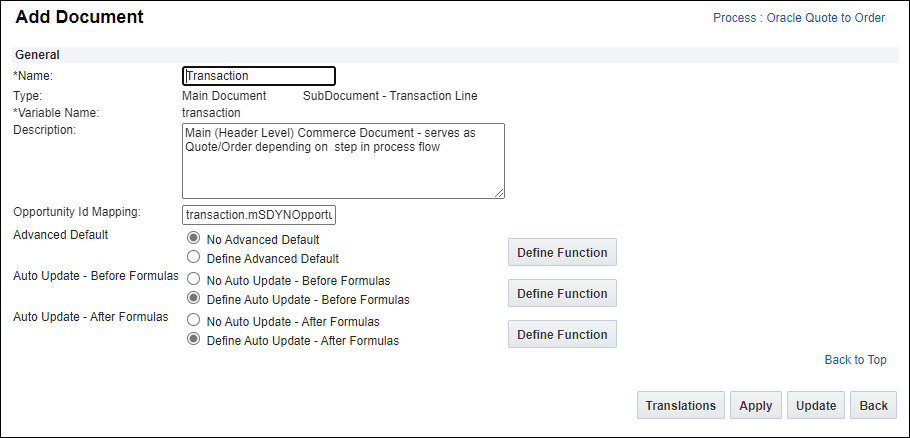
Enter Opportunity Id Mapping, if necessary.
This field is used to map a Salesforce opportunity id to a Commerce document.
-
Click Add.
The Advanced Default, Auto Update - Before Formulas, and Auto Update - After Formulas options appear.
-
Edit the Advanced Default, if necessary.
-
Select No Advanced Default.
-or-
-
Select Define Advanced Default, then click Define Function.
The Select Attributes dialog box appears.
- Select the System Variable Name, Variable Name for (Main Document), Variable Name for (Sub-Document), and/or Library Function(s) for the selected document.
- Click Next Screen to go the Function Editor page.
- Enter the BML function, then click Save and Close.
-
-
Edit Auto Update - Before Formulas, if necessary.
This allows functions to run before Formulas when the Commerce page performs an auto update.-
Select No Auto Update - Before Formulas.
-or-
-
Select Define Auto Update - Before Formulas, then click Define Function.
The Select Attributes dialog box appears.
- Select the System Variable Name, Variable Name for (Main Document), Variable Name for (Sub-Document), and/or Library Function(s) for the selected document.
- Click Next Screen to go the Function Editor page.
- Enter the BML function, then click Save and Close.
-
-
Edit Auto Update - After Formulas, if necessary.
This allows functions to run after Formulas when the Commerce page performs an auto update. This was previously known as simply auto update.
-
Select No Auto Update - After Formulas.
-or-
-
Select Define Auto Update - After Formulas, then click Define Function.
The Select Attributes dialog box appears.
- Select the System Variable Name, Variable Name for (Main Document), Variable Name for (Sub-Document), and/or Library Function(s) for the selected document.
- Click Next Screen to go the Function Editor page.
- Enter the BML function, then click Save and Close.
-
Main document formulas can be executed when users add a line item (sub-document) to the quote, regardless of whether the line item is a result of Configuration, Search, or Quick Key Line Items.
When a new line item is added to a Quote, the formulas that are defined for line item attributes will run to determine the default values of the attributes.
-
Click one of the following actions:
- Translations: Oracle CPQ content and product templates can be translated into supported languages.
- Apply: saves changes and remains on the page.
- Update: saves changes and returns to the Document List page.
- Back: returns to the Document List page without saving changes.
Note: If Advanced Default - Before Formulas or Advanced Default - After Formulas are required for the sub-document, proceed to the Edit a Sub-Document procedure.
Complete the following steps to edit a main document.
- Navigate to the Admin Home Page.
- Click Process Definition in the Commerce and Documents section.
-
Select Documents from Navigation drop-down for the applicable process.

-
Click the name for the main document.
View Standard Process Main Document 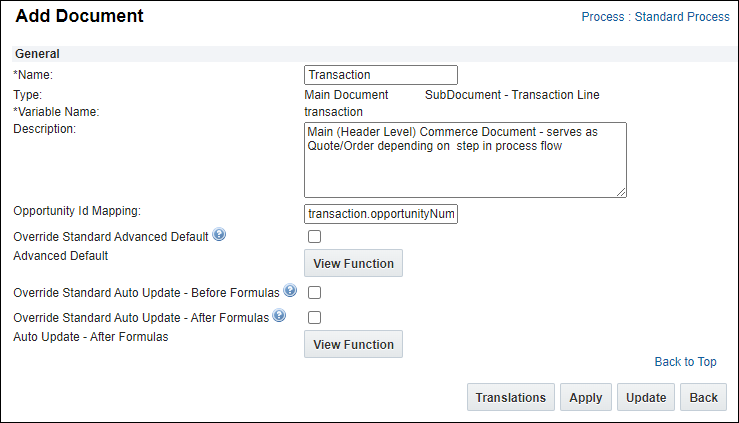
- Edit the Name, if necessary.
- Edit the Description, if necessary.
-
Enter Opportunity Id Mapping, if necessary.
This field is used to map a Salesforce opportunity id to a Commerce document.
-
Edit the Advanced Default, if necessary.
-
Select No Advanced Default.
-or-
-
Select Define Advanced Default, then click Define Function.
The Select Attributes dialog box appears.
- Select the System Variable Name, Variable Name for (Main Document), Variable Name for (Sub-Document), and/or Library Function(s) for the selected document.
- Click Next Screen to go the Function Editor page.
- Enter the BML function, then click Save and Close.
Standard Process Documents are pre-populated with default values.
- To override a default value, check the applicable override option, click Apply, and then define the new function.
- To quickly return to the standard function, simply uncheck the applicable override option, and then click Apply.
- To view a function in read-only mode, click on View Function.
-
-
Edit the Auto Update - Before Formulas, if necessary.
This allows functions to run before Formulas when the Commerce page performs an auto update.-
Select No Auto Update - Before Formulas.
-or-
-
Select Define Auto Update - Before Formulas, then click Define Function.
The Select Attributes dialog box appears.
- Select the System Variable Name, Variable Name for (Main Document), Variable Name for (Sub-Document), and/or Library Function(s) for the selected document.
- Click Next Screen to go the Function Editor page.
- Enter the BML function, then click Save and Close.
Standard Process Documents are pre-populated with default values.
- To override a default value, check the applicable override option, click Apply, and then define the new function.
- To quickly return to the standard function, simply uncheck the applicable override option, and then click Apply.
- To view a function in read-only mode, click on View Function.
-
-
Edit the Auto Update - After Formulas, if necessary.
This allows functions to run after Formulas when the Commerce page performs an auto update. This was previously known as simply auto update.
-
Select No Auto Update - After Formulas.
-or-
-
Select Define Auto Update - After Formulas, then click Define Function.
The Select Attributes dialog box appears.
- Select the System Variable Name, Variable Name for (Main Document), Variable Name for (Sub-Document), and/or Library Function(s) for the selected document.
- Click Next Screen to go the Function Editor page.
- Enter the BML function, then click Save and Close.
Standard Process Documents are pre-populated with default values.
- To override a default value, check the applicable override option, click Apply, and then define the new function.
- To quickly return to the standard function, simply uncheck the applicable override option, and then click Apply.
- To view a function in read-only mode, click on View Function.
-
-
Click one of the following actions:
- Translations: Oracle CPQ content and product templates can be translated into supported languages.
- Apply: saves changes and remains on the page.
- Update: saves changes and returns to the Document List page.
- Back: returns to the Document List page without saving changes.
Complete the following steps to edit a sub-document.
- Navigate to the Admin Home Page.
- Click Process Definition in the Commerce and Documents section.
- Select Documents from Navigation drop-down for the applicable process.
-
Click List.
-
Click the name of the sub-document on the Document List page.
 View Standard Process Sub-Document
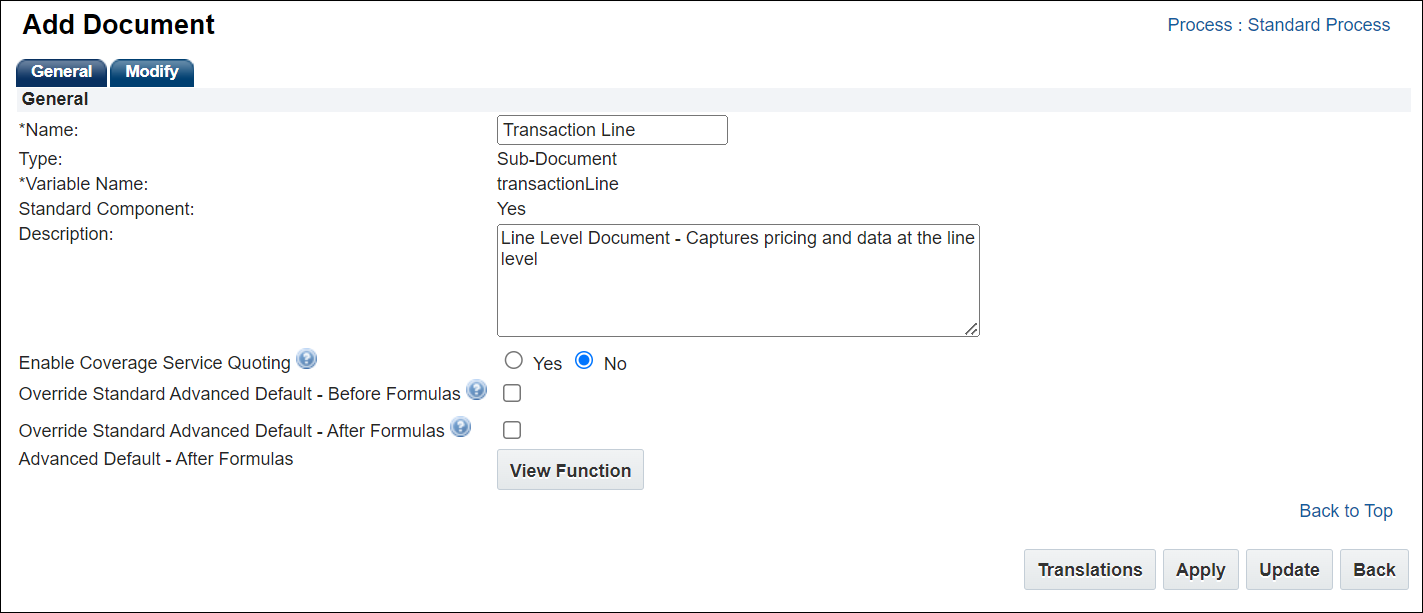
- Edit the Name and/or Description displayed on the Add Document page.
-
Select the Yes option for Enable Coverage Service Quoting.
Coverage Products for a Standard Process
Note: The coverage product attributes are automatically mapped for the Standard Process.
Coverage Products for a non-Standard Process
Note: The Sales Product Type attribute in the sub-document Part Attribute Set must be enabled. Refer to Manage Parts Attributes for instructions.
Search and map the following fields:
-
Coverage Order Number Mapping – the attribute which records the order number attribute of the covered product.
-
Coverage Line Number Mapping - the attribute which records the line number attribute of the covered product.
-
UOM Mapping - the attribute which records the ‘Unit of Measure’ of the coverage service, which should be same as that of the covered product.
-
Quantity Mapping - the attribute which records the 'Quantity' of the coverage service, which should be same as that of the covered product.
-
Order Number Mapping - the attribute which is used to search for previous Orders, which contains the product to be covered.
-
Customer Id Mapping - the attribute which captures the customer ID of the customer placing the coverage order.
-
- Edit the Advanced Default - Before Formulas, if necessary.
Select No Advanced Default- Before Formulas.
-or-
Select Define Advanced Default - Before Formulas, then click Define Function.
The Select Attributes dialog box appears.
- Select the System Variable Name, Variable Name for (Main Document), Variable Name for (Sub-Document), and/or Library Function(s) for the selected document.
- Click Next Screen to go the Function Editor page.
- Enter the BML function, then click Save and Close.
Standard Process Documents are pre-populated with default values.
- To override a default value, check the applicable override option, click Apply, and then define the new function.
- To quickly return to the standard function, simply uncheck the applicable override option, and then click Apply.
- To view a function in read-only mode, click on View Function.
-
Edit the Advanced Default - After Formulas, if necessary.
This allows functions to run after Formulas when the Commerce page performs an auto update. This was previously known as simply auto update.
-
Select No Advanced Default-After Formulas.
-or-
Select Define Advanced Default - After Formulas, then click Define Function.
The Select Attributes dialog box appears.
- Select the System Variable Name, Variable Name for (Main Document), Variable Name for (Sub-Document), and/or Library Function(s) for the selected document.
- Click Next Screen to go the Function Editor page.
- Enter the BML function, then click Save and Close.
Standard Process Documents are pre-populated with default values.
- To override a default value, check the applicable override option, click Apply, and then define the new function.
- To quickly return to the standard function, simply uncheck the applicable override option, and then click Apply.
- To view a function in read-only mode, click on View Function.
-
-
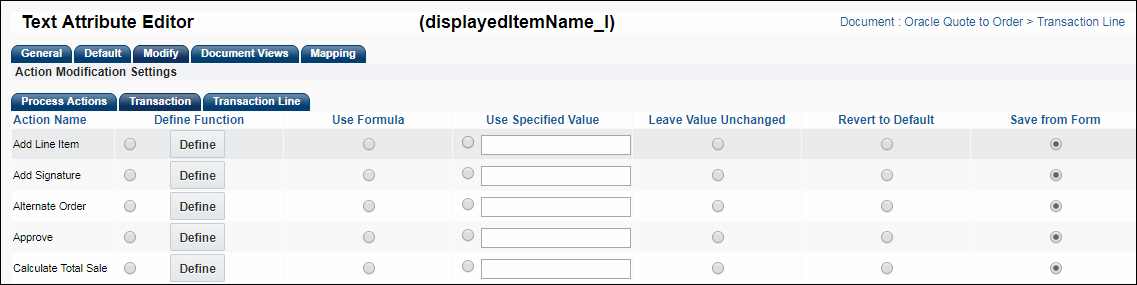
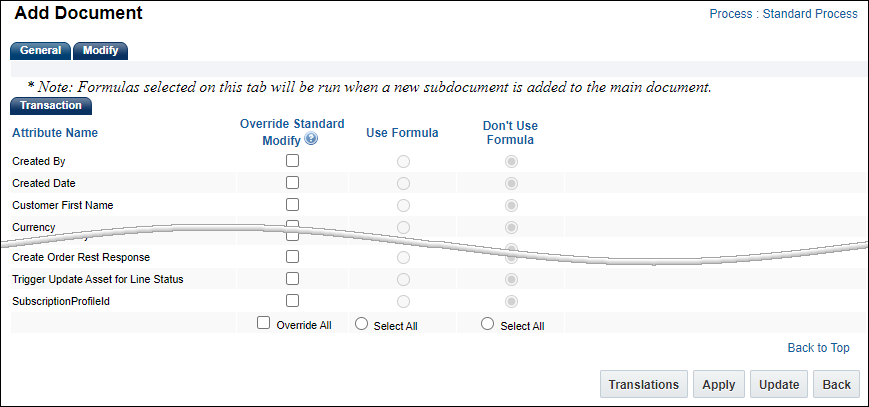
Click the Modify tab to choose whether to Use Formula or Don't Use Formula for certain quote-level attributes.
Only quote level attributes exist on the line level Modify tab. For each quote level attribute, the user can specify whether to use or not use formulas during a new line item addition.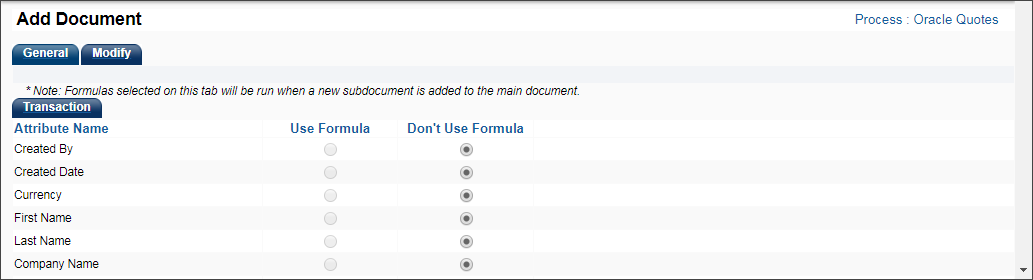 View Standard Process Sub-Document Modify Tab
Standard Process Documents are pre-populated with default values.
- To override a default value, check the applicable override option, click Apply, and then define the new function.
- To quickly return to the standard function, simply uncheck the applicable override option, and then click Apply.
- To view a function in read-only mode, click on View Function.
Main document formulas can be executed when users add a line item (sub-document) to the quote, regardless of whether the line item is a result of Configuration, Search, or Quick Key Line Items.
When a new line item is added to a Quote, the formulas that are defined for line item attributes will run to determine the default values of the attributes.
-
Click one of the following actions:
- Translations: Oracle CPQ content and product templates can be translated into supported languages.
- Apply: saves changes and remains on the page.
- Update: saves changes and returns to the Document List page.
- Back: returns to the Document List page without saving changes.
The order of execution is:
1. Modify tab
2. Advanced Default- Before Formulas
3. Formulas
4. Advanced Default- After Formulas.
Upon deletion, all associated views, attributes and actions within the document are also deleted.
Complete the following steps to delete a Commerce document.
Only undeployed Commerce documents can be deleted.
- Navigate to the Admin Home Page.
- Click Process Definition in the Commerce and Documents section.
- Select Documents from Navigation drop-down for the applicable process.
-
Click List.
- Select the checkbox for the corresponding document you wish to delete on the Document List page.
- Click Delete.
Ordering documents determines how they appear in the Commerce Manager. Order numbers are auto-generated at the time of creating documents. Since only one sub-document is associated with a main document, sub-documents don't require ordering.
-
Navigate to the Document List page.
-
Click Admin to go to the Admin Home Page.
-
Click Process Definition in the Commerce and Documents section.
The Processes page opens.
- Select Documents from Navigation drop-down for the applicable process.
-
Click List.
The Document List page opens.
-
- Click on the order number next to the document and set it to any positive integer. The order numbers of other main documents in the list will be automatically reordered.
-
Click Update.
Changes to document order deletes current document mapping data.
![]() Formulas in Reconfiguration Scenarios
Formulas in Reconfiguration Scenarios
The Reconfigure action is split into one parent (Reconfigure) and one sub-action (Reconfigure Inbound). This eliminates the need for conditionals to segregate logic.
- The parent action (Reconfigure) contains all things common to both Reconfigure actions and its own identifiers: Label, Variable Name, Description, Action Icon, Show Loading Dialog, Layout Path, and Document Views Tab.
- The sub-action (Reconfigure Inbound) only contains what is specific to it.
- This allows administrators to execute a formula per attribute on:
- Outbound paths from a Commerce Transaction.
The Formula will run immediately after the user clicks the Reconfigure action in Commerce, and before the user enters Configuration.
- Inbound paths to a Commerce Transaction.
The Formula runs after the user clicks Save in the Reconfiguration, and before the user returns to the Commerce page.
- Formula execution is consistent with the existing order of operations for inbound and outbound executions.
Notes
Warnings:
- You cannot add, delete, or update order numbers for documents in a deployed Commerce Process.
- Certain areas of document administration are only visible for Processes that have not been deployed. You cannot delete documents once a Process is deployed.
- Users cannot create or add quotes from Configuration to Commerce if mandatory items are missing.
Notes:
- Sub-documents and main documents have a one-to-one relationship, meaning only one sub-document can be associated with a main document.
- Main document Advanced Default will run when the transaction is first created. Its purpose is to set main document attribute default values. The purpose is to have one script that sets all of these attribute values at once, instead of pulling each of them separately. This also simplifies maintenance because all the defaults are set in a single script.
- Sub-document (line item) Advanced Default will run whenever a line item is added to a quote. The purpose of writing this script is to set all of the line item attribute values at once.
Tips and Considerations:
- Edits are not visible until the process is deployed (or redeployed).
- Create main documents as the primary documents in a set. Create sub-documents as detail pages that link up with main documents, that is, Line Item page for an RFQ.
- There is an option, Run Once For All Line Items, next to the advanced default on sub-documents. Standard functionality of the Advanced Default is that it will run every time a line is added to a quote. Having this option enabled enhances performance.


