Commerce Menu Attributes (Redwood)
Overview
Menu attributes allow customers to implement drop-down menus for Commerce main and sub-documents. The menu source can static or dynamic.
Static Menus
The menu options for static menus are defined in the menu attribute. There are two types of static menus:
Dynamic Menus
Dynamic Menu attributes are available for JET Commerce UIs. Similar to Configuration Single Select Pick Lists, Dynamic Menu attributes allow you to implement drop-down menus that display dynamic options. Dynamic Menus are available for Commerce main and sub-documents, and they can be referenced in Commerce rules, BML, Formulas, and Document and Email Designer Templates.
Dynamic Menu attributes allow customers to implement drop-down menus that display dynamic options for Commerce main and sub-documents. Administrators can easily maintain menu options using data tables or array sets.Updated table values for Live or deployed Data Tables are automatically available in the dynamic menu.
 Dynamic Menu Domains
The Domain, Variable, and Display determine the menu options for the user side menu. After defining the domain items, customers can simply add new items to the referenced Data Table or Transaction Array when they need new menu options. Administrators can select the following items when defining Dynamic Menus:
-
Domain - The Data Table or Transaction Array that contains the Dynamic Menu options.
Note: When Transaction Arrays are available, they are listed at the top of the Domain resources before the Data Table or Transaction Array items.
- Variable - The Data Table or Transaction Array column that contains the list of variable values of all possible Dynamic Menu options. Just like Single Select Menu and Multi-Select Menu attributes, CPQ uses the variable value of the selected menu option for Commerce processing and rules.
-
Display - The Data Table or Transaction Array column that contains display names for all possible Dynamic Menu options. Display names determine the menu option names that appear in the user side menu.
- A display name can be different from or the same as the variable name of a menu option.
- If administrators intend the display name and variable name to match each other across all entries, they can set the Variable and Display settings to reference the same Data Table or Transaction Array column.
For example, an administrator wants to implement a Dynamic Menu so users can select a country. They create a "Country" Dynamic Menu attribute and select their pre-defined "CountryTax" Data Table for the Domain, the "CountryCode" column for the Variable, and the "Country" column for the Display value. As shown below, the Domain is highlighted in red, the Variable is highlighted in blue, and the Display is highlighted in green.

The following image shows the target "CountryTax" Data Table that contains the menu options.

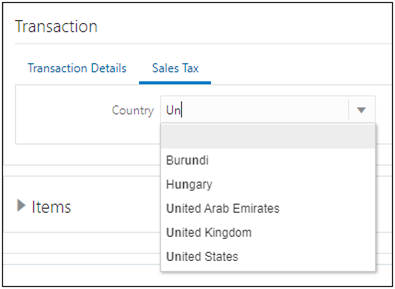
When added to the JET Transaction UI, the Country menu will show the Display column values as menu options. Another feature to note is the “Type to Filter” functionality, which provides a field where users can enter text filter criteria. The Dynamic Menu will filter out options that do not contain the character(s) entered by the user.
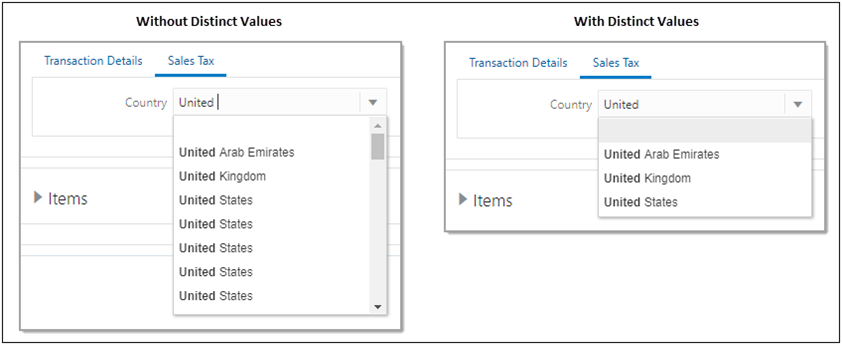
Dynamic Menu Distinct Values
If a Data Table or Transaction Array column has multiple items with the same value, the Dynamic Menu filter returns multiple results with the same value, resulting in users seeing the same result multiple times in the Dynamic Menu options.
Administrators can enable Distinct Values to ensure that a value displays only once in the user side menu.

Note: When the Distinct Values option is enabled, the Variable and Display columns are set to the same column, the Variable field is not selectable, and the Order By option is set to the selected Display column.
The following image shows user side Dynamic Menu options without and with distinct values enabled.
Dynamic Menu Filters
Dynamic Menus can filter the menu options shown to the user based on static values or other attribute values. Within the Filter field, administrators can define a query to filter which Data Table or Transaction Array column values to display to the user. The size of the Filter text box supports 4000 characters.
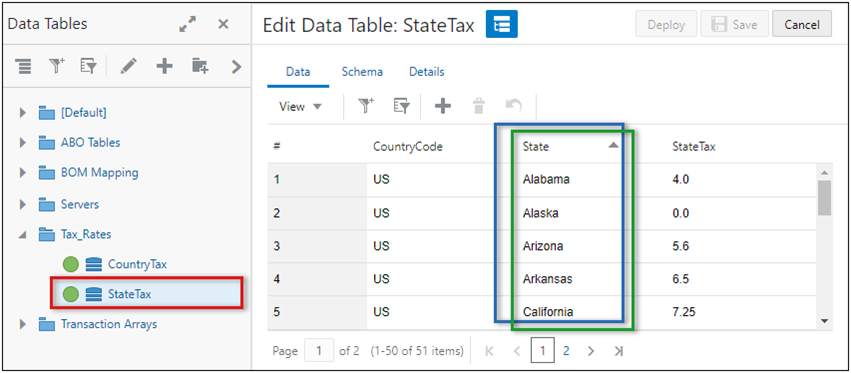
In addition to the Country menu, the administrator wants to implement a Dynamic Menu so users can select a state. They create a "State" Dynamic Menu attribute and select their pre-defined "StateTax" Data Table for the Domain and the "State" column for the Variable and the Display value.

The following image shows the target "StateTax" Data Table that contains the menu options.
Filter Syntax
CPQ can interpret query specifications that follow a subset of MongoDB syntax.
For more complex filters, refer to the Manage Collections and MongoDB’s Query Documents documentation.
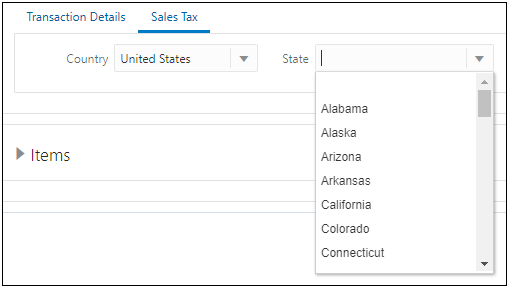
For example, within the State Dynamic Menu attribute the administrator defined a Filter to match the "CountryCode" column in the StateTax Data Table to the value selected in the Country attribute. The Dynamic Menu will filter the menu options based on the user selection. Example Filter: {CountryCode:"|country|"}

Note: To use a Commerce system attribute in a filter, complete the following:
- Create a hidden attribute on your Commerce process that contains the value of the system attribute as its default value.
- Set all actions to revert that attribute to default to ensure the data is up to date.
When a user selects "United States" from the Country drop-down, the "State" Dynamic Menu uses the "US" CountryCode value to filter the "State" column values from the "StateTax" Data Table. On the user side, only menu options whose "CountryCode" value matches the value selected in the "Country" attribute value are shown.
Case Sensitive Dynamic Menus
The Case Sensitive option determines if the matching between the selected attribute value and the defined "Variable" Data Table or Transaction Array column differentiates between capital and lowercase letters. By default, this option is disabled and matches are case insensitive. If your site has case sensitive variable values, you should enable this option to ensure the desired results are returned. If your site has case sensitive display values and the Case Sensitive option is disabled, the site will return the first value based on the "Order By" selection and direction.
For example, assume that a Dynamic Menu has the same column defined tor the Variable and Display values. The chosen column has the following values: red, Red, and RED.
- If Case Sensitive is disabled, no matter which option a user selects they will get back the value that is deemed first based on the Order By selection and direction. This may not be the value associated with the case sensitive option they chose, because the site is performing a case-insensitive match and all of the values match each other (e.g. red = Red = RED)
- If Case Sensitive is enabled, when a user selects a case sensitive option they will always get the value that matches their selection, because the site is performing an exact match and the values do not match each other (e.g. red ≠ Red ≠ RED)
Dynamic Menu Translations
Customers can also provide translations for Dynamic Menu display values for named supported languages. To enable translations, administrators select the "Translations" option and provide the translated values in the target Data Table or Transaction Array domain.

The column selected for Display contains the base language values. Language codes are appended to the column name for the translated values. Data Table or Transaction Array column names for all other language columns should use the following format: "<Display Column Name>_<Language_Code>"
- Dynamic Menus support two-letter translations language codes. For example, the following column is used to provide French translations for the Country display values: "Country_fr"
- Dynamic Menus also support additional two-letter country codes. When using country codes, the first two characters of a language code define the language and the last two characters define the country. For example, the following column is used to provide Brazil Portuguese translations for the Country display values: "Country_pt_BR"
Notes:
- The Data Table or Transaction Array column selected for "Display" must contain the site base language values. CPQ does not look for a differently named column with the site base language code suffix.
- Language codes are case sensitive.
For the following example, English is the site base language. Therefore, the "Country" column contains English values. The "Country_de" column contains German translations, the "Country_es" column contains Spanish translations, and the "Country_fr" column contains French translations.

The following image shows user side Dynamic Menus for German, Spanish, and French translated sites.
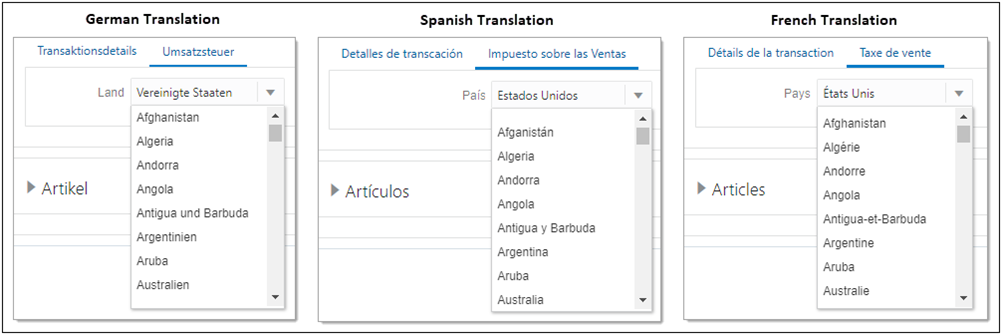
During use, the session language (typically the logged in user's language) is used to determine which display value to show. If a display value translation cannot be found for the session language, the site base language display value will be used. This can occur if a specifically named column for the session language does not exist in the Data Table or Transaction Array or if the column exists but there is no value in that row.
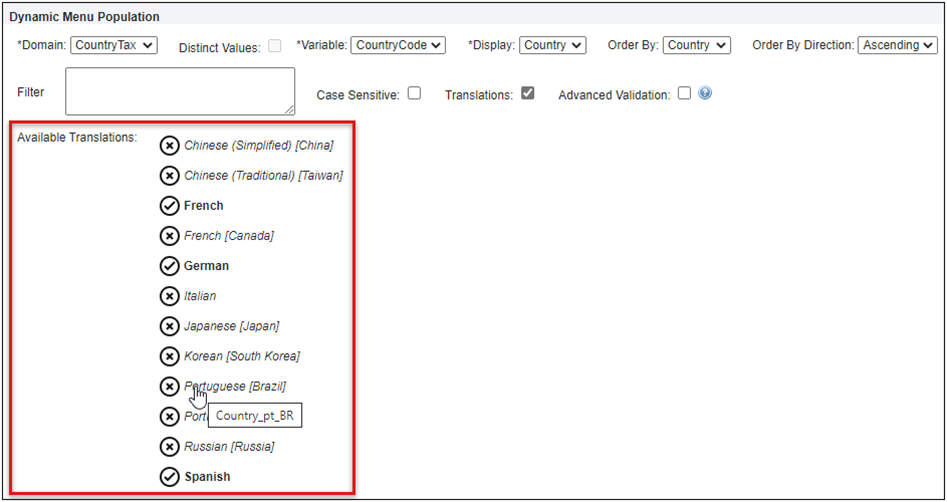
When an administrator selects the Translations option for a Dynamic Menu attribute, the Available Translations section appears. This list shows the supported language set of a site. A "ü" checkmark icon indicates the appropriate translation column is found, and an "x" icon indicates the appropriate translation column was not found. Hovering the mouse over each language will indicate the name of the column from which translations are expected to be found for the language.
Advanced Validations
When the Advanced Validations option is enabled, data validations are triggered on a direct value changes and are also triggered during any modification action even when the value has not changed.
You should only enable this option when validations are required, to prevent negative impacts on performance. The performance impact will be even greater for sub-document Dynamic Menu attributes.
Administration
Add or Edit a Static Menu Attribute (Single Select Menu or Multi Select Menu)
Complete the following steps to create a single select menu or multi select menu attribute for a main document or sub-document.
- Navigate to Admin Home > Quotes > Process > Manage Transaction or Manage Transaction Line > Attributes.
- To create an attribute, click + Attribute, then enter the following information:
- Type: Select the desired attribute type from the drop-down.
- What is the name of the attribute? This the name of the attribute.
Variable Name: The variable name of the attribute.
Click inside this filed to auto-populate the variable name. Variable names can only contain alpha-numeric characters and underscores. The entry can be changed before saving, but after saving the value is read-only.
- Menu Source: Select Static Menu.
- Click Add Entry to add menu options.
Enter the Displayed Text and Variable Name.
Menu items appear in the order they are listed.
To reorder menu options, click on the Reorder  icon, drag and drop the menu options into the desired order.
To delete custom menu options, click on the associated Delete  icon
icon
- Click Create to save changes. or click Cancel to exit without saving changes.
- To edit an attribute, click on the Name of the applicable attribute.
-
Select the Basic Information tab to edit general options.
-
What do you want to call this attribute? This is the name of the attribute
-
Description The description of the attribute
-
Is this a standard component? Identifies if this attribute is a Standard Process attribute. This value is read-only.
-
Standard Process attributes cannot be deleted.
-
Administrators can view default values for Standard Process attributes, override values to incorporate custom logic, and remove overrides to easily return to default values.
-
Exclude from XML: This selection determines if an attribute is available to include in Email Designer and Document Designer documents. The attribute is available when this option is unselected.
-
Required: When enabled, users are required to enter a value for this attribute before proceeding.
-
Trigger Auto Update: If this option is selected, a change of value of this attribute by the user will trigger updates by the system without the user invoking an action.
Note: Administrators should note that transaction level Auto Update Before Formulas will not execute for attributes without auto-update enabled. So if an attribute with Trigger Auto Update enabled has formula that references an attribute without auto-update, the attribute with Trigger Auto Update enabled will not execute the Auto Update Before Formulas when the attribute without auto-update is modified.
-
Constrained Menu Option Behavior: This selection determines if constrained options are hidden or disabled.
-
Menu Type: Select Single-select Menu or Multi-select Menu. After saving the menu type is read-only.
-
Array Control Attribute: Array Control Attributes can be used to set the size of an array set. Enabling this option designates the attribute as an Array Control Attribute. Array Control Attributes can be associated with multiple array sets.
-
Open the Layout Usage section to view layout references and access JET and mobile layouts (if applicable).
-
Referenced in Redwood Layout? Indicates if this attribute is displayed in the Redwood Quote UI. Refer to the Redwood Quote Designer for the quote layout.
-
JET Layout Path: Specifies the layout path for this attribute.
-
Mobile Layout Path: Specifies the layout path for this attribute.
-
This option is only displayed when a mobile layout exists
-
Click Save and Edit Mobile Layout to open layout editor.
-
Open the Menu Definition section to manage menu options.
-
To add menu options, click Add Entry, enter the Displayed Text and Variable Name, then click Save
-
Menu items appear in the order they are listed.
To reorder menu options, click on the Reorder icon, drag and drop the menu options into the desired order, then click Save.
-
To delete menu options, click on the associated Delete icon.
-
Open the Default Value section to manage the default value for the attribute.
-
Override Standard Default: This option is displayed for Standard Process attributes
-
To customize standard defaults,
Check the Override Standard Default option, and then click Save.
-
To return to the standard defaults,
Uncheck the Override Standard Default option, and then click Save.
-
If applicable, select one of the following options to set the Default Value:
-
None - Select this option to not specify a default value.
-
Data - Select this option to define a static value to set the default value.
-
Function - Select this option to define a dynamic default value, click Define Function to create a function that sets the default value into the field.
- Refer to the following procedures to manage the applicable tab options:
-
Click the Translations  icon to add translations.
-
Select one of the following:
-
Click Save to save changes and remain on the current page.
-
Click Save & Close to save changes and return to the attributes list page.
-
Click Cancel to return to the attributes list page without saving changes.
Add or Edit a Dynamic Menu Attribute
Complete the following steps to create a single select menu or multi select menu attribute for a main document or sub-document.
- Navigate to Admin Home > Quotes > Process > Manage Transaction or Manage Transaction Line > Attributes.
- To create an attribute, click + Attribute, then enter the following information:
- Type: Select the desired attribute type from the drop-down.
- What is the name of the attribute? This the name of the attribute.
Variable Name: The variable name of the attribute.
Click inside this filed to auto-populate the variable name. Variable names can only contain alpha-numeric characters and underscores. The entry can be changed before saving, but after saving the value is read-only.
- Menu Source: Select Dynamic Menu.
Set the following Domain-related fields. Refer to Dynamic Menu Domains for more information.
Domain Source: Select Array Set or Data Table.
Domain: Select the applicable array set of data table.
Variable: Select the column that contains the variable values for the dynamic menu options.
Note: The Variable field is not selectable when the Distinct Values option is enabled.
Display: Select the column that contains display names for the dynamic menu options.
- Which Field do you want to order by? : Select the column used to sort dynamic menu options.
- Select Ascending or Descending order.
- Filter: (optional) Define a query to filter which menu options in the Domain are shown to the user. Refer to Dynamic Menu Filters for more information.
Distinct Values: Select this option to ensure that a value displays only once to users in the Dynamic Menu.
Note: The "Translations" option is not available when the Distinct Values option is enabled.
- Case Sensitive: Select this option if your site has case sensitive variable values. By default, this option is disabled and matches are case insensitive. Refer to Case Sensitive Dynamic Menus for more information.
- Translations: Select this option to display translated menu values in the user's language preference, when the translated values are provide in the Data Table or Transaction Array resource. Refer to Dynamic Menu Translations for more information.
Advanced Validation: When enabled, data validations run on the Dynamic Menu attribute even when there is no change in the value.
Note: You should only enable this option when required, to prevent negative impacts on performance. The performance impact is even greater for sub-document Dynamic Menu attributes.
- Click Create.
- To edit an attribute, click on the Name of the applicable attribute.
-
Select the Basic Information tab to edit general options.
-
What do you want to call this attribute? This is the name of the attribute
-
Description The description of the attribute
-
Is this a standard component? Identifies if this attribute is a Standard Process attribute. This value is read-only.
-
Standard Process attributes cannot be deleted.
-
Administrators can view default values for Standard Process attributes, override values to incorporate custom logic, and remove overrides to easily return to default values.
-
Exclude from XML: This selection determines if an attribute is available to include in Email Designer and Document Designer documents. The attribute is available when this option is unselected.
-
Trigger Auto Update: If this option is selected, a change of value of this attribute by the user will trigger updates by the system without the user invoking an action.
Note: Administrators should note that transaction level Auto Update Before Formulas will not execute for attributes without auto-update enabled. So if an attribute with Trigger Auto Update enabled has formula that references an attribute without auto-update, the attribute with Trigger Auto Update enabled will not execute the Auto Update Before Formulas when the attribute without auto-update is modified.
-
Constrained Menu Option Behavior: This selection determines if constrained options are hidden or disabled.
-
Open the Layout Usage section to view layout references and access JET and mobile layouts (if applicable).
-
Referenced in Redwood Layout? Indicates if this attribute is displayed in the Redwood Quote UI. Refer to the Redwood Quote Designer for the quote layout.
-
JET Layout Path: Specifies the layout path for this attribute.
-
Mobile Layout Path: Specifies the layout path for this attribute.
-
This option is only displayed when a mobile layout exists
-
Click Save and Edit Mobile Layout to open layout editor.
-
Open the Dynamic Menu Definition section to manage menu options.
-
Domain Source: Select Array Set or Data Table.
-
Domain: Select the applicable array set of data table.
-
Variable: Select the column that contains the variable values for the dynamic menu options.
Note: The Variable field is not selectable when the Distinct Values option is enabled.
Display: Select the column that contains display names for the dynamic menu options.
- Which Field do you want to order by? : Select the column used to sort dynamic menu options.
- Select Ascending or Descending order.
- Filter: (optional) Define a query to filter which menu options in the Domain are shown to the user. Refer to Dynamic Menu Filters for more information.
-
Distinct Values: Select this option to ensure that a value displays only once to users in the Dynamic Menu.
Note: The "Translations" option is not available when the Distinct Values option is enabled.
- Case Sensitive: Select this option if your site has case sensitive variable values. By default, this option is disabled and matches are case insensitive. Refer to Case Sensitive Dynamic Menus for more information.
- Translations: Select this option to display translated menu values in the user's language preference, when the translated values are provide in the Data Table or Transaction Array resource. Refer to Dynamic Menu Translations for more information.
-
Advanced Validation: When enabled, data validations run on the Dynamic Menu attribute even when there is no change in the value.
Note: You should only enable this option when required, to prevent negative impacts on performance. The performance impact is even greater for sub-document Dynamic Menu attributes.
-
Open the Default Value section to manage the default value for the attribute.
-
Override Standard Default: This option is displayed for Standard Process attributes
-
To customize standard defaults,
Check the Override Standard Default option, and then click Save.
-
To return to the standard defaults,
Uncheck the Override Standard Default option, and then click Save.
-
If applicable, select one of the following options to set the Default Value:
-
None - Select this option to not specify a default value.
-
Data - Select this option to define a static value to set the default value.
-
Function - Select this option to define a dynamic default value, click Define Function to create a function that sets the default value into the field.
- Refer to the following procedures to manage the applicable tab options:
-
Click the Translations icon to add translations.
-
Select one of the following:
-
Click Save to save changes and remain on the current page.
-
Click Save & Close to save changes and return to the attributes list page.
-
Click Cancel to return to the attributes list page without saving changes.
Related Topics
See Also


