Overview
Organizations using Oracle CPQ rely heavily on CPQ Quoting to sell their product offerings to customers and capture the orders. In the quote life cycle, there is a lot of information that needs to be captured at the transaction and transaction line level. Some of this information is repetitive, but dynamically varies from one transaction to another. This requires customers to maintain a large number of attributes and control their access through rules. Arrays sets allow customers to group multiple, scalar attributes using a single array structure to capture repeatable data and reduce administrative overhead. The array attributes can then be instantiated multiple times at runtime without explicitly defining each instance.
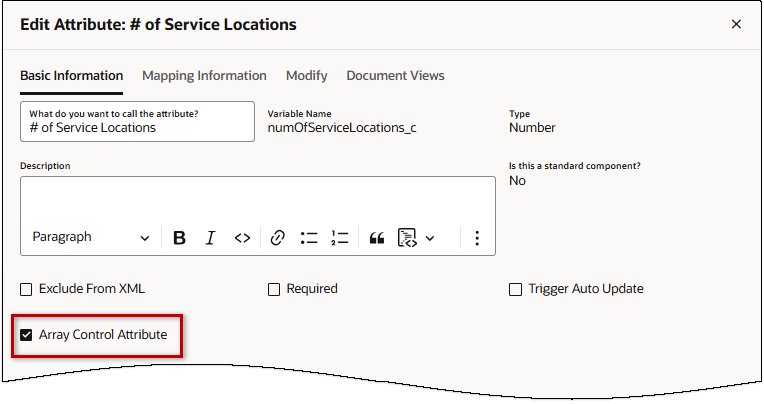
Array Control Attributes can be used to set the size of an array set. Number and Menu type attributes can be designated as an Array Control Attribute. A single Array Control Attribute can be associated with multiple array sets.
Array Control Attribute Behavior
The Array Control Attribute for array sets is optional. If the Array Control Attribute is not defined, the size of the array set is controlled by create and delete actions. This behavior is intentionally different from Configuration, where the array set size is always "1" when the Array Control attribute is not defined.
Note: If Access Rules are used to hide a transaction array, administrators should designate an Array Controller Attribute for the transaction array and set the minimum value to one or more.
The following conditions exist when an Array Control Attribute is defined:
- When an Array Control Attribute is an number attribute, the validation of attribute is changed to Check Range, with the minimum set to 0. The minimum and maximum values can be modified.
- When an Array Control Attribute is a Menu attribute, it must be Single-Select Menu.
The variable names of the menu items must be non-negative integers. - The add and delete actions are dynamically enabled and disabled as described below:
- When the Array Control Attribute is set to read-only or hidden by workflow steps, Add and Delete buttons are disabled.
- When an array set reaches the maximum size, add is disabled.
- When an array set reaches the minimum size, delete is disabled.
- When the Array Control Attribute is a Menu attribute, add and delete buttons are disabled.
- When the Array Control Attribute controls more than one array set, add and delete buttons are disabled.
![]() Access Rules using Transaction Arrays
Access Rules using Transaction Arrays
Administrators can use transaction array set attributes in the Commerce Access Rules. Array attributes can be used in both simple and advanced modes for the Condition and for the Components to Hide/Read-only sections of the access rules. Transaction array hiding behaviors are similar to Configuration array set behaviors.
Transaction array attribute hiding behaviors are as follows:
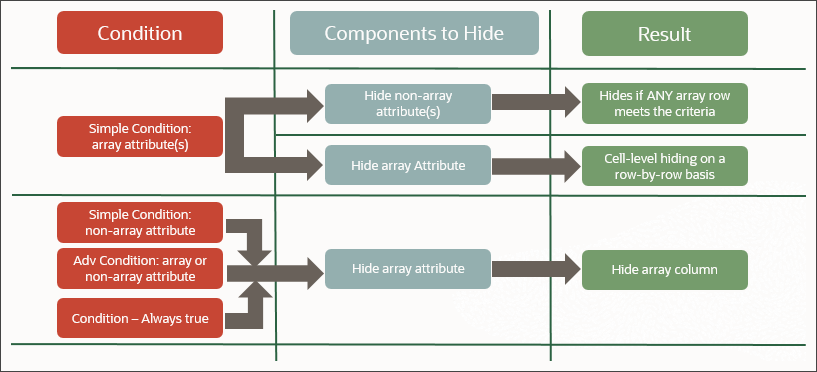
- If an array attribute is used as a simple condition and the components to hide only uses document attributes, the result is that the document attributes are hidden if any array row meets the condition.
- If an array attribute is used as a simple condition and the components to hide also use array attributes, the result is cell-level hiding as determined on a row-by-row basis.
- If a simple condition exists without referencing an array attribute and the components to hide uses array attributes, the result is that the entire array column is hidden.
- If an advanced condition is used either with or without array attributes and the components to hide uses array attributes, the result is that the entire array column is hidden.
- If a condition is "Always True" and the components to hide uses array attributes, the result is that the entire array column is hidden.
The standard process provides the following array sets:
Transaction
Transaction Line
Administration Pages
The Attributes tab provides access to main document or sub-document level array sets.
-
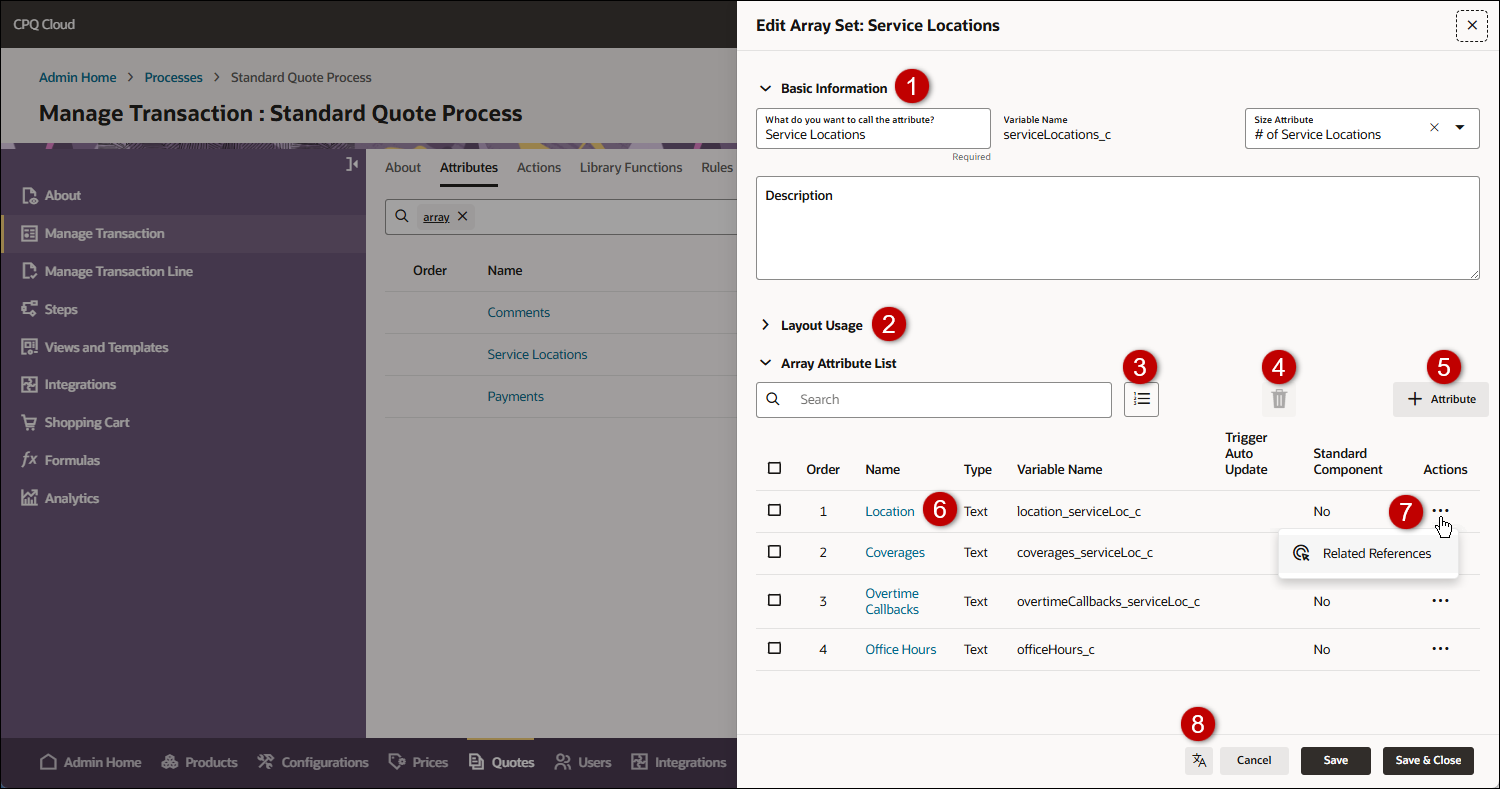
To access Commerce arrays set, navigate to: Admin Home > Quotes > Process > Manage Transaction or Manage Transaction Line > Attributes, then click on the applicable array set.
| Item | Description |
|---|---|
|
1 |
Manage general information and the size attribute for an array set |
|
2 |
Identifies layout references and provides access to JET and mobile layouts (if applicable). |
|
3 |
Reorder array set attributes |
|
4 |
Delete selected array set attribute(s) |
|
5 |
Add an array set attribute |
|
6 |
Access an array set attribute |
|
7 |
View related references for an array set attribute |
|
9 |
Click this icon to manage attribute translations. |
Administration
![]() Add an Array and Array Attributes
Add an Array and Array Attributes
Perform the following steps to create an array set with array attributes:
-
Navigate Admin Home > Quotes > Process > Manage Transaction or Manage Transaction Line > Attributes
-
To edit an array, click on the Name of the applicable array.
-
To add an array, click + Attribute, then select or enter the following information:
-
Type:Array Set
-
What is the name of the attribute? Enter the name of the array.
-
Enter the Variable Name.
The Variable Name field populates automatically. You can change the entry before saving. After saving, the value is read-only. Variable names can only contain alpha-numeric characters and underscores.
-
Click Create.
-
-
Enter the Basic Information options.
-
If applicable, enter a Description.
-
If applicable, select an Array Control Attribute from the Size Attribute menu.
Notes:
- If Access Rules are used to hide a transaction array, administrators should designate an Array Controller Attribute for the transaction array and set the minimum value to one or more.
- If there are no Array Control Attributes listed refer to Designate an Attribute as an Array Control Attribute.
- When an Array Control Attribute is an Integer attribute, the validation of attribute is changed to Check Range, with the minimum set to 0. The minimum and maximum values can be modified.
- When an Array Control Attribute is a Menu attribute, it must be Single-Select Menu.
The variable names of the menu items must be non-negative integers. - The add and delete actions are dynamically enabled and disabled as described below:
- When the Array Control Attribute is set to read-only or hidden by workflow steps, Add and Delete buttons are disabled.
- When an array set reaches the maximum size, add is disabled.
- When an array set reaches the minimum size, delete is disabled.
- When the Array Control Attribute is a Menu attribute, add and delete buttons are disabled.
- When the Array Control Attribute controls more than one array set, add and delete buttons are disabled.
-
- Add array attributes in the Array Attribute List section.
Click + Attribute.
Select the attribute Type, then enter the Name and Variable Name.
Click Create, then define the applicable settings. Refer to Commerce Attributes (Redwood) for more information.
Click Save & Close.
Repeat this step to add additional attributes.
-
To reorder attributes:
- Click on the Reorder
 icon.
icon. -
Drag and drop the attributes into the desired order.
-
Click Save.
- Click on the Reorder
-
Click the Translations
 icon to add translations.
 -
Select one of the following:
-
Click Save to save changes and remain on the current page.
-
Click Save & Close to save changes and return to the attributes list page.
-
Click Cancel to return to the attributes list page without saving changes.
-
![]() Edit an Array and Array Attributes
Edit an Array and Array Attributes
Perform the following steps to create an array set with array attributes:
-
Navigate Admin Home > Quotes > Process > Manage Transaction or Manage Transaction Line > Attributes
-
To edit an array, click on the Name of the applicable array.
-
Enter the Basic Information options.
-
If applicable, enter a Description.
-
If applicable, select an Array Control Attribute from the Size Attribute menu.
Notes:
- If Access Rules are used to hide a transaction array, administrators should designate an Array Controller Attribute for the transaction array and set the minimum value to one or more.
- If there are no Array Control Attributes listed refer to Designate an Attribute as an Array Control Attribute.
- When an Array Control Attribute is an Integer attribute, the validation of attribute is changed to Check Range, with the minimum set to 0. The minimum and maximum values can be modified.
- When an Array Control Attribute is a Menu attribute, it must be Single-Select Menu.
The variable names of the menu items must be non-negative integers. - The add and delete actions are dynamically enabled and disabled as described below:
- When the Array Control Attribute is set to read-only or hidden by workflow steps, Add and Delete buttons are disabled.
- When an array set reaches the maximum size, add is disabled.
- When an array set reaches the minimum size, delete is disabled.
- When the Array Control Attribute is a Menu attribute, add and delete buttons are disabled.
- When the Array Control Attribute controls more than one array set, add and delete buttons are disabled.
-
- Manage array attributes in the Array Attribute List section.
To edit an attribute, click on the attribute Name.
- To add an attribute:
Click + Attribute.
Select the attribute Type, then enter the Name and Variable Name.
Click Create, then define the applicable settings. Refer to Commerce Attributes (Redwood) for more information.
Click Save & Close.
Repeat this step to add additional attributes.
To reorder attributes:
- Click on the Reorder icon.
Drag and drop the attributes into the desired order.
Click Save.
- Click on the Reorder
To delete array attributes:
- Check the Select option next to the applicable attribute(s).
- Click the Delete
 icon.
icon. Click Delete.
-
Click the Translations
icon to add translations. -
Select one of the following:
-
Click Save to save changes and remain on the current page.
-
Click Save & Close to save changes and return to the attributes list page.
-
Click Cancel to return to the attributes list page without saving changes.
-
Perform the following steps to delete an array set:
-
Navigate Admin Home > Quotes > Process > Manage Transaction or Manage Transaction Line > Attributes
- Select Delete for the array set's ellipsis menu.
-
Click Delete.
Notes:
-
You can only delete empty array sets, refer to Delete Array Set Attributes.
-
You can't delete standard process arrays.
-
Perform the following steps to delete an array set:
-
navigate to: Admin Home > Quotes > Process > Manage Transaction or Manage Transaction Line > Attributes.
-
Click on the name of the applicable array set.
- Check the Select option next to the applicable attribute(s).
- Click the Delete icon.
-
Click Delete.
-
Click Save or Save and Close.
Note: You can't delete standard process array attributes.
![]() Populate a Commerce Transaction Array from a Data Table
Populate a Commerce Transaction Array from a Data Table
- Create a data table (e.g. Shipping_Options Data Table).
- Add the applicable data table columns; e.g. Service_Level (String), Delivery_Timeframe (String), and Shipping_Cost (Float).
Populate the data table data.
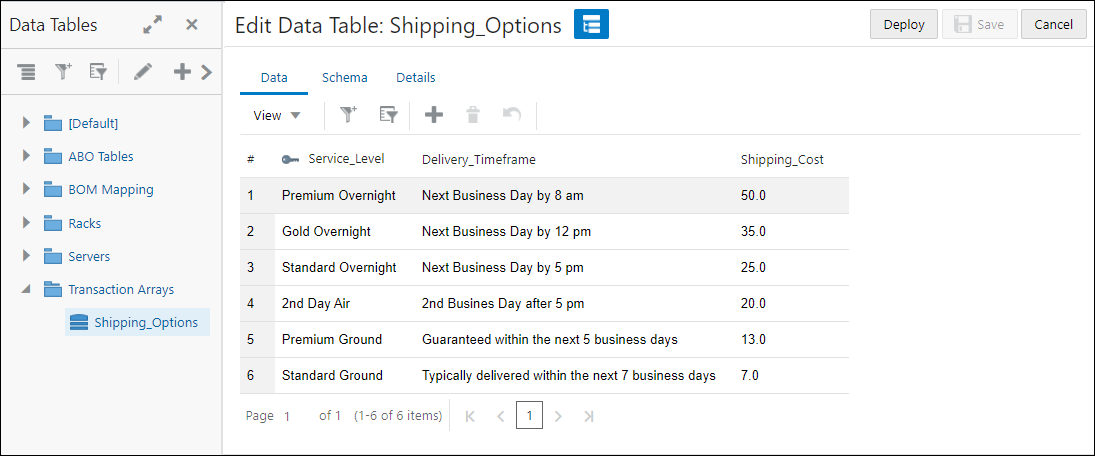
For more detailed instructions, refer to Data Table Maintenance.
-
Create an array set (e.g. Shipping Options Transaction Array)
The Shipping Options (shippingOptions) Commerce Array Set Attribute contains three array attributes: Service Level (serviceLevel), Delivery Timeframe (deliveryTimeframe), and Shipping Cost (shippingCost). These attributes correspond to the columns in the data table.
-
Create a Commerce Modify type action to populate the array set (e.g. populateShippingOptions)
This example uses an Advanced Modify - Before Formula to define a function for the action.
- Select an attribute (e.g.Variable Name for (Transaction) tab > _transaction_document_number)
-
Enter the BML script into the BML Editor and click Save.
//  Define the String parameter that will be returned by the function.
returnString = "";

//  Define a JSON Array to hold the extracted data from the Data Table.
shippingMethods = jsonArray();

//  Perform BMQL Query of the "Shipping Options" Data Table to gather all of data rows.
optionList = bmql("select Service_Level, Delivery_Timeframe, Shipping_Cost from Shipping_Options");

//  Perform a loop over the returned Data Table rows.
for option in optionList {
//      Create a JSON string containing the data from the rows of the Data Table.
        optionJson = json();
//      Put into the optionJson string the Key:Value pairs for each column in the table.
	jsonput(optionJson,"serviceLevel",get(option,"Service_Level"));
	jsonput(optionJson,"deliveryTimeframe",get(option,"Delivery_Timeframe"));
	jsonput(optionJson,"shippingCost",get(option,"Shipping_Cost"));

//      Append the optionJson string to the shippingMethods JSON Array object.  Each iteration adds one row to the JSON Array.
	jsonarrayappend(shippingMethods, optionJson);
}

//  Build the returnString, adding the transaction_document_number (which is required), the Array Set Commerce attribute (shippingOptions)
//  and the JSON Reference ID of the shippingMethods JSON Array.
returnString = returnString + _transaction_document_number + "~shippingOptions~" + jsonarrayrefid(shippingMethods) + "|";

return returnString;
- Add the populate action and array set to the applicable layout
![]() XML Integration Support for Transaction Arrays
XML Integration Support for Transaction Arrays
The bulk of back-end integration is accomplished by exchanging XML data between Oracle CPQ and other third party systems. Oracle CPQ Release supports array set data for outbound XML integrations. XML Integration is the mechanism that sends Transaction XML to a third party server when a transition rule is fired.
The following sample displays an XML fragment for the "feeArraySet"
<feeArraySet maxRowNum="4">
    <_array_set_row _row_number="1">
        <feeType>
            <![CDATA[ water ]]>
        </feeType>
        <feeAmount>
          <![CDATA[ 100.0 ]]>
        </feeAmount>
    </_array_set_row>
    <_array_set_row _row_number="3">
        <feeType>
            <![CDATA[ gas ]]>
        </feeType>
        <feeAmount>
          <![CDATA[ 200.0 ]]>
        </feeAmount>
    </_array_set_row>
</feeArraySet>
Notes
Notes:
-
The default row limit for transaction arrays is 500 rows. To increase the default row size, open a ticket on My Oracle Support.
-
Error messages for invalid values are not displayed when Advanced Validation is set to Save without Validating for actions that modify a transaction array or line item attributes.
Custom Variable Name Conventions Oracle CPQ appends the "_c" suffix to custom variable names to provide more consistency for integrations with Oracle Sales.
Customers can submit a Service Request (SR) on My Oracle Support to disable the "_c" suffix on variable names for custom Commerce entities
- When the "_c" is disabled, the "_c" variable name suffix will not be required for newly created custom Commerce entities.
- Disabling the "_c" variable name suffix for custom Commerce entities will not change existing variable names.
- The "_c" suffix setting will not impact existing variable names when cloning a Commerce process or migrating Commerce items. Target variable names will be the same as the variable names from the source Commerce process.
Edits are not visible until the process is deployed (or redeployed).


